How do I add a new control in dialogs using Spring theme?
The following article uses options that are available starting
with the Enterprise edition and project
type.
This tutorial will show the basics on how to edit the HTML based Spring Theme. We will add a new button that once pressed will display the DiskCostDlg dialog.
1. Create Project
Because Spring theme is an HTML based theme and uses HTML Host Controls the installer will feature two versions of the User Interface conditioned by Internet Explorer:
- If Internet Explorer 6 or higher is installed on the target machine, the HTML layout will be displayed using Enhanced User Interface
- If Internet Explorer 6 or higher is not installed on the target machine, the standard Windows Installer interface be displayed
Launch Advanced Installer, select Enterprise and press the button.

2. Select the Spring Theme
![]() Go to the Themes Page, select the Spring theme and press the button. A warning message will appear. Press the
button to continue.
Go to the Themes Page, select the Spring theme and press the button. A warning message will appear. Press the
button to continue.
Optionally, you can customize the general appearance by selecting a different Style and Frame or if to use a header or not. You can also change the Icon and Background for your theme by pressing the button and using the option.
3. Add a new push button
In this section we will add a new push button control on the "SetupTypeDlg dialog". We will create the published events and the necessary settings so that a message box will appear when the button will be pressed.
![]() Go to the Dialogs Page and select the "SetupTypeDlg"
dialog from the tree list on the left.
Go to the Dialogs Page and select the "SetupTypeDlg"
dialog from the tree list on the left.
Add a new push button control by using the toolbar button or by selecting it from the Control Toolbox dialog which is accessible through the toolbar button.
- Using the Properties pane on the right, in the Name field write DiskCost_Button which is the name of this control. This name will be used later when editing the HTML file.
- Using the Events Editor navigate to the "Published Events" tab. Use the button to add the following control event:
| Name | Argument | Condition |
|---|---|---|
| Display a specific child dialog | DiskCostDlg | AI_INSTALL |
This published event is used for tutorial purposes only, in order to
see how and if the button works.
4. Edit the HTML file
In the above sections we selected the Spring theme for our package, added a button to a dialog that will appear when the standard Windows Installer interface will be used. In this section we will edit the HTML file and create a hyperlink instead of a button, with the same functionality as the button, that will appear when the installer is running using the HTML layout.
![]() In the Dialogs Page select the
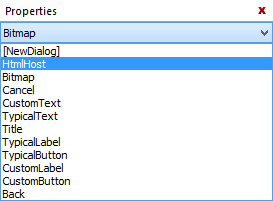
HtmlHost control by using the combobox from the
Properties pane on the right.
In the Dialogs Page select the
HtmlHost control by using the combobox from the
Properties pane on the right.

The File field will display the location of the HTML file associated with this dialog, in this case setuptype.html. In order to modify the layout for this dialog the html file must edited.
Whenever the Spring theme is selected, the resource files will be
automatically added in the Files and Folders Page - Installer Project under
Windows
Volume\Temporary\[|ProductCode]\Spring.742DA8B7 folder.
These files will be accessible only during the package run time and
can not be removed from the project.
- Using Windows Explorer, navigate to the location where Advanced Installer resides and select the setuptype.html from the themes\spring\resources\html folder. Usually Advanced Installer is installed in C:\Program Files(x86)\Caphyon\Advanced Installer 8.2 for Windows X64 systems.
- Copy the setuptype.html file to location so that the original file doesn't get modified. For example: G:\work\setuptype.html.
- Open the newly copied HTML file in an editor, like Notepad.
- Navigate until you find the following section:
...
   </div>
    <div id="footer" style="visibility: hidden">
      <div class="button-group">
        <div class="buttonwrapper">
...- Above the </div> from this section we will create the hyperlink:
<div style="padding-top: 90px; padding-left: 100px">
        <a href="#" title="" onclick="external.MsiPublishEvents('DiskCost_Button');">Disk Cost Information</a>
</div>Description of the code:
| Identifier | Description |
|---|---|
| external.MsiPublishEvents('DiskCost_Button') | external.MsiPublishEvents is a function that will execute the published events associated with the DiskCost_Button push button control |
| Disk Cost Information | The hyperlink will appear using this name |
- Save the file and return to Advanced Installer.
5. Assign the edited HTML file to the dialog
![]() Go to the Files and Folders Page - Installer Project and navigate to Windows
Volume\Temporary\[|ProductCode]\Spring.742DA8B7 where the
temporary files reside.
Go to the Files and Folders Page - Installer Project and navigate to Windows
Volume\Temporary\[|ProductCode]\Spring.742DA8B7 where the
temporary files reside.
- Find and select the setuptype.html file
- From the context menu use the "Properties..." command
- The Edit Temporary File Dialog will appear. Use the button next to the Source Path field to navigate and select the edited html file. In our example: G:\work\setuptype.html.

6. Condition which controls to appear in HTML layout
![]() We will condition the push button to
appear only when the Windows Installer interface is being used. When the HTML layout
will be used, the hyperlink will appear
instead.
We will condition the push button to
appear only when the Windows Installer interface is being used. When the HTML layout
will be used, the hyperlink will appear
instead.
In order to achieve this the following steps must be
taken:
- Go to the Dialogs Page and select the "SetupTypeDlg" dialog from the tree list on the left.
- Select the DiskCost_Button control and set the Visible attribute to the False value.
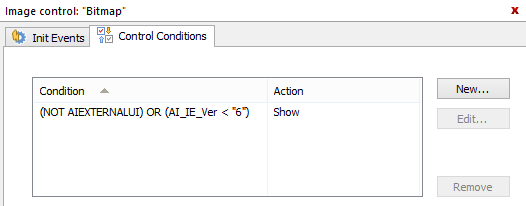
- With DiskCost_Button control still selected go to the "Control Conditions" tab and add the following condition:
| Condition | Action |
|---|---|
| (NOT AIEXTERNALUI) OR (AI_IE_Ver < "6") | Show |

This condition (NOT AIEXTERNALUI) OR (AI_IE_Ver <
"6") will make the button visible only if the package is
running using Windows Installer interface. The package will run using this interface
when Internet Explorer 6 or higher is not present on the machine.