Creating an App-V Package
The following article uses options that are available starting with the Architect edition and project type.
This tutorial will guide you step by step through the creation and customization of an Advanced Installer Architect project that produces an App-V 4 or App-V 5 package types.
Let's suppose you want to create an App-v package for a text editor you have created. For this purpose we will use a sample editor applicatio made by us. This editor has some characteristics:
- For the editor to function properly, some registry keys must be present on the target system.
- It has a specific file type associated, called EDI.
1. Create project
Start Advanced Installer by selecting it from the “Start” menu. Launching Advanced Installer automatically starts a new installation project. Choose “Installer” > “Architect” as the project type.

![]() A good idea is to save and name the project at this point. Use the “Save” menu
item under the “File” menu or the Ctrl+S keyboard shortcut
and let's name it appv.aip.
A good idea is to save and name the project at this point. Use the “Save” menu
item under the “File” menu or the Ctrl+S keyboard shortcut
and let's name it appv.aip.
3. Add files and folders to your project
The next step is to add the files and/or folders that compose your application to the project. You will need an EDI file to test the editor's file associations. Since it is a custom type of file, you will have to create it. Use any text editor to create a "foo.txt". Then rename it "foo.edi".
![]() Select “Files and Folders” from the
“Resources” menu on the left pane.
Select “Files and Folders” from the
“Resources” menu on the left pane.
![]() Click on the toolbar button and select your
application's files, use our Sample Application.
Repeat this step to include the Foo.edi file you have created. This way you can add as many
files as you want.
Click on the toolbar button and select your
application's files, use our Sample Application.
Repeat this step to include the Foo.edi file you have created. This way you can add as many
files as you want.

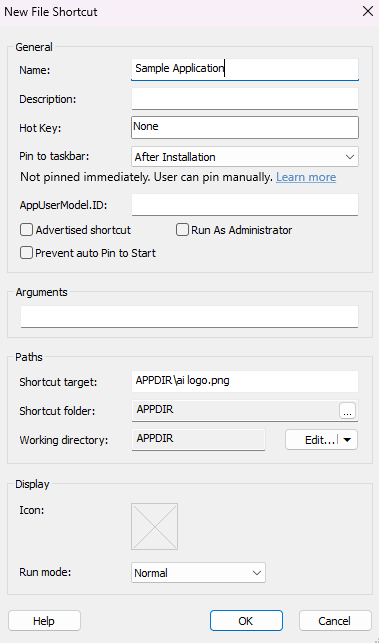
Once the files are added, their name will appear in the right-side pane. Now let's make a shortcut to the Sample.exe file you just added. Right click on this file and choose “New Shortcut...”. In the newly appeared dialog, choose a name for your shortcut and a location - like in the following screen-shot. Press the OK button and the shortcut will appear listed in the application shortcut folder.

For more information please see the Files and Folders
page.
4. Add registry keys and values to your package
Let's suppose your application needs two registry entries. These are located in the "Software\[Manufacturer]\[ProductName]\Settings" key.
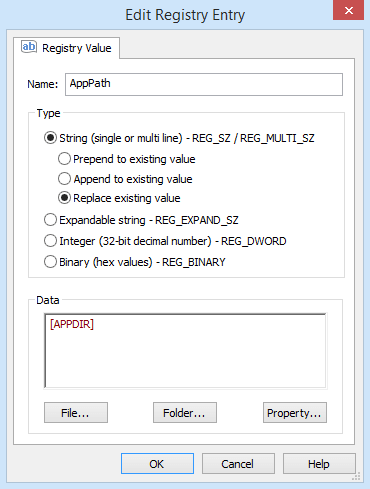
- One registry value is named "AppPath" and stores the path where your application is installed.
- The other one is named "AppSettings" and contains a value that shows your application's current settings. On install, it has the value "0x36".
![]() Select the “Registry” page.
Select the “Registry” page.
In the tree, select the "Software\[Manufacturer]\[ProductName]" key.
![]() Click on the toolbar button to create a key. Edit the
key name to "Settings".
Click on the toolbar button to create a key. Edit the
key name to "Settings".
![]() Add a value for it using the toolbar
button.
Add a value for it using the toolbar
button.
In the "Name" text field enter the name of your first key: "AppPath". Use the button and select "Application Folder". Since "Data" is a Formatted Type text field, the value that it contains will be expanded at install time into the full path to your application's location.
Use the same steps to create the "AppSettings" value. This time just type in the "Data" field the text "0x36" and select the "Binary" type.

Once the registry keys and values are added, you can see them in the view's right-side pane.

For more information please see the Registry page.
5. Create new file extensions and make file associations
Your application uses files with a particular extension (in our example that is "edi"). You may want to associate that type of files to be opened or edited with your application. Our App-V packager helps you do this in a very simple way.
![]() Choose “File Association” from the “Project
Details” options group.
Choose “File Association” from the “Project
Details” options group.
![]() Use the toolbar button to create a new
extension: "edi". In the appropriate field in the right-side pane, enter a description for
this extension. You may choose an icon to be displayed for all the files with the extension
you created.
Use the toolbar button to create a new
extension: "edi". In the appropriate field in the right-side pane, enter a description for
this extension. You may choose an icon to be displayed for all the files with the extension
you created.

For every extension contained in your application, you need to add at least one verb. The name of the verb will be seen in the context menu that appears when you right click on a file of "edi" type in Windows Explorer. For this example, you should leave the default settings. The effect is when you double click a file or you choose the "Open" action from a context menu of an "edi" file, the application is automatically launched with the command line argument specifying the absolute path of the chosen file.

You can add as many verbs as you want for an extension.
For more information please see the File Associations
page.
6. Create an App-V build
Now that you have added resources to your project, it is time to configure the packager to create an App-V package containing these resources.
![]() Choose
“Build” from the “Package Definition” options group.
Choose
“Build” from the “Package Definition” options group.
Use the toolbar button to create a new build of type App-V 4.x. For this tutorial you can leave the default values.
Starting with Advanced Installer 10 you can also create a new .
7. Build and Install
You are now ready to test your program. Right-click the App-V build in left tree and select from context menu. This will only build the Microsoft App-V package and not the MSI for normal install.
Now open the build's output folder. You will see the following files generated for App-V 4.x builds: One .sprj file, one .sft file, one.osd file, one .xml file and one .msi file. Copy the .msi file on a system that has App-V Client installed and run it. This will install the files of App-V package on that system, register the App-V application with the App-V client and make it ready to run in virtual mode. After the MSI has finished a shortcut to Sample.exe will appear on desktop. Double-click this shortcut in order to launch the virtual Sample.exe. For testing file associations, create a file with .edi extension and double-click it. It should be opened with Sample.exe from the App-V package.
