How-To: Build an Advanced Installer Visual Studio Project from Azure DevOps
In this article, you will learn how to configure and build an Advanced Installer Visual Studio Project(AIPROJ) from an Azure DevOps pipeline.
Before diving in, let’s clarify some concepts in terms of the Advanced Installer Visual Studio Project.
As Visual Studio is a widely used IDE, Advanced Installer developed an extension for Microsoft Visual Studio to better manage the installers and have closer integration between the application development and the packaging process.
Therefore, the extension enables you to create an installer directly from the development environment.
Advanced Installer offers free licenses for Open-Source
projects.
Find more details here.
If you are part of the Open-Source community,
don't hesitate to share this information with your colleagues.
When creating an Advanced Installer Visual Studio Project, a file
with the .AIPROJ extension is generated.
You can download the Advanced Installer for Visual Studio extension here.
Let’s go over the tutorial and see how you can build an AIPROJ from AzureDevops pipelines.
Prerequisites
In order to build an AIPROJ, Advanced Installer has to be present on the build agent. In order to achieve that, we need to add the Advanced Installer - Tool Installer task to the pipeline. If you don’t already have an existing pipeline, follow these steps:
- Go to the Pipelines section and click “Create Pipeline” in the left corner click on “Use the classic editor to create a pipeline without YAML”.
- Select “Azure Repos Git” as a source. Make sure you have the “Team project”, “Repository” and default branch fields filled in.
- Click Continue.
- Scroll down the list and choose “Empty pipeline as a template”.
- Give it a characteristic name.
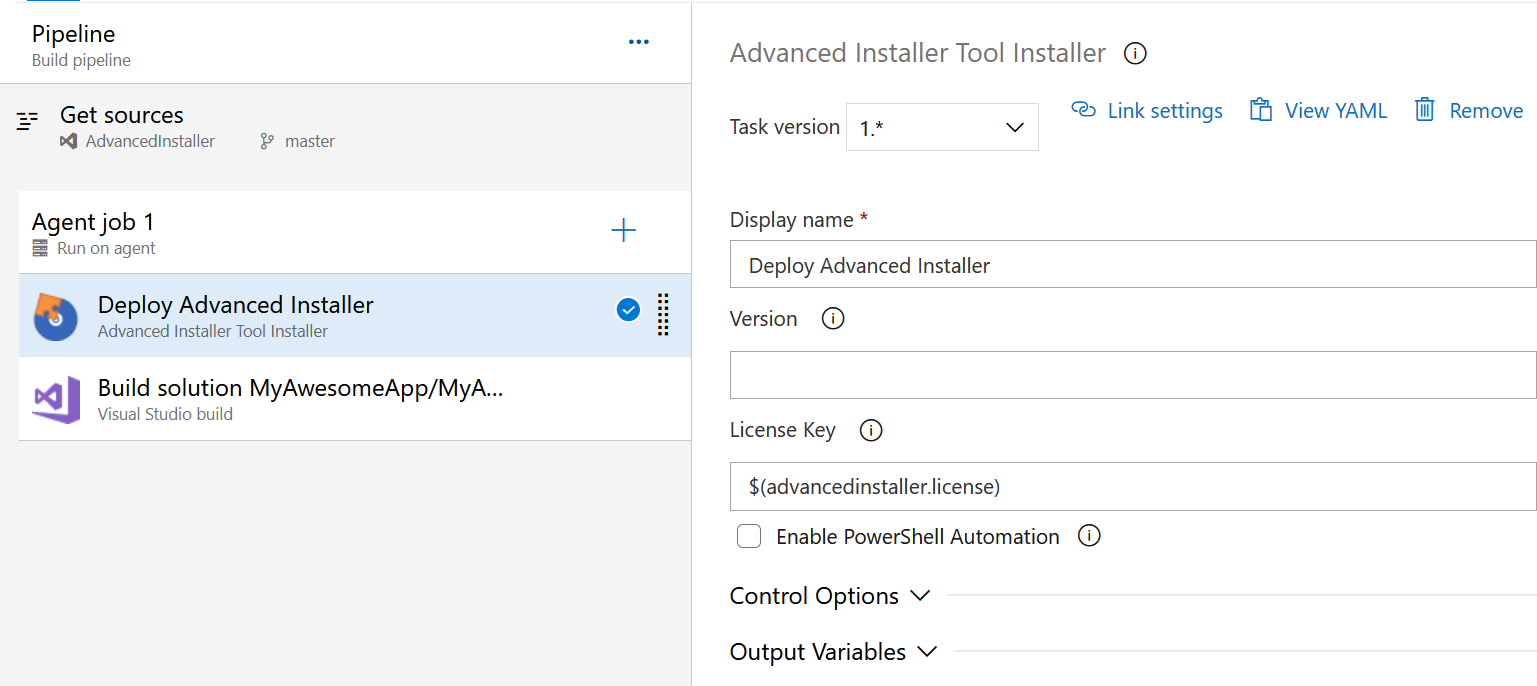
Now that we have added a new pipeline, we need to add the task to our build agent. Click the “+” button on the build agent and search for “Advanced Installer Tool Installer”.
Once you have the Advanced Installer Tool Installer present in the pipeline, together with the mandatory configurations, we can go further and build the Visual Studio Project.

For those who prefer to have the code, here's the YAML (Yet Another Markup Language):
steps:
- task: caphyon.AdvancedInstallerTool.Caphyon.AdvancedInstaller.Tool.AdvancedInstallerTool@1
  displayName: 'Deploy Advanced Installer'
  inputs:
	advinstLicense: '$(advancedinstaller.license)'
Build the Visual Studio Project
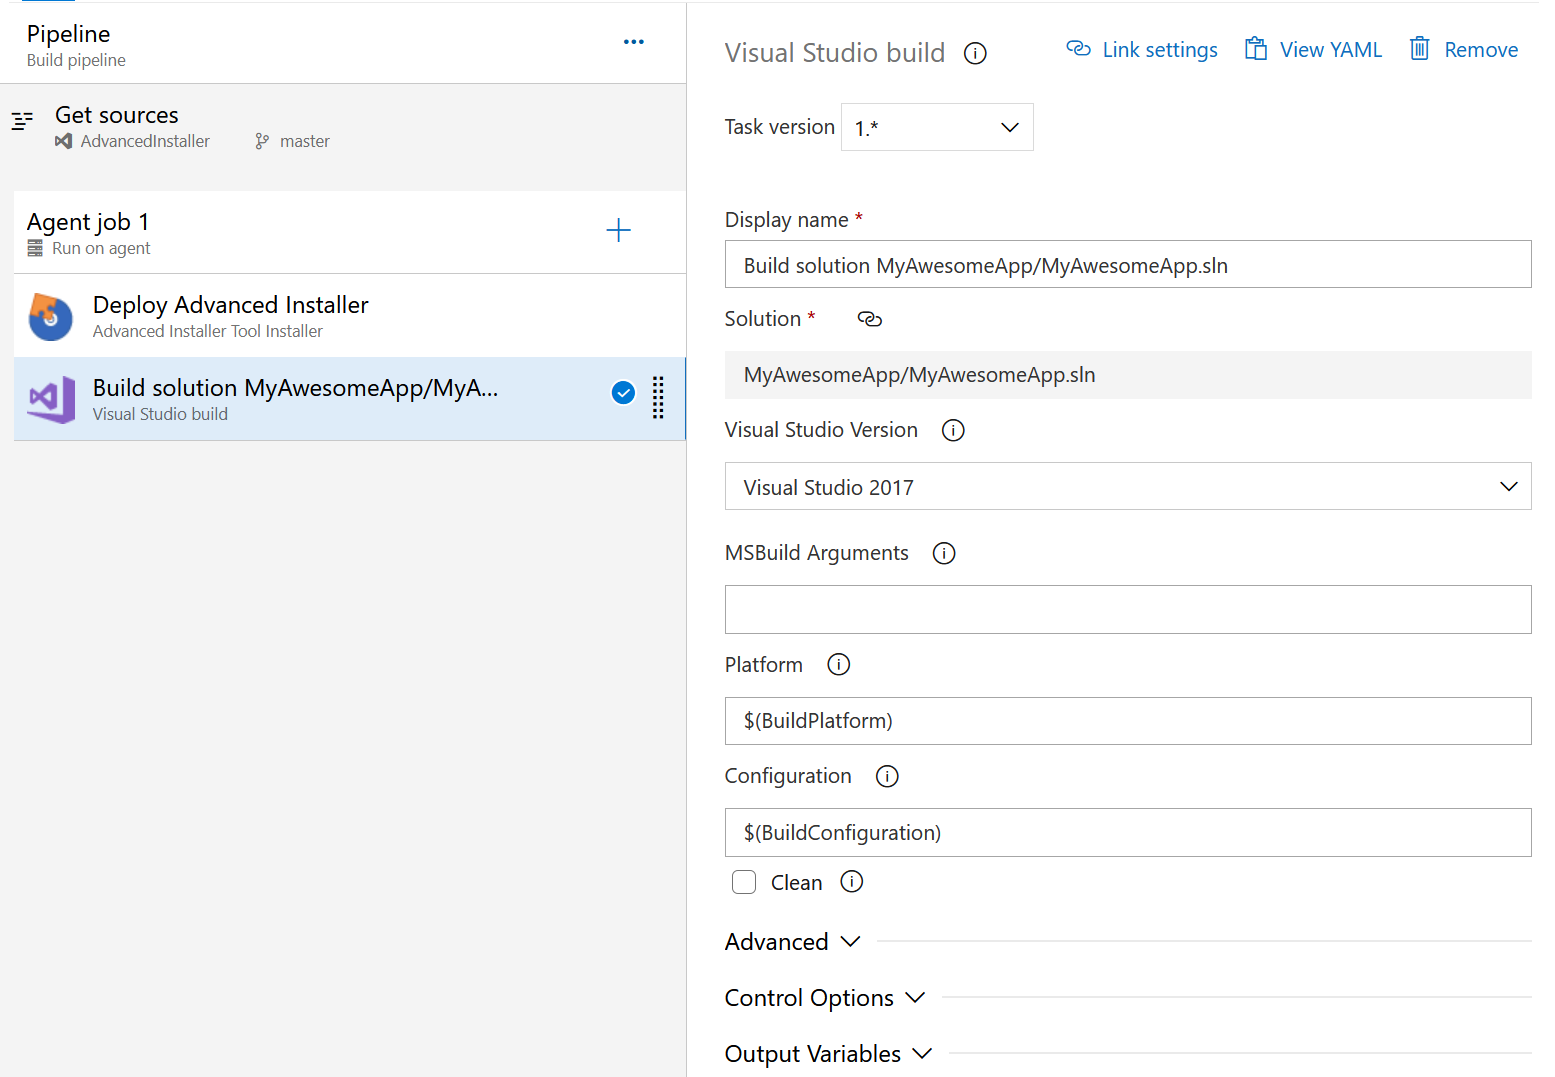
Now that the prerequisites are fulfilled, we have to schedule a task that builds the solution containing the AIPROJ. To do so, we will use a Visual Studio Build task. Once it is added to our pipeline, we can complete the necessary fields.

YAML:
steps:
- task: VSBuild@1
  displayName: 'Build solution MyAwesomeApp/MyAwesomeApp.sln'
  inputs:
	solution: '$(Parameters.solution)'
	vsVersion: 15.0
	platform: '$(BuildPlatform)'
	configuration: '$(BuildConfiguration)'
Once you have the Visual Studio Project task configured, save and run the pipeline.
If you’re new to Advanced Installer, we
recommend you take advantage of the 30-Day Full-Featured Free Trial (no
credit card required).
Start free trial
You can make various configurations to the Advanced Installer
project by using PowerShell scripts. Check this article
for more in-depth information.
Happy coding!
Subscribe to Our Newsletter
Sign up for free and be the first to receive the latest news, videos, exclusive How-Tos, and guides from Advanced Installer.