How to Create a Custom UI for Your Application Installer
The user interface is a key part of any application, and the same applies to its installer.
In some scenarios, you may not want to use the standard installer dialogs. You may need more control over the installation experience or a UI that matches your application's design.
One way to achieve this is to build your own custom installer UI. In this article, we'll look at how you can build one using a WPF project. Then I'll show you how to achieve the same UI customization more easily using Advanced Installer.
How Does the Custom Installer Work?

Instead of allowing Windows Installer to display its own dialogs, we create a separate WPF application that provides the installer UI.
The app acts as a bootstrapper, providing the custom UI and launching the MSI package.
The actual installation is handled by the MSI package. The WPF app needs to launch and configure the MSI silently so the user does not see the standard Windows Installer interface:
msiexec /i "MyApplication.msi" /qn /norestart
This example contains the minimal command needed to run the installation silently. Depending on your scenario, you can extend it with additional parameters as shown below in this article.
To uninstall, use:
msiexec /x {ProductCode} /qn /norestartThe /qn parameter disables the MSI user interface. The MSI is embedded as a resource inside the WPF executable. When the WPF app starts, it extracts the MSI to a temporary folder and uses msiexec to install or remove the app.
The WPF app needs to be available to provide the custom uninstall process. For this, store a copy of the executable under ProgramData and create a custom Programs and Features entry that points to it. Also, hide the MSI’s standard Programs and Features entry so that users will only see a single entry for the installed app.
How to Create the WPF Project for the Dialog Sequence?
Now that we know how the custom installer works, let’s create the WPF project that will control the installation wizard:
- Open Visual Studio
- Select File → New → Project.
- Choose the WPF application template
- Set the project name and location, then click Create
The sample will use the following dialog sequence to simulate a setup wizard:
PrepareDlg → WelcomeDlg → FolderDlg → VerifyReadyDlg → ProgressDlg → ExitDlg.
Each dialog will handle one step in the setup process.
How to Add a Dialog to the Sequence?
Once the project is created, it’s time to add the dialogs that make up the installer wizard.
Implement each dialog as a WPF UserControl and use the MainWindow as the wizard navigator.
To add a new dialog:
- Right-click on the project in the Solution Explorer
- Select Add → User Control (WPF)
- Name the control based on its purpose.
Once the dialog is added, add the controls and logic required for that installation step. Let’s use FolderDlg as an example to better understand how things work.
In our sample, FolderDlg contains a text box where users can enter the installation path and a Browse button for selecting a folder. Here is how we’ve designed it.
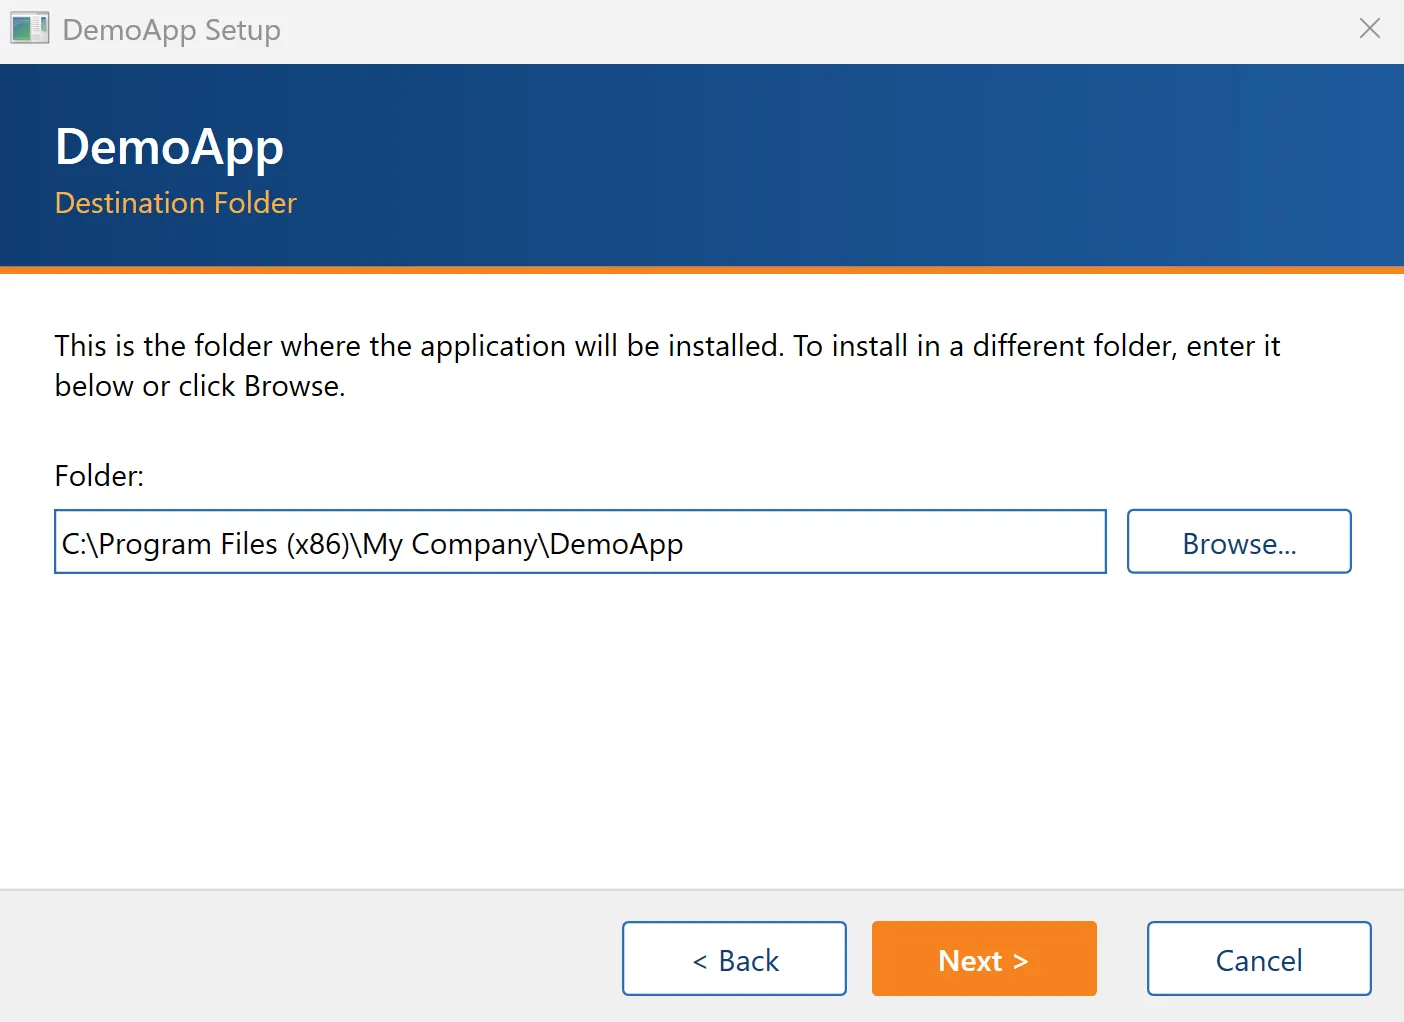
The FolderDlg.xaml file defines the controls and layout that are displayed to users.
<UserControl x:Class="InstallerApp.Dialogs.FolderDlg"
             xmlns="http://schemas.microsoft.com/winfx/2006/xaml/presentation"
             xmlns:x="http://schemas.microsoft.com/winfx/2006/xaml">
	<StackPanel>
    	<TextBlock TextWrapping="Wrap"
               	Text="This is the folder where the application will be installed.
                     	To install in a different folder, enter it below or click Browse."/>
    	<TextBlock Text="Folder:" Margin="0,20,0,6"/>
    	<Grid>
        	<Grid.ColumnDefinitions>
            	<ColumnDefinition Width="*"/>
            	<ColumnDefinition Width="Auto"/>
        	</Grid.ColumnDefinitions>
        	<TextBox x:Name="PathTextBox" Grid.Column="0"
                 	Height="26" VerticalContentAlignment="Center"/>
        	<Button Grid.Column="1" Content="Browse..." Margin="8,0,0,0"
                	Padding="14,4" Click="BrowseButton_Click"/>
    	</Grid>
	</StackPanel>
</UserControl>Add the code-behind in the FolderDlg.xaml.cs file. The dialog returns the selected path, validates it, and handles the “Browse” button.
public partial class FolderDlg : UserControl
{
	public FolderDlg() => InitializeComponent();
	public string SelectedPath
	{
    	get => PathTextBox.Text.Trim();
    	set => PathTextBox.Text = value;
	}
	public bool Validate(out string error)
	{
    	if (SelectedPath.Length == 0 || !Path.IsPathRooted(SelectedPath))
    	{
        	error = "Please enter a full destination path.";
        	return false;
    	}
    	error = string.Empty;
    	return true;
	}
	private void BrowseButton_Click(object sender, RoutedEventArgs e)
	{
    	// OpenFolderDialog is built into WPF starting with .NET 8.
    	var dialog = new OpenFolderDialog { Title = "Choose the installation folder" };
    	if (dialog.ShowDialog(Window.GetWindow(this)) == true)
        	SelectedPath = dialog.FolderName;
	}
}Once all the dialogs are created, modify MainWindow to control how users navigate between them. The shared Next button decides which dialog should be displayed next.
private async void NextButton_Click(object sender, RoutedEventArgs e) { switch (_page) { case WizardPage.Welcome: ShowPage(_mode == SetupMode.Install ? WizardPage.Folder : WizardPage.VerifyReady); break; case WizardPage.Folder: if (!_folderDlg.Validate(out string error)) { MessageBox.Show( this, error, Title, MessageBoxButton.OK, MessageBoxImage.Warning); return; } ShowPage(WizardPage.VerifyReady); break; case WizardPage.VerifyReady: await RunOperationAsync(); break; // ... } }You can use the same navigation mechanism to display a different sequence when the user wants to uninstall the app.
 You can find the complete sample project at the following link:
How to Detect if the App is Already Installed?
Before displaying the first dialog, the WPF app needs to determine if the application is already installed. For this:
- Read the ProductCode from the embedded MSI.
- Pass that value to the Windows Installer MsiQueryProductState API.
- Check the returned product state:
- Not installed → Install flow
- Installed → Uninstall flow
public static bool IsInstalled(string productCode) => MsiQueryProductState(productCode) == InstallStateDefault;
How to Pass Information from the Custom UI to the MSI?
Because we run the custom installer UI outside the MSI, we need to pass the configuration values collected from the user to the Windows Installer.
A common example is the installation directory selected in FolderDlg. When the user selects a specific path, the WPF app must pass that value to an MSI property when it launches msiexec.
To achieve this, follow these steps:
1. Read the selected value from the dialog:
string installFolder =_folderDlg.SelectedPath;
2. Pass the value to the installation method:
MsiService.Install(_package!, installFolder, status)
Inside the MsiService.Install method, the installFolder argument is returned as the customInstallDir parameter. Then, it is added to the msiexec command line through the APPDIR property.
3. Add the selected path to the msiexec command line:
if (!string.IsNullOrWhiteSpace(customInstallDir))
arguments += $" APPDIR=\"{customInstallDir.Trim()}\"";The resulting command looks similar to this one:
msiexec /i "MyApplication.msi" /qn /norestart APPDIR="C:\Program Files\My Company\My Application"
Windows Installer does not define a standard property for the app’s installation folder. The property depends on how the MSI package was authored. There are different conventions used by different authoring tools: APPDIR (Advanced Installer), INSTALLDIR (InstallShield), or INSTALLFOLDER (WiX).
Running the MSI in the Background
While msiexec is running, the WPF application needs to remain responsive.
If the UI thread waits for the msiexec process to finish, the installer UI window could stop working. To avoid this, run the install operation on a background thread.
Once msiexec finishes, inspect its exit code to determine the result.
Some common Windows Installer exit codes are:
- 0 → the operation completed successfully.
- 1602 → the operation was cancelled.
- 1618 → another Windows Installer operation is already running.
- 1603 → a fatal installation error occurred.
How to Handle Elevation?
The WPF app needs admin privileges for operations such as creating the custom uninstall registration under HKEY_LOCAL_MACHINE. To handle this, request admin privileges when the EXE runs.
For this, add an application manifest to the project and set requestedExecutionLevel to requireAdministrator:
<requestedExecutionLevel level="requireAdministrator" uiAccess="false" />
Windows will display the UAC prompt when the WPF app starts. This ensures that both the WPF application’s per-machine operations and MSI installation run with the required privileges.
How to Create a Custom Uninstall Experience?
Installation is only half of the process. You also need to route the uninstall process through the WPF app.
For our sample, the uninstall sequence is:
PrepareDlg → WelcomeDlg → VerifyReadyDlg → ProgressDlg → ExitDlg.
You can reuse the same dialogs but update their content based on the current mode. For example:
- WelcomeDlg introduces the uninstall wizard
- VerifyReadyDlg displays “Ready to Remove” instead of “Ready to Install”
- The action button displayed “Remove” instead of “Install”
- ProgressDlg reports removal progress
As described earlier, when the WPF app runs, it checks whether the MSI product is already installed. If it is, the app switches to uninstall mode and displays the uninstall dialog sequence.
Once the user confirms the operation, the WPF app launches the MSI uninstall silently using the ProductCode:
msiexec /x {ProductCode} /qn /norestartWhat Happens When the User Uninstalls from Programs and Features?
Normally, an MSI package registers its product entry in Programs and Features. When the user selects the entry and clicks Uninstall, Windows Installer launches the MSI uninstall directly. In our scenario, this would bypass the custom installer interface.
If you want Programs and Features to launch the custom uninstall UI instead, you need to control how the application is registered for uninstall:
1. Hide the MSI’s Programs and Features entry.
Install the MSI with ARPSYSTEMCOMPONENT=1. The MSI remains installed and registered with Windows Installer, but its ARP entry is hidden.
2. At install time, copy the WPF EXE in a permanent location on the machine. Thus, the executable can be launched when the user removes the app. In our sample, the exe is stored under ProgramData.
3. Create an entry that points to the bootstrapper:
a. Create the entry under: HKEY_LOCAL_MACHINE\SOFTWARE\Microsoft\Windows\CurrentVersion\Uninstall
b. Add the information you want Windows to display in Programs and Features, such as display name, version, publisher, or icon
c. Set the UninstallString to the stored WPF executable instead of calling msiexec
[HKEY_LOCAL_MACHINE\SOFTWARE\Microsoft\Windows\CurrentVersion\Uninstall\DemoApp]
DisplayName     = "DemoApp"
DisplayVersion  = "1.0.0"
Publisher       = "My Company"
DisplayIcon     = "C:\Program Files (x86)\My Company\DemoApp\DemoApp.exe"
UninstallString = "C:\ProgramData\DemoApp\Setup\InstallerApp.exe"
4. Clean up the WPF app after uninstall. After Windows Installer successfully removes the application:
a. Delete the custom uninstall registry entry
b. Remove the stored bootstrapper files from ProgramData
c. Schedule the final directory cleanup after the WPF app process exists
How to Build the Custom Installer?
Once the WPF application is ready, it’s time to build the executable that users will launch to install the application.
A normal Release build may produce additional files required by the WPF application. In our case, the goal is to distribute a single setup executable.
For this:
- Configure the project for single-file publishing:
<RuntimeIdentifier>win-x64</RuntimeIdentifier>
<PublishSingleFile>true</PublishSingleFile>
<SelfContained>false</SelfContained>
- Embed the MSI as a resource:
<ItemGroup> <EmbeddedResource Include="Payload\**\*.msi" /> </ItemGroup>
- Publish the project from Visual Studio or run:
dotnet publish -c Release
 The WPF app uses <SelfContained>false</SelfContained> which means the target machine must have the matching .NET Desktop Runtime installed. If you want the WPF executable to include the .NET runtime, use a self-contained deployment instead.
How to Customize Your Installer UI Using the Advanced Installer Tool?
Advanced Installer makes it easier to create and customize installers. It features a user-friendly interface that lets you manage the dialogs, add controls, and customize them directly from the UI, no coding required.
 The Dialog Editor is available starting with the Enterprise edition.
1. Create the installer project
Start by creating the installer project in Advanced Installer:
- From the Start Page, select the MSI installer project template and click Create New Project
- Go to the Product Details Page and configure the product information.
- Add the application resources in the Files and Folders page.
This article contains a complete tutorial on how to create an installer using Advanced Installer.
2. Choose an installer theme
Once the project is created, open the Themes page and choose the design you want for the installer. Advanced Installer includes predefined themes that apply a consistent look across the dialogs. You do not have to redesign each one individually.
To select a theme:
- Go to the Themes page
- Browse the available themes and use the preview to compare them
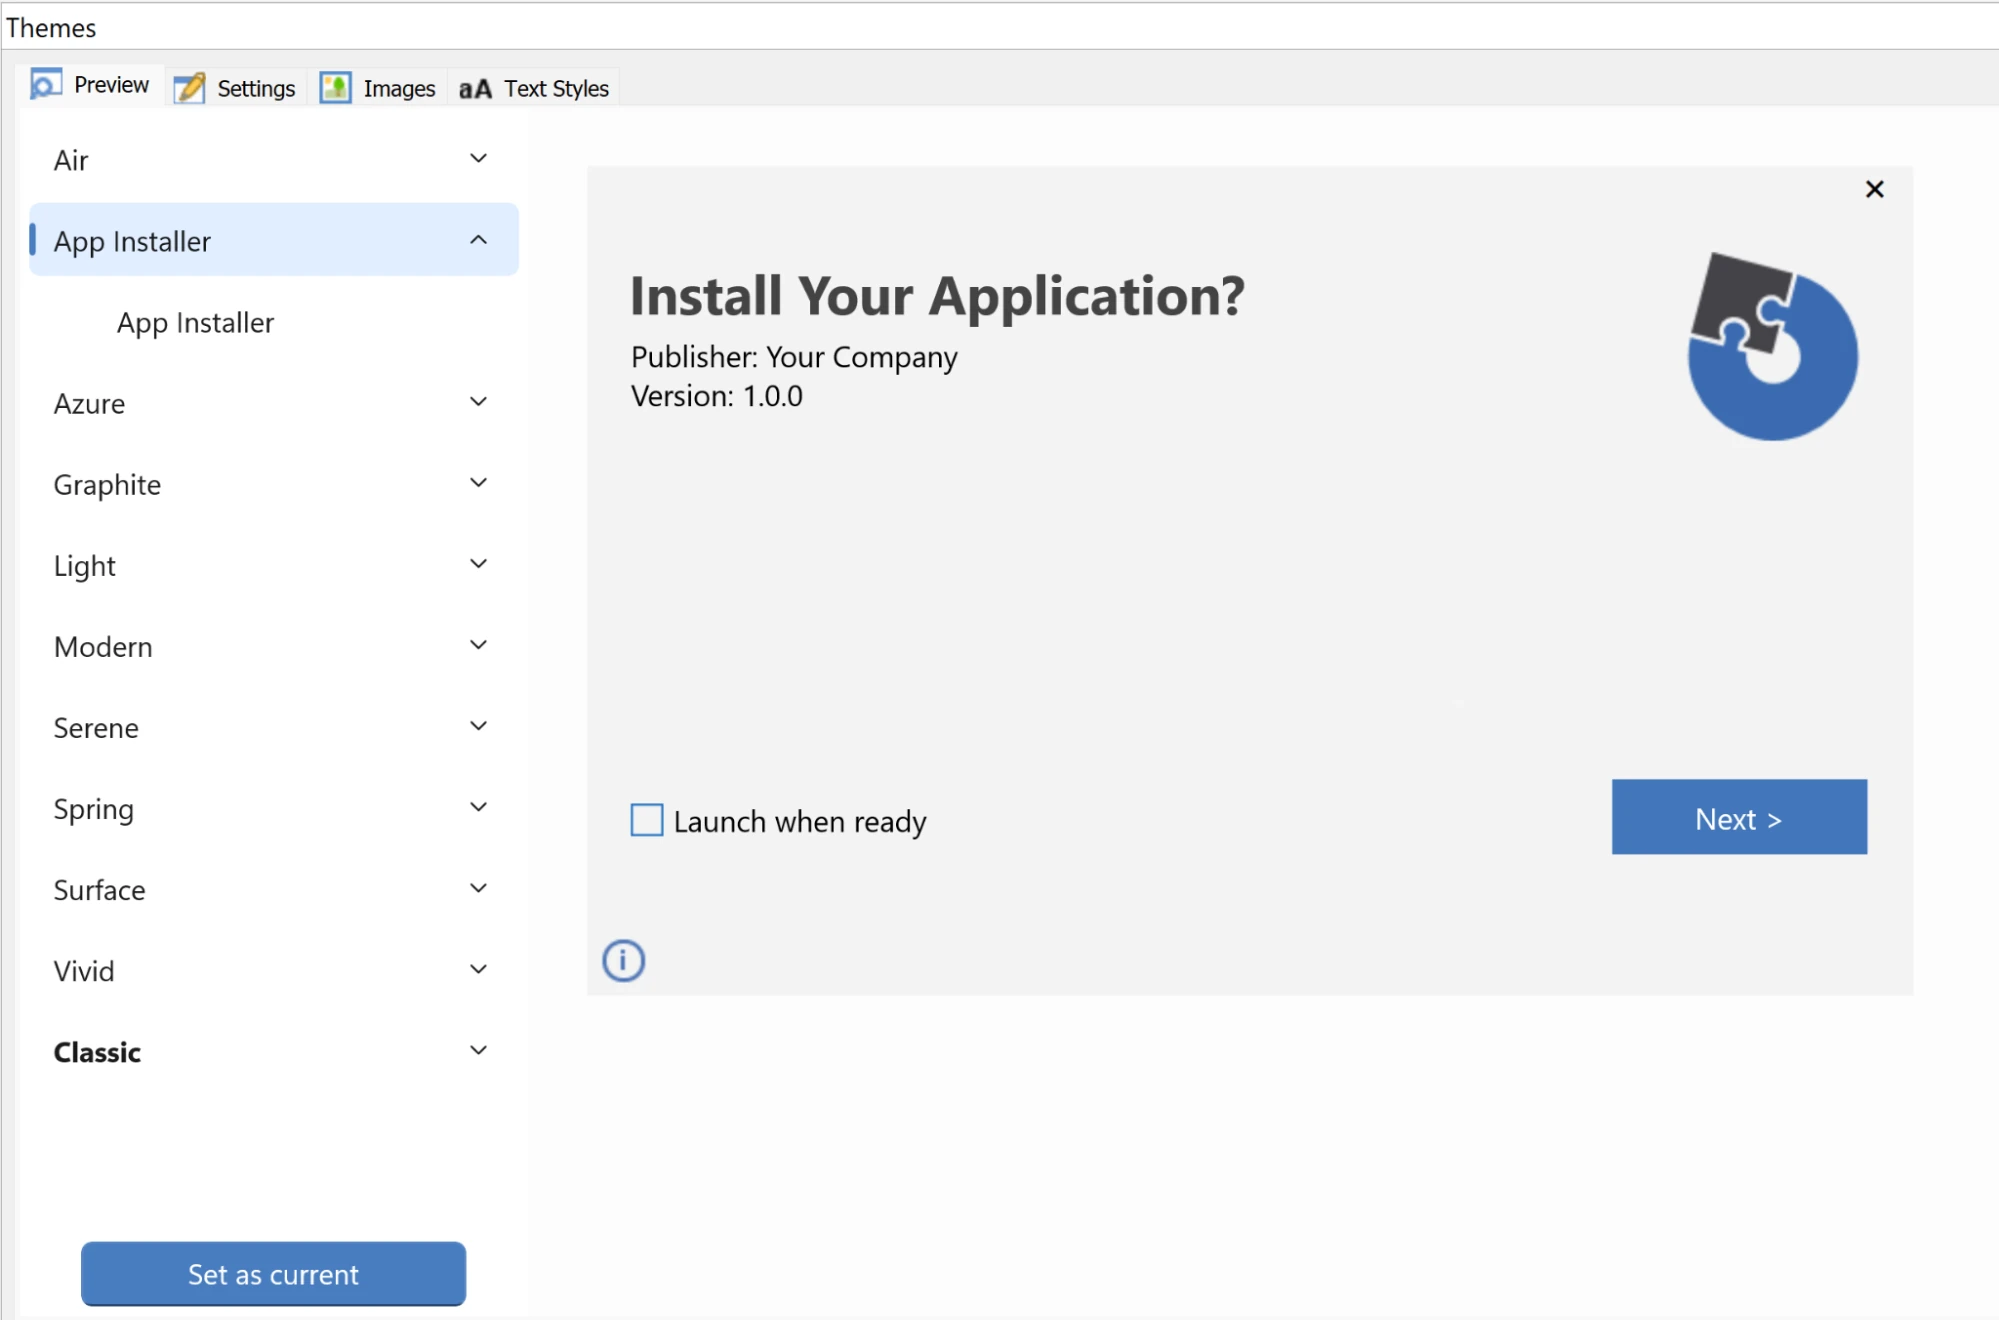
- Select the theme you want to use
- Click Set as current
You can keep one of the predefined themes as it is or use it as the starting point for a more customized installer UI.
3. Customize the dialog sequence
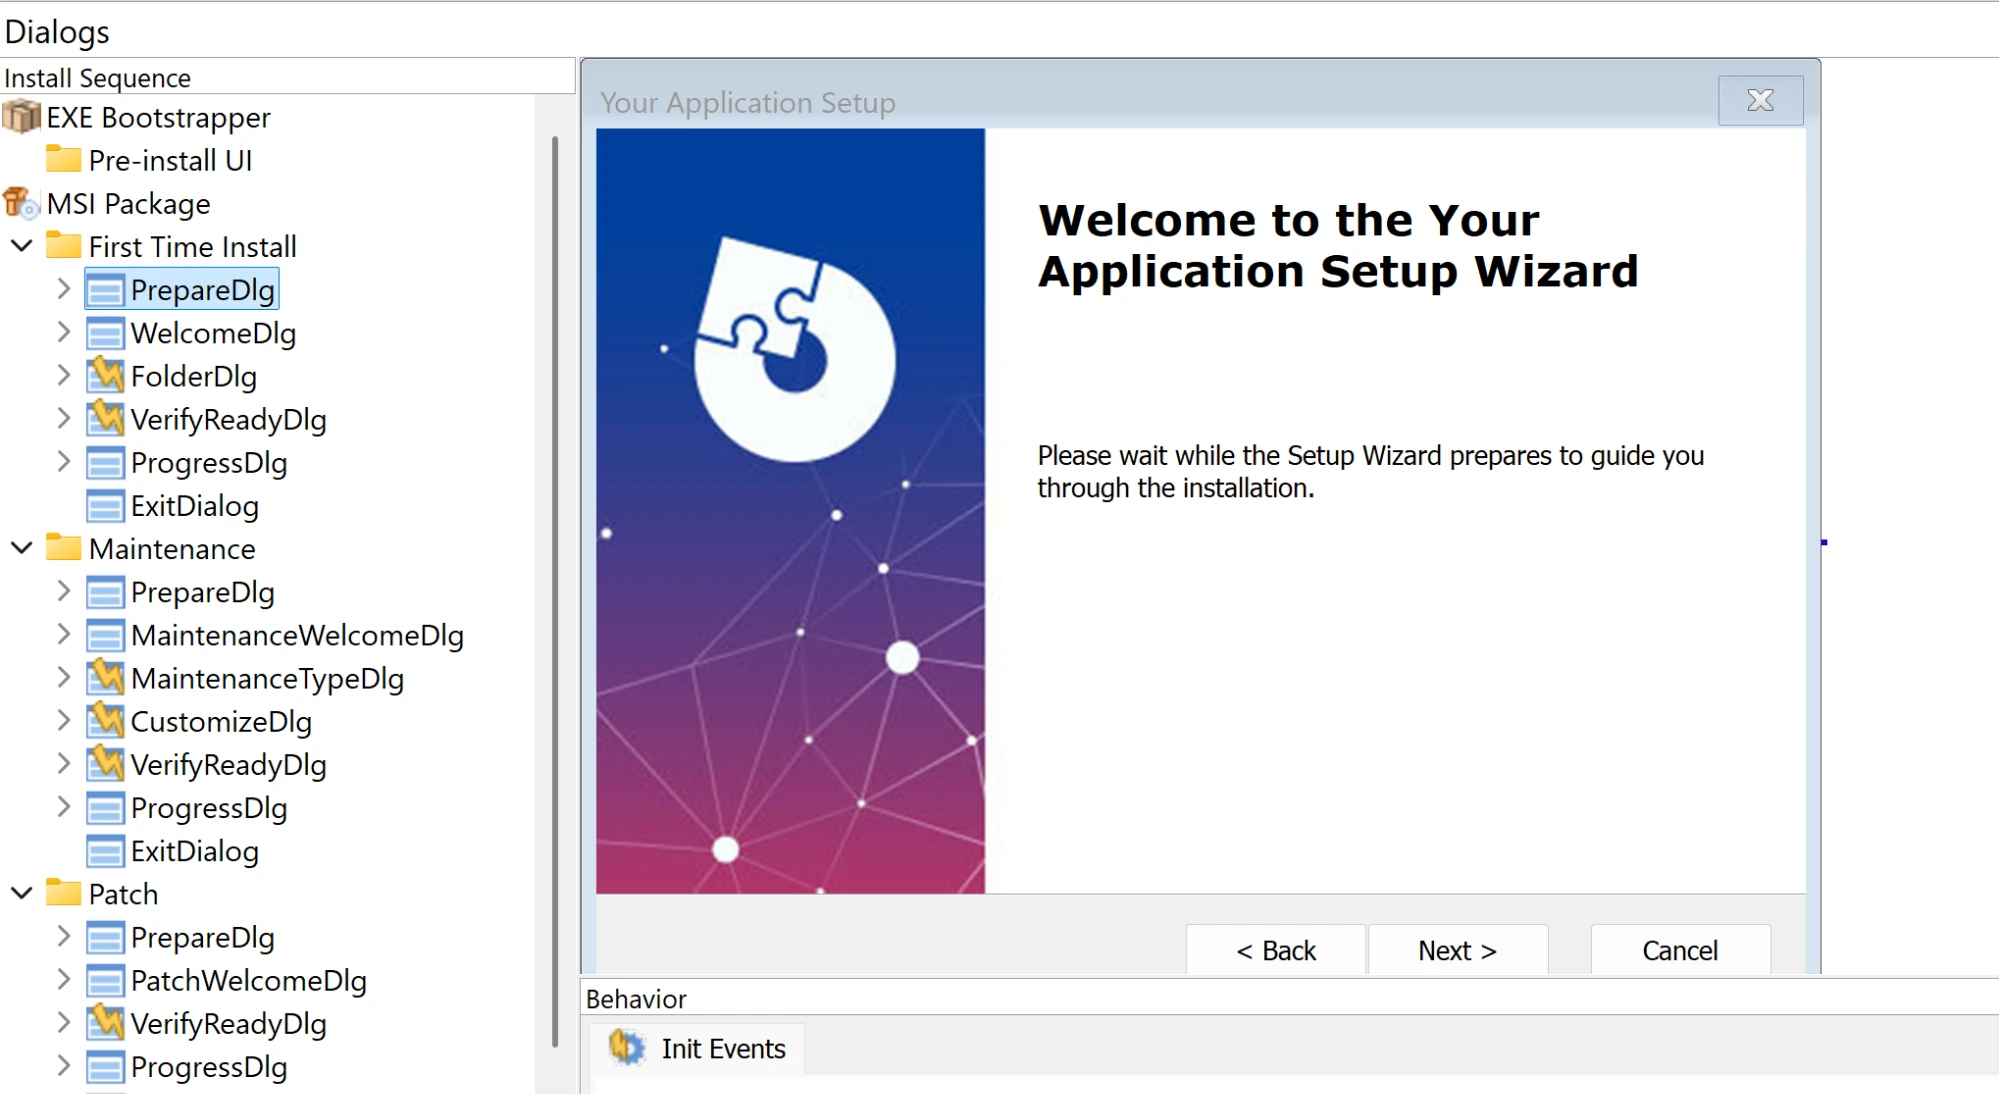
Once the theme is set, go to the Dialogs page. Here, you can view and manage the dialogs that make up the installation sequence. You can change the sequence by adding, removing, or rearranging dialogs.
To customize a dialog, select it from the sequence to open it in the editor. Then, modify its appearance, controls, and behavior using the built-in WYSIWYG editor.
4. Add predefined dialogs
Advanced Installer provides a list of predefined dialogs for common scenarios. For example, you may need to include license agreements, ReadMe information, or other configuration pages.
Instead of creating the dialogs yourself, you can add the predefined ones and then customize them if needed:
- In the Dialogs page, select the dialog after which you want the new one to appear
- Click Add Dialog
- Select the predefined dialog that you want to add from the list
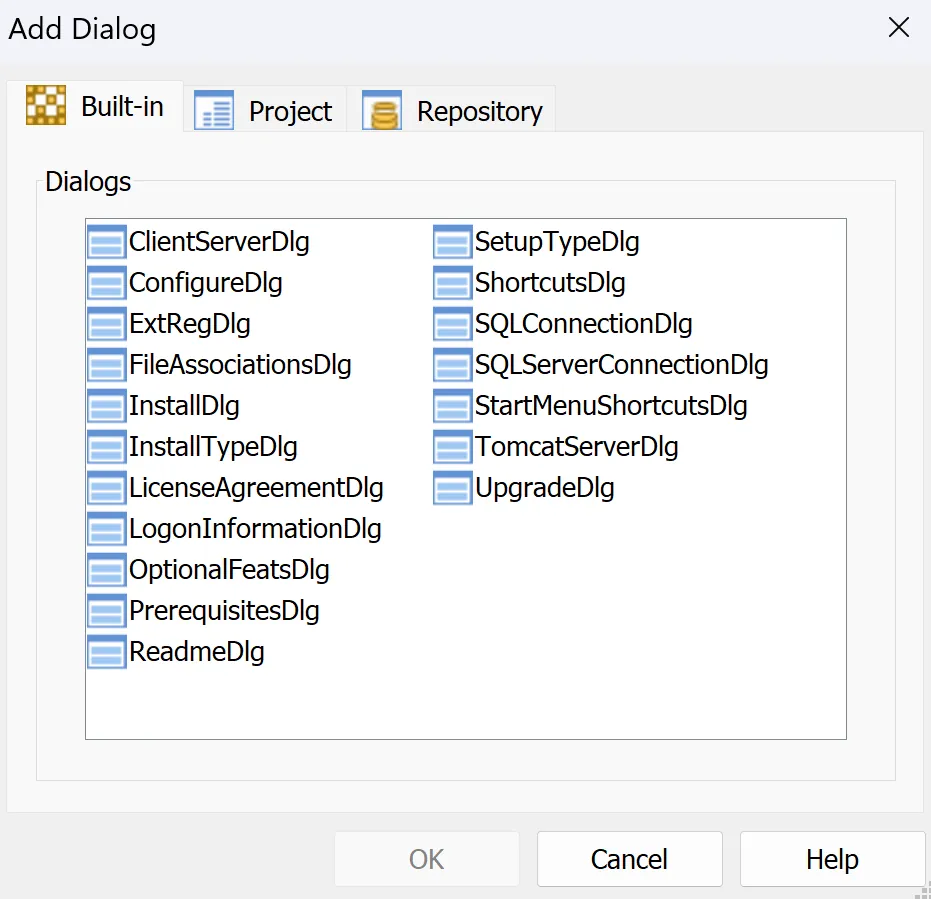
The new dialog is inserted into the sequence and can then be selected and customized in the Dialog Editor.
5. Create your own dialogs
If the predefined dialogs do not fit your requirements, you can create custom ones:
- Click the New Dialog button to add an empty dialog to the sequence
- To add controls, click the Control button
- Select a control from the list, such as an edit box, button, checkbox, or another available control
- Place the control on the dialog and configure its properties and behavior
Installer controls can work directly with MSI properties.
For example, you can store a value entered by the user in an installer property and later use that value to configure files, custom actions, or install conditions. You do not need to build a separate communication layer between the UI and the MSI.
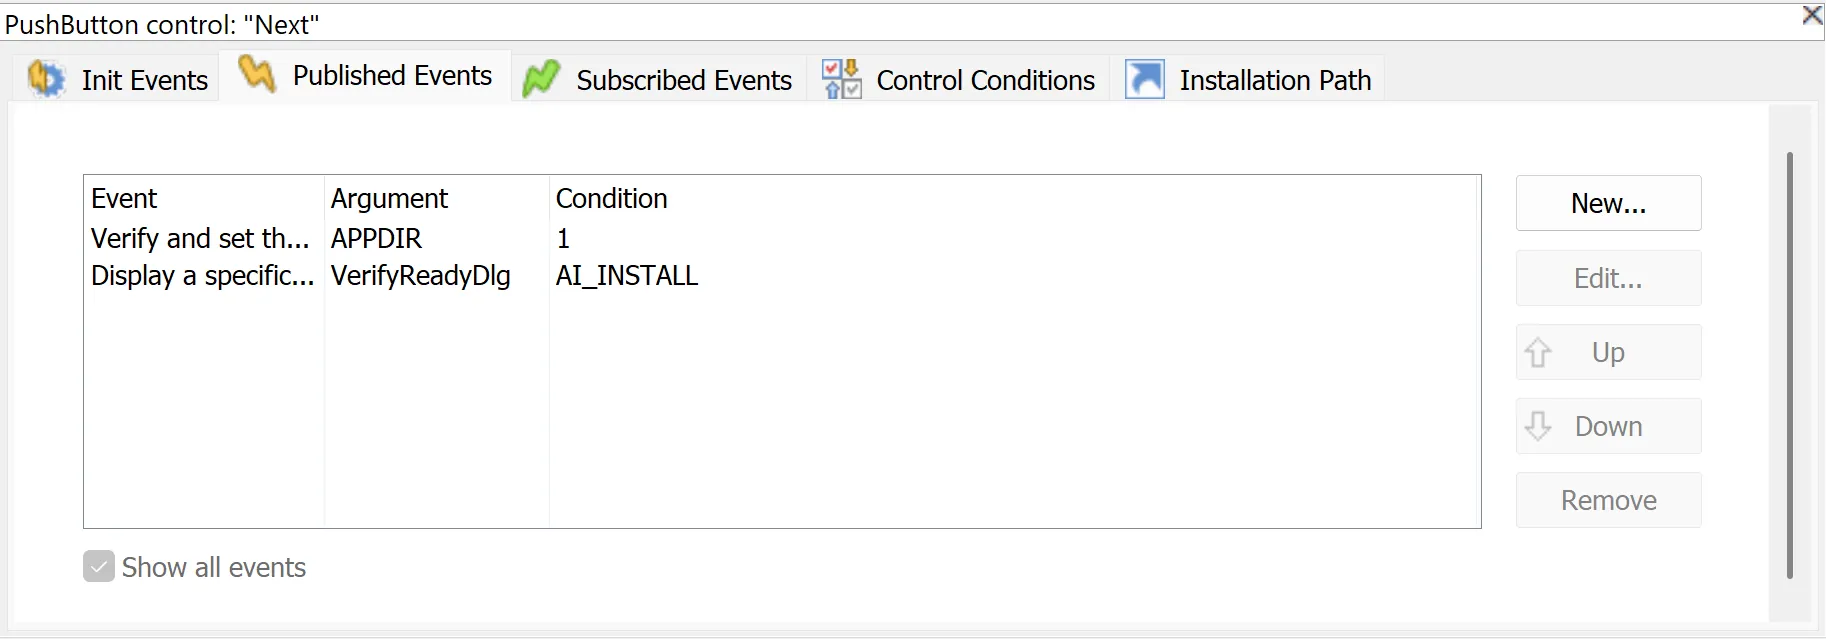
6. Control what happens when the user interacts with a dialog
Once you add controls, you can define what happens when the user interacts with them.
A button, for example, can open another dialog, a dialog can appear only when a condition is true, or a checkbox can set an installer property.
Use the Events Editor to configure these interactions:
- Select the control you want to configure
- Open the Events Editor
- Add the required event and configure its arguments and conditions
Conclusion
A custom WPF installer gives you full control over the setup experience.
However, it also requires you to handle much more than just the UI. You need to manage navigation, configuration, errors, and package execution.
For complex scenarios, Advanced Installer offers a simpler approach. It can reduce development effort while still giving you significant control over the installer experience. For a complete tutorial, you can watch the video below.
Written by

Renato Ivanescu
Renato is a technical writer for Advanced Installer and an assistant professor at the University of Craiova. He is currently a PhD. student, and computers and information technology are his areas of interest. He loves innovation and takes on big challenges.