How to Package and Register a Windows Preview Handler with MSIX
Windows Explorer can display a file’s content directly in the Preview Pane without opening the associated application. This can be done using a preview handler. Here is an example with a PDF file.
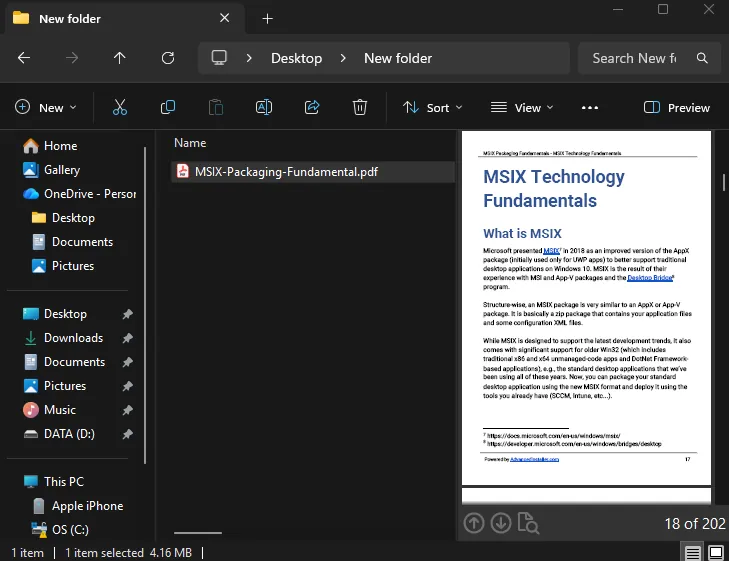
A preview handler is a COM component on Windows that is typically compiled as a DLL. When building an installer for an app that includes a preview handler, you need to make sure the COM DLL is properly registered. Otherwise, the OS will not load it.
In this article, we’ll use Advanced Installer to package an application that opens “.abc” files together with a preview handler into a single MSIX package. The installer will handle the COM registration automatically at install time.
1. Create the Application

First things first, let’s create the application.
For the scope of this tutorial, this will be a simple Win32 desktop application whose only role is to open and display .abc files when the user double-clicks one. The .abc format is simply a custom extension for text files used to demonstrate the preview mechanism.
To create the application:
- Open Visual Studio.
- Go to File → New → Project.
- Select the Windows Desktop Application (C++) project template.
- Enter the project name and click Create.
Once the project is created, edit the .cpp file and replace the content.
For this scenario, the code reads the path of the “.abc” file passed by Windows when the file is opened. Then, it opens that file and displays its content in the application window.
 The snippet below shows the relevant part. The full source code used in this tutorial (the DemoViewer application, the AbcPreviewHandler DLL project, and the Advanced Installer .aip project) is available in this GitHub repository: https://github.com/Caphyon/samples/tree/main/MsixPreviewHandlerDemo.
void OpenFileIntoEdit(const std::wstring &path)
{
    std::ifstream f(path.c_str(), std::ios::binary);
    if (!f)
    {
        SetWindowTextW(hEdit, (L"Could not open file:\r\n" + path).c_str());
        return;
    }
    std::ostringstream ss;
    ss << f.rdbuf();
    SetWindowTextW(hEdit, Utf8ToWide(ss.str()).c_str());
}
int WINAPI WinMain(HINSTANCE hInstance, HINSTANCE, LPSTR, int nCmdShow)
{
    // ... register the window class and create the main window
    //     (a read-only multiline EDIT control, hEdit, plus Open/Close buttons)
    // When the user double-clicks an .abc file, Windows passes its path
    // as the first command-line argument
    int argc = 0;
    LPWSTR *argv = CommandLineToArgvW(GetCommandLineW(), &argc);
    if (argv)
    {
        if (argc > 1)
            OpenFileIntoEdit(argv[1]);
        LocalFree(argv);
    }
    // ... standard message loop
    return 0;
}2. Create the Preview Handler DLL
Next, we need to create a native COM DLL that implements the Preview Handler.
It loads directly when the user selects a .abc file with the Preview Pane open. This is the component that actually renders the preview.
The DLL implements four interfaces plus an optional fifth:
- IPreviewHandler: the main interface. Through it, Explorer gives the handler a window and a rectangle to draw and tells it when to render the preview, when to resize it, and when to release it.
- IInitializeWithStream: Explorer uses this to hand the handler the file’s content as a stream of bytes instead of a path on disk.
- IObjectWithSite: Lets Explorer hand the handler a reference back to itself via SetSite.
- IOleWindow: Explorer uses this separately to find out the handle of the window the handler created.
- IPreviewHandlerVisuals (optional): makes the preview automatically pick up the font, background, and text color used by Explorer.
The DLL exports the standard COM entry points and implements a CLSID that must match the CLSID declared later in the MSIX manifest.
This sample uses CC12C1A5-7B5B-4367-8D3E-EBCEF1D697B9, but you need to generate your own GUID for a real project. Also, build the DLL for the same architecture as the package and the target machine.
3. Create the MSIX Package Project
Once you have the app and the DLL ready, open Advanced Installer and on the Start Page, select the MSIX package template (Windows Store Package).
Then, go to the Files and Folders tab and add the resources: DemoViewer.exe and the AbcPreviewHandler.dll.
Next, navigate to the Application Details page:
- In the General section, set the name displayed to the users.
- Check the Application is compiled option.
- Choose the DemoViewer.exe executable.
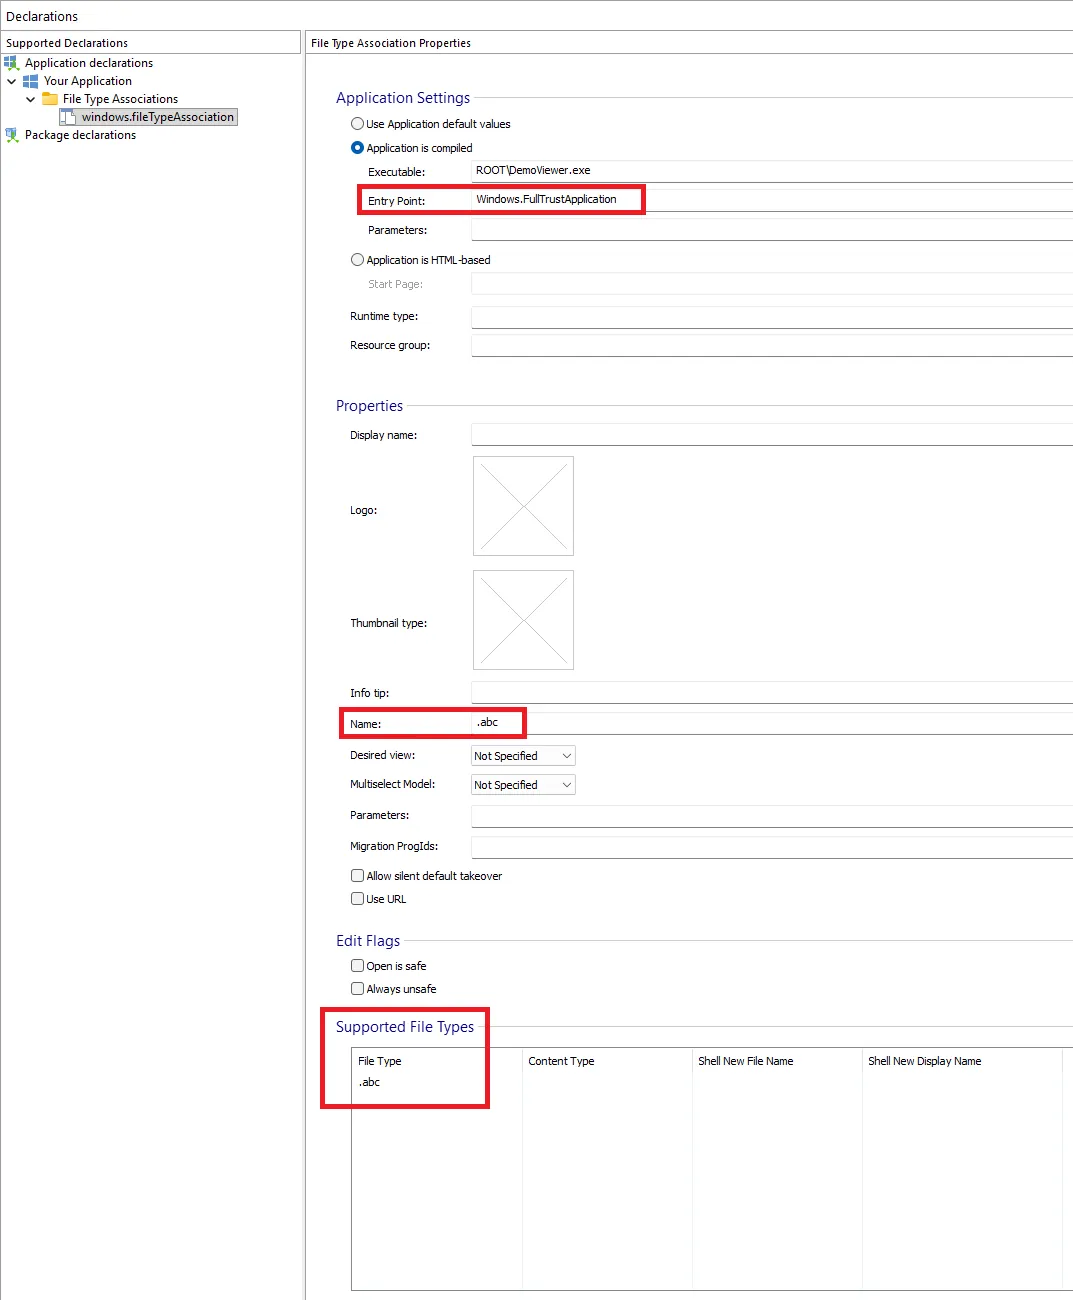
- Set the Entry Point to Windows.FullTrustApplication. This is mandatory because the app is a classic desktop app, not a UWP.
4. Create the File Type Association
Now, associate .abc files with DemoViewer.exe.
In Advanced Installer:
- Go to the Declarations page.
- Right-click on your application and select Add Application Declaration
- Choose File Type Association from the list
- Make sure the entry point is set to Windows.FullTrustApplication
- In the Properties section, set the default “.ext” name to “.abc”
- Under Support File Types, add the actual extension “.abc”
5. Register the Preview Handler DLL as Packaged COM
In the Advanced Installer project, open the Manifest Editor menu.
For this sample, add the COM server declaration to the application's Extensions section.
Declare the Preview Handler DLL as a packaged COM surrogate server:
- Select the Extensions node in the manifest tree.
- Click New Subtree.
- Build the nested structure below:
<com:Extension
    Category="windows.comServer"
    xmlns:com="http://schemas.microsoft.com/appx/manifest/com/windows10">
    <com:ComServer>
        <com:SurrogateServer DisplayName="Abc Preview Handler">
            <com:Class
                Id="CC12C1A5-7B5B-4367-8D3E-EBCEF1D697B9"
                Path="AbcPreviewHandler.dll"
                ThreadingModel="STA"/>
        </com:SurrogateServer>
    </com:ComServer>
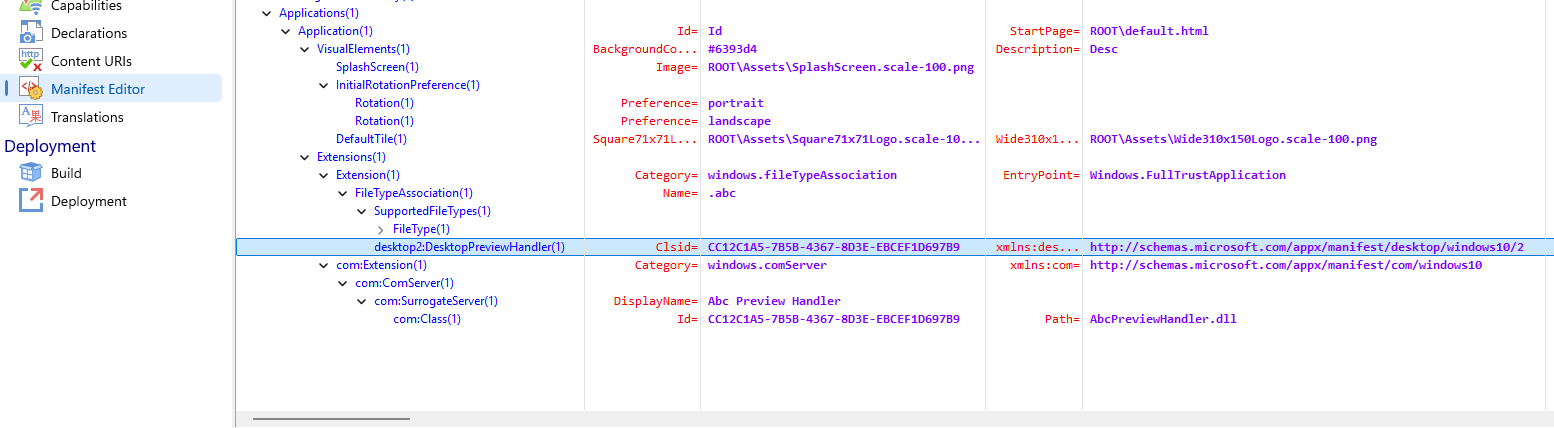
</com:Extension>Once the subtree is added, you should see it in the manifest editor.

Be aware that the Path value must be relative to the package’s root. It is not an absolute path, as Windows controls the actual install location. If AbcPreviewHandler.dll is located directly in the package root, use only the filename. If it is in a subfolder, include that path (e.g., bin\dlls\AbcPreviewHandler.dll).
The com:SurrogateServer registration tells Windows how to activate the COM class implemented by the DLL.
6. Connect the File Type to the Preview Handler
Next, connect the .abc association to the Preview Handler CLSID. In the Manifest Editor, locate the File Type Association that Advanced Installer already created. Select it and then select the New Element toolbar button.
In the opened dialog:
1. Set name to desktop2:DesktopPreviewHandler
2. We need to add two attributes. Click New for each one:
a. The first one declares the XML namespace that defines the DesktopPreviewHandler. Set Name to xmlns:desktop2 and Value to http://schemas.microsoft.com/appx/manifest/desktop/windows10/2
b. For the second attribute, set Name to Clsid and Value to CC12C1A5-7B5B-4367-8D3E-EBCEF1D697B9
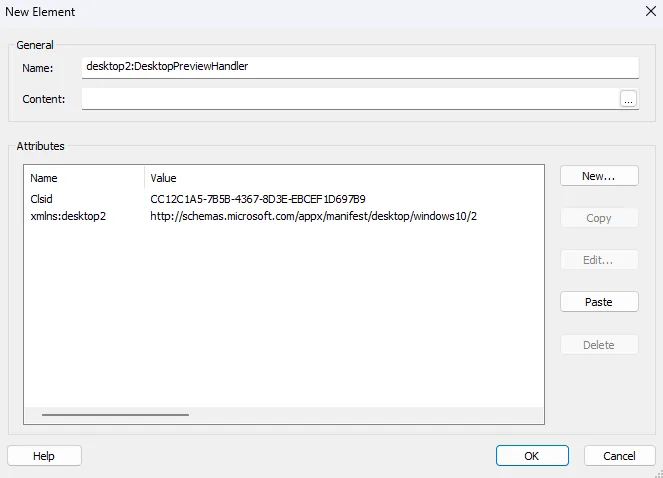
Once you add the element, it will be visible in the manifest editor.
7. Build and Test
Before building the package, you need to sign it. You can do this from the Digital Signature tab. For more information, see the article at https://www.advancedinstaller.com/user-guide/win-store-app-digital-signature.html.
Next, build the package to generate the MSIX and run it to install the app.
Before testing, you need a sample .abc file. Simply create a .txt file, add some text, and then rename it to file.abc. Or, you can download a sample file from the project’s GitHub repository.
Next, open File Explorer and enable the Preview Pane (or press Alt + P) and select the file. If the configuration is correct, the file content will be displayed in the Preview Pane.
Conclusion
When you want Explorer to preview files that open with an associated application, you need a separate DLL, the preview handler that gets registered so Windows knows to use it for that file type.
With Advanced Installer, you can package both the application and the Preview Handler DLL into a single MSIX file, and Windows will register the Preview Handler automatically at install time, eliminating the need for manual registry scripting.
If you're new to Advanced Installer, take advantage of the fully featured 30-day trial available here.
Written by

Renato Ivanescu
Renato is a technical writer for Advanced Installer and an assistant professor at the University of Craiova. He is currently a PhD. student, and computers and information technology are his areas of interest. He loves innovation and takes on big challenges.