Debloat Windows 11 Enterprise with Dynamic MSIX/APPX App Removal
Removing the Store apps that ship with Windows is a recurring topic inside any enterprise environment.
Basically, all devices should have the same configuration, and as a rule of thumb, we remove applications that are not needed or we consider as bloatware. Generally speaking, this was a tedious process.
Back in the SCCM/MECM days, an OS image would have been prepared to be as clean as possible, and then in MECM we would include the required packages such as Visual C++ redistributables as mandatory packages, which would have been installed during the task sequence process.
And ever since Store apps came out, it has always required additional work, but with a change to a Windows 11 policy, this could make things noticeably easier.
Microsoft introduced a policy for removing preinstalled apps and now accepts a dynamic list of package family names, so you’re no longer limited to the few apps Microsoft decided to put in a checkbox list.
That sounds like a small tweak, but anyone who has maintained a removal script across a few Windows releases knows why it matters. In this article we look at how removal worked before this change, what the dynamic list adds to it, and what this means for packaging and deployment teams who care about clean images.
Keep in mind that the policy is officially supported on Windows 11 Enterprise and Education.
How it used to work
Before any policy existed, removing preinstalled Store apps was a scripting job, and the usual recipe was Remove-AppxPackage for the copies already installed in a user profile, plus Remove-AppxProvisionedPackage or DISM against the image so that new profiles would not get the app again.
An example of a script would be:
$appsToRemove = @(
    "Microsoft.BingNews",
    "Microsoft.MicrosoftSolitaireCollection",
    "Microsoft.ZuneMusic"
)
foreach ($app in $appsToRemove) {
    Get-AppxPackage -Name $app -AllUsers |
    Remove-AppxPackage -AllUsers
    Get-AppxProvisionedPackage -Online |
        Where-Object { $_.DisplayName -eq $app } |
        Remove-AppxProvisionedPackage -Online
}These types of scripts ran either in a task sequence, during Autopilot, or just before the sysprep, and they needed to be touched every time an app was renamed, split, or added. This is what Microsoft describes as the pain point.
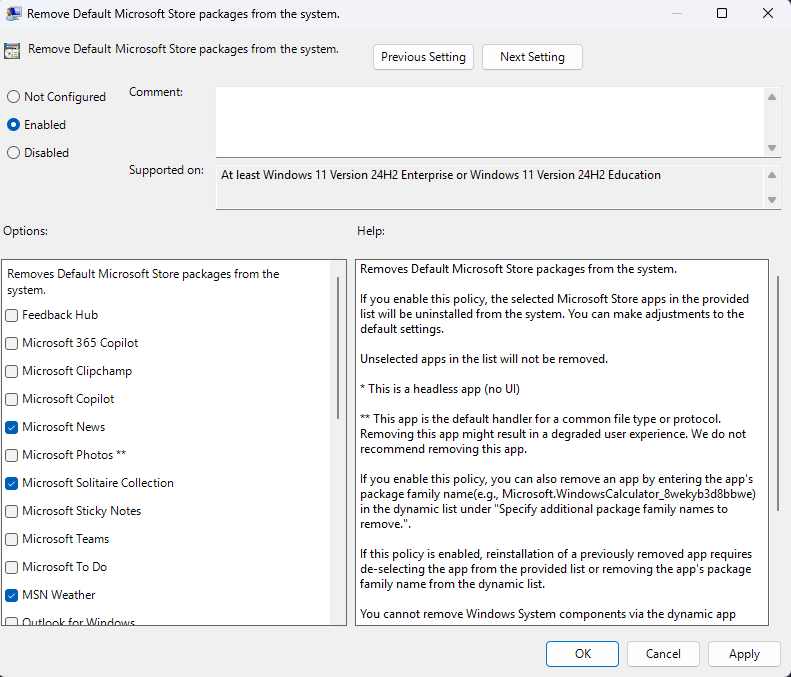
The first native answer arrived with Windows 11 24H2, as a policy called Remove Default Microsoft Store Packages from the system and according to the Windows IT Pro Blog, it is off by default and can be configured through the Intune settings catalog.
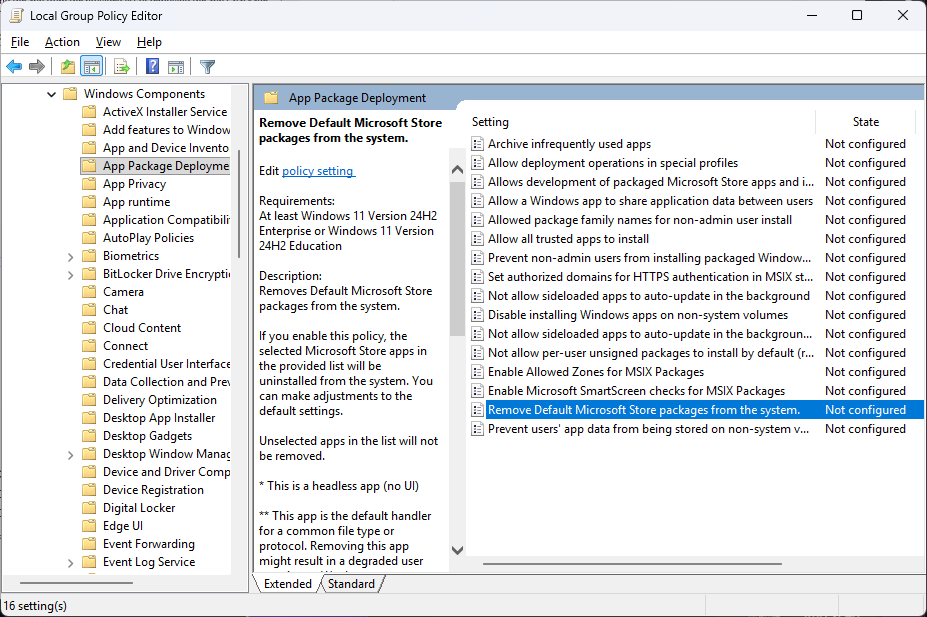
In Group Policy, it lives under Computer Configuration > Administrative Templates > Windows Components > App Package Deployment.
Once enabled, it removes the selected apps during OOBE, after an OS upgrade or when a policy update is applied at the used sign-in.
But it was not perfect, because the policy only knew about a predefined application list from Microsoft and you only got the checkboxes for a short set of Microsoft apps.
How it works now
Microsoft first announced the change on March 13, 2026, in Windows 11 Insider Preview builds 26300.8068 (Dev Channel) and 26220.8062 (Beta Channel) when it updated the policy for Windows Enterprise and Education with a dynamic app removal list.
This means administrators can now remove any MSIX/APPX application by adding its package family name to that list.
To do this, if we go to the Group Policy editor, open up the Local Group Policy Editor and go to Computer Configuration > Administrative Templates > Windows Components > App Package Deployment:
If you now open up Remove Default Microsoft Store packages from the system, you will see that besides the existing checkboxes, there is now a multi-text list called Specify additional package family names to remove.
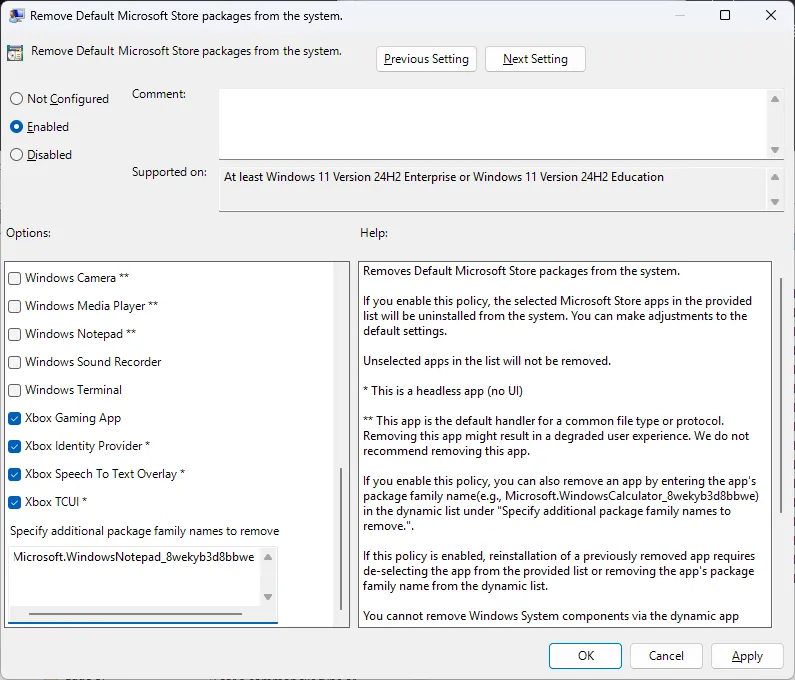
For each line you add, there is a PFN that Windows will remove. To find the PFN of an app, run Get-AppxPackage in a terminal window:
Get-AppxPackage *Notepad* | Select-Object PackageFamilyName
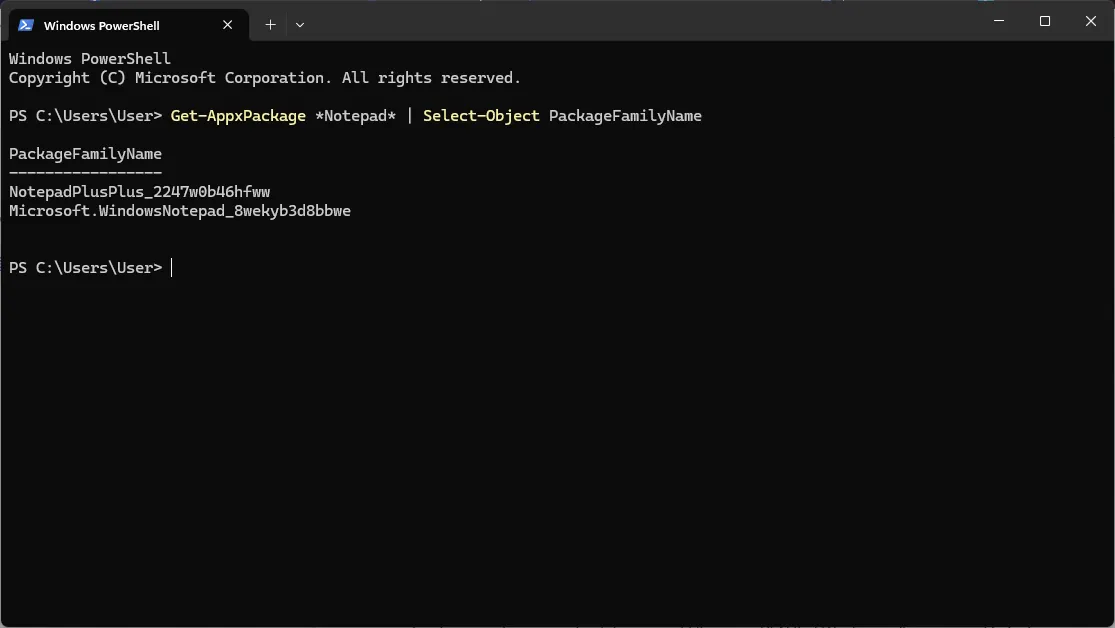
That returns a value in the form of Microsoft.WindowsNotepad_8wekyb3d8bbwe, which is what you paste into the list.
A PFN (package family name) is stable across app versions. This is exactly why it is a better handle for a policy rather than a full package name that changes every release.
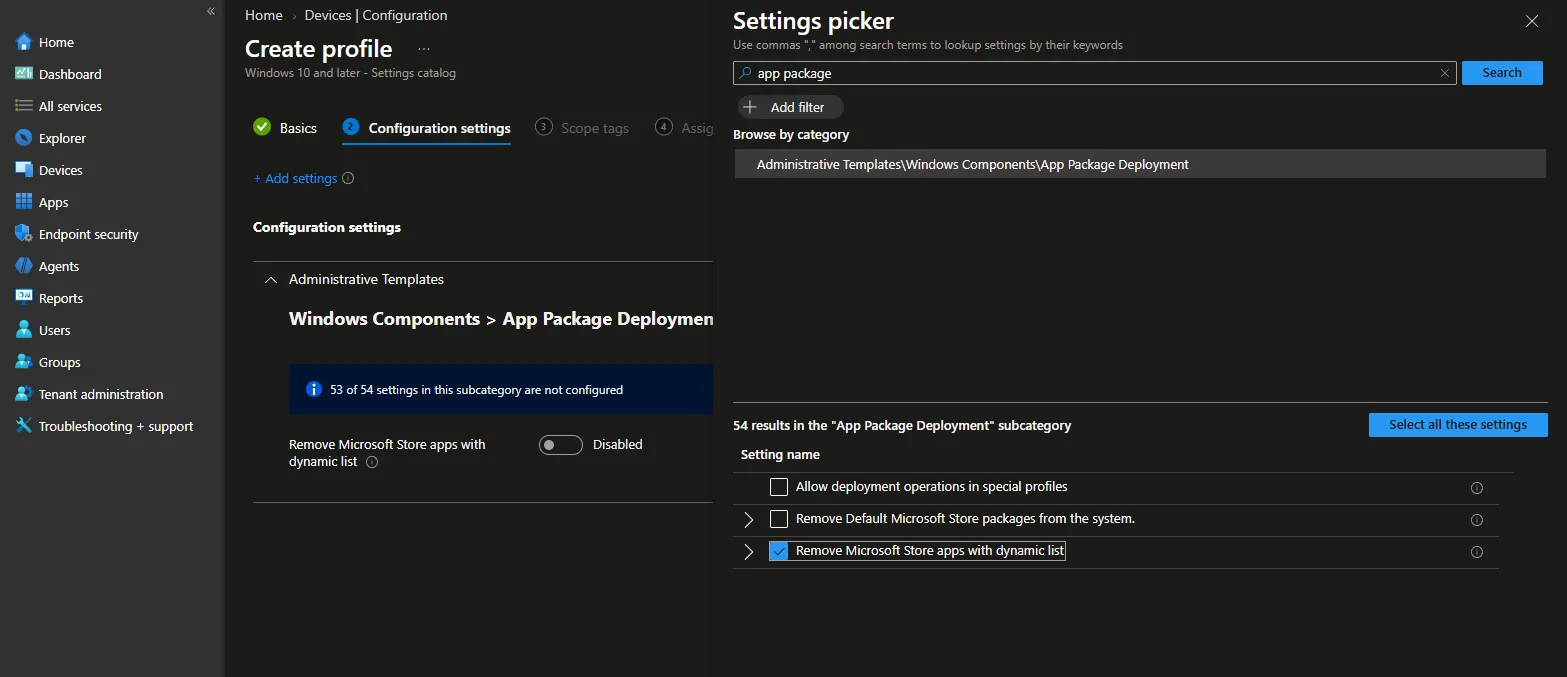
The dynamic list is available in Intune as well. Just go to the Microsoft Intune admin center and under Devices > Configuration, you create a new policy. The policy should be Windows 10 and later as the platform and the Settings catalog as the profile type.
In the configuration settings, add the settings from Administrative Templates > Windows Components > App Package Deployment and in the subcategory for removing Microsoft Store apps with a dynamic list.
You get a true/false toggle per supported app, and below that you can see a field called “Specify additional package family names to remove (Device).” That field is where the dynamic list is stored, and you do it as you do it with GPOs: add one entry per line.
Because this is a Device-targeted policy ((Device) in Intune), it handles both deprovisioning the app from the system image and removing it from active user profiles during OOBE or sign-in, ensuring new user profiles won't receive the app.
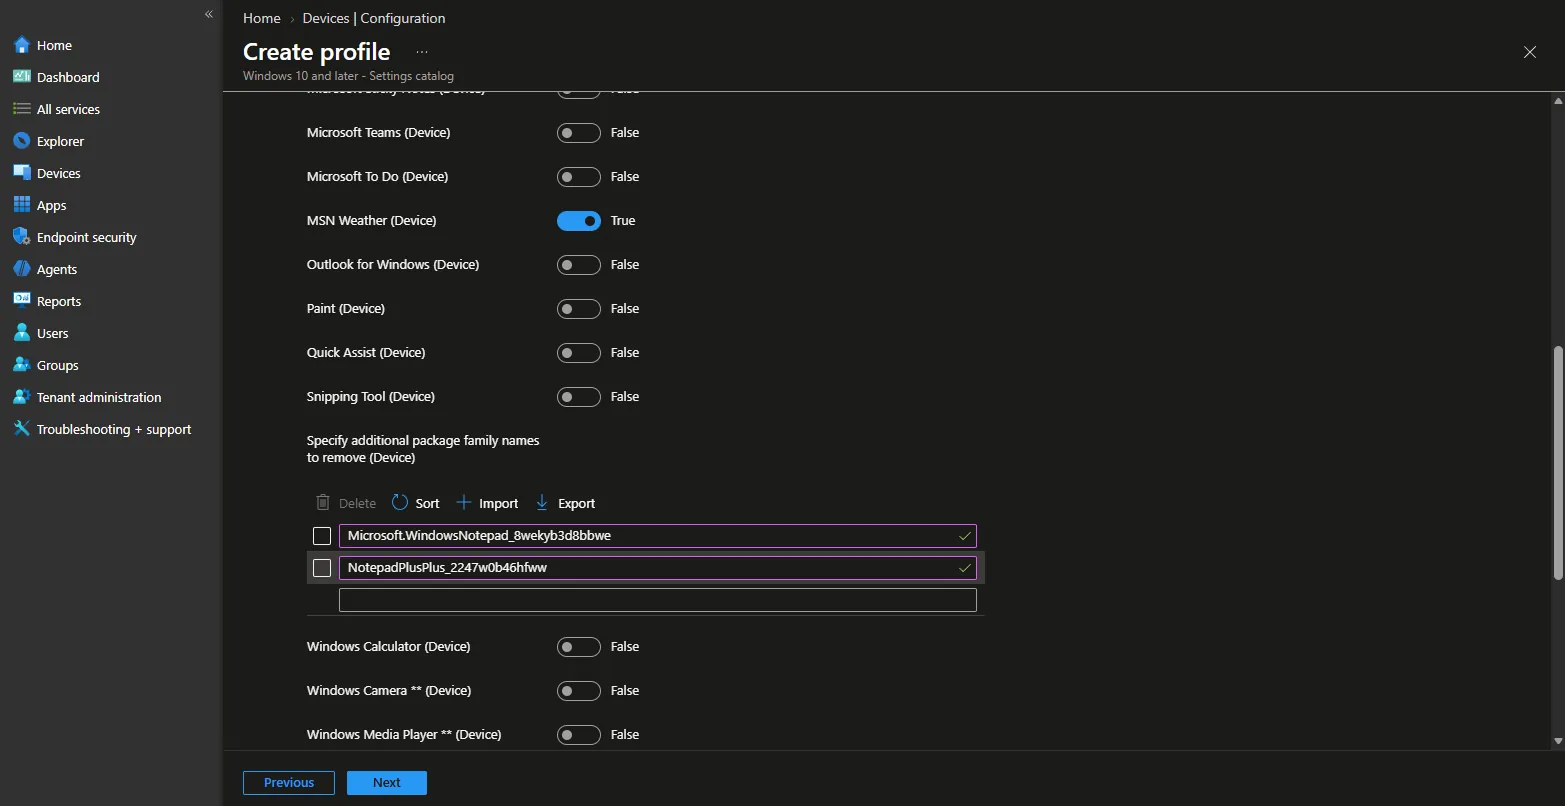
Under the hood, that Intune setting is the same policy as before, only with more flexibility.
The setting is the RemoveDefaultMicrosoftStorePackages policy in the ApplicationManagement area of the Policy CSP, backed by AppxPackageManager.admx but this is still limited to Enterprise and Education.
Conclusion
The dynamic removal list does not invent a new mechanism, it exposes the one that Windows already uses and allows administrators to finally feed it their own package family names. That turns app removal into a policy you can review, version, and deploy through the same tools you already use for the rest of your baseline rather than a script you have to babysit.
If you manage Windows 11 Enterprise or Education devices, it is now worth testing on a pilot ring: collect the PFNs you care about with Get-AppxPackage, add them to the list, and see how removal behaves at OOBE, after an upgrade, and at sign-in. Then roll it out broadly once you are happy with the results.
If you have tried the new dynamic removal policy, please share your experience in the comments.
Written by

Alex Marin
Application Packaging and SCCM Deployments specialist, solutions finder, Technical Writer at Advanced Installer.