What is and How to Create an Application Pool in IIS
If you’ve ever worked with web applications, especially on a Windows Server, you’ve probably encountered IIS, or Internet Information Services.
IIS is Microsoft’s web server platform, and you’ve most likely dealt with an application pool.
In this article, we will explain what an application pool is, how it works under the hood, and how you can configure one as part of your installer project with Advanced Installer.
What Is An Application Pool?

Before we get into any configurations, let us understand what an application pool is, which is a simpler concept than you might think.
An application pool in IIS is essentially a container that groups one or more web applications together, allowing them to run under a shared set of settings and within their own isolated processes.
Does it sound familiar? That is exactly what APPX and MSIX do: run within a container.
When IIS receives a request for a web page, it routes the request to a worker process called W3wp.exe. That worker process handles everything needed to serve the response back.
An application pool in IIS simply controls which worker process handles which responses.
The important thing to remember here is the isolation. Each application pool is assigned its own worker process, which is completely separated from other pools that are running on the same server.
If one application suddenly starts throwing errors, leaking memory, or crashing entirely, it doesn’t technically bring down everything else. However, this is not always the case: if the memory leak is too great, then the server itself can enter a hang state, effectively blocking the IIS.
Of course, the separation is important for many other reasons.
If you are an ISP that hosts websites for two competing companies on the same physical server, by placing each company’s application in separate pools, the IIS application pool boundary ensures that one customer never has access to or interferes with the data of the other.
The same goes for resource management. If we take into consideration the ISP example, you can limit the CPU usage and memory consumption per pool, allowing you to offer different hosting price packages and allow each customer to choose what they want based on the complexity of their web application.
And these aren’t the only benefits that application pools bring into ISS. We also have other important aspects, such as Identity and security, where you can define a specific user account per pool, as well as IIS pool monitoring, which is just as important as knowing how to set it up.
How to Create an Application Pool in IIS with Advanced Installer
Now that we’ve covered the application pool theory, which hopefully was easy to understand, let’s talk about the practical side of things.
Manually configuring IIS settings on each target machine is error-prone and does not scale well.
A much cleaner approach is to define the application pool as part of your installer so that the right configuration is applied automatically each time the product is deployed.
This is easy to do in Advanced Installer. First things first, we need to navigate to your project’s IIS Page. This is where all IIS-related settings live.
First, we need to have at least one site on which we configure an application pool. To create a site, simply right-click Sites or select New Web Site in the top ribbon.
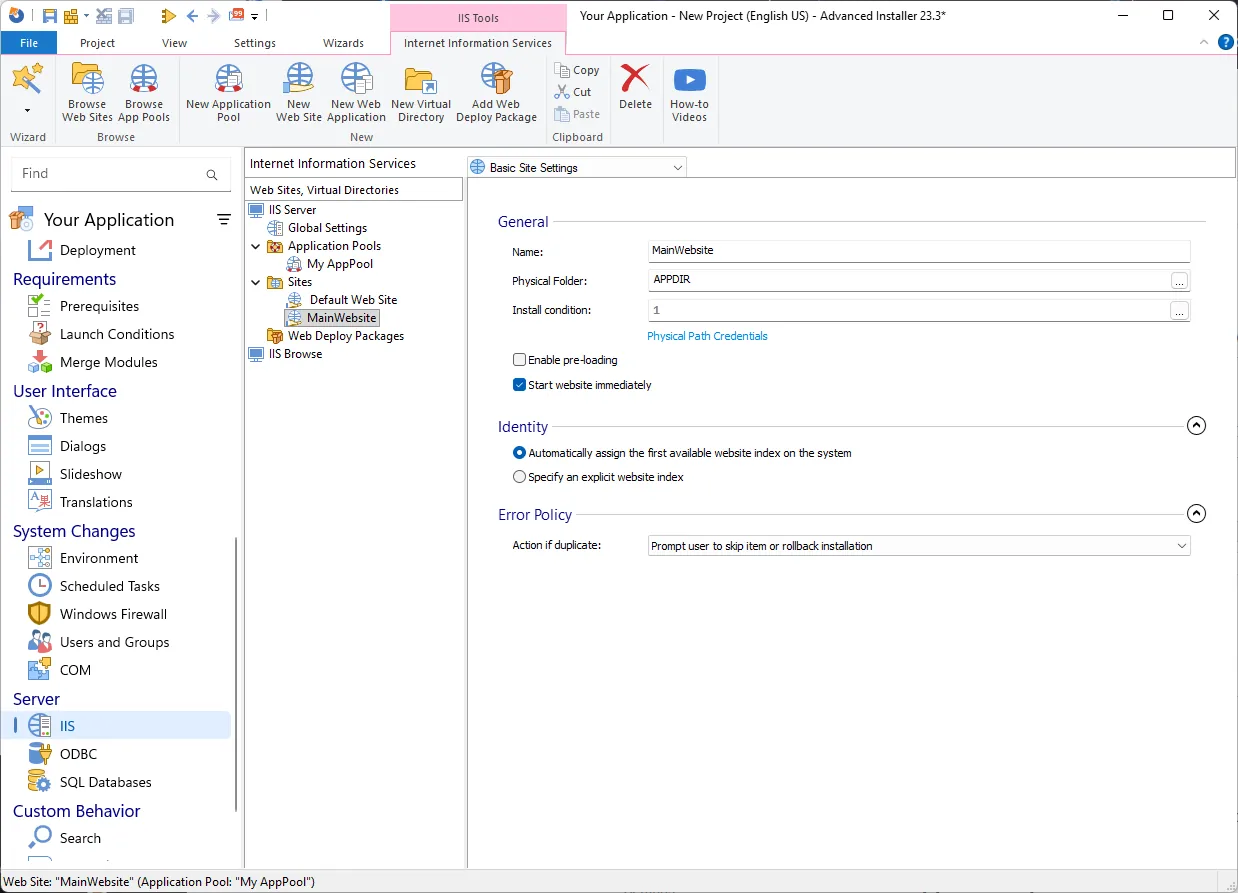
On the right side of the window, where we see Basic Site Settings, there is a drop-down menu, and Advanced Installer offers many options that you can configure.
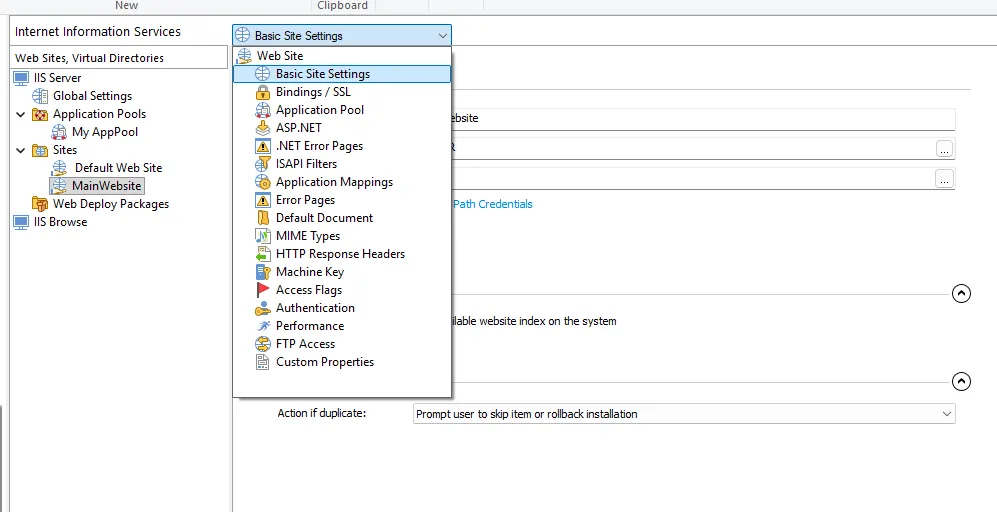
Each of these settings is available. However, because this is beyond the scope of the article, we will not go into detail about what each setting does. We recommend checking out the full user guide for more clarity.
Cool, so now that we have a site, the next step is to create an application pool.
To do this, right-click on Application Pools and select New Application Pool, or you can simply click New Application Pool in the top ribbon.
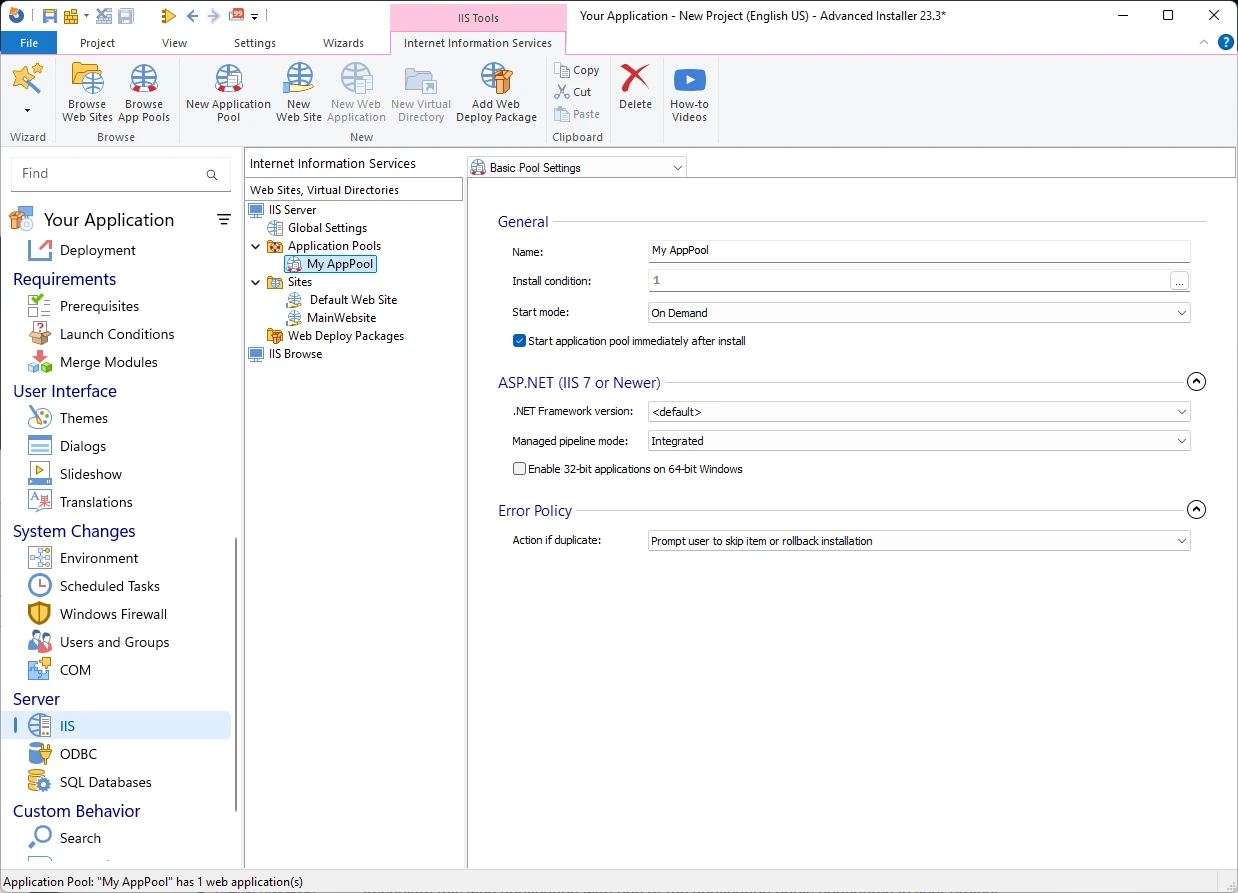
Same as with Sites, the upper right side, where it says Basic Pool Settings, is a drop-down menu that offers additional options for application pools that you can configure.

For example, if you want to define a maximum number of worker processes or CPU usage, simply go to Performance and add them.
So now we have an application pool with all the desired configurations...but how do I link it to the “Site” so that the site runs into that application pool with the required settings?
That’s quite easy to do: simply return to your site and select Application Pool in the drop-down menu.
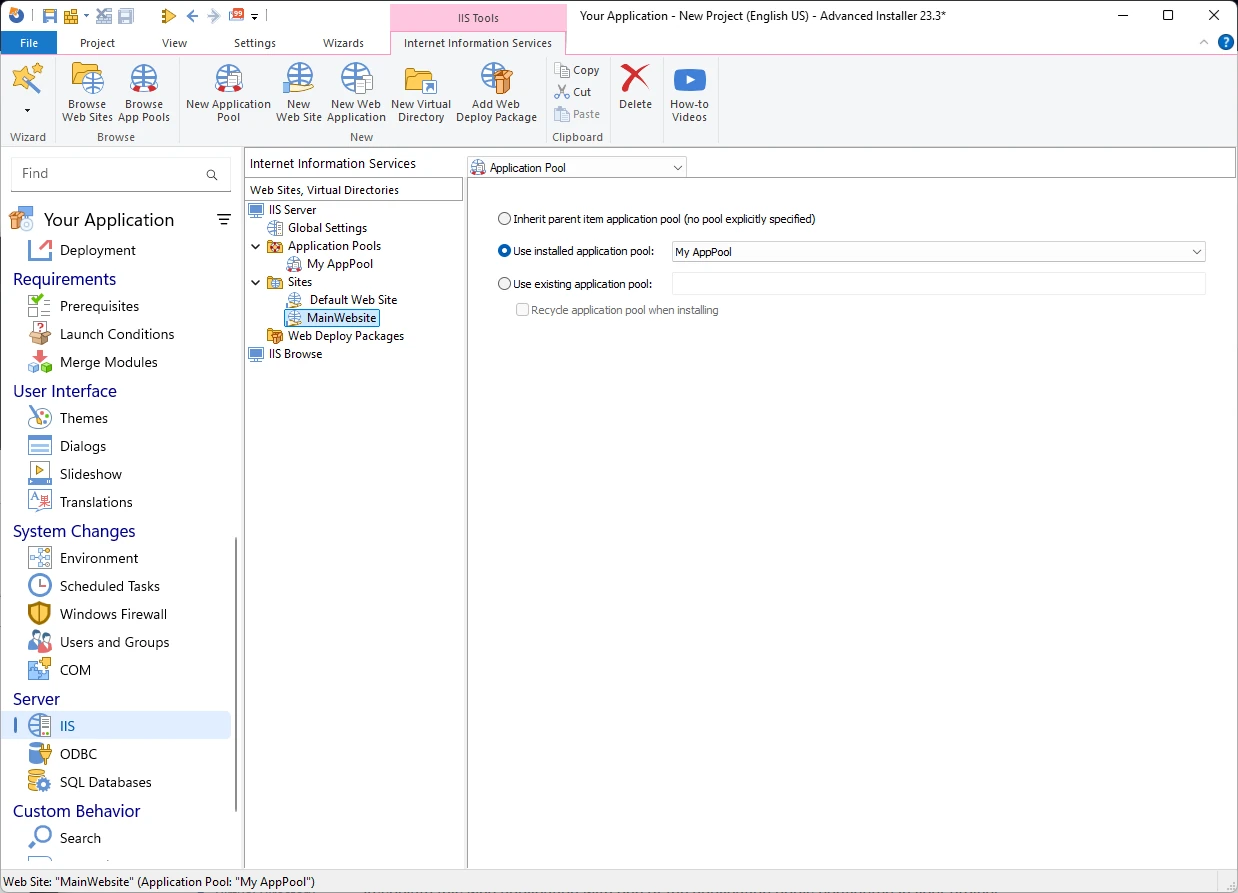
In this section, you can select “Use Installer Application Pool” and choose the desired application pool with its required configuration.
That is it.
Next time you want to make any changes to the site, all you need to do is update the files in your project and add new ones as needed, then update the project and export the app. All of these settings will remain as they are.
Conclusion
Application pools are one of those IIS concepts that seem intimidating at first but become second nature once you understand the logic behind them.
They exist to isolate web applications from one another, give you control over how worker processes behave, and allow you to apply security boundaries through pool identity settings.
Knowing what an application pool is, how recycling and monitoring work, and how to create and manage pools properly are essential skills for anyone deploying web applications on Windows Server.
Advanced Installer completely automates that setup as part of a deployment pipeline. By defining your IIS application pool configuration directly in your installer project, you get repeatable, reliable deployments, which is exactly what production environments demand.
Final Takeaways
- In IIS, an application pool is essentially a container that groups one or more web applications together so that they run under a common set of settings and within their own isolated processes, much like APPX and MSIX do when running inside a container. When IIS receives a request for a web page, it sends it to a worker process called W3wp.exe.
- Each application pool receives its own worker process that is completely separated from other pools that are running on the same server, so if one application suddenly starts throwing errors, leaking memory, or crashes completely, it does not technically bring down everything else.
- Main benefits: isolation, data separation, resource management (CPU usage and memory consumption limit), user account management per pool, and IIS tools monitoring.
Creating an application pool in IIS with Advanced Installer:
- In your project, go to the IIS page and create a site by right-clicking Sites or using New Web Site in the ribbon, then set your options under Basic Site Settings.
- Create an application pool: either right-click on Application Pools and select New Application Pool or select New Application Tool in the top ribbon
- Same goes for Sites, as you can see additional options in the upper side where it says Basic Pool Settings, such as Performance
- To link it to your site, go back to the site, open the Application Pool dropdown, select Use Application Pool, and browse to your desired pool.
 Subscribe to our blog to receive monthly articles and webinar invites.
No spam — just pure, valuable content for IT professionals