The Installer Testing Guide
A hands-on guide for developers and ISVs in charge of building software installers.
Download The Ebook
Context
Introduction
With over 20 years of combined software packaging experience, Radu and Horatiu decided to write this guide to help software developers master the key elements of application packaging.
Many developers still package their applications like we did in the early 2000s. This is an enormous risk for your business and an opportunity for your competitors to steal your clients.
Software access and distribution today are completely different than in the 2000s, when a company would mostly buy their software on a CD or floppy disk from a local distributor. The internet reshaped that landscape, and today customers are much more demanding, knowledgeable, and informed about how easy it is for them to find a solution from your competitors.
A good end-user experience is not purely based on the functionalities of the software product you offer; the way you deliver it plays a major role too. The installer is the first interaction of your product with the end-user, not your application. This is why having a robust installer for your software product is as important as developing it.
Each software vendor must fully understand their customers' needs (whether we are talking about home users or enterprises) and embrace the latest technologies and security requirements when developing the software product and the installer.
This book is particularly aimed at developers and goes through the most important key points that must be taken into account when building an installer for Windows applications.
1. Test Environment Setup: Basic Functionalities and using Virtual Machines for Testing
Setting up a Test Environment is the foundation of a successful app installation, since it helps create a well grounded testing process.
A stable test environment is a key part in identifying potential errors that need to be fixed.
One of the best ways to carry out accurate, fast, and repeatable tests is by using Virtual Machines (VMs). The concept of testing using VMs is the same regardless of the tool you use (Microsoft Hyper-V, VMware, etc.) -- essentially, you're creating a virtual environment where you can install the operating system.
To create a Virtual Machine, you will use resources from the host machine that are shared based on your configurations, just as you would on a physical machine.
Simulating multiple devices with various configurations
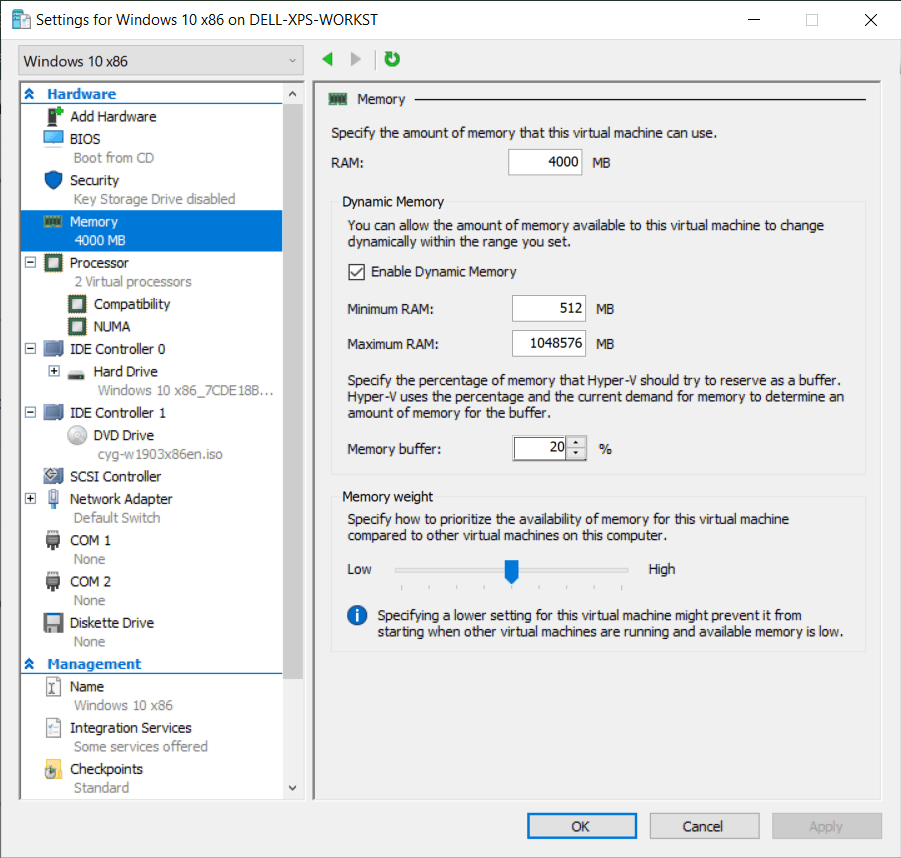
The first key feature of using VMs is that you can simulate multiple devices with different configurations such as:
- varying disk space,
- RAM,
- and available CPU cores.
Configuring multiple devices is useful when testing your installer in various scenarios, e.g. when hardware conditions are not met. The results of your test will help you make informed decisions and implement a proper user experience.
Creating Snapshots to Revert to a Previous Version of the OS
The snapshot or checkpoint functionality is another key feature of a Virtual Machine (VM). It allows you to capture the state of the operating system at any given time and to revert it to that original version whenever you need to.
This option comes in handy in the following situations:
- When you intend to avoid the installer to corrupt the Operating System (OS) and you don’t want to waste time by reinstalling it.
- When you want to check how the installer behaves with or without other software installed on the machine.
- When you test your application multiple times and you don’t want to corrupt the test results by having residual components from a previous installation.

Another advantage of generating a snapshot is that you can create different Virtual Machines with different Operating Systems and architectures. This is useful when you want to test your installer application based on your specific configurations.
What are the steps you need to follow to create a test environment?
- Create a virtual machine by starting the “New virtual machines wizard” - this works the same way in Hyper-V, VMWare, Virtual Box, or any other virtualization software.
- Configure the system resources during the creation process -- a basic virtual machine for application testing would have at least 2 CPUs, 4 GB of RAM, and 80 GB of hard disk space.
- Enable the Virtual Network Adapter (for internet or intranet).
- Have a Windows Disk Image ready (ISO). You will be prompted to select the location from where to install the Operating System.
- Install the Operating System.
- Login to the test machine and perform the initial standard OS configuration: Time Preferences, Zone, Location, Windows Experience, etc.
- Shut down the machine.
- Create a Checkpoint/Snapshot.
Once you have created the virtual machine and have an initial Checkpoint/Snapshot, you can start testing the installation. After each test, it’s best to revert to the machine’s initial state (to the checkpoint/snapshot you created in Step 8).
ProTips:
You can use PowerShell Direct to initiate a session with your Hyper-V Virtual machine from your host machine. Open Powershell and use the following commands:
To initiate the session:
//code snip
Enter-PSSession -VMName <VMName>
To end the session:
//code snip
Enter-PSSession -VMName <VMName>
Advanced Installer offers direct support for integrating VMs. You can trigger the installation directly from your host machine in one click. Learn more about Testing installations in Virtual Machines.

Installation context and silent deployments
When it comes to the installation context of an application, there are two options:
- Install in user context (“per-user” installation): Which means the setup is executed by the current logged-in user and the application is installed and available for that particular user’s profile.
- Install in system context (“per-machine” installation): Which means the setup is executed by the “system” with system privileges, and the application is available for all users on that machine.
Install in "user context" (“per-user” installation)
The "user context" or "per-user" installation is used most commonly by a regular user with no admin privileges. To test how the application installation behaves under the "user context", check the following scenarios:
- Log in to the test machine with your user account (non-administrator), double-click to launch the installer, and go through the installation wizard.
- Log in to the test machine with your administrator user account, double-click to execute the installer, and go through the installation wizard.
It is exactly the same task but with different types of users. This is because administrator users have different privileges from regular users and have access to advanced resources and different locations of the Operating System (OS).
If your application requires this kind of administrative access, the installation will fail when a basic user without admin privileges tries to execute the setup. Don’t worry, this is normal behavior. In this case, for the application to install successfully, you need to run the installer as an administrator user.
Install in "system context" (“per-machine” installation)
The "system context" installation is used in enterprise environments when the setup is not executed by the users (even if they have admin privileges). It is triggered by configuration management tools after the application is deployed to the targeted machine.
Some examples of configuration management tools include: Microsoft’s former SCCM (now called MECM), Intune EDM, Ivanti Landesk, Matrix42 Empirium.
To replicate and test a system context installation, you need to use PsExec, a command-line utility tool that allows you to execute various commands using different contexts.
To do that:
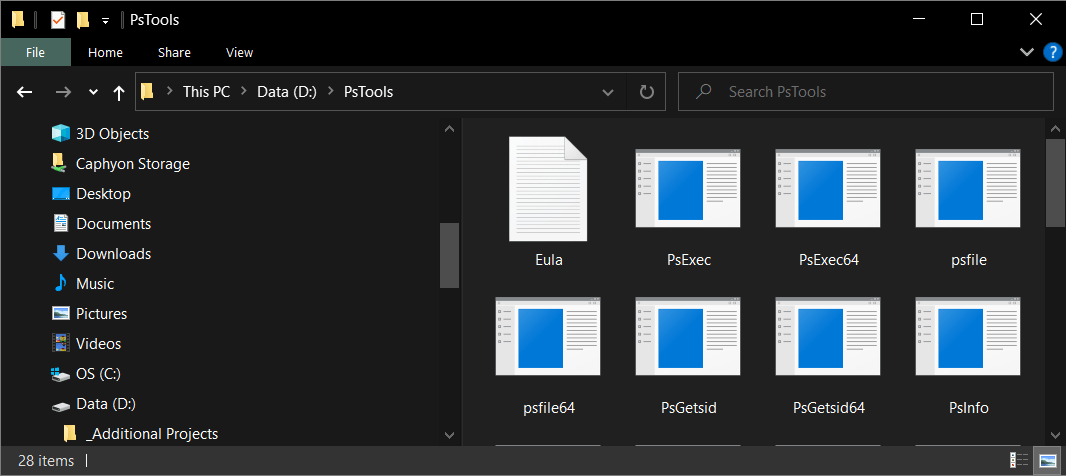
- Download PsTools from the Sysinternals.
- Unzip the content to a known location -- PsTools includes the PsExec tool that you will use.
You can see how it will look on your screen in the image below.
Then, continue with the following steps:
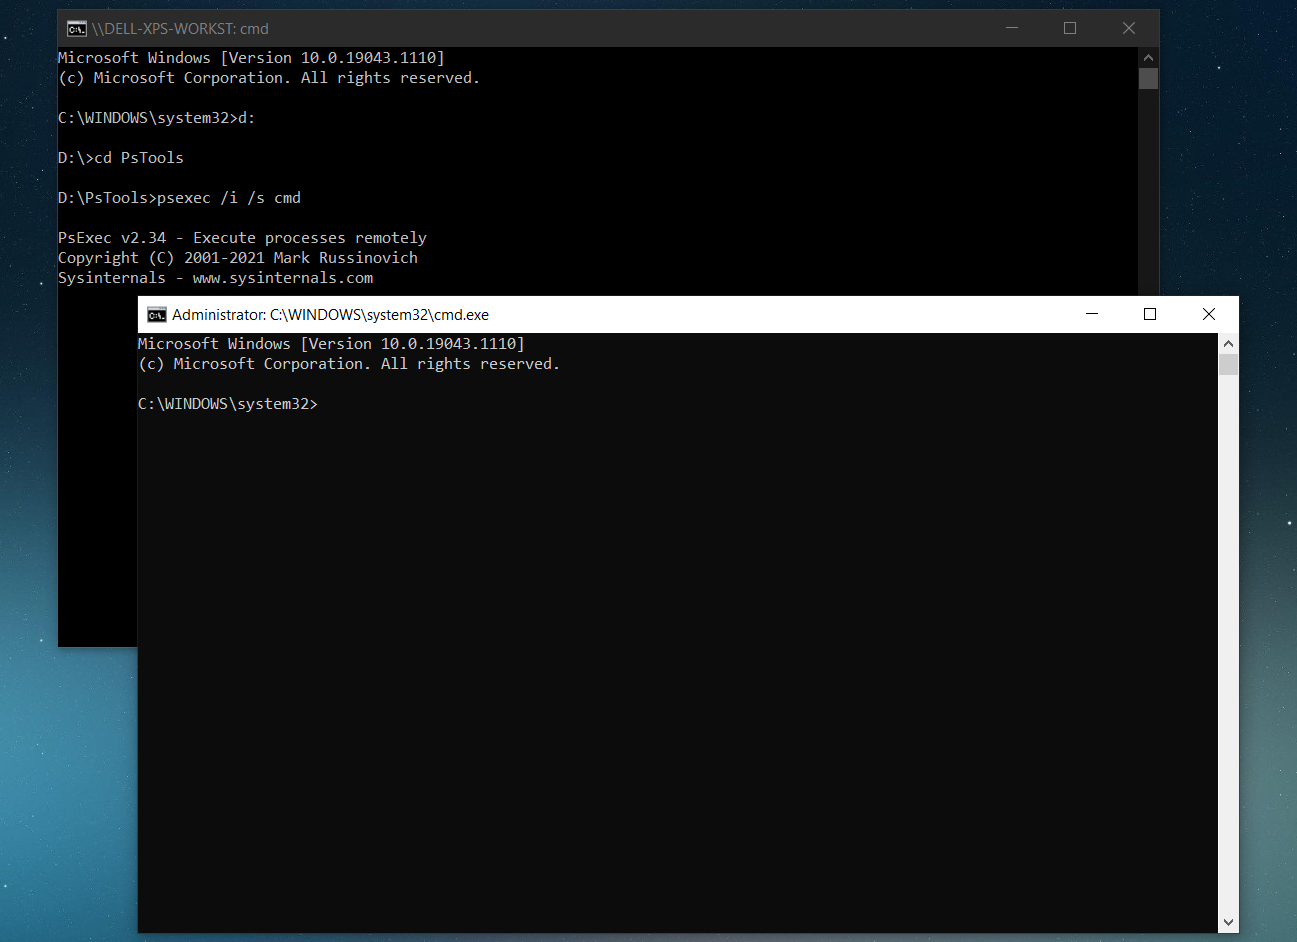
- Open a command prompt with administrative privileges,
- Navigate to the folder containing the psexec,
- Type the following command: Psexec.exe /i /s cmd
- Click Agree.
After you click on the “Agree” button, it will open a new cmd window interface from which you can run install commands using the system context. It works just as if the command was executed by a configuration management tool after the application was deployed.
To deploy an application in an enterprise environment, first, it has to be integrated into a configuration management tool.
As soon as the package is integrated, the config management tool calls the installer with the set parameters. These parameters are used to automatically install the application without the need of any user interaction -- making this the silent part of the deployment.
To make your life easier during your installation, you want your application to support being silently deployed.
You can review MSI's silent install standard parameters right below:
/quiet - quiet mode (there is no user interaction)
/passive - unattended mode (the installation shows only a progress bar)
/q - set the UI level:
- n - no UI
- n+ - no UI except for a modal dialog box displayed at the end.
- b - basic UI
- b+ - basic UI with a modal dialog box displayed at the end. The modal box is not displayed if the user cancels the installation. Use qb+! or qb!+ to hide the [ Cancel ] button.
- b- - basic UI with no modal dialog boxes. Please note that /qb+- is not a supported UI level. Use qb-! or qb!- to hide the [ Cancel ] button.
- r - reduced UI
- f - full UI
To replicate the silent deployment of Configuration Management tools, we suggest testing at least the two most common silent modes: /qn and /qb!
To do that, go to the system context cmd window and test the command lines (listed below) separately. After each command line is executed, the application must be uninstalled before you try the other silent install command.
Msiexec /i <applicationname.msi> /qn /l*v install.log
Msiexec /i <applicationname.msi> /qb! /l*v install.log

The /qn parameter replicates a fully silent installation mode provided by the configuration management tools. If an error occurs in the background or a pop-up appears while triggering the installer without any user interaction and GUI, the installation will get stuck in the background. This is due to the fact that all the install interfaces and windows are hidden.
On the other hand, the /qb! parameter offers the same automation needed for silent deployment (no user interaction during the setup) but shows a progress bar of the installer. In case an error occurs or a pop-up appears, it will be visible because the interface is not fully hidden. This is great when performing silent install testing because it lets you know what is wrong and what needs to be reconfigured in the installer.
Pro Tips:
In some cases, application installers have two or more selectable features. Usually, you want the application to install all the features by default when triggered silently. After the installation is done, you must check if all the components are present on the machine.
Windows Installer offers the capability to perform a per-user or per-machine installation by setting the property value to “ALLUSERS”. If you set your application in Configuration Manager to “Install for system”, but the application itself is not configured for a “per-machine” installation, then you might run into problems.
As an example, when set to “Install for system”, the installation is executed under system context and if the application has a shortcut in StartMenu, that shortcut will end up in the System Start Menu, making it not visible to the user.
Remember, a good application is one that installs and can be distributed silently without any problems. It's not all about its design and dialog functionality!
You can take it a step further by setting up a test environment for your configuration management tool – such as MECM or Intune – where you can manually import and test your application’s installation behaviour. Alternatively, you can use PacKit.
PacKit is a powerful utility tool developed by Advanced Installer to simplify and automate the management of application packages.
- It integrates seamlessly with configuration management tools like Intune and MECM, giving IT professionals a more efficient way to handle the entire package management workflow.
- PacKit allows you to easily import applications into MECM and Intune, configure deployment settings, and distribute them across your network. This reduces manual effort and improves the overall process of organizing, managing, and deploying applications at scale, ensuring smoother and more reliable application rollouts.
Additionally, PacKit supports integration with WinGet, Microsoft's package manager.
If your application is available in the WinGet repository, your clients can effortlessly import it directly from WinGet into the PacKit workspace. From there, it can be configured and deployed to MECM or Intune for seamless deployment to end-user devices.
This level of integration simplifies the process of managing software across diverse systems and ensures that updates and deployments are handled in an organized, efficient manner.
What’s more, PacKit can notify your clients when a new version of an application is available in WinGet, making it easier to keep software up to date across your environment.
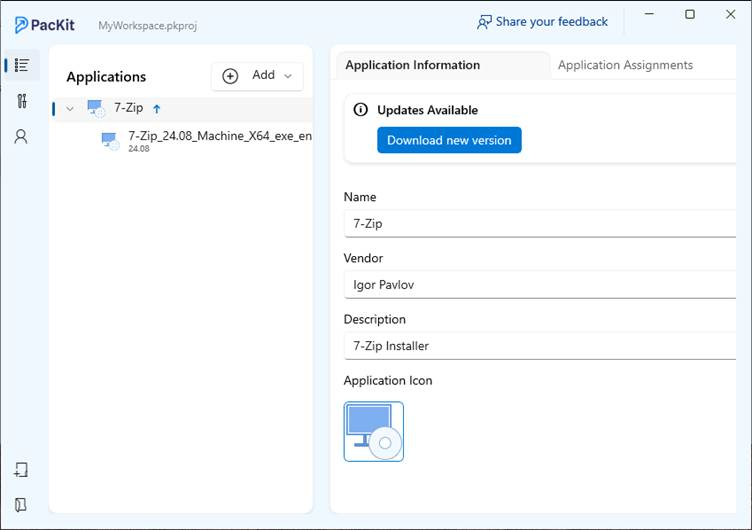
Explore all PacKit features or download PacKit to start simplifying your application packaging process today.
2. InstallExecuteSequence: No Installation Wizard
While individual users are used to installing and configuring their applications using the installation wizard, things work differently for business users. Within the enterprise environment, applications, along with their customizations, are deployed silently without any user interaction.
Other than the fact that a standard business user does not have enough permissions to perform a per-machine installation, most of them do not have the technical knowledge to configure and customize applications -- they don't need it for their role.
From a business user perspective, all they must know is how to use these applications to complete their job tasks.
This is why silent installations are important for these users and dialogs are not recommended.
To achieve a silent installation of the application with MSI, it is mandatory for the Custom Actions scheduled in “InstallExecuteSequence” not to display any dialog boxes or any messages that block the installation process and require user interaction. The same goes for uninstallations and upgrades. This is because, during a silent installation, uninstallation, or upgrade only the Custom Actions scheduled in “InstallExecuteSequence” are executed.
3. Installation Logs
It is quite difficult, if not impossible, to achieve a 100% installation success rate, especially if the application is targeted to hundreds or thousands of devices located in different areas of the business and with slightly different configurations.
When an installation fails, the first place to look before troubleshooting must be the log file created during the installation. The information in the log file should provide enough details to the person who reads it to identify the root cause of the issue and solve it.
Windows Installer offers logging support to help out in troubleshooting issues with MSI installers. To log the execution of a specific MSI installer, you need to use /L parameter along with the needed flags which indicate which information to log.
The syntax for the logging command is:
msiexec.exe [/i][/x] <path_to_package> [/L{i|w|e|a|r|u|c|m|o|p|v|x+|!|*}] <path_to_log>The most commonly used logging parameter is /L*v which records all the logging information, including verbose output.
E.g.:
msiexec.exe /i "C:\MyPackage.msi" /L*V "C:\MyPackageLog.log"
For more information on how to create an installation log for your installer and learn more about other parameters you can use, check out our User Guide - How to Create an Installation Log.
Alternatively, you can enable Windows Installer logging for all MSI installers. This will record all the information into a .log file located in the Temp folder.
Be cautious when you do this as it could cause serious problems if applied incorrectly. Also, it is not recommended for Windows Installer logging to be permanently enabled on production devices as it could cause performance and disk space issues.
Additionally, through the use of Custom Actions, Windows Installer offers the possibility to amend the installer log file and write a specific event into it.
Read more about how to write a specific event in the log file here: How to write a specific event in the log.
The MSI log files are massive and if you are not familiar with them, you might feel lost.
If the return code is 0 (zero), that means the action (install/uninstall) has been completed successfully. A 3010 return code indicates that the action has been completed successfully, but a reboot is required.
Review the Microsoft documentation for a fully comprehensive list of MSI return codes.
The most common return code in case of a failure is 1603 which indicates a fatal error occurred during the installation. A good practice would be to search for “value 3” in the log file and start reading up from there.
Pro Tip:
You can use the CmTrace.exe to easily read the logs. The sections that contain the word “error” are highlighted and are easily spotted. Even if it’s old, it’s still reliable. You can get it from the MicrosoftConfiguration Manager Current Branch.
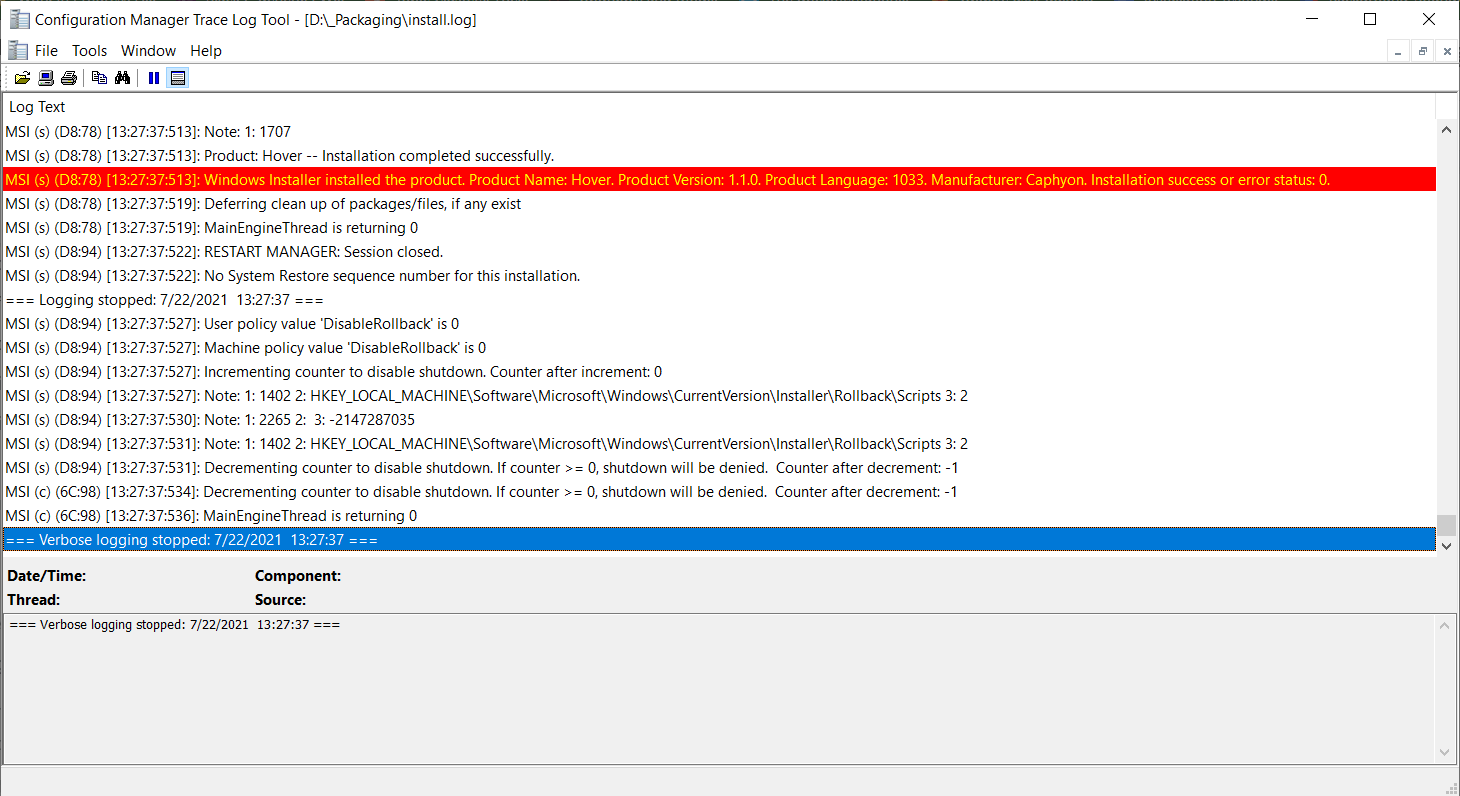
In our User Guide, you can find more details about how to debug a verbose log file created by Windows Installer.
If you don’t deliver your application to your customers in MSI format, then make sure that:
1. Your application installer supports logging
2. It records enough information in the log file to help with troubleshooting in case of a failure
3. You have documented the return codes.
4. Uninstall
The installation process of an application is not the only aspect to keep track of when testing your application. It is equally important to make sure that the uninstallation works as expected.
Test the uninstallation on all the operating systems supported by your application.
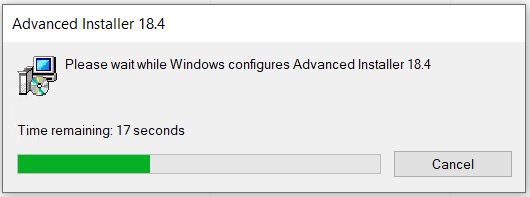
Ideally, the uninstallation must run without any errors and successfully remove all of the resources added during the installation.
Ideally, the uninstallation must run without any errors and successfully remove all of the resources added during the installation.
We are talking files, registries, shortcuts, windows services, environment variables, fonts or any other OS resources of the applications. All of these elements must be removed during the uninstallation process. In simple words, the OS state after an uninstallation must be the same as the OS state before the installation of the application.
With MSI, it is difficult to achieve a clean uninstall and it's common for MSI applications to leave a trace in the system.
In MSI, you will see that all the files and registry entries created by the application at runtime are left on the machine. Moreover, all of the application files from the user profile (AppData, LocalAppData, Roaming) and the registry key from the Current User hive are also left behind. This clutter stays on the host machine, making it slower with the installation of every new application.
Luckily, App-V and MSIX have changed that. These new technologies simplify the uninstallation of applications and you do not need to worry so much about OS resources remaining in the system after uninstalling it.
Thanks to their containerized model, all the OS resources related to the application either stay within the container or follow precise, predictable rules about where they may live. Therefore, when you uninstall the application, all the specific OS resources go with it – leaving no clutter behind.
5. Rollback
The rollback action will always occur when the installation process is canceled or an error appears. The rollback should ensure that if the application installation is interrupted, all the actions that have been completed up to that point get reversed and that resources related with the application (files and/or registries)are left behind.
When an installation rollback occurs, Rollback Custom Actions are executed. They reverse the changes made by any Deferred Custom Actions during the installation and roll the system back to its original state.
Only Deferred Custom Actions can have a corresponding Rollback CustomAction to undo the changes during the installation rollback.
Let's set a scenario: During installation, all the files were copied and all the registry keys were applied -- but the installation gets canceled by the user or an error occurs. If the rollback works correctly, all the files that have been copied and registry keys that were applied, get deleted automatically and are no longer present on the machine after the installation error occurs.
To test the rollback functionality, follow these steps:
- Trigger the installer setup file.
- Go through the installation wizard.
- Note the install folder (ex: C:\Program Files\My Application ).
- Click the cancel button while the installation progress bar is still displayed.
As a result, depending on how the GUI of the application was designed, it should display “Rolling back action ” under or above the progress bar. The progress bar should go backward, undoing what the installer had done up to that point.

The time it takes the rollback action to finish varies depending on various factors ranging from the size of the application to the number of files that were copied, as well as the actions that were performed before the installation got canceled.
After the rollback is finished, you should check that there's no “My Application” folder in C:\Program Files by navigating to the installation folder.
Pro tip:
You can track the rollback action in the log file if you trigger the installation via the command line and the log parameter is passed. Here is an example extracted from the install log file that provides information about the rollback action.
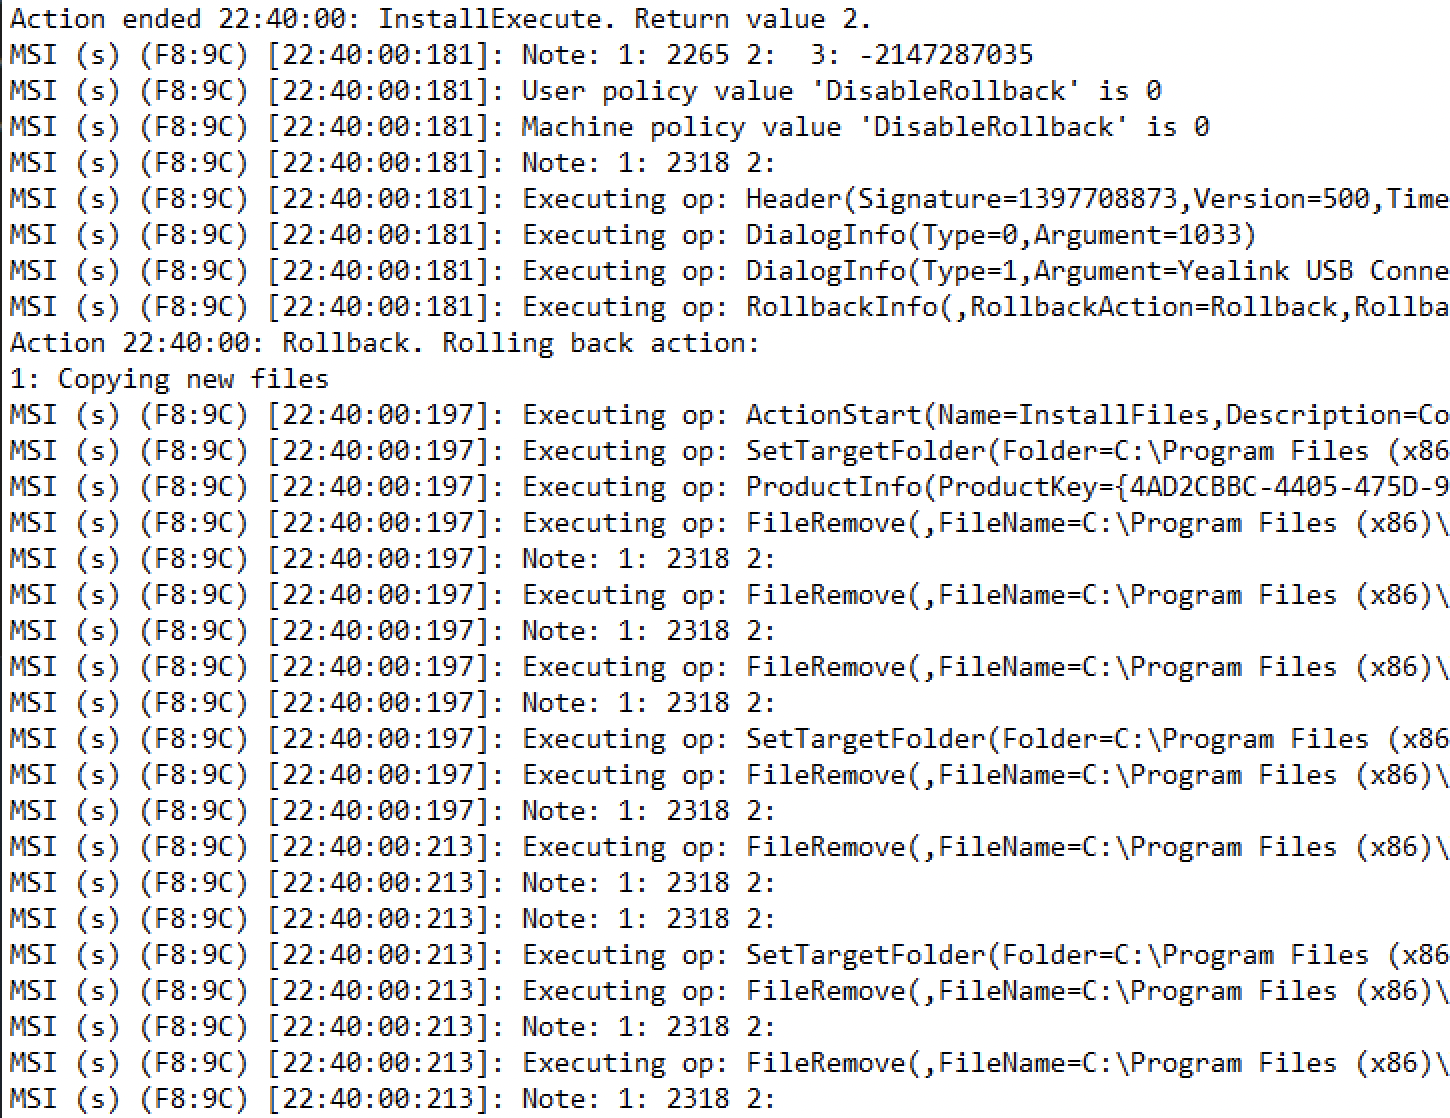
6. Maintenance - Repair, Modify/Change
Maintenance represents a key feature of an MSI installer that is usually neglected because it is used after the application is installed.
When it comes to the Repair function:
1. You must first install the application on the test machine.
2. Then, delete a file, a registry key, or anything belonging to the application.
3. Finally, use the repair button from the Control Panel.
4. After that, the missing file should be restored.

Alternatively, you can launch the repair command from a command prompt:
Msiexec /fomus <MSIPRODUCTCODE>
F - stands for the standard repair argument
O - reinstall if a file is missing or an older version is installed
M - rewrites all required application computer-specific registry keys
U - rewrites all required application user-specific registry keys
S - overwrites all specific shortcuts
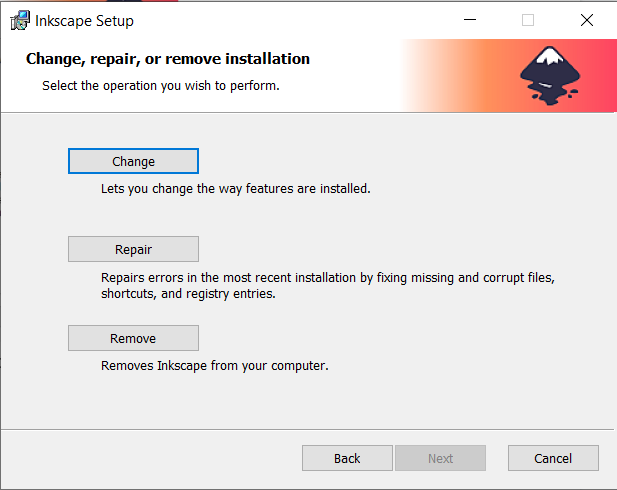
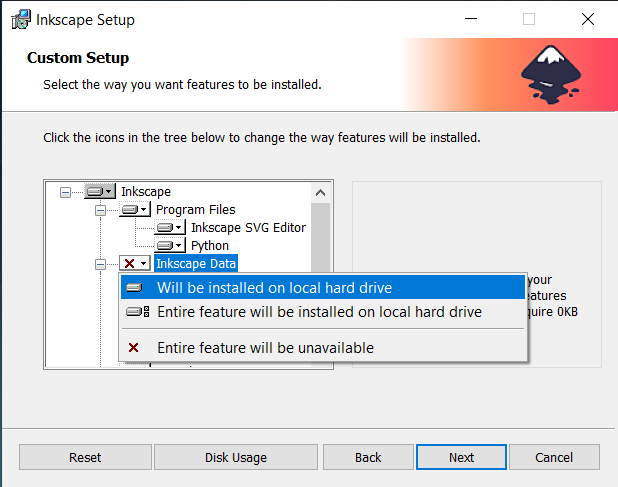
The Modify/Change function usually applies to applications that offer multiple features during the installation.
To test it, you should initially install one feature from the available ones in the application.
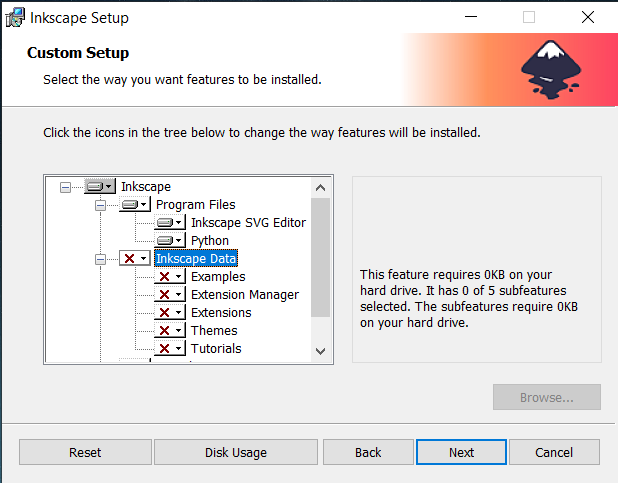
Following up, trigger the Change/Modify from Apps and features and add the additional feature you want from the installation setup wizard.
7. Advertised shortcuts vs Active Setup
Advertised shortcuts and Active Setup are mostly used in enterprise environments where applications are distributed using Configuration Management tools in a system context installation (see the Installation Context chapter). The role of advertised shortcuts and active setup is to install user information, files, registry settings, etc.
How do Advertised Shortcuts work?
After the application is installed in the system context, launch the advertised application shortcut for the first time. After that, it should trigger a “repair” action of the application that will apply all the user settings as mentioned above.
These actions will occur for the logged-in user that launched the application shortcut.
We recommend you follow these guidelines when you test the advertised shortcuts:
- Install the application in the system context with the PsExec tool (see the installation context chapter from this book).
- Double-click the application shortcut.
- Repair should be automatically triggered.
How does the Active Setup work?
The Active Setup uses the same principle of triggering the repair but in a slightly different way. The Active Setup is set by initially adding the "StubPath" reg key -- which has the value equal to the msiexec repair command.
Example :
msiexec /f {ProductCode} /qb!The key is located in the registry hive below:
"HKLM\Software\Microsoft\Active Setup\Installed Components\[PRODUCTCODE]"

Then, it compares it to the corresponding key for the below hive:
"HKCU\Software\Microsoft\Active Setup\Installed Components\[PRODUCTCODE]"
Did you notice the difference?
It’s the hive parent: One is Local Machine while the other is Current User (HLKM vs HKCU). If the HKCU key is not present on the currently logged-in user hive, it will trigger the active setup at the first login.
How to test the Active Setup?
- Install the application in a system context with the PsExec tool (see the installation context chapter from this book).
- Log out from the test machine.
- Log back in to the test machine.
- The Active setup should be triggered automatically and based on the display level from the example.
For each user, the active setup should be triggered at the first login after the application is installed, and the application user settings, files, etc. should be applied. Also, the above HKCU should be present there. On the next login, an active setup will not be triggered unless there is a new user.
8. Digital signing
Digital signing is mandatory for MSIX applications. Although it is still optional for MSI applications, it is highly recommended.
A digitally signed package guarantees to the end-user that the application built by the vendor was not corrupted by a man-in-the-middle attack. Today, man-in-the-middle attacks are one of the most common ways for hackers to install malicious ransomware.
When you install an application without a digital signature, Windows automatically detects this and shows a pop-up asking if you want to allow an app from an "unknown publisher" to make changes to your device.
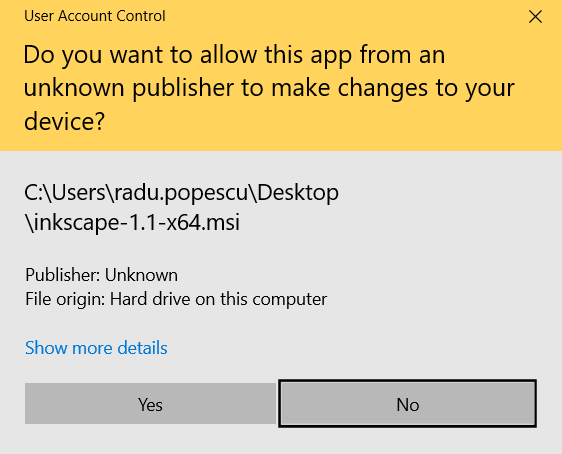
The first step to take is to check if the MSI installer is digitally signed. This can be easily done by right-clicking on it and selecting “Properties”. Then, go to the “Digital Signature” tab.
This tab will show the information of the signature certified authority that issued the certificate.
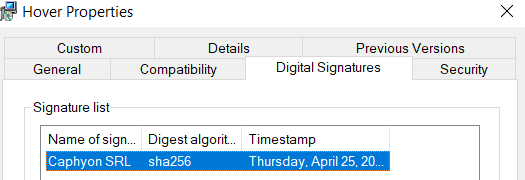
If the digital signature tab is missing, then the application installer was not digitally signed.
There are two methods to obtain a certificate that can be used to digitally sign a package:
- Buying a code certificate from a certified authority
- Generating an in-house certificate
When you buy a certificate from a certified authority, you can get a standard code signing certificate or an EV code signing certificate.
EV code signing certificates are relatively new, being used for just a few years. These certificates ensure a higher degree of verifications and promise an instant trustable reputation with the Microsoft SmartScreen filter.
As a software vendor, you should always use a code signing certificate to digitally sign your package. As mentioned above, this helps the OS separate malicious from authentic software and reduces the amount of false-positive detections with antivirus vendors.
When it comes to in-house self-signed certificates, there are two main use cases:
- When used by development teams to temporarily sign daily builds of an MSIX package so it can be tested by the QA team.
- When deployed in private enterprise environments where some organizations can use a self-signed certificate to better control corporate policies, including which software can be installed or launched by an end-user.
A self-signed certificate must be present (previously installed) on the test machine, otherwise, the OS will not recognize the package’s digital signature. To check if the certificate is installed:
1. Open the Windows Start menu
2. Type certlm.msc
3. Then Run as administrator.
4. The certificate should appear under “Local Computer” / “Trusted Root Certified Authorities”.
If the certificate is not there, you should install the certificate on the machine by double-clicking on it and following the wizard.

After the certificate is applied, in the case of an MSI installation, this pop-up should not appear anymore.

This means the digital signature from the application installer is recognized by the system. For an MSIX installation, you should then be able to install the MSIX package (before this, the system would have blocked the installation).
Learn more about digital signature and its importance from our MSIX Digital Signing and Timestamping blog posts.
9. Multilingual Packages
Other than the default English interface, an application can have a multi-language user interface or a language-specific interface based on what the user selects.
It is important not to neglect this particular aspect during the testing phase.
To test multilingual interfaces, install the application on OSs using different languages and check if the results are as expected.
For example: If the installer supports German and you install it on a machine where Windows is also in German, the interaction dialogs should be in the same language. Also, the default language should be in the German language if, by design, the software allows you to select the language.
Testing your application on a different language OS can also indicate if you have any hard-coded data (but this is not a common scenario).
Imagine your application adds some files in
“C:\Program Files (x86)\YourApplication”
If you are on the German language OS, then “C:\Program Files (x86)” is called “C:\Programme(x86)”.
So, if you haven’t defined this path as an environment variable (%ProgramFiles(x86)%), it will not be recognized.
Now, when it comes to Unicode, ANSI, or any other database encoding, the principle is the same but with a focus point on character interpretation.
Below is an example of an application in the Russian language on a Windows 10 English machine. Because of the different encoding, the characters are interpreted and displayed incorrectly.

You must test the UI alignment and spacing when you use a different language. Keep in mind that the encoding will be different for some languages that have special characters (ie. Russian, Arabic, and Greek). Also, the length of text will vary depending on each language and the installer interface might look jumbled.
10. Updates deployment scenarios
Most of the time, especially in an enterprise environment, you will have previous versions of the application already installed on the machine. Therefore, you must test the application behavior when installing it on a system where the previous version is already present.
First, consider if the newly deployed application is a patch or a new, updated version standalone application.
Patches only change the version and upgrade some files, registry keys, or minor settings of the base application that get updated compared to a standalone update application. You can read more on our Major Upgrade vs Patch article.
Patch application
The first patch test is to log in to the test environment and without having the base application installed previously, execute the patch install.
This should give you an error message. It’s expected behavior since this is what patches do: they patch an application. So, you need the base version.
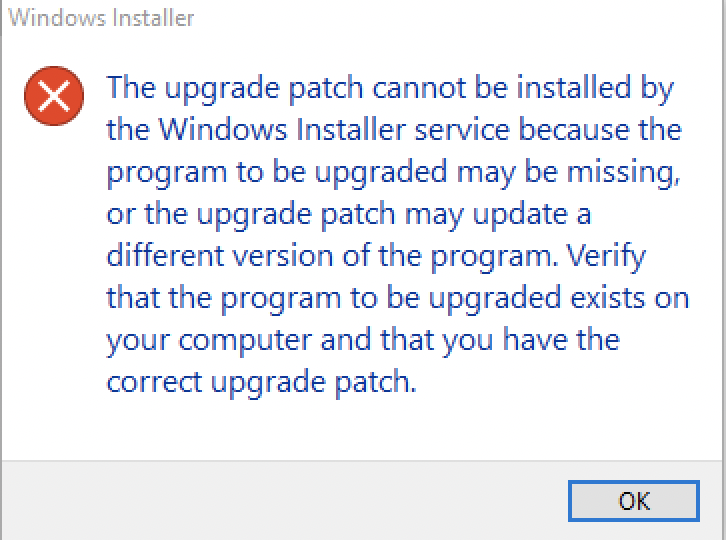
The second patch test is to install the base application first and then execute the patch.
This should open the setup wizard so you can proceed with the installation. In the end, after the patch is installed, you should notice an increase in the application version when looking in the Add/Remove Programs.
If you have the previous version installed, and you get the same error from the previous screenshot, then there is a misconfiguration in the upgrade table of the package.
Use the free Orca MSI editor and open both the patch and the base MSI application.
Check the View / Summary Information tab.

The product code from the patch Targets should match the product code from the base application.
For easier troubleshooting when you test a patch, it is best that you execute the installation using the command line and include the logging parameter as explained in the Logging chapter.
A standard patch installation command should look like this:
Msiexec /p <mypatchapplication.msp> /l*v patchinstall.log
You can also include the /qb! or /qn parameter to test the silent deployment (as discussed in the Installation Context and Silent Deployment chapter)
Standalone upgrade application
In standalone applications that also upgrade the previous version to a new one, the expected behavior when testing should be to automatically remove the previous version and then install the new version. You can check the Add/Remove programs entry and it should only display the latest version installed.
Keep in mind that there are situations where different versions of applications can coexist at the same time.
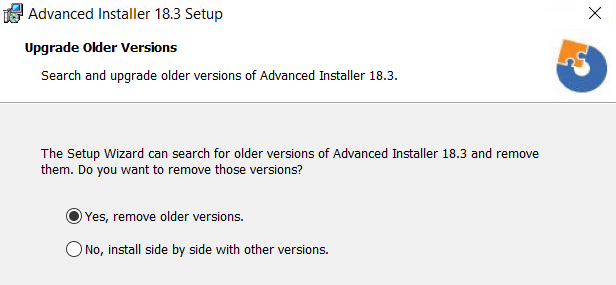
In Advanced Installer, when a new version is released, it offers the users two options when upgrading:
- Install the new version while the old one is removed.
- Keep the old version but also install the latest one: side-by-side installation.
11. Offline installation
There are multiple reasons why enterprises set specific policies to restrict internet access for their users - the main one being the security vulnerabilities that come with uncontrolled internet use.
Restricting internet access prevents application installers from downloading resources that may be needed during the installation.
This is why, if used within an enterprise, the installer should have all the resources needed during the installation within it so that an internet connection is not required during the installation.
Of course, enterprises could unblock certain URLs if needed, but still, an application that downloads its resources from the internet during the installation is not the best option. Why? Just imagine the traffic generated when the application is targeted to hundreds or thousands of devices all at once.
Testing offline installations is very straightforward. Make sure that the test environment is disconnected from the internet and then launch the installer. Run through the installation wizard while performing a silent installation.
If you receive an error suggesting that some required files or resources are not accessible, this means you have a misconfiguration in your installer and it still requires internet access.
Some vendors come with both offline and online installers for their applications. This way, individual customers or enterprises can choose which one suits them best.
Visual Studio is one of them and below you can see a screenshot of the error you get when you try to use the online installer without having access to the corresponding URL (because you don't have access to an internet connection).

There's a bit of a drawback when it comes to these types of installers: size limitations.
Installers that are too large, and include lots of expanded files, are prone to fail when deployed to end-users.
It is a best practice to keep the size of the installer as low as possible by removing the wasted storage space in the MSI and compressing all the files needed for the installation. You can store them in the cabinet files (streamed inside the MSI installer or stored outside as a separate file) instead.
12. Avoid Reboots
Some applications require a reboot after the installation, uninstallation, or upgrade of the software.
A reboot of the device is needed when you can't replace a file because it is being used by the operating system or by other applications.
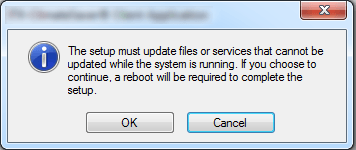

Within an enterprise, business disruptions should be minimal and avoided whenever possible. The installation, uninstallation, or upgrade of the applications within the enterprise infrastructure are all done silently in the background, without interrupting or prompting action from the end-user.
A forced reboot of the device is out of the question – you do not want to risk forcing a reboot when some of your business users are working on critical tasks.
This is why enterprises prefer to suppress any force reboot needed by their application installers and manage that externally (e.g. via SCCM/MEMCM). The most common ways to suppress a reboot are via the REBOOT and MSIRESTARTMANAGERCONTROL properties.
E.g.
msiexec.exe /i "C:\MyPackage.msi" /L*V "C:\MyPackageLog.log" REBOOT=ReallySuppress MSIRESTARMANAGERCONTROL=Disable
The installer may still require a reboot. You can check that out by having a look in the installer log.
A 3010 return code indicates that the action has been completed successfully, however, a reboot is required.
13. Public vs. Private Properties
Properties are global variables that can be used by Windows Installer to configure the software installation. Their values can be defined either within the installation package or by the end-user (via User Interface).
There are two categories of properties:
- Private properties (My_Prop)
- Public properties. (MY_PROP)
The value of private properties must be either authored into the Windows Installer database or set by the installer itself to values determined by the operating environment. Users cannot interact with them other than through Control Events.

In addition, the value of public properties can be changed by users via the command line or by applying a transform file (MST). For example, REBOOT is a public property.
And its value can be changed from a command line like this:
msiexec /i <path to the msi> REBOOT=ReallySuppress |
|---|
To easily distinguish one from the other, the name of public properties must not contain lowercase letters.
14. User Account Control implications
The User Account Control (UAC) is a windows security layer that helps to prevent malware.
Most applications require administrative privileges in order to be installed because the installer copies files on system locations and access resources on the OS that are located under secure locations. Many of these actions are performed with the help of custom actions inside the package.
Therefore, an MSI application should be properly configured when it comes to custom actions. All custom actions that require admin privileges must be set up as "deferred" instead of "immediate". Otherwise, it will not run properly and errors will occur.
When testing the application UAC, consider the following:
- Check whether the UAC is disabled or enabled on the test machine.
- If you trigger the installer under system context (mentioned in the installation context chapter) you shouldn't get any UAC pop-up if UAC is enabled.
- If you start the installer from a cmd with elevated privileges (as an administrator), no UAC pop-up should appear if UAC is enabled.
- If you start the installer and you are an administrator, no UAC pop-up should appear if UAC is enabled.
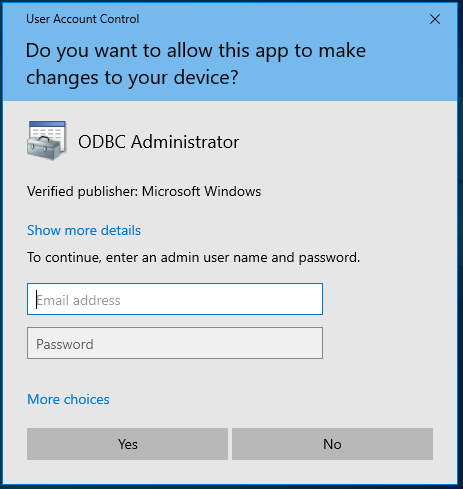
- If you start the installer as a standard user, and the UAC is enabled, then you should get a UAC pop-up.
UAC information could also be embedded into the program manifest. If UAC is enabled, the execution level of the program is set to “require administrator” (level='requireAdministrator'), then UAC will kick in and the system will prompt for admin credentials.
15. Avoid Unnecessary Start-up and Desktop Shortcuts
The application shortcut is the most common and easiest way for the end-user to launch a program.
Each application can have one or more shortcuts that can be placed in any folder (StartMenu, Programs, Taskbar, Desktop, or any other location on the computer).
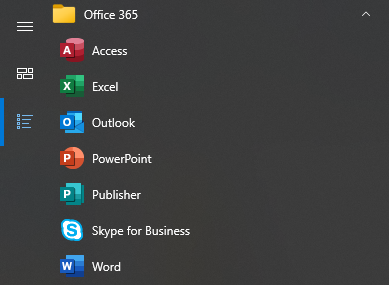
Even though having a shortcut on the Desktop eliminates the need for the end-user to go to the Start Menu Programs list and launch the application from there, enterprises tend to not favor Desktop shortcuts.
They have a good reason to do so. Multiple applications are needed by each of the end-users to do their work. If each of those applications installs a Desktop shortcut, it could easily become cluttered.
Moreover, in contrast with home users who have full permission on their devices, a standard business user within an enterprise does not have enough permission to remove any Desktop shortcuts when installed under the Public Folder.
These are some aspects that must be taken into account when you build your application installer.
Having a Desktop shortcut included in your application installer is not necessarily a bad idea since it offers easy access to your applications, but having a desktop shortcut should be something that can be easily customized during the installation of your software.
The same goes for the shortcuts placed in the Start-up folder. It is not ideal to have too many programs running once Windows loads as it causes slow bootup.
In Windows 10, the Start-up folder is hidden, and to access it you need to browse the corresponding location via Windows Explorer (C:\ProgramData\Microsoft\Windows\Start Menu\Programs\StartUp or C:\Users\<user>\AppData\Roaming\Microsoft\Windows\Start Menu\Programs\Startup) or by opening a Run command window (Win+R) and then typing:
- shell:common startup - for “All Users” Start-up folder
- shell:startup - for the current user Start-up folder.

Conclusion
Enterprise environments function differently than individual users. A regular user may not care too much if your software installers copies a Desktop or Start-up shortcut or if it asks for a reboot after install. But these kind of actions must be avoided as much as possible within enterprise environments. The same goes for online installers: they are not well liked by enterprise organizations.
Every single enterprise organization in the world uses tools like Microsoft Endpoint Manager (Configuration Manager or Intune) to deploy the applications to the target devices/users. In most of the scenarios it should be a silent deployment – meaning that your software installer must offer support for silent switches. It is also preferable for the software installers to be easily configurable, hence why parametrization and the usage of public properties must be taken into account when building the software installer. Logging switches also comes in handy within an enterprise environment when debugging is needed.
A smooth upgrade from a version to another as well as the uninstall of your software product are two other scenarios you must consider and thoroughly test before delivering it to your customers.
Cybersecurity has become increasingly important nowadays. So note that if User Account Control is an absolute must within an enterprise organization, most of them have adhered to modern security solutions such as digital signing. As a respectable ISV, you may want to take this into consideration when you build your software installer.
With all this in mind, and making sure you fully understand your target audience needs, you, as an ISV, are a step closer to success. And don’t forget – your installer is as important as the functionality you offer within your software product.