Working with Services
Introduction to Services
Services play a critical role in the installation and management of software applications. They are independent background processes that provide specific functionality or perform system tasks. Services are components that can be installed, configured, and managed as part of an application installation in the context of Windows Installer (MSI).
Understanding Services in MSI
Services are represented as components in MSI, which include files, registry entries, and configuration settings required for the service to function properly. The MSI package defines these components, which can be installed, started, stopped, and managed using the Windows Service Control Manager (SCM).
Benefits of Using Services in MSI
Including services in your application installation provides several advantages:
- Scalability: Services can be designed to handle heavy workloads and manage system resources efficiently. They can operate in the background, ensuring continuous operation even when the user is not logged in.
- Flexibility: Services enable applications to perform tasks autonomously by providing a flexible architecture. They can be set to start automatically with the operating system or to be triggered by specific events, allowing for a more seamless user experience.
- Centralized Management: The SCM can centrally manage services, allowing users or administrators to start, stop, pause, and resume them as needed. This centralized management makes administration and troubleshooting easier.
- Integration with System Tools: Services can be integrated with system tools and utilities to interact with other services and respond to system events. This integration improves your application's overall functionality and interoperability.
- Security: Services can be configured with specific user accounts and security permissions to ensure that they run with the appropriate level of access and follow best security practices. This aids in the protection of sensitive data and system resources.
Creating and Configuring Services in MSI
You must define the necessary components, files, registry entries, and configuration settings to create and configure services within an MSI package. The following are the key steps:
- Component Definition: Create a component that contains the service files, dependencies, and any additional resources that the service requires.
- Service Installation: Specify the details of the service installation, such as the display name, description, startup type (automatic, manual, or disabled), and dependencies on other services, if any.
- Service Control: Define the installation actions, such as starting or stopping the service, as well as the error control settings and recovery options.
- Service Properties: Set the service's additional properties, such as the service account, password, and other security-related settings.
- Service Customization: Customize the service's behavior by providing parameters, command-line arguments, or any other configuration needed for the service to function properly.
The MSI package installs and configures the services defined in the package using the Service Control Manager (SCM). The installer communicates with the SCM to create service entries, configure dependencies, and set the appropriate startup type.
The installer ensures that the services are properly managed during maintenance operations such as repair, modification, or uninstallation. This includes starting, stopping, and updating the service configuration as needed to maintain the installation's integrity.
Advanced Installer tools provide additional functionality to improve service management in MSI installations. These are some examples:
- Service Start Conditions: Specify when the service should start, such as after the system boots, when a specific event occurs, or when a specific file is modified.
- Service Failure Actions: Define what to do if the service fails to start or stops unexpectedly. Restarting the service, running a specific program, or sending alert notifications are examples of these actions.
- Service Monitoring: In the event of service failures or issues, monitor the status of installed services and provide feedback or notifications to users or administrators.
Creating and configuring services with Advanced Installer
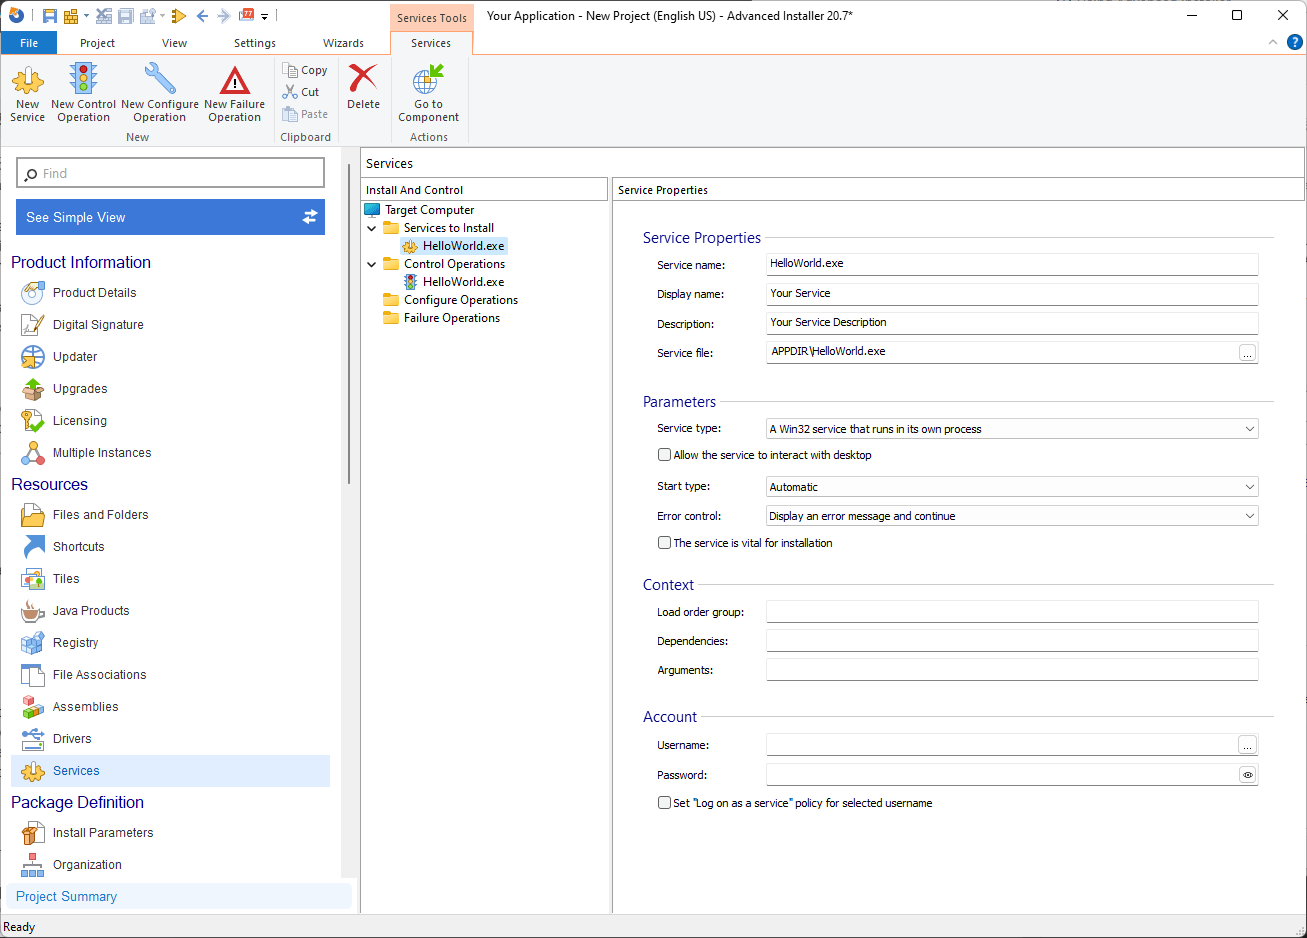
In Advanced Installer, you have full control over the installation, configuration, and management of Windows native services using Advanced Installer's intuitive interface.

Advanced Installer's service management interface includes a comprehensive set of features for managing services. The interface is split into four sections:
- Services to Install: This branch contains a list of all the services that your package will install. You can specify the services that will be installed and their properties.
- Control Operations: Control actions for services during installation or uninstallation can be defined here. This includes launching, stopping, and deleting services as needed.
- Configure Operations: During installation or uninstallation, you can configure service-specific operations in this branch. You can specify custom actions or configurations that must be carried out for specific services..
- Failure Operations: This branch allows you to configure service failure actions. When a service fails or encounters errors, you can specify what actions should be taken.
Service Installation
To add a new service for installation, you can use the "New Service" option. This can be accessed through the toolbar button, context menu item, or by pressing the Insert key while the "Install and Control" panel is focused. A file picker dialog will appear, allowing you to select the file that contains the service.

When configuring a service in Advanced Installer, you can fine-tune its behavior and characteristics using a range of properties. Here are the key properties you can set:
- Service Name: This property specifies the service's unique identifier within the Windows API functions.
- Display Name: The display name is the friendly name that users will see. It can be translated into multiple languages.
- Description: You can provide a detailed description of the service in the description field. It, like the display name, can be localized.
- Service File: This property specifies the service's source file. You can navigate through your project files and choose the appropriate file.
- Service Type: You can run a Win32 service in its own process or a Win32 service that shares a process.
- Allow the service to interact with the desktop: This option specifies whether the service may interact with the user by displaying a user interface. It should be noted that this option is not recommended for services installed on Windows Vista or later.
- Start Type: You can configure the service to start automatically when the operating system boots, start on demand when the user initiates it, or disable it entirely.
- Error Control: This property defines the system's behavior when the service fails to start.
- The service is vital for installation: If this option is selected, the package installation will be aborted if the service fails to install.
- Load Order Group: If the service belongs to a specific group, you can specify the group's name. Otherwise, leave this field empty.
- Dependencies: In this field, you can specify any active applications or services that need to be running before this service starts. Use [~] as a separator for multiple dependencies.
- Arguments: This property allows you to pass command line arguments to the service when it starts.
- Account: You can specify the user account under which the service will run. If left empty, the service will run under the LocalSystem account. Use the specified format (<Domain_Name><User_name>) for user accounts, and use a dot (.) as the domain name for local user accounts.
Services which interact with the desktop can use only the LocalSystem account.
- Password: If applicable, you can provide the password for the service user account. Note that the LocalSystem account does not require a password.
- Set "Log on as a service" policy: Enabling this option sets the "Log on as a service" policy for the specified user account.
If you want to install a service for a specific user, you must take specific steps. These steps are detailed in the How-To Install a Service for a Custom User.
Control and Configure Operations
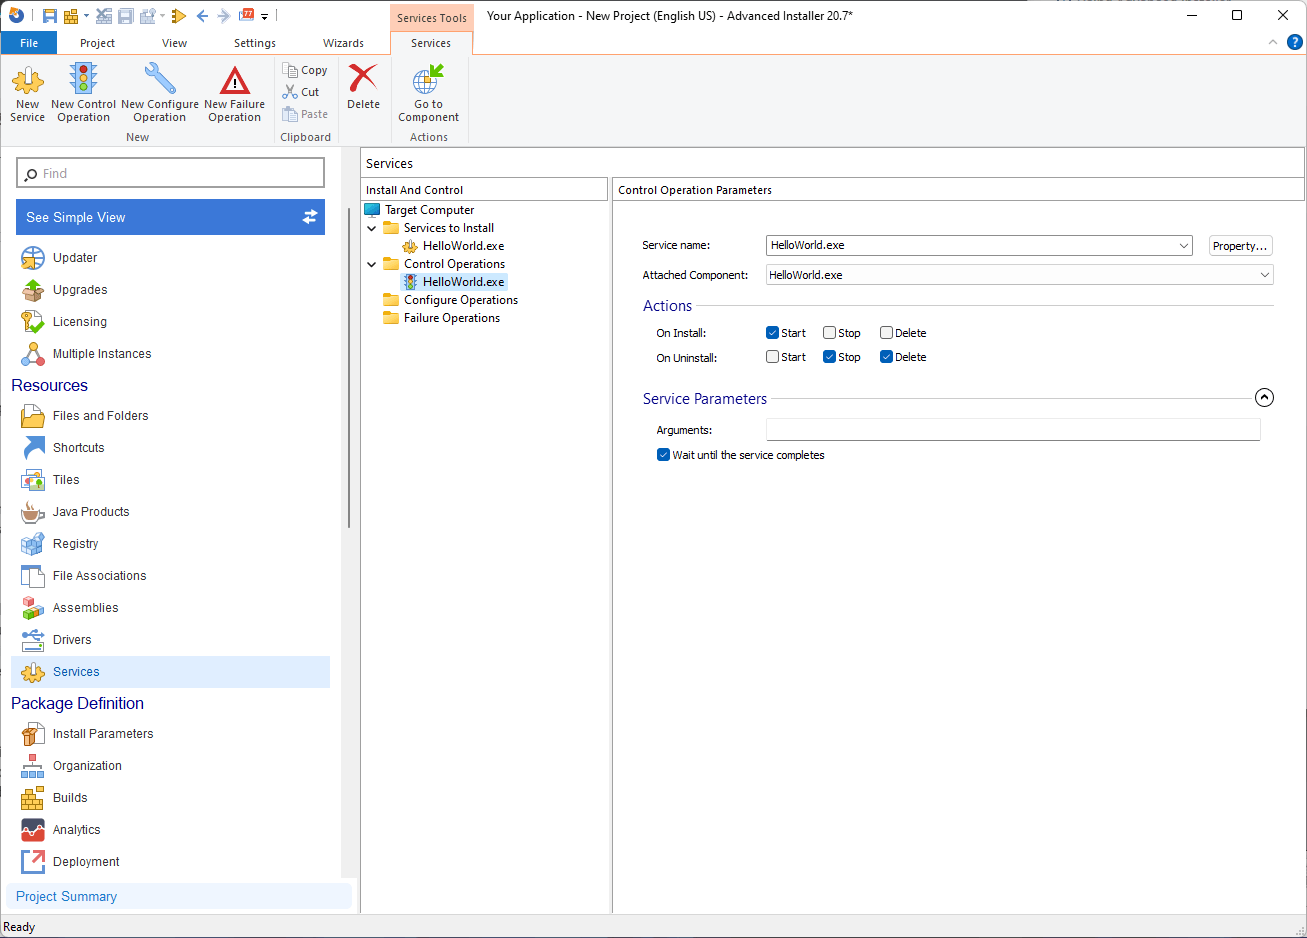
Service control operations allow you to have full control over the behavior of services after they are installed using Advanced Installer. With these operations, you can start, stop, or delete services based on your installation package's requirements.

Advanced Installer's service control operation section includes the following properties:
- Service Name: This field contains the name of the service you wish to manage. You can either select a service from the combo box or type the name of a service that is already installed on the target machine. The service name and installer properties can both be localized.
- Attached Component: You can specify the component that will house the control operation here. This enables you to link the operation to a specific component in your package. Simply select the desired component from the drop-down list box that contains all of the components in your package.
After the service is installed, you have three available options:
- Start: The service will be started automatically.
- Stop: The service will be stopped.
- Delete: The service will be removed.
If all three options are selected, the existing service will be stopped and removed, and the service in the package will be installed and started.
During the uninstallation of your package, you can specify the behavior for the service:
- Start: The service will be started.
- Stop: The service will be stopped.
- Delete: The service will be removed.
For uninstallation, you can only start a service that will still be present on the target machine after the uninstallation is complete.
In the service parameters section, you can provide a list of arguments separated by [~] that will be executed when the service starts. These arguments can be localized, and the field accepts formatted types, allowing you to perform advanced editing with installer properties and smart edit control.
Enabling the “Wait until the Service Completes“ option instructs the installer to wait for a maximum of 30 seconds for the service to complete before proceeding. This is useful when critical events must be completed before proceeding with the installation. If this option is disabled, the installer will not proceed until the Service Control Manager (SCM) reports that the service is in a pending state.
Several attributes for Merge Module projects can be made configurable at merge time. These are the name, the events, the argument, and the wait. This adaptability enables you to tailor the behavior of service control operations during the merge process.
Also, service configure operations in Advanced Installer allow you to modify the settings of services that are already installed or being installed by your current package. With these operations, you can make changes to service configurations to ensure they meet your application's specific requirements.

The service configure operation section in Advanced Installer provides the following properties:
- Service Name: This field contains the service name that you want to configure. You can either select a service from the combo box or type the name of a service that is already installed on the target machine. The service name and installer properties can both be localized.
- Attached Component: You can specify which component will contain the configure operation here. You have fine-grained control over when and how the configuration changes are applied by associating the operation with a specific component within your package. Simply select the desired component from the drop-down list box that contains all of the components in your package.
The "Configure On" property determines when the service configuration changes should be applied. You can select one or more options from the following:
- Install: Configure the service during the installation of the component.
- Uninstall: Configure the service during the uninstallation of the component.
- Reinstall: Configure the service during the reinstallation of the component.
By combining these options, you can precisely control when the service configuration changes are applied.
In the “Setting To Change” section, you can specify the changes to be made to the service configuration. You can dynamically configure the service by setting specific values or using installer properties. You can easily select a property to assign the desired value by clicking the "Property..." button..
"Time delay of an auto-start service" is applied only on auto-start services or services installed by the package configured with Automatic Start Type from the "Parameters" field in the Service Properties page.
Failure Operations
Failure actions are an essential aspect of managing services, ensuring that they respond appropriately in case of failures. Advanced Installer provides a comprehensive set of tools to configure failure actions for services, whether they are already installed or being installed by your current package. The "New Service Failure Operation" option allows you to define failure actions for services. This feature enables you to specify actions to be taken when a service fails to start or encounters errors. You can define custom actions, such as restarting the service or sending error notifications, to ensure smooth operation and prompt error handling.

Advanced Installer's service failure operation section includes the following properties:
- Service Name: This field contains the name of the service for which the failure actions are to be configured. You can either choose a service from the combo box or manually enter the name of a service that is already installed on the target machine. The service name and installer properties can both be localized.
- Attached Component: You can specify which component will contain the failure operation here. You have fine-grained control over when the failure actions are applied by associating the operation with a specific component within your package. Simply select the desired component from the drop-down list box that contains all of the components in your package.
The "Configure On" property determines when the service failure actions should be configured. You can select one or more options from the following:
- Install: Configure the failure actions during the installation of the component.
- Uninstall: Configure the failure actions during the uninstallation of the component.
- Reinstall: Configure the failure actions during the reinstallation of the component.
By combining these options, you can precisely control when the failure actions are applied.
In the “Failure Actions” section, you can specify the actions to be taken if the service fails. The following properties are available:
- Reset failure count after: The Service Control Manager (SCM) keeps track of how many times each service has failed since the system began. When the specified number of times the service fails, the system executes the action with the corresponding index in the "Failure Actions" list. You can specify a time (in minutes) when the failure count should be reset.
You can specify a message to be sent to network users before restarting the computer in response to a "Restart the computer" action specified in the "Failure Actions" list in the "Reboot Message" section. You have the option of sending a reboot message or deleting the current message and sending no message.
You can specify a program to run in response to a "Run a program" action specified in the "Failure Actions" list in the "Run Program" section. When the service fails, you can use a formatted string to delete the current command and run no program. You can leave this field blank to continue using the current run program.
Any changes made to the failure actions will take effect the next time the system is started.
Service Example
Apache Tomcat is a popular open-source web server and servlet container for running Java-based web applications. Apache Tomcat is typically distributed as a set of executable files that must be manually installed and configured. However, you can repackage Apache Tomcat into an MSI installer using advanced packaging tools such as Advanced Installer, which simplifies the installation process and adds new features.
You can create an MSI package that includes the necessary files, configurations, and scripts to install and configure Apache Tomcat as a service on a Windows system by repackaging Apache Tomcat with Advanced Installer. This enables users to easily install and manage Apache Tomcat without requiring manual setup or configuration.
Once the repackaged MSI installer has been built, users can run it to begin the installation process. The MSI package will extract the required files and place them in the appropriate locations on the target system during installation. It will also create the necessary registry entries and configurations for Apache Tomcat to run as a service.
Users can view the installed Apache Tomcat service in Windows' Services management console after the installation is complete. The Services management console provides an interface for starting, stopping, and managing the system's installed services. In this case, the Apache Tomcat service will be listed among the installed services, allowing you to control its behavior and have it start automatically with the system.
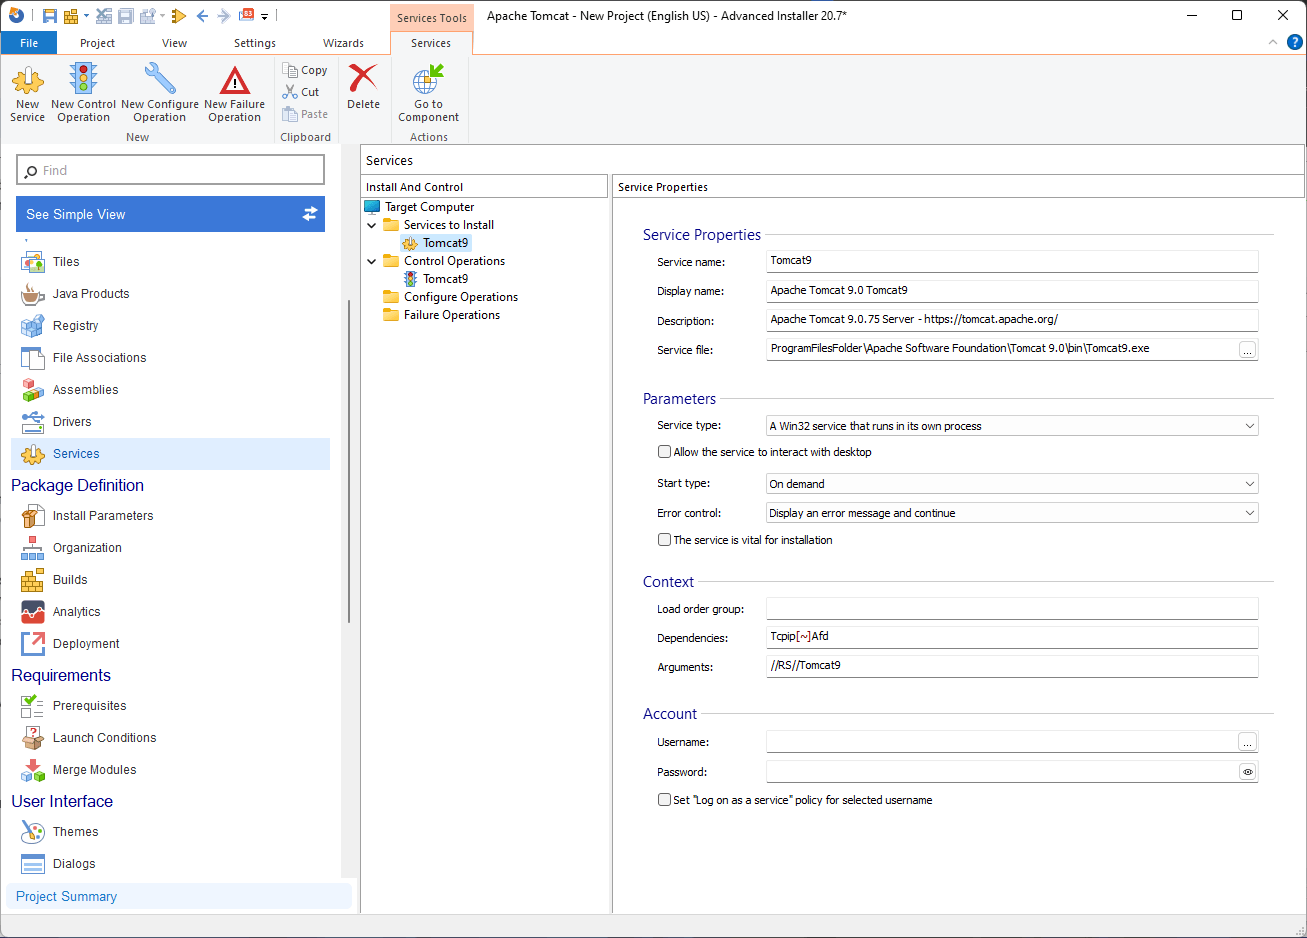
But jumping to the Services Page, we can see that after we repackaged Apache Tomcat, we see 2 operations:
- Services to Install
- Control operations
This is because, as previously stated, after installing a service, you must also configure the operations that must occur once it is present on the machine.

Looking at how the service installation is configured, we can see that Advanced Installer has already implemented some best practices and detected the necessary configurations. This is a Win32 service that runs its own process; the start type is on demand; and we discovered some dependencies and arguments that were passed during the executable's installation.

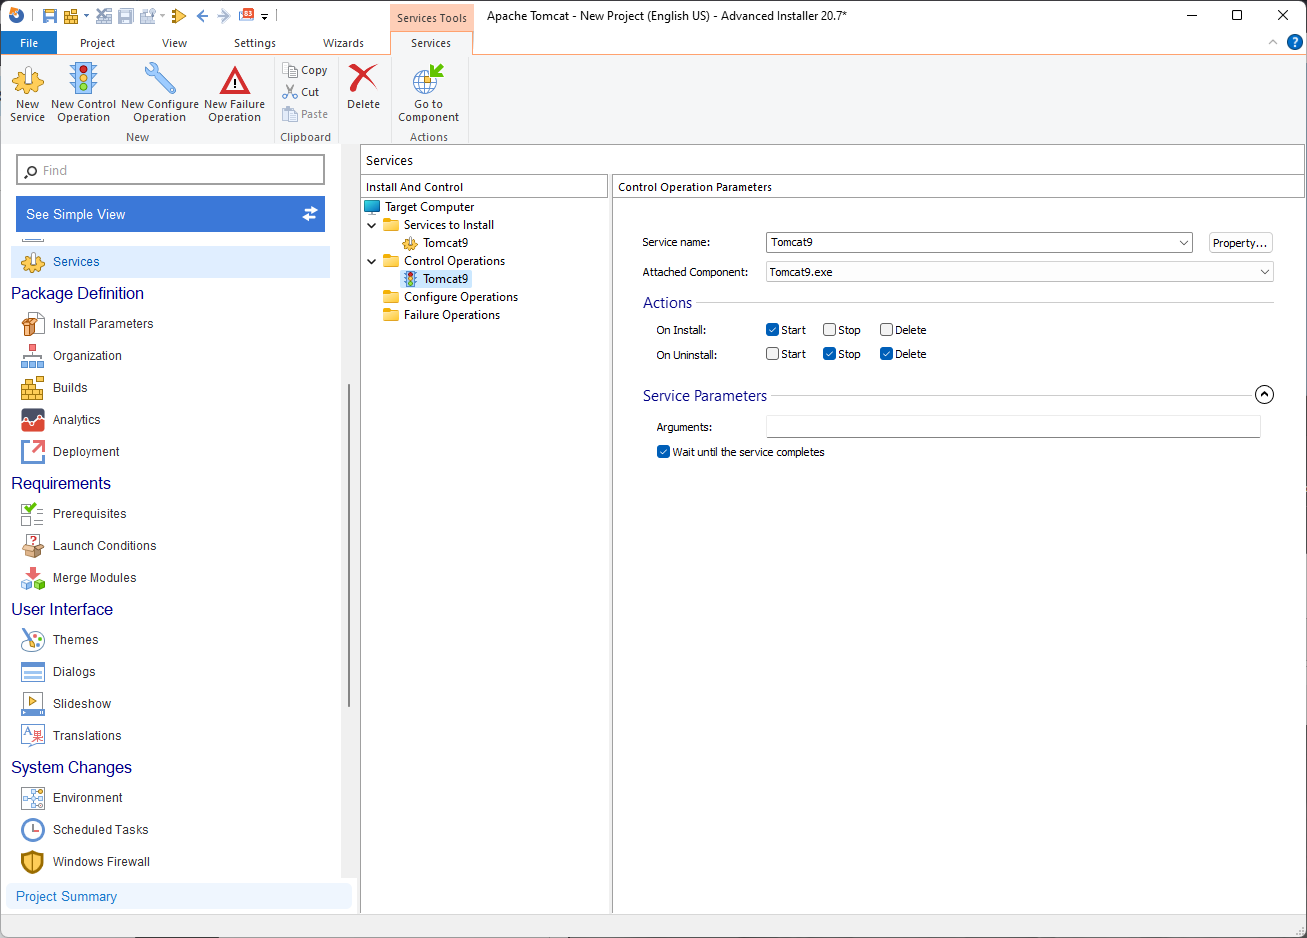
When it comes to controlling what happens with the service after it is installed or removed, the Control Operations tab provides a graphical interface to define what you require. In this case, after installing the service, we must start it, and when uninstalling, it is best practice to first stop the service and then delete it. If the service is not stopped before deleting it, the operation may fail.
