Working with Conditional Statements
Conditional statements give you greater control and flexibility when creating MSI packages. This allows you to build robust setups that can be tailored to suit various system configurations, making it easier for users to install as required.
Conditional statements in MSI packaging give you the control to decide when an action should be taken. This means that certain files or applications will only get installed if a certain set of conditions are met. As an example, you can specify that a file should only be installed if another file is already present on the system.
To use conditional statements in MSI packaging, you'll need to specify the condition in the appropriate section of the MSI package. For example, to conditionally install a file based on the presence of a specific registry key, you would add the following code to the component where the file is located:
<Component Id="MyComponent" Directory="INSTALLDIR"> <File Id="MyFile" Source="MyFile.txt"> <Condition><![CDATA[REGISTRY_VALUE_EXISTS("HKEY_LOCAL_MACHINE\Software\MyApp", "MyKey")]]></Condition> </File> </Component>In this example, the file "MyFile.txt" will only be installed if the registry key "HKEY_LOCAL_MACHINE\Software\MyApp\MyKey" exists on the system.
Custom actions are yet another way to use conditional statements. Custom actions are scripts or programs that are executed during the installation process and can be used to perform tasks that the standard MSI package does not support.
For example, you can use a custom action to check for the presence of a specific file on the system, and use that information to conditionally install a file. To do this, you would create a custom action that checks for the presence of the file, and set a property that can be used as a condition in the appropriate section of the MSI package.
The last type of conditional statements that you could use with MSI are called launch conditions. Prior to initiating the installation process, launch conditions must be satisfied. This can include verifying that certain system requirements are met, for example, determining if specific hardware or software components are present. or the presence of certain registry keys. In other words, launch conditions are a type of conditional statement that are used to control the behavior of the installation process based on the system configuration. By using launch conditions, you can ensure that the installation package is installed only on systems that meet the specified requirements, reducing the potential for errors and improving the overall reliability of the installation process.
Component Conditions
Advanced Installer makes it much easier to work with conditions while building MSI components. You can easily set conditions on files, registry keys and other elements to control their setup process. This streamlined interface really simplifies the entire MSI component creation process based on system configuration.
To add a condition to an MSI component in Advanced Installer, simply select the component and add the appropriate condition under Component Properties. There are numerous conditions to choose from, including system properties, registry keys, file and folder presence, and custom conditions.
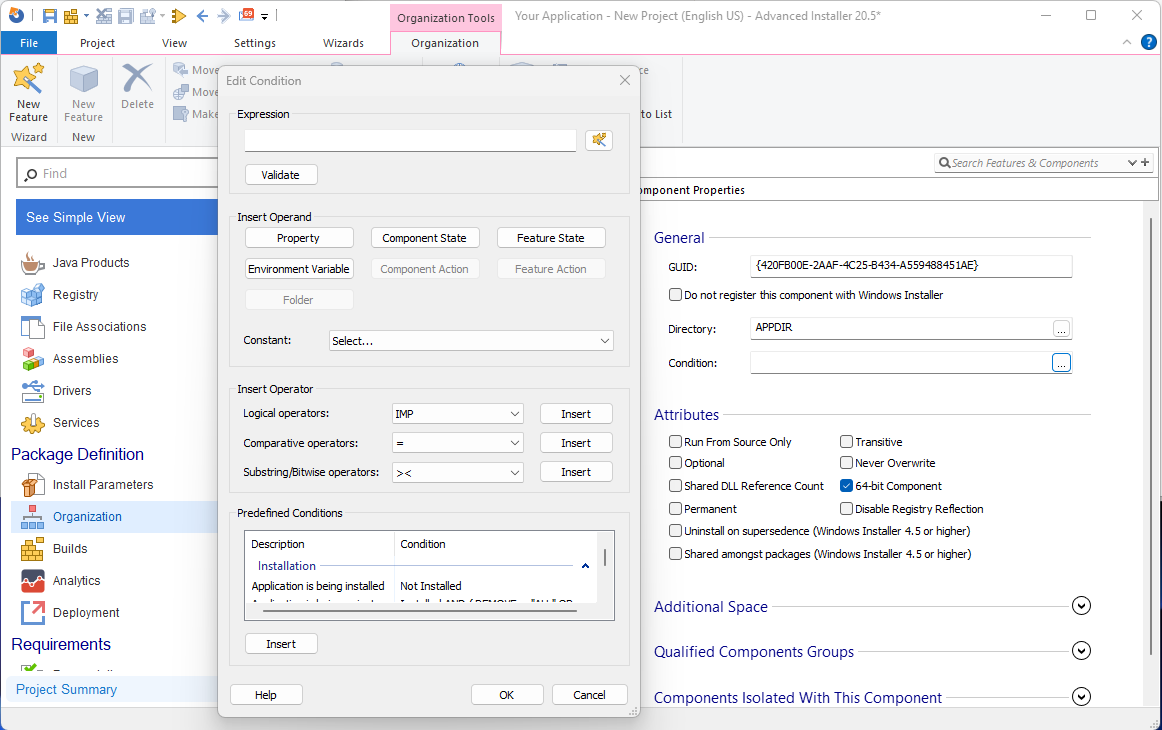
To perform the same actions as explained earlier where the file is only installed if a certain registry key exists, we must do some steps:
1. Search for the registry key and store this result into a property. We are going to use the default RESULT_PROPERTY
To do this, navigate to the Search page and click on New Search. A wizard will appear that will guide you through the process.
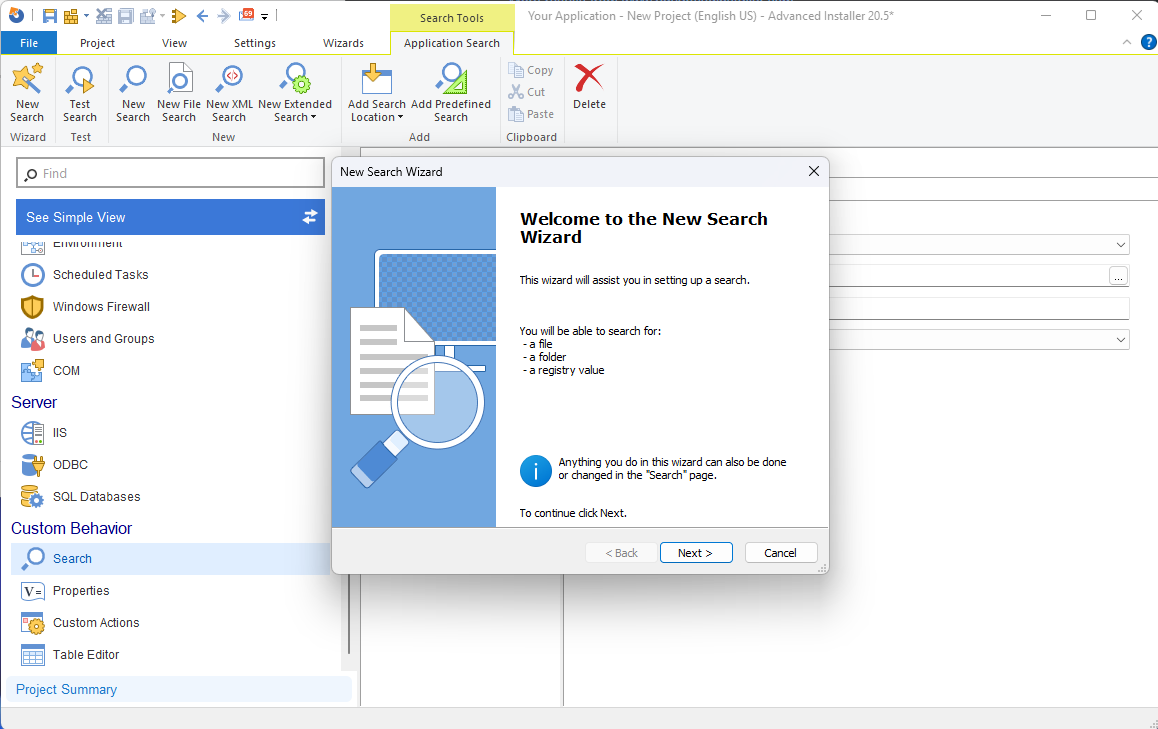
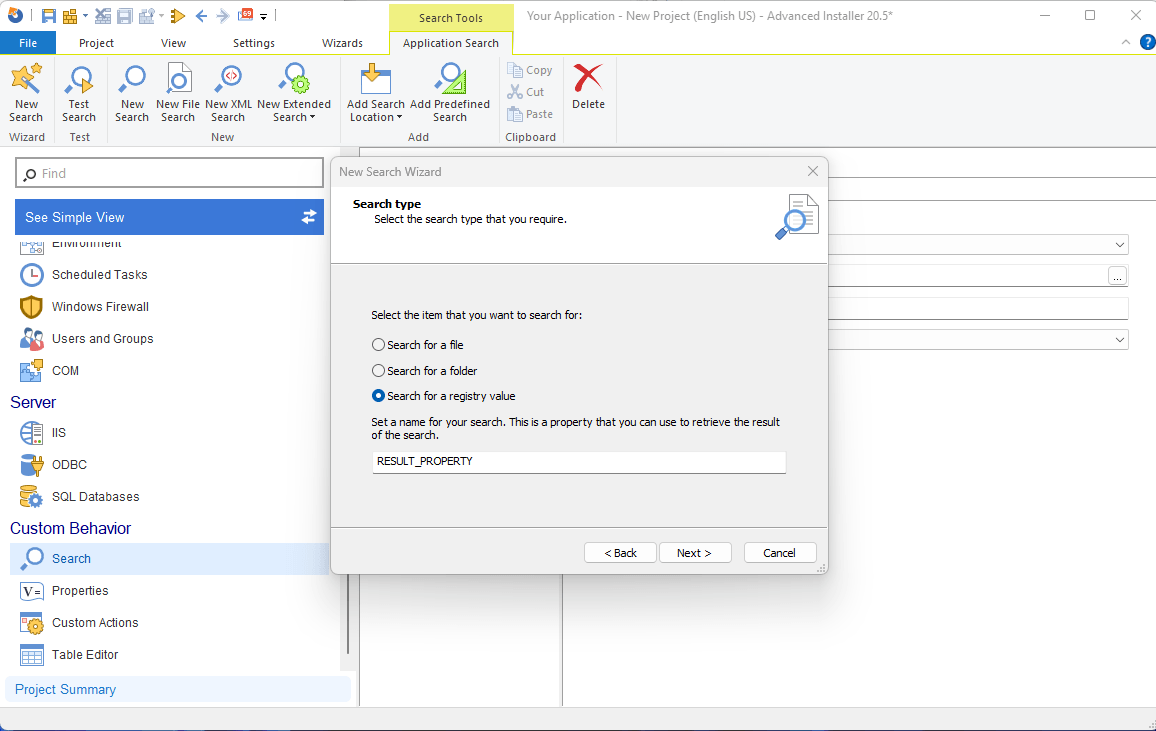
Next, select to Search for a registry value. As mentioned we will leave the search results in the RESULT_PROPERTY.
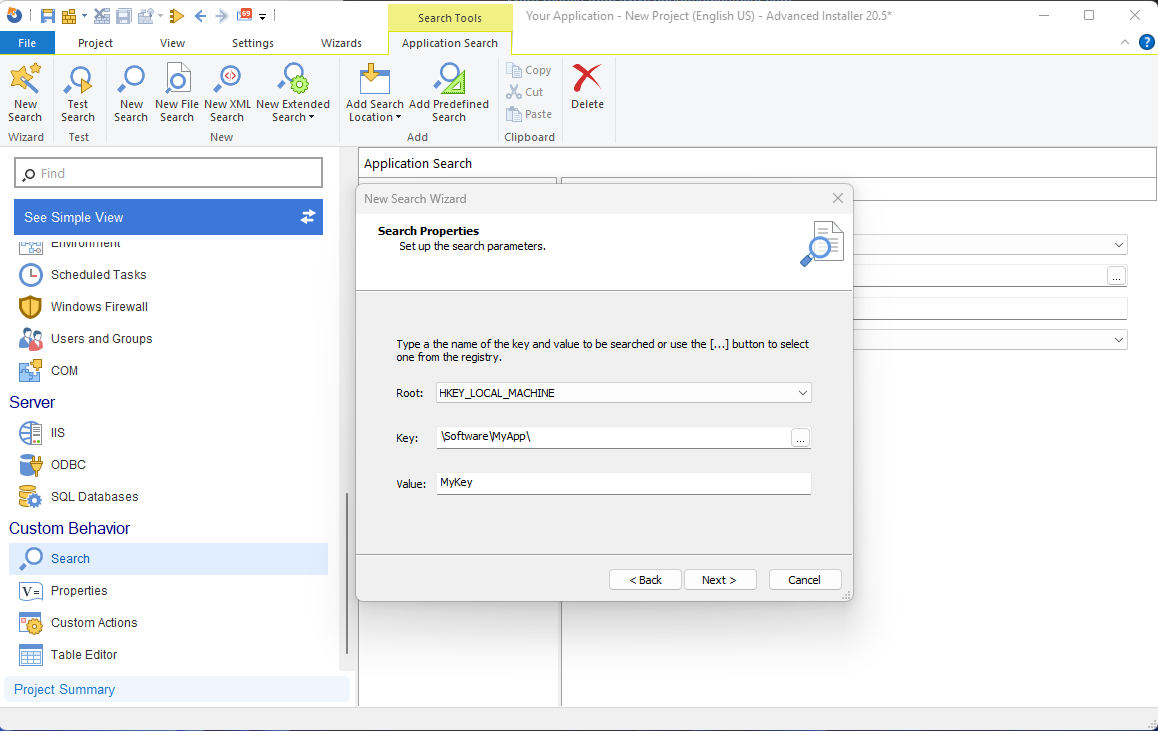
Next, define the registry key value that we are searching for.
Select to retrieve the value and finish the wizard. After the wizard is completed check if your registry key is in the 64-bit portion of the registry and check the appropriate checkbox. You can also do a Test Search just to confirm that everything is in order.
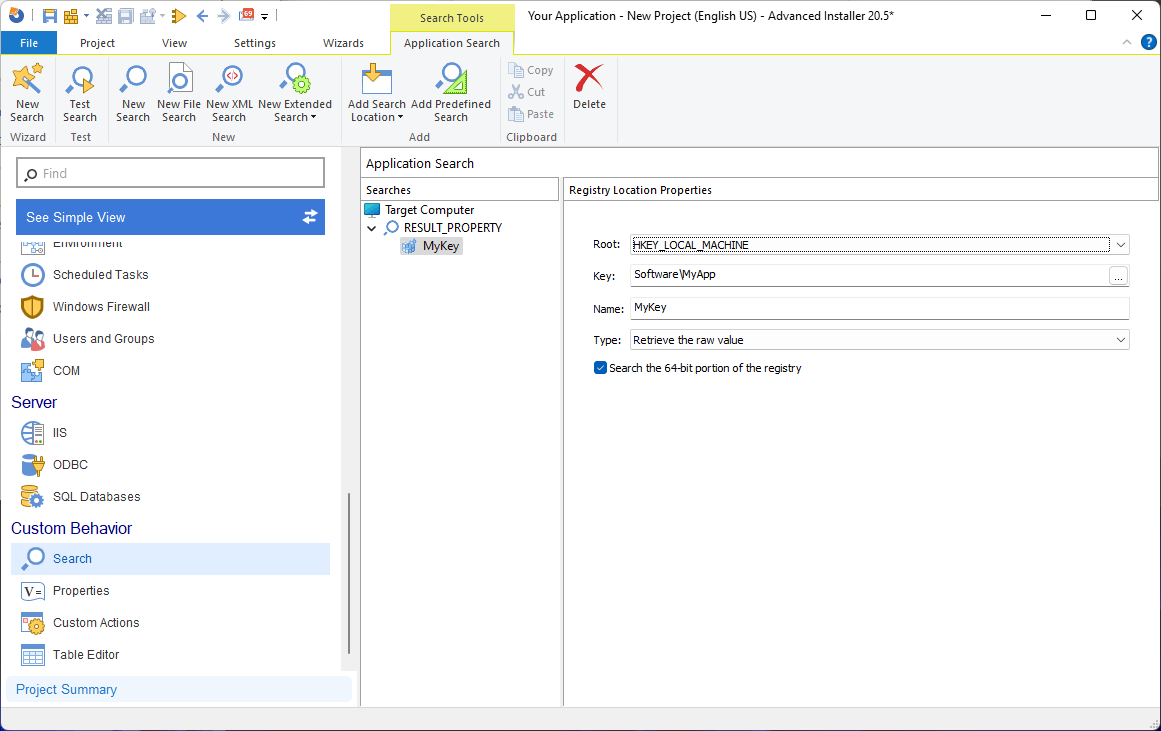
2. Use the above created Property to define the condition on the component where the file is located.
A property has two states:
- It has a value and therefore it exists
- It has no value and therefore it does not exist
Because we don’t care about what value the property outputs and we are only interested if it exists or not, defining the condition on the component where the file is located is quite simple. All we have to do is navigate to the Organization page and we set the condition for our HelloWorld.exe component to RESULT_PROPERTY.
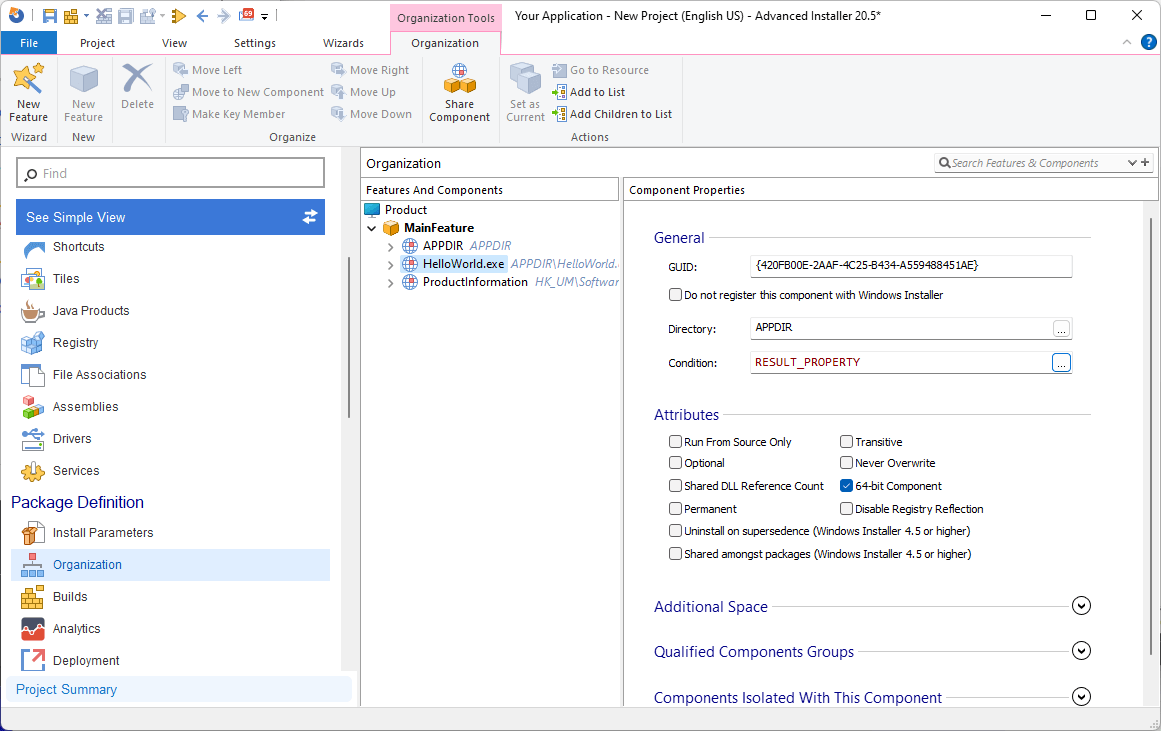
During the install phase, the MSI will first perform the search function to see if the registry key exists and populate the property, afterwards it will parse through all the components which are marked to install. Once it reaches our component with the HelloWorld.exe file, it will first check if the condition is met, meaning if the property is present or not. If the property is present, it means the condition has been passed and the component is then installed on the machine.
Launch Conditions
In Advanced Installer, configuring a launch condition is a straightforward process. You can create a launch condition to check for the presence of specific system requirements, such as the availability of a specific version of the .NET Framework, or the presence of specific registry keys or files on the system.
To configure a launch condition in Advanced Installer, you can simply navigate to the Launch Conditions page and create a new launch condition. Advanced Installer offers by default multiple pre-configured types of launch conditions and we can separate them into:
- System
- Software
System Launch Conditions
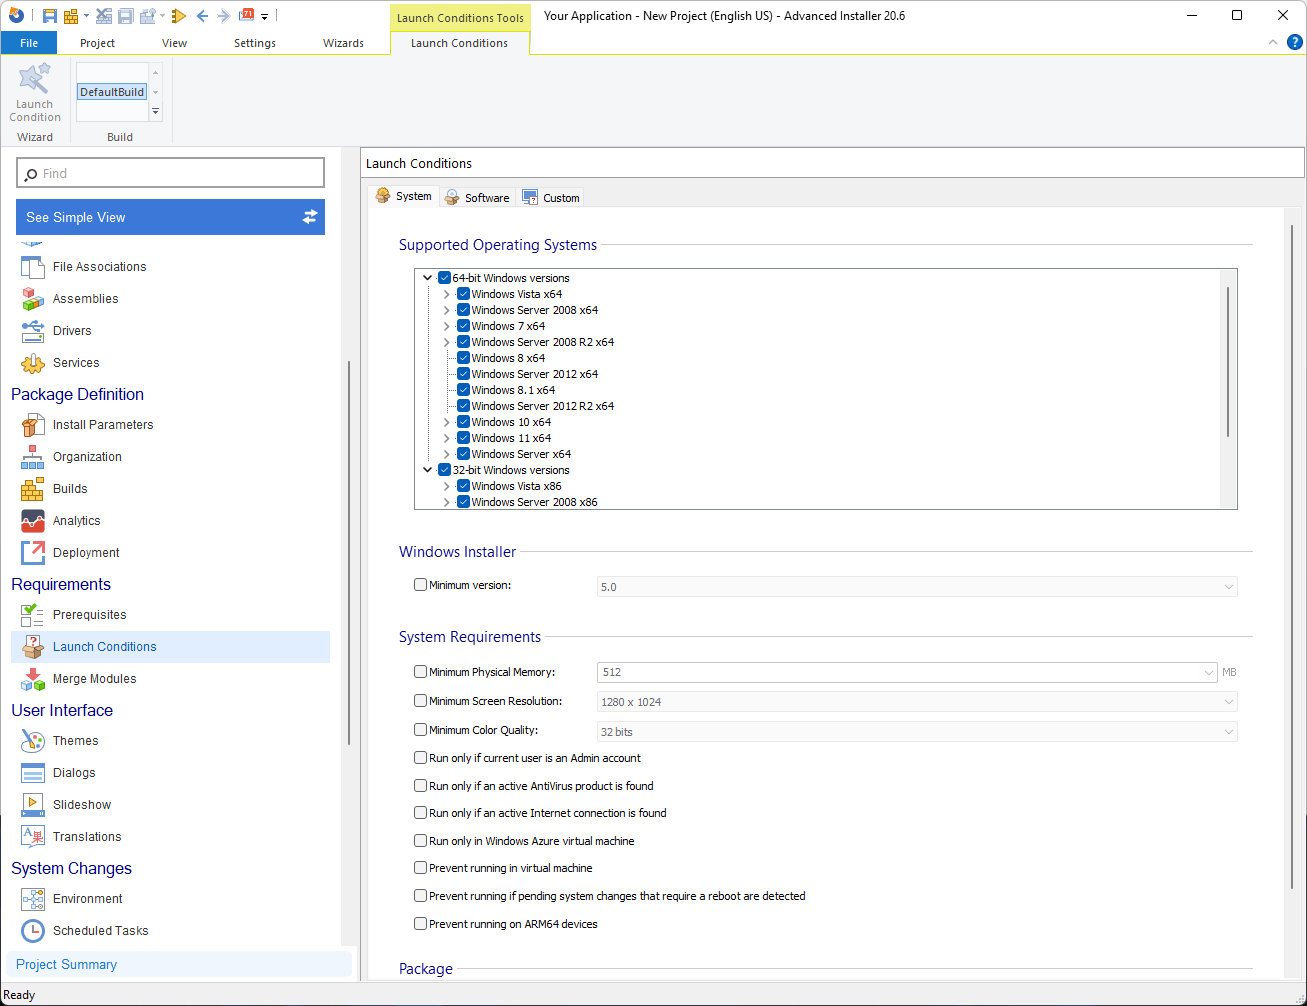
When it comes to system launch conditions, you can easily define on which Operating System your package will be supported, what minimum version of Windows Installer is needed, but also more in-depth checks such as minimum physical memory that the user needs to run the software, minimum screen resolution, minimum color quality and so on. For more details check out this page.
Software Launch Conditions
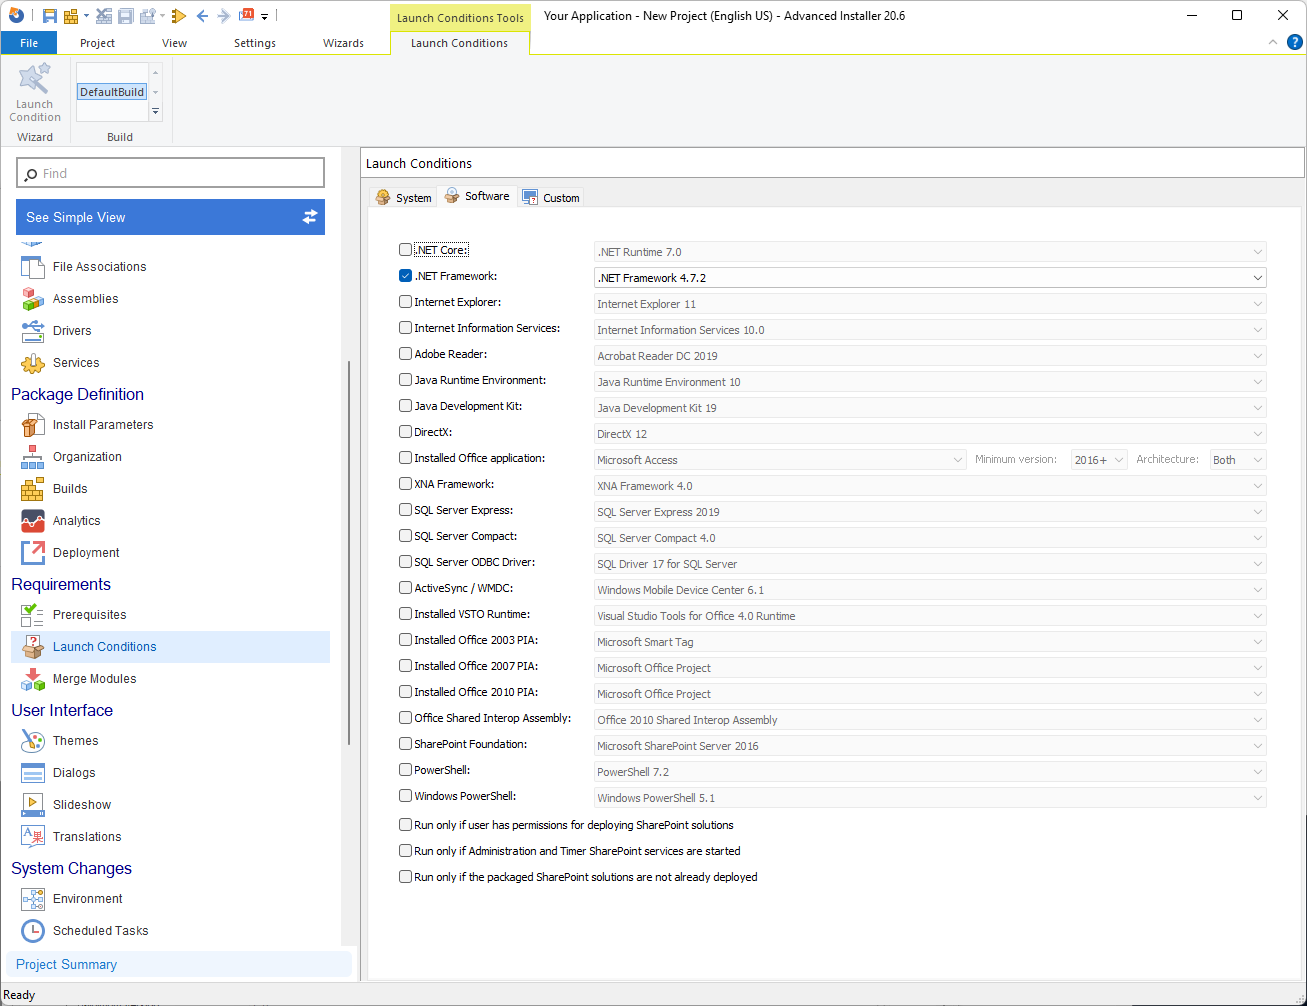
Coming back to our scenario where you would need a certain version of .NET Framework installed on the machine, if we navigate to the Software launch conditions tab we can see that Advanced Installer offers many predefined checks for some of the most popular software products out there such as:
- .NET Core
- .NET Framework
- Internet Explorer
- Internet Information Services (IIS)
- Adobe Reader
- Java Runtime Environment (JRE)
- Java Development Kit (JDK)
- DirectX
- Office applications
- XNA Framework
- SQL Server Express
- SQL Server Compact
- SQL Server ODBC Driver
- ActiveSync / WMDC
- VSTO Runtimes
- Office 2003 PIA
- Office 2007 PIA
- Office 2010 PIA
- Office Shared Interop Assembly
- Sharepoint Foundation
- PowerShell
- Windows PowerShell
In our case, all we need to do is check .NET Framework and select the desired version, for the scope of this example we went with .NET Framework version 4.7.2.
Custom Launch Conditions
In Advanced Installer, you can define custom launch conditions by using installer properties or environment variables. These properties can be predefined or set by searches and custom actions.
To create a new launch condition, simply click on the "New" button, the "New" list context menu item, or press the Insert key while the list control is focused. The Edit Launch Condition Dialog will pop up, allowing you to specify a launch condition.
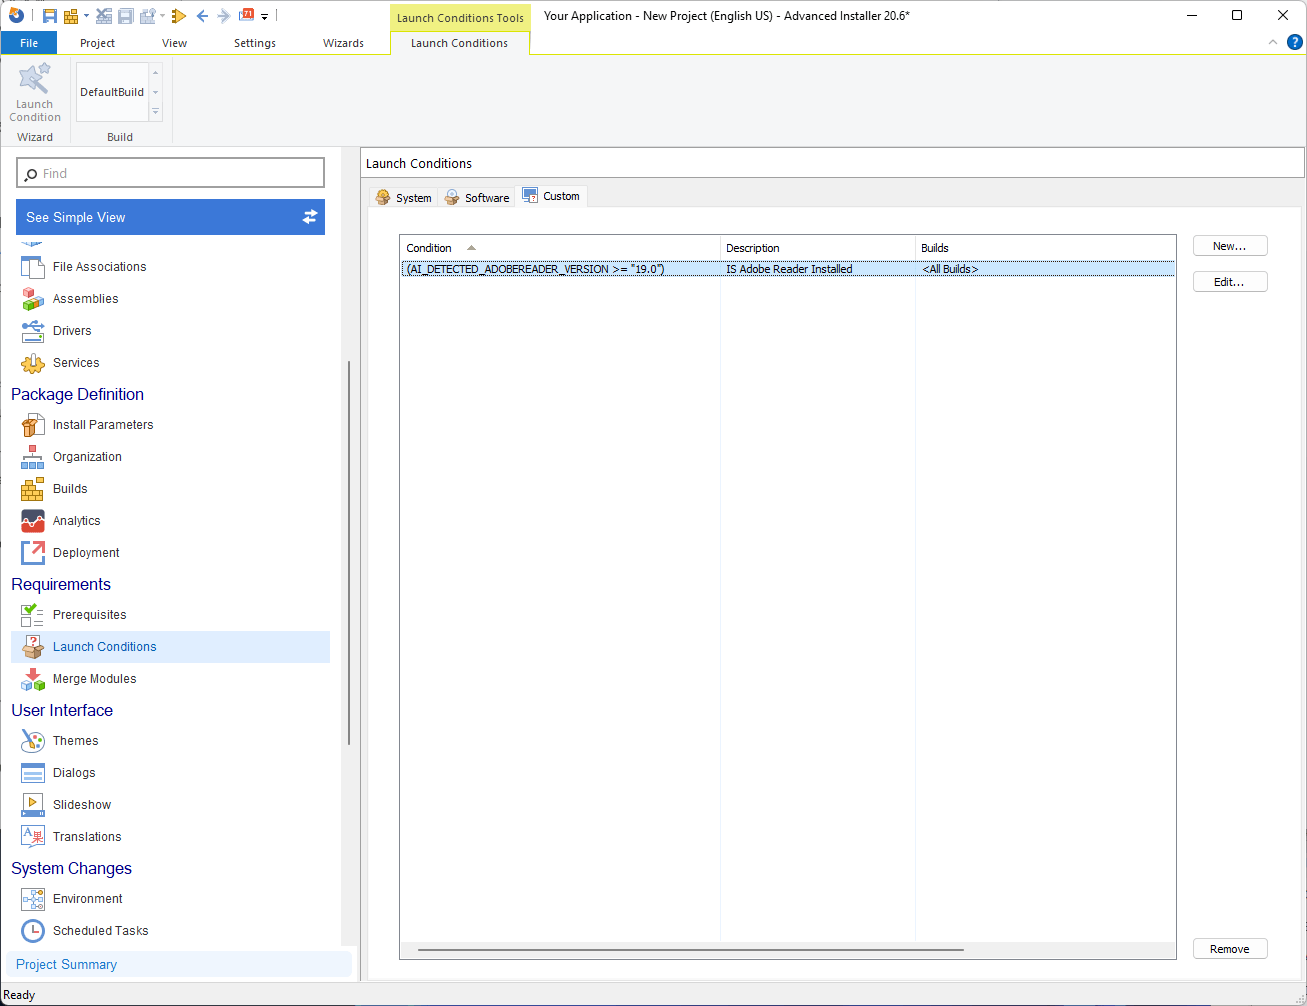
To modify a launch condition, use the "Edit" button, the "Edit" list context menu item, or press the Space key while an element from the list control is selected. The Edit Launch Condition Dialog will pop up, allowing you to edit the launch condition.
If you no longer need a launch condition, you can remove it using the "Remove" button, the "Remove" list context menu item, or by pressing the Delete key while an element from the list control is selected.
Defining custom launch conditions in Advanced Installer is a best practice that can help to ensure the reliability and efficiency of the installation process. By specifying the conditions that must be met before installation, you can reduce the potential for errors and ensure that the installation package is installed only on systems that meet the required specifications.
Custom Actions as Conditional Statements
One of the key benefits of custom actions is their ability to act as conditional statements, enabling you to create complex installation packages that can adapt to different system configurations.
Custom actions can be used to perform a wide range of tasks during the installation process, including creating registry keys and values, copying files, and executing scripts or other programs. By using custom actions as conditional statements, you can control the behavior of the installation process based on the system configuration.
For example, you can use a custom action to check for the presence of a specific file or registry key on the system, and use that information to conditionally install or execute other custom actions. You can also use custom actions to perform tasks that are specific to a particular system configuration, such as installing a driver or configuring a network adapter.
This can be done using a wide range of syntax and scripting languages, including VBScript, JavaScript, C++ and even C#.
Depending on the approach you want to take with Custom Actions you can either:
- Write the custom action to initialize a variable as we did above and then check during the custom launch condition if the variable is initialized or not
- Write the custom action to produce an error if the check is not passed. When the custom action is inserted in the Sequence with Advanced Installer make sure that the “Fail installation if custom action returns an error” is checked. The installer is awaiting a return code either with 0 (success) either with 3010 (reboot)
Let's take the second scenario and consider that we want to create a script that checks if a certain registry key exists. If that registry key is missing we will give back the return code 100 which will be interpreted as a failure.
Const HKEY_LOCAL_MACHINE = &H80000002
Dim RegKey
Dim objWshShell
Set objWshShell = CreateObject("WScript.shell")
strComputer = "."
Set objRegistry = GetObject("winmgmts:\\" & strComputer & "\root\default:StdRegProv")
RegKey= "ProgramFilesDir"
strKeyPath = "SOFTWARE\Microsoft\Windows\CurrentVersion"
objRegistry.GetStringValue HKEY_LOCAL_MACHINE,strKeyPath,RegKey,strValue
'check if the value exists
If IsNull(strValue) Then
    wscript.quit (100)
End IfAs you can see above, we are checking with VBScript if the ProgramFilesDir which is located in HKLM\SOFTWARE\Microsoft\Windows\CurrentVersion has any value. If the value is null then we will return the error code 100.
Now that we have the script created, all we need to do is navigate to the Custom Action page and set it up like so:
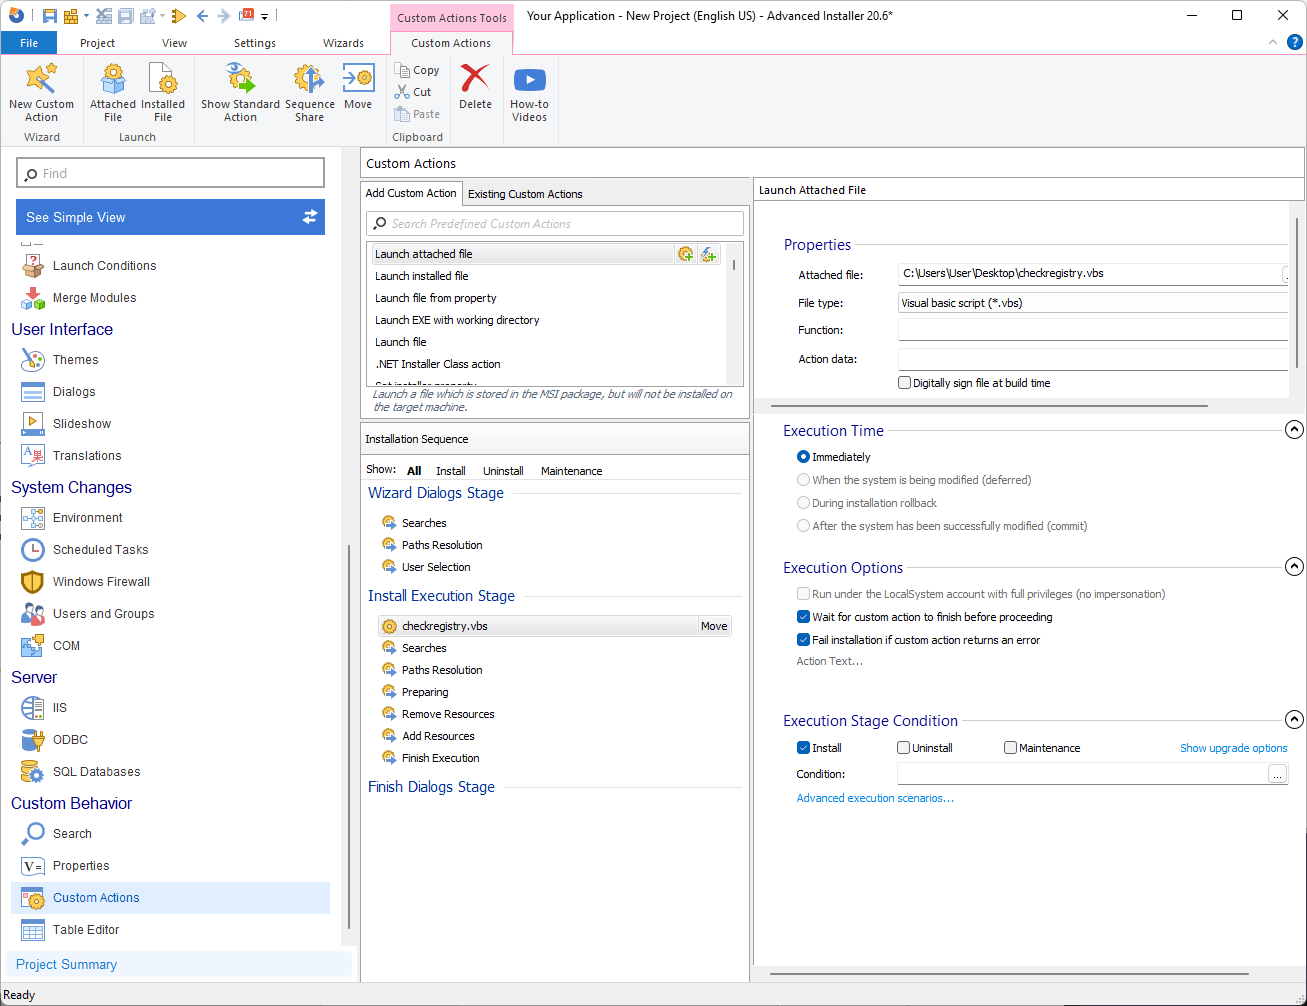
If you remember our discussion in the MSI Packaging Fundamentals ebook, immediate execution custom actions can be executed before the InstallInitialize Action, and this is exactly what we need because we need to run this script as soon as possible to confirm that the system has the requested parameters.
As you can see in the Install Execution Stage, the custom action is set at the top to be the first CA that is executed, and when it comes to Execution Stage Conditions we are only setting it to run during the Install phase.
