How to Add Launch Condition in Wise Package Studio
Software products often require additional components to be installed on the target machine to run correctly. Therefore, it’s crucial to ensure that these components are present before proceeding with the application installation.
This article will guide you through the process of adding a launch condition in an installer built with Wise Package Studio. Additionally, I will show you a simpler alternative for adding launch conditions using Advanced Installer.
How to Create a System Search for Java in Wise Installer
Let’s suppose you have created a package project with Wise and you need to add a launch condition to ensure the target machine has a Java Runtime Environment (JRE) version greater than 7 installed.
The first step is to create a system search for JRE. Here’s how:
1. Open the Installer Editor and go to the System Search under the Target System section.
2. Click on the ‘Add’ button and then select the ‘Registry’ option.
3. In the opened dialog, populate the fields as follows:
- Property: JAVA_INSTALLED_VERSION
- Operation: Read directory name from registry
- Root: KEY_LOCAL_MACHINE
- Key: SOFTWARE\WOW6432Node\JavaSoft\Java Runtime Environment
- Value Name: CurrentVersion
Adding a Launch Condition in Wise Package Studio
Once the system search is created, the next step is to add a launch condition using the property value retrieved from the search. To do this, follow the next steps:
- In the Setup Editor view, right-click on the Launch Conditions and select New → Launch Condition.
- In the opened dialog, set the condition to JAVA_VERSION > "1.7" and add a message for the Message Box. This condition ensures that the Java Runtime Environment version is greater than 7.
Building and Testing Your Installer Package with Wise
After adding the launch condition, build the project to generate the installer and then install the application.
If the target computer does not have a Java Runtime Environment version higher than 7, the installation process will return an error message and the application will not be installed.
To fix this, you can manually install the JRE on the target machine or include it as a prerequisite in your package.
Setting Up a Launch Condition in Advanced Installer
Advanced Installer offers an easier way to manage launch conditions with a list of predefined options.
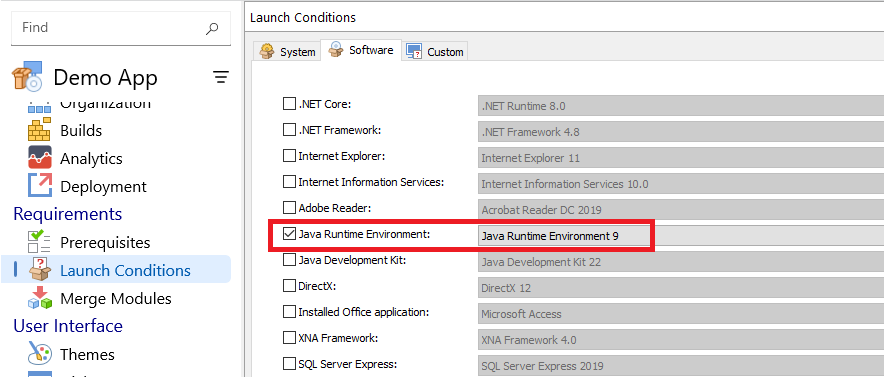
To add software launch conditions (the Java Runtime environment in our case), follow these steps:
- Go to the Launch Conditions page.
- Select the Software tab.
- Check the Java Runtime Environment from the list together with the specific version you require. This ensures the app will be installed only if the selected version or a higher one is found on the target machine.

Video Tutorial
Watch the video guide on how to add a launch condition with Advanced Installer here:
Conclusion
Adding a launch condition can be time-consuming when creating an installer package with Wise.
In contrast, Advanced Installer provides a more efficient and user-friendly solution, thanks to its predefined list of custom actions that cover most common software scenarios.
These custom actions simplify the process, reducing the potential for errors and saving valuable development time. Whether you need to enforce system or software requirements, Advanced Installer’s flexible approach allows you to manage launch conditions with ease.
For those situations where the predefined options don't meet your specific needs, you still can create custom conditions, ensuring your installation process is both robust and adaptable.
