Contents
- Repackaging Best Practices
- When should I repackage an installation?
- Tips for an optimal repackaging result
- Repackaging in a clean environment
- Clean image
- Testing packages in System Context
- Advanced Installer
- Capture with Advanced Installer
- Cleaning Advanced Installer’s Captures
- Editing and Modifying Advanced Installer’s captures/MSIs
- Compiling .aip in .msi
- Wise Package Studio
- Capture with Wise
- Editing / Modifying Wise captures/MSIs

Repackaging Best Practices
Repackaging allows you to create projects based on capturing existing installations. The installation repackaging operation focuses on monitoring the file system and registry changes performed by the monitored installation.

After repackaging an installation, you may need to perform some adjustments to obtain a working installation package.
When should I repackage an installation?
We recommend that you repackage installations only for these specific scenarios:
- To create consistent, standardized, and customized installations: Repackaging an installation so that it adheres to your organization’s standards reduces the cost of supporting end users’ desktops.
- To create silent installations or limit the options available to end users: This streamlines installations and eases application deployment.
- To migrate installations to the MSIX format: Migrate legacy installers to the latest MSIX packaging standard. Repackaging those installations lets you take full advantage of the latest features. Also, Active Directory deployment, SCCM, and Intune require the MSI/MSIX format.
New to MSIX? Check out the Free MSIX Packaging Fundamentals Ebook.
Tips for an optimal repackaging result
- Repackage in a clean environment.
- Launch the Repackager remotely or install Advanced Installer on a clean virtual machine.
- Use the Repackager interface to exclude unwanted items from the new package.
- Close all other applications that might create noise during the repackaging process.
Repackaging in a clean environment
To avoid capturing unwanted modifications produced by different software running on the PC, repackaging should be performed in a clean environment where only the OS is installed.
The Repackager can be configured to capture an installation running on your local machine, where Advanced Installer is installed, or on a new virtual machine (a much cleaner system which can yield much more accurate results).
It is strongly recommended to disable anti-viruses, firewalls and Windows updates on the machine you will use for repackaging. This is because any system software working in the background may generate changes that could interrupt or clash in the newly created package.
If during the repackaging operation the system restarts, don’t worry, the repackaging operation will continue its process after the system restart.
Clean image
Description
Most of the older software isn’t based on the Windows Installer technology.
To benefit from the advantages offered by the MSI technology, they must be transformed into packages (msi extension files). Moreover, it requires monitoring for what is actually installed on a system (files, registries, shortcuts, services, etc).
There are specialized tools that capture everything a setup adds to a machine, after the system’s analysis resulting in msi files. For testing, if the capture’s result is identical to the original setup’s capture, you need to go back to the original state of the system. In technical terms, this state is called a Clean Image (clean meaning that the application is already installed).
Necessity
As we’ve stressed before, when you want to repackage an application, you need to consider the following: the system where you will capture that application has to be as clean as possible.
A clean system (also called a clean image) contains mainly the operating system and almost nothing else. Because of this, when the capture is made, there’s little to no interference with the system.
Note: Even commonplace applications like screensavers, could interfere in the capture.
If applications have dependencies, we won’t be able to use a 100% clean image, but we can try to keep the system as clean as possible by following these steps:
- Stopping all applications
- Stopping all unnecessary services
- Emptying the Recycle Bin
- Deactivating screensavers
- Deactivating the antivirus
- Deactivating any programs that are running in the background
If needed, you can add software or customizations before starting the capture of an application (Environment variables, Firewall Rules, etc).
Local vs Virtual Machine
There are various ways to repackage an application and the process you choose to do so will depend on your repackaging tool and whether or not you have a virtual machine or a hypervisor solution.
We’ll use Advanced Installer to go through some options to see which ones are the most practical.
Repackage on the host machine
Since best practices recommend to perform the repackaging on a clean vanilla machine, you need to rebuild the host device after every attempt to repackage an application -- and that is not a quick step.
This is the reason why nobody really uses the local host machine to repackage an application unless it is needed (i.e. with hardware dependent application). In the past, though, that was the only option, which made repackaging an application far more time consuming than it is now. Today, IT Professionals save time by setting up multiple virtual machines with a single host device and running them simultaneously.
You can achieve this by having Advanced Installer installed on your host machine. Once you launch the Advanced Repackager and select the installer you want to repackage, all you need to do is click on the “Start Local” toolbar button to run you through the repackaging process.
Repackage directly on a virtual machine
All the hassle caused by rebuilding the local host devices after every attempt to repackage an application is now gone. New tools, including but not limited to VMware Workstation or Microsoft Hyper-V, sorted that out. With them, you can create snapshots and revert your Virtual Machine to any previously created snapshot in no time.
Just make sure you have Advanced Installer Architect installed on the virtual machine (the one used for repackaging the application), instead of having it installed on the host itself.
Same as above, you have to use the “Start Local’’ toolbar button to run you through the repackaging process.
Connect and repackage on a virtual machine
The Advanced Installer’s Repackager supports integrations with VMware Workstation, VMware vSphere, and Hyper-V virtual machines.
This means you can connect to any snapshot of the virtual machine and fire up the Repackager from there; all of this within the Advanced Installer’s interface installed on the local host.
Just click “Start in VM” from the toolbar to open the list of configured virtual machines you can connect to and repackage your application.
Step-by-step instructions
In the Advanced Installer user guide, you can find step-by-step tutorials that show you how to repackage an application on the following machine types:
The tutorials will also guide you on how to edit your virtual machines profiles, so you don’t have to go through the process of manually copying and reverting your machines during the repackaging process.
Using a virtual machine when repackaging
For a faster repackaging operation, we recommend to use virtual machines, due to the fact that they allow you to quickly revert to the same state, ensuring the same conditions for the repackaging operation.
To have a better repackaging experience with VMware and Hyper-V virtualization providers, you must install Advanced Installer tools. Avoid having to install the tools every time, by copying and installing Advanced Installer Tools (osprovision.exe) from the following location, then saving the snapshot:
C:\Program Files (x86)\Caphyon\Advanced Installer 15.4\bin
This is a representation of the flow for using a virtual machine:
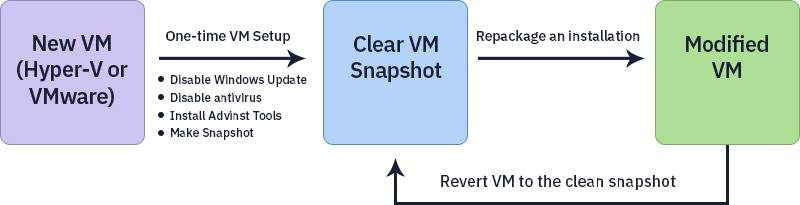
If you’re using Hyper-V as your virtualization provider, make sure that you select the standard checkpoint option when creating the checkpoint so that the installed Advanced Installer Tools service can be properly captured.

Packaging and deployment of desktop applications for enterprise customers is a challenge. This is why we created a handy checklist for you to follow the Enterprise Packaging Recommendations.
Testing packages in System Context
If you are repackaging applications, chances are you will use some kind of infrastructure management tool (IMT) to push them in your infrastructure.
There are a lot of IMTs out there, but the most popular (and widely used) are:
- Microsoft Endpoint Manager Configuration Manager (MEMCM), formerly known as System Center Configuration Manager (SCCM)
- Microsoft Intune
There is one general rule that applies to most IMTs: all software installations are performed via the system context (as referred to by the IT Pros).
What is the System Context
The system context refers to the LOCAL SYSTEM account, or NT Authority\System. The LocalSystem account is a built-in Windows Account. It is the most powerful account on a Windows local instance, more powerful than any admin account on that machine.
Most of the services from a Windows machine run in the system account -- the account with the highest privileges.
What is PSEXEC
A tool called PSExec must be used to access the LocalSystem account. PsExec is a command-line utility for Windows which allows administrators to run programs on local and remote computers. It’s part of Sysinternals pstools suite built by Mark Russinovich.
How to access the System Context with PSEXEC
Once you download and extract the Sysinternals PsTools Suite, you will find the PSEXEC.EXE

To get into the System Context:
- Open CDM.EXE as an Administrator
- Type the following command: %pathtopsexec%\psexec.exe -s -i
cmd

Run CMD with PSExec - Click Enter
A new CMD window should appear. If you type whoami in the new CMD, you should appear as the NT Authority\System.

From this new CMD (which runs in the system context), it is recommended to install your MSI packages using the msiexec.exe commands. If tests are successful in this context, it means that the application can be safely deployed within your IMT of choice.
It is important to understand that in infrastructures, software packages are not installed within the user context. Moreover, in most infrastructures, users don’t have administrator rights to install or change anything on the system.
For example, if you have a package that places user registry or user files, you always have to use advertised shortcuts or the Active Setup mechanism. This will ensure that user data will be applied to all users.
It’s also good to understand that if you want to perform changes in the current user context, it will be tricky and you will need to use alternative solutions.