How to Build MSI or EXE Package Using MSBuild
Let's suppose you want to make changes to a build system so that it can perform multiple actions when building MSI or EXE packages.
In this article, we will show you how to build MSI or EXE packages by using MSBuild.
What is MSBuild?


The Microsoft Build Engine (MSBuild) is a platform used to build applications that controls the build process through an XML-based project file format. You can use MSBuild in two ways:
- Through Visual Studio,
- Or by using the command line.
You can install MSBuild as part of the Visual Studio IDE, but you can also download it as a standalone tool. Moreover, MSBuild is used by Visual Studio, but it doesn't require Visual Studio to run.
Prerequisite: Creating an installer package for your project in Visual Studio


In today’s tutorial, we will use Advanced Installer’s extension for Visual Studio. This extension helps you create and manage the installers for your solutions directly from Visual Studio.
To get the Visual Studio extension, check out the Visual Studio marketplace or browse our website.
To install it, follow the next steps:
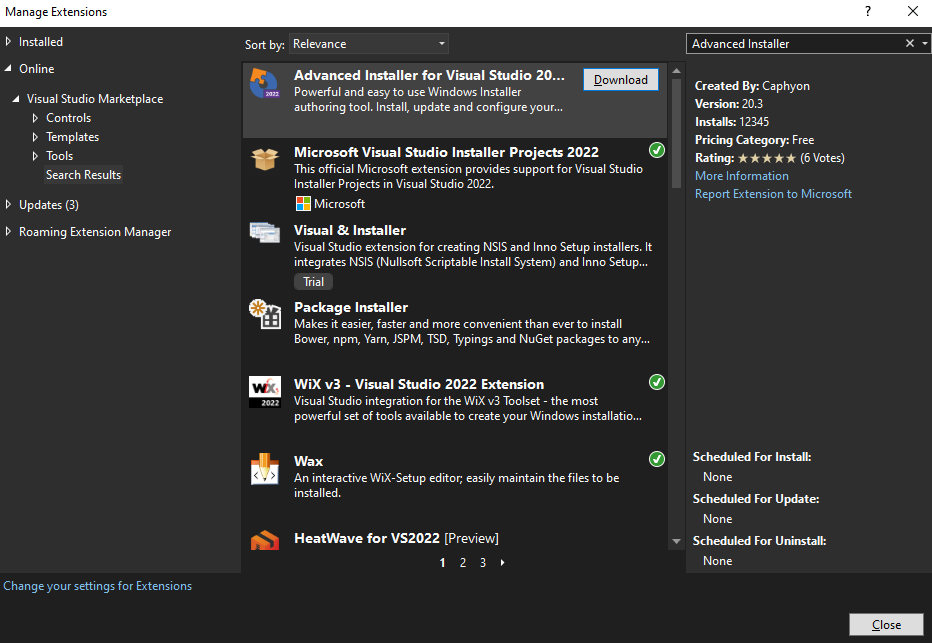
1. In Visual Studio go to Extensions → Manage Extensions.
2. From the Manage Extensions window go to the Online section and type Advanced Installer in the search bar.
3. From the extensions list, select Advanced Installer for Visual Studio extension and click the Download button.

Keep in mind that the installation will begin after all Visual Studio windows are closed.
After you install the extension, you can now open your existing project in Visual Studio and create the installer package. Here are the steps:
1. File → New → Project.
2. From the Create New Project dialog, select Advanced Installer Project
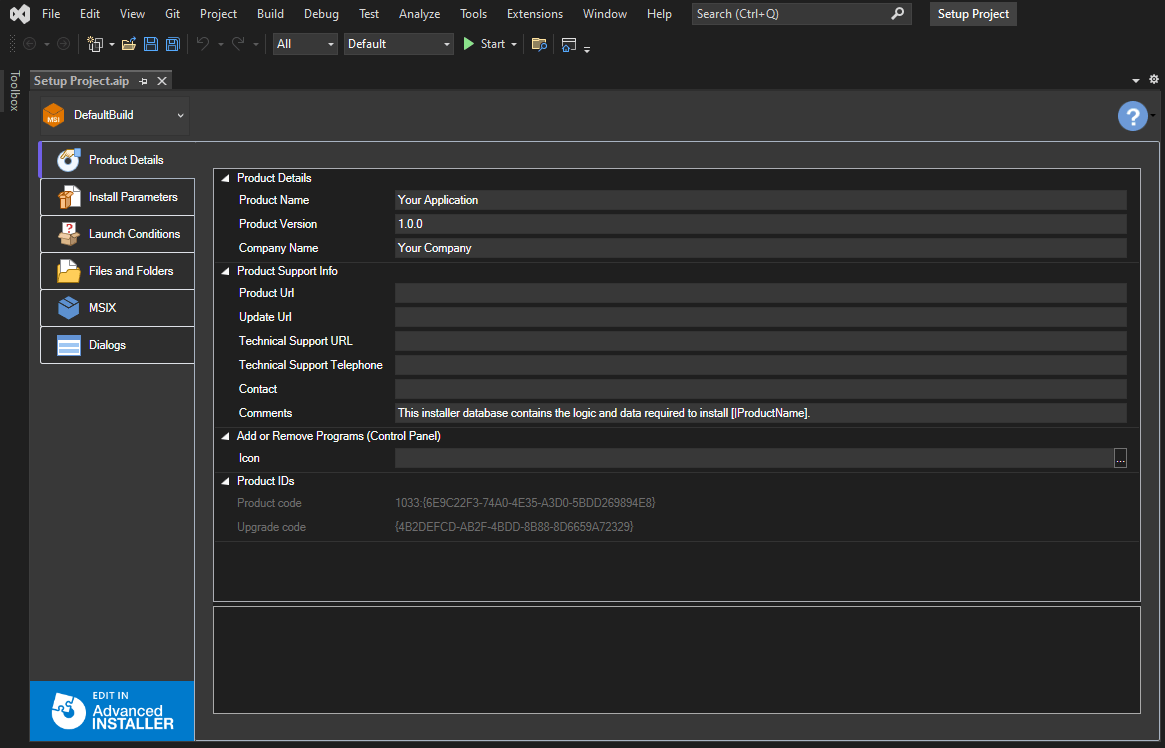
Once you create the Advanced Installer project, you can edit your project’s details in the “Project Details” tab.
For more in-depth customization, you have the option to edit your projects in Advanced Installer by clicking on the left-corner “Edit in Advanced Installer” button.
After you edit the project in Advanced Installer, you can return to Visual Studio and reload all the files that include all your changes. You can build your Advanced Installer projects at the same time with your Visual Studio solutions.
Streamline the packaging process for your team with the help of Advanced Installer - Tool Installer and Advanced Installer - Build extensions, and Advanced Installer’s integration with Azure DevOps, which enables you to create projects directly on your hosted agents.

Now, when you build your solution in Visual Studio, you’ll notice that your MSI package is automatically generated.
For more details about Advanced Installer’s extension with Visual Studio, watch this tutorial:
In the following section, we’ll show you how to build your package with MSBuild without using Visual Studio.
How to build your package from the command line with MSBuild

Once your Advanced Installer project (.aiproj file) is ready, you can build the .sln file using MSBuild.
1. Open a command prompt and pass the file to the MSBuild.exe:

2. Provide the path to the MSBuild executable file along with the path to the .sln file that contains the Advanced Installer project.
3. You can also provide MSBuild command line options, depending on your build scenario.
4. After you build the .sln file, the SetupFiles folder containing the MSI will be generated in the same folder as your .aiproj file.
MSBuild Tasks and Targets

The XML file format used by MSBuild cannot fully handle the build operations. Thus, MSBuild uses tasks outside of the project file. Tasks are units of executable code used to perform several actions during the build process. For example, a task might compile input files.
There are several common tasks included in MSBuild like MakeDir (creates directories) or Copy (copy files). You can modify these tasks to fit your needs. You can use MSBuild properties and items as parameters for the tasks. When talking about properties, we refer to key/value pairs while items typically represent files that are inputs in the build system.
A task is part of a target element. A target element groups tasks in a particular order and executes them sequentially. Targets are grouped in logical sections and factor the build process into smaller units. They allow you to call some pieces of the build process from other targets. Because some targets have a dependency on others, they must be correctly ordered as they run once during a single build.
When installing Advanced Installer, the MSBuild integration/extension files will be copied to the MSBuild extension folder
(C:\Program Files (x86)\MSBuild\Caphyon\Advanced Installer). The .aiproj file imports "C:\Program Files (x86)\MSBuild\Caphyon\Advanced Installer\AdvInstExtTasks.Targets". This is our extension .targets file which contains all the MSBuild tasks to build a .aiproj file or a .aip file.
Conclusion

In conclusion, if you want to modify a build system to enable multiple actions when building MSI or EXE packages, MSBuild can be a powerful tool to achieve this.
Advanced Installer's extension for Visual Studio can simplify the process of creating and managing installers for your solutions directly from Visual Studio. Additionally, Advanced Installer provides several extensions to streamline the packaging process for your team and integrates with Azure DevOps to create projects directly on your hosted agents.
By following the steps outlined in this article, you can build your MSI or EXE packages efficiently using MSBuild and Advanced Installer.
