How to create an MSI installer for your C++ application in Visual Studio
Developing in C++ means creating powerful and efficient applications. But once the development is done, how do we package such an app for the end users?
Hey there, C++ devs! You've built a killer app, and now it's time to get it out there. Packaging your C++ masterpiece into a neat MSI installer doesn't have to be a headache.
In this article, I'll walk you through how to create an installer for a C++ application using Visual Studio (VS) with ease.
Set up the VS Installer Project extension

Before we jump in, make sure you’ve got the Microsoft Visual Studio Installer Project extension. If you do, skip to the next section. If not, follow the steps below to install the extension:
1. In Visual Studio navigate to Extensions → Manage Extensions.
2. In the opened dialog go to the Online section and search for Microsoft Visual Studio Installer Project Extension.

3. Download the extension and close the Visual Studio IDE to install the extension.
4. Once installed, reopen the IDE.
Add the Setup Project

Got your C++ app all set to be deployed? Let’s add the Setup Project:
- Right-click on the Solution → Add → New Project.
- From the template options, select the Setup Project template.

You'll see your new project in the Solution Explorer and a File System tab will pop up in VS.
Add the project output

Now, let’s choose the project you are creating the installer for. Here’s how:
- Right-click on the Setup Project → Add → Project Output.
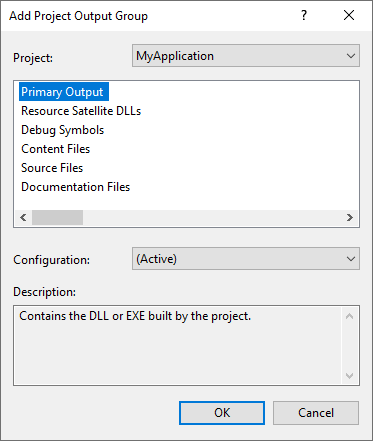
- In the Add Project Output Group dialog, choose your project, select Primary Output and click OK.

Voilà! You have a new item in the Application Folder from the File System tab.
If our app is named My Application, the new item name is Primary Output from My Application.
Add a desktop shortcut to your application

Users love shortcuts, so let’s give them one.
Here’s how you can do add a desktop shortcut to your application:
1. Go to the Application Folder in the File System.
2. Right-click on the Primary Output from My Application → Create Shortcut to Primary Output from My Application.

3. Rename the shortcut and place it in the User’s Desktop folder from the File system view.
Want a Programs Menu shortcut too? Just make another shortcut and pop it into the User’s Programs Menu folder.
How to add launch conditions

Sometimes you have to make sure your app runs in the right environments. If your software only runs when specific criteria are met, you have to add launch conditions:
1. Right-click on the Setup Project → View → Launch Conditions.
2. Right-click on the Launch Conditions folder → Add Launch Condition.

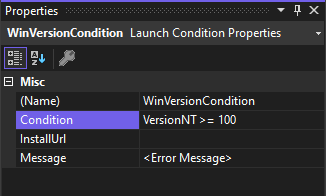
3. Once the condition is created, you can go to the editor to define your criteria. For example, if your app requires Windows 10 or later, in the Condition field write VersionNT >= 100.
4. You can also specify a Message to be displayed when a condition evaluates to false at installation time.

How to add prerequisites

Your application might rely on specific software to run correctly. So, you need to make sure these prerequisites are installed before the app is run.
To add a prerequisite to your package:
- Right-click on the Setup Project → Properties.
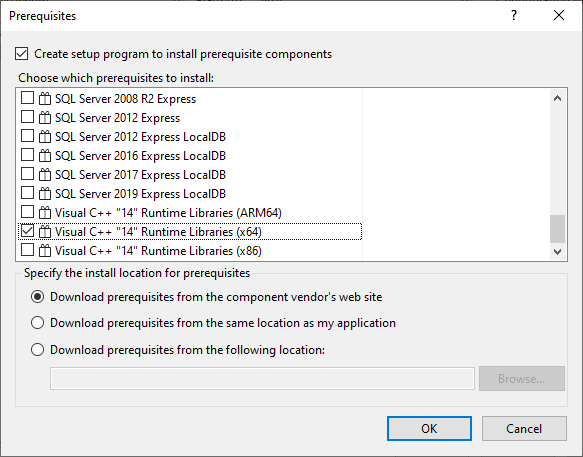
- Click on the ‘Prerequisites’ button.
- From the opened dialog, select the necessary components such as .NET Runtime or SQL Server. You can also provide a location to download a specific prerequisite if you do not find it in the list.

How to add a custom action

Need to run scripts or executables during install? Custom actions are the tools you need to use.
Here’s how to add a custom action:
1. Right-click on the Setup Project → View → Custom Actions.

2. The Custom Actions view will open. You will find different phases: Install, Commit, Rollback and Uninstall.
3. Choose the phase when you want to add a custom action, Right-click on the corresponding folder and choose Add Custom Action.
4. From the opened dialog, select the item you want to add as a custom action.
5. Go to the Properties section and configure any parameter as required.
How to use the Advanced Installer extension to create the installer package

Want something more powerful than VS alone? The Advanced Installer extension for Visual Studio is your friend. The extension is available on the Visual Studio Marketplace.
Here's the quick setup:
1. In Visual Studio navigate to Extensions → Manage Extensions.
2. In the opened dialog go to the Online section and search for Advanced Installer for Visual Studio extension.

3. Download the extension and close the Visual Studio IDE to install the extension. Once installed, reopen the IDE.
Ready to roll? After you install the extension and your C++ app is ready for deployment, it’s time to create the Setup Project:
- Right-click on the Solution → Add → New Project.
- From the template options, select the Advanced Installer Project template. After creating the project, it will be listed in the Solution Explorer.
The Advanced Installer Projects provides a viewer for basic package customisation, such as:
- editing product details,
- setting install parameters,
- adding launch conditions,
- and more.
To open the viewer, select the AIP file.

Now, add the Project Output:
- From the Files and Folders tab, clicking ‘Add Project Output’,
- Select the project files and then click ‘OK’.
For advanced features, you can edit the project in Advanced Installer. It offers a user-friendly interface and extensive package customisation options—use the ‘Edit in Advanced Installer’ button located at the bottom left of the viewer.

All set? Hit save, head back to Visual Studio, and you're ready to build your MSI. Run the package, and your app is ready to hit user desktops.
Ready to streamline your C++ application deployment?
Click here to start your 30-day free trial with Advanced Installer and experience effortless packaging today.
Video Tutorial

Conclusion

There you have it—your step-by-step guide to packaging your C++ application into a sleek MSI installer using Visual Studio. From setting up your environment with the right extensions to adding shortcuts for easy access, we've covered the essentials to ensure your users enjoy a smooth installation experience.
Remember, whether you stick with the familiar confines of Visual Studio or opt for the robust features of the Advanced Installer extension, the goal is the same: to create a professional-grade installer that gets your application on users' machines hassle-free.
By following this guide, you're not just wrapping up your code; you're delivering convenience, reliability, and a great first impression. So go ahead, build that installer, and take pride in the fact that your C++ application is ready to make its mark on the world, one click at a time.
Happy deploying!
