Intune Deployment: How to Customize Line of Business (LoB) App Installs
John Marcum is 13-time Microsoft Enterprise Mobility MVP, Fatstacks.tech Program Manager, and experienced Advanced Installer user. This is the first article in a series of guest blogs that John shared about solving Intune challenges with Advanced Installer.
Deploying applications with Microsoft Intune comes with some challenges, such as:
- .msi files must be fully self-contained
- you can't mix application types such as Line of Business (LoB) and Win32 apps during Autopilot deployments
- deploying feature updates to personal devices (BYOD) is not supported
On top of these, I found that Microsoft's recommended approach of using the Win32 Content Prep Tool lacks essential features, is overly complicated, and often requires the Intune Management Extensions which may not be present on all the devices.
For these reasons, I decided to standardize all my deployments using .msi files. These files can be created easily using Advanced Installer, require little to no additional scripting, and are supported in all Intune enrollment scenarios.
In this article, I will explain how I use Advanced Installer to solve a common Intune challenge: defining the installation order of several .msi files.
1. To begin, start a new Generic -> Architect installer project in Advanced Installer.
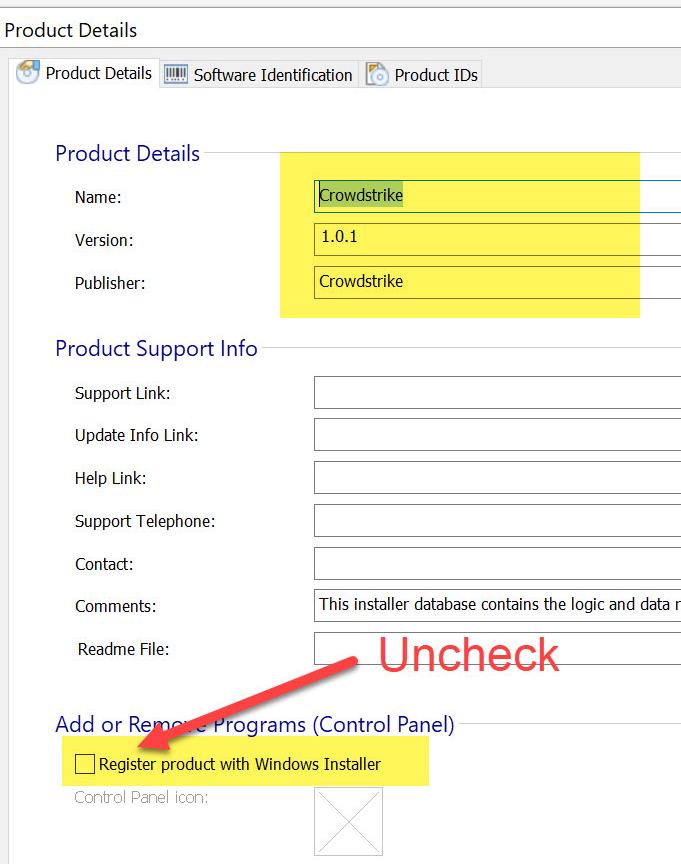
2. On the Product Details pane, provide the project a Name, Version, and Publisher.
I typically use the actual product name and publisher. In my case, I use version 1.0.0 to start rather than the actual product version. I do this because each time that a new .msi is uploaded to Intune, the version number must be incremented or Intune will block the upload.
3. On the Product Details pane, uncheck the Register product with Windows Installer.
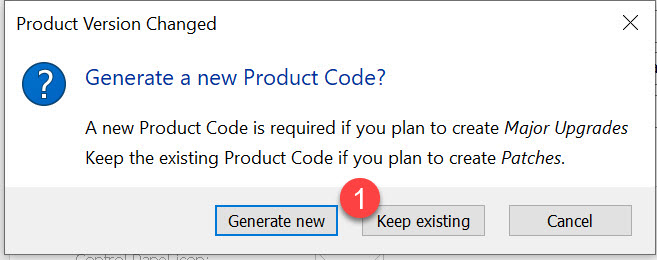
When changing the product version, you will be prompted to select
whether or not to Generate a new Product Code, you should
always select Keep existing, Intune will not allow you to
upload a new .msi to an existing app if the product codes do not
match.
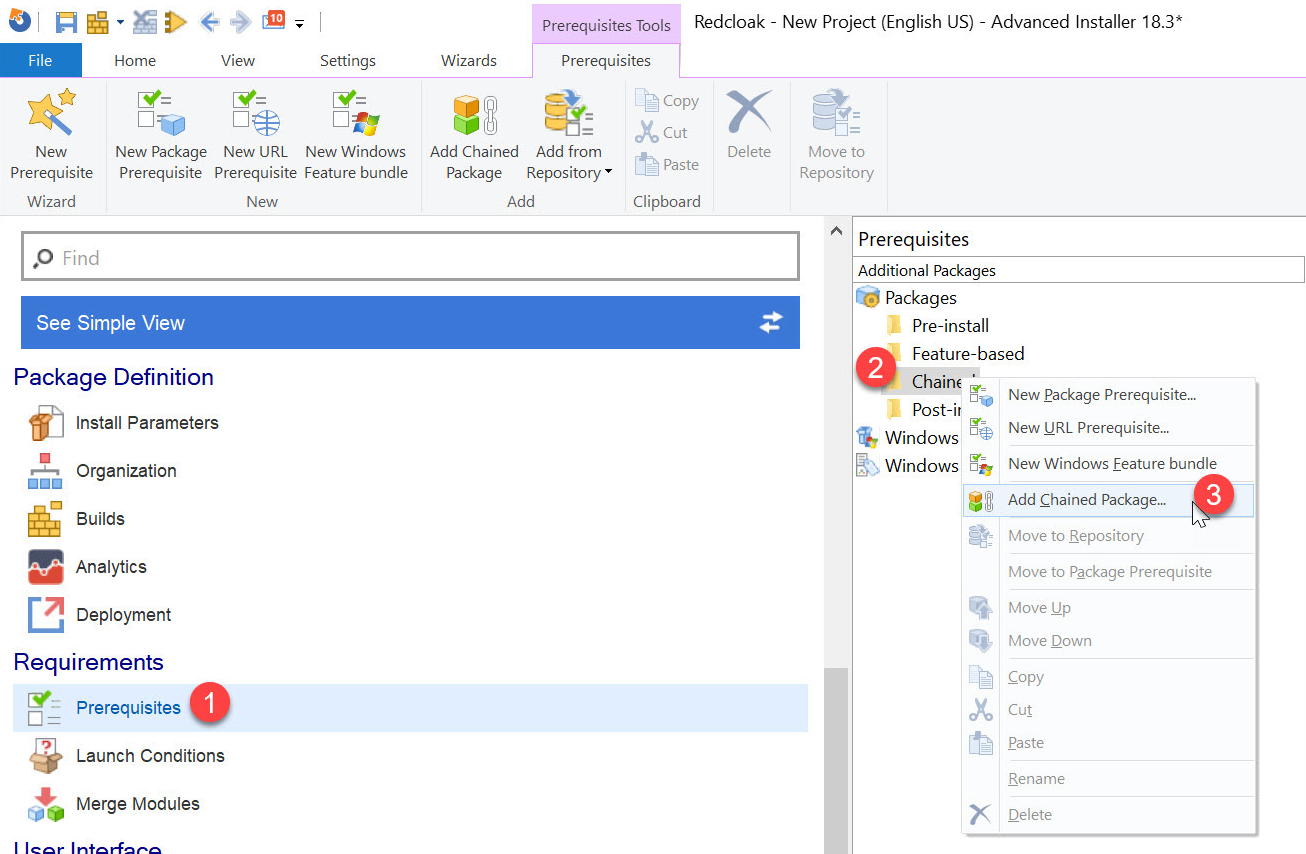
4. To add the .msi files to your project, select the Prerequisites pane, right-click Chained, select Add Chained Package.
5. Browse to the .msi files that you’d like to add to the project and select them, one at a time.
This is where the magic happens. We are chaining 3 .msi files in the custom .msi that we are creating, the chained .msi files will install in the order that they are shown under Chained Packages.
In a follow-up article, I will share how to perform actions such as
copying files, editing the registry, checking for and installing missing
prerequisite applications, etc. You can perform those actions at any
point during the installation -- in case you need to install the chained
.msi files and then edit the registry, or if you need to copy files to a
folder before or after the chained .msi files install.
6. For each of the .msi files added to your project, you need to define the following values:
- Install UI Level: Silent Install (no UI)
- Properties: Enter any required public properties
- Uninstall UI Level: Silent Install (no UI)
- Enable Logging: Define the log file path
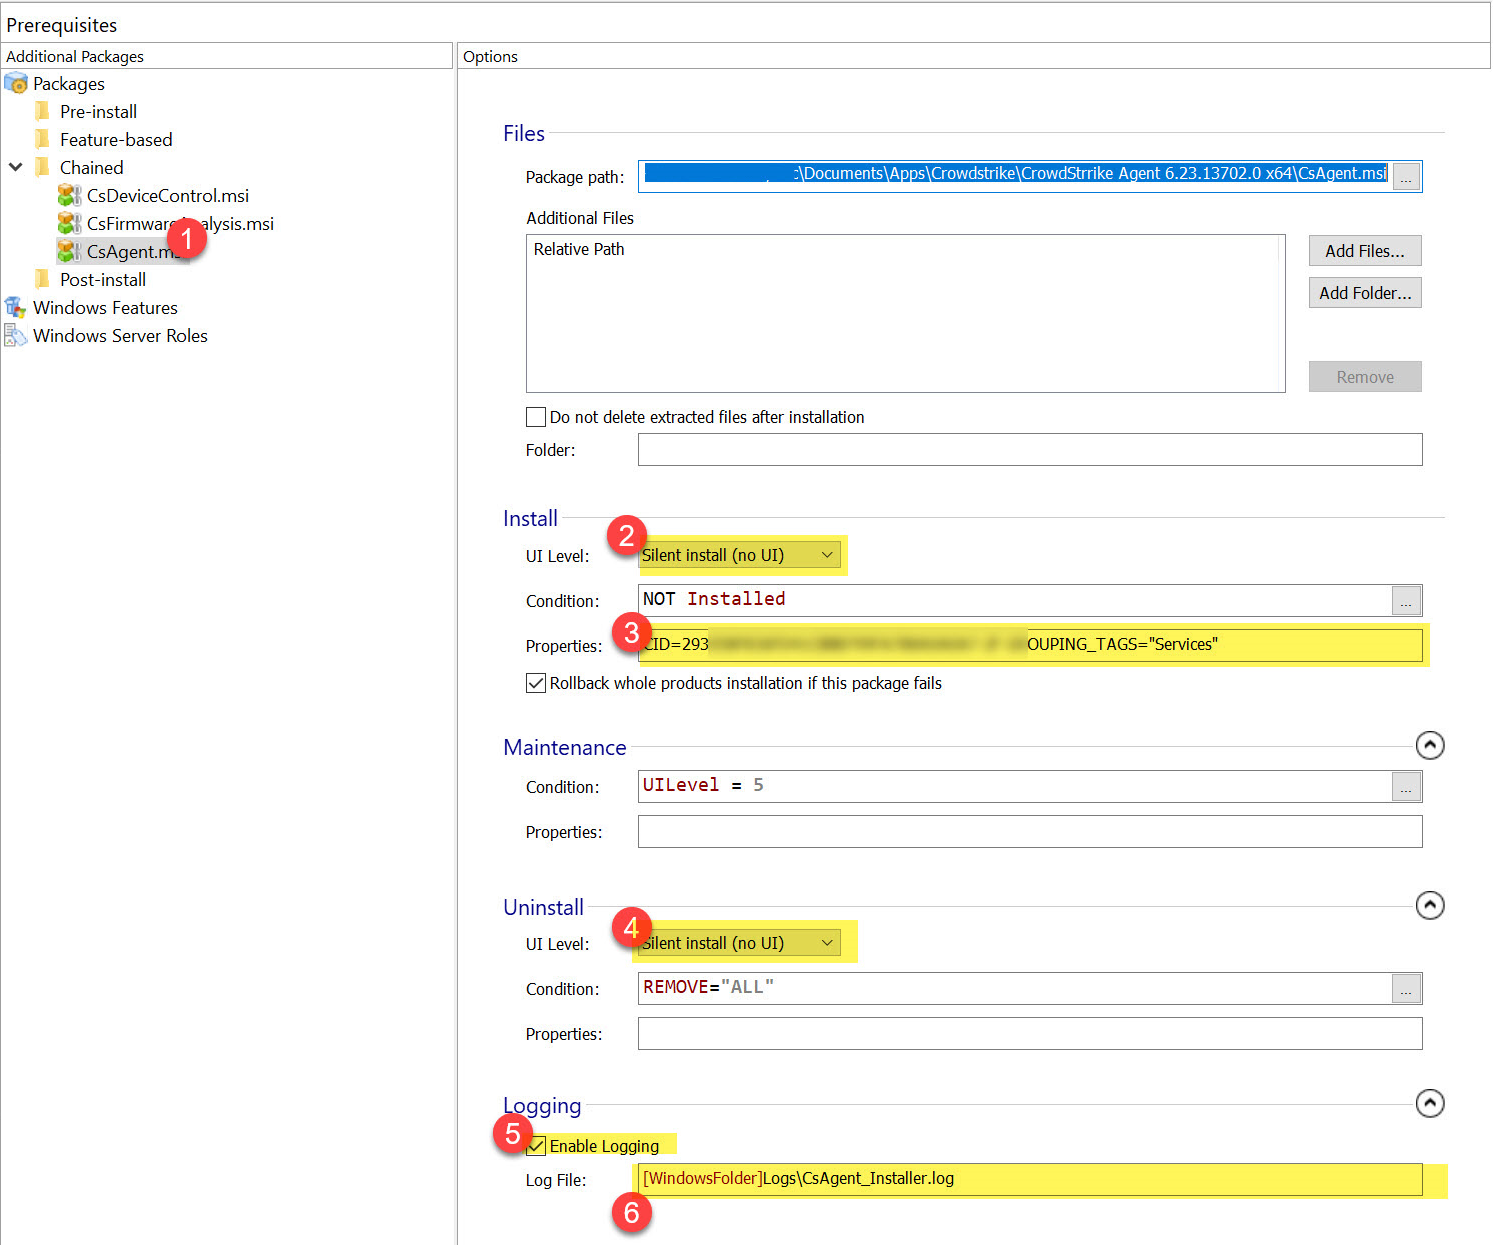
7. By default, Advanced Installer adds registry keys based on the project name. We don’t need these keys for our Intune deployment - so we will not create them.
8. On the Registry pane, select the [Manufacturer] registry key, right-click, and select Delete.

9. Advanced Installer creates (by default) an application folder based on the project name. We don’t need this folder, so we will configure Advanced Installer not to create it.
10. On the Files and Folders page, select Application Folder and then select Properties.
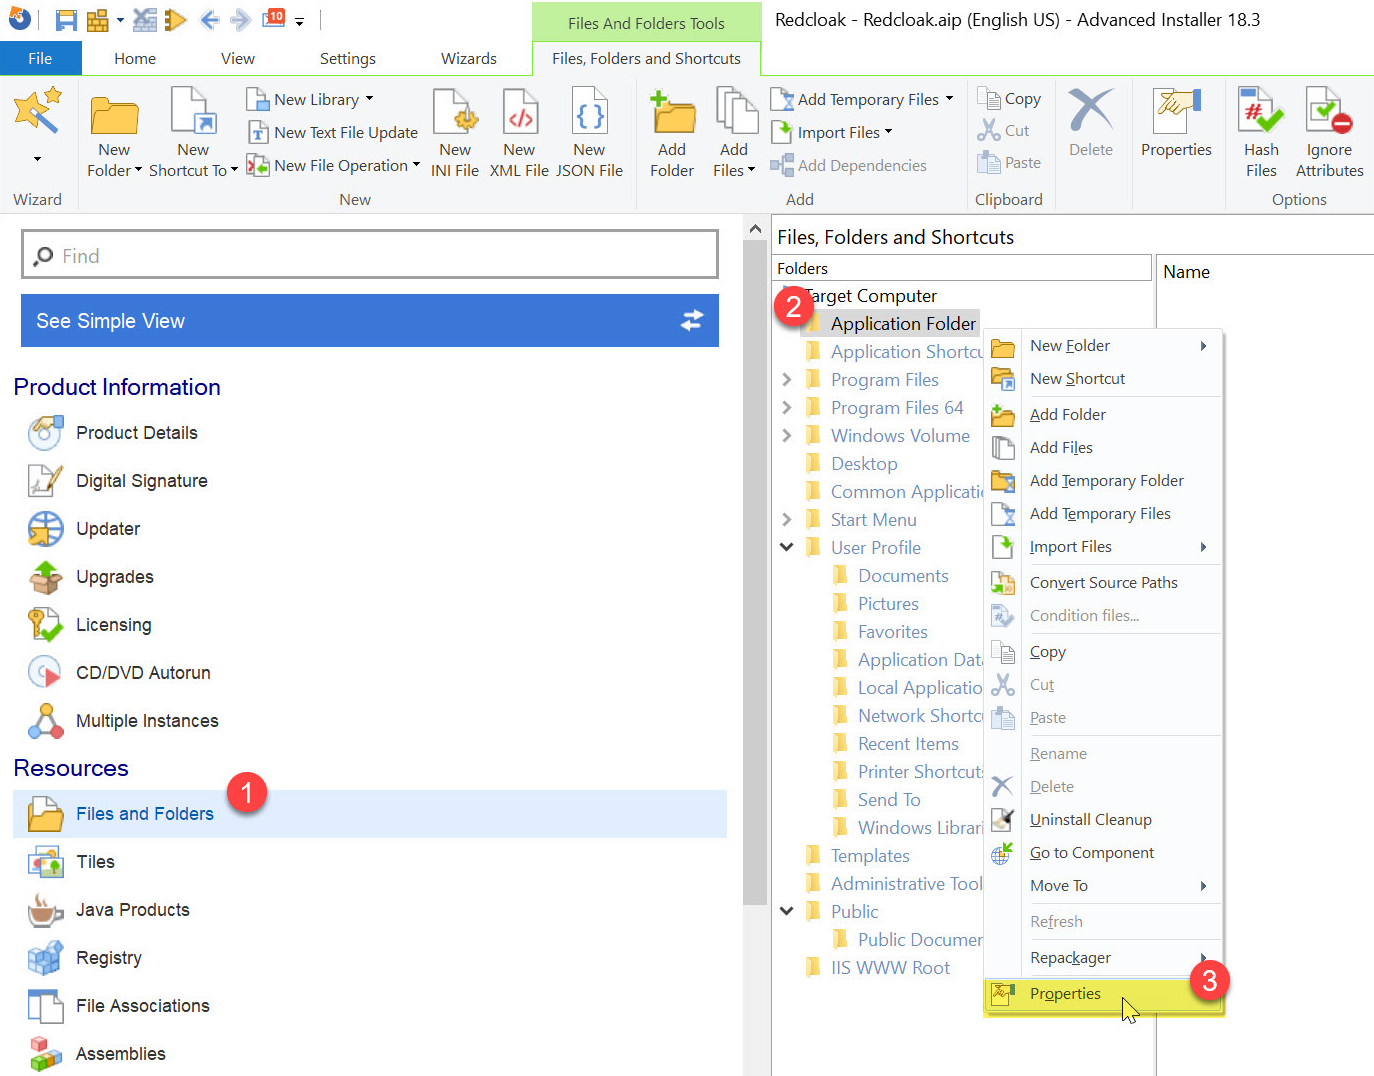
11. Uncheck Create Folder on the target machine and select OK.

12. To build the .msi, we need to make sure Advanced Installer has an action to complete -- other than the prerequisites configured earlier. To meet this requirement, just add any .txt file to the C:\Windows\Temp directory.
13. Create an empty .txt file and save it somewhere locally on your computer.
On the Files and Folders page, expand the Windows Volume directory, right-click the Windows directory and create a new directory named Temp.
15. Then, right-click the Temp directory, select Add Files and browse to the .txt file you created earlier to add it to your project.
16.On the Builds page, ensure that Single MSI is the selected Package Type. The Archive options should be configured as follows:
- Archive installation files into CAB files.
- Compress CAB files for smaller size.
- One CAB archive containing all installation files.
- Include CAB file into the MSI database.
17. Make sure that the Home tab is selected, select Build.

Now your .msi file should be ready for testing and deployment via Intune afterwards. I always recommend testing installations by using PSExec to open a command prompt as a local system with the command:
PSExec /s /I cmd.exe
Running the installation from the resulting command prompt closely mimics how it will behave when deployed with Intune or Configuration Manager.
Do you have any specific topics you would like us to cover? Tell us in the comments!
Subscribe to Our Newsletter
Sign up for free and be the first to receive the latest news, videos, exclusive How-Tos, and guides from Advanced Installer.