De-hardcoding File Paths Using VbScript and PowerShell Custom Actions
Often throughout the repackaging process, it's frequent to come across files featuring straightforward paths such as: C:\Program Files.
Allowing users to modify the installation path of their application is a common practice. However, this practice comes with one downside: the need to change the path written in those particular files during the installation.
In this article, we'll see how we can replace hard coded paths or variables inside files using custom actions.
How to Discover Hard-coded Files?
Before we actually replace the hard coded paths, we first need to find out which files contain hard-coded paths. There are various ways to get this information, but the most straightforward one is to use Notepad++.
For instance, let’s imagine we have an application installed in C:\Program Files\MyApp. As a general rule, when repackaging, we always search for the installation directory inside all of the application files.
In this scenario, the installer sets the ProgramFilesFolder property to the full path of the Program Files folder. So we don’t need to search for the full C:\Program Files\MyApp string, only for the part that we can use as a variable - in our case, the C:\Program Files\ string.
Keep in mind that the “Program Files” is an internal property known by the MSI.
Other properties include AppDataFolder, CommonAppDataFolder, CommonFiles64Folder, CommonFilesFolder, DesktopFolder, FontsFolder, LocalAppDataFolder, MyPicturesFolder, PersonalFolder, PrimaryVolumePath, ProgramFiles64Folder, ProgramMenuFolder, StartMenuFolder, System64Folder, SystemFolder, TempFolder, WindowsFolder and WindowsVolume. By using one of these properties, we can de-hardcode part of the installation directory as a best practice.
To see which files contain the C:\Program Files\path, follow these steps:
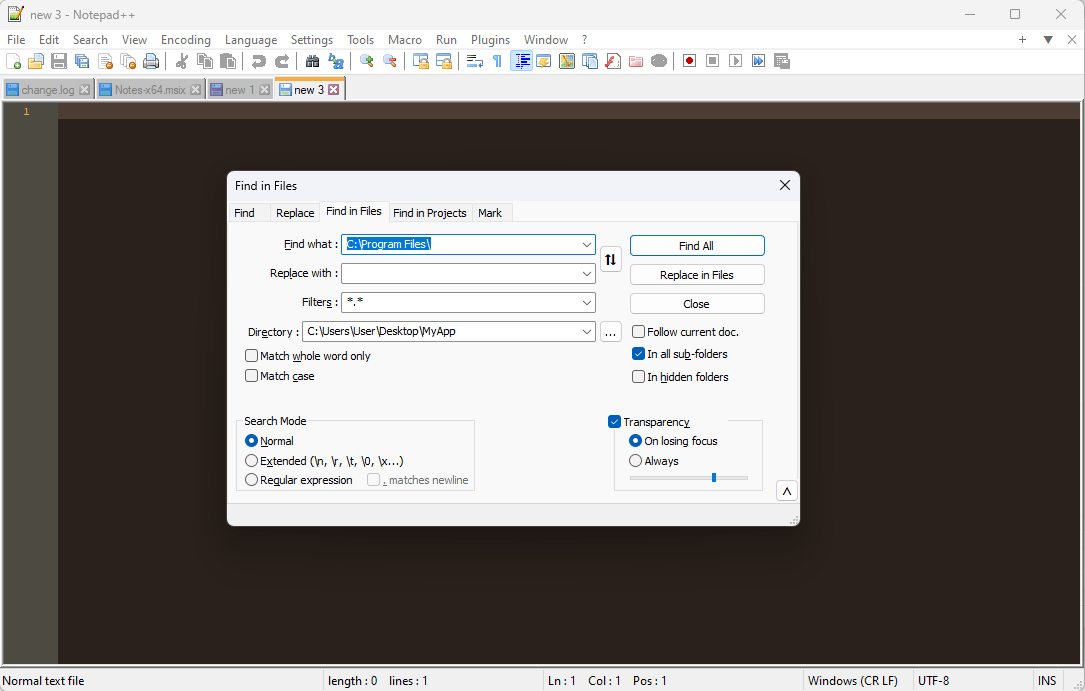
1. Open Notepad++ and go to Search > Find in Files.

2. In the Find What field, input the INSTALLDIR of your application, in our case: C:\Program Files\.
3. In the Directory field, input the location of your captured files.
4. Then, click on Find All.
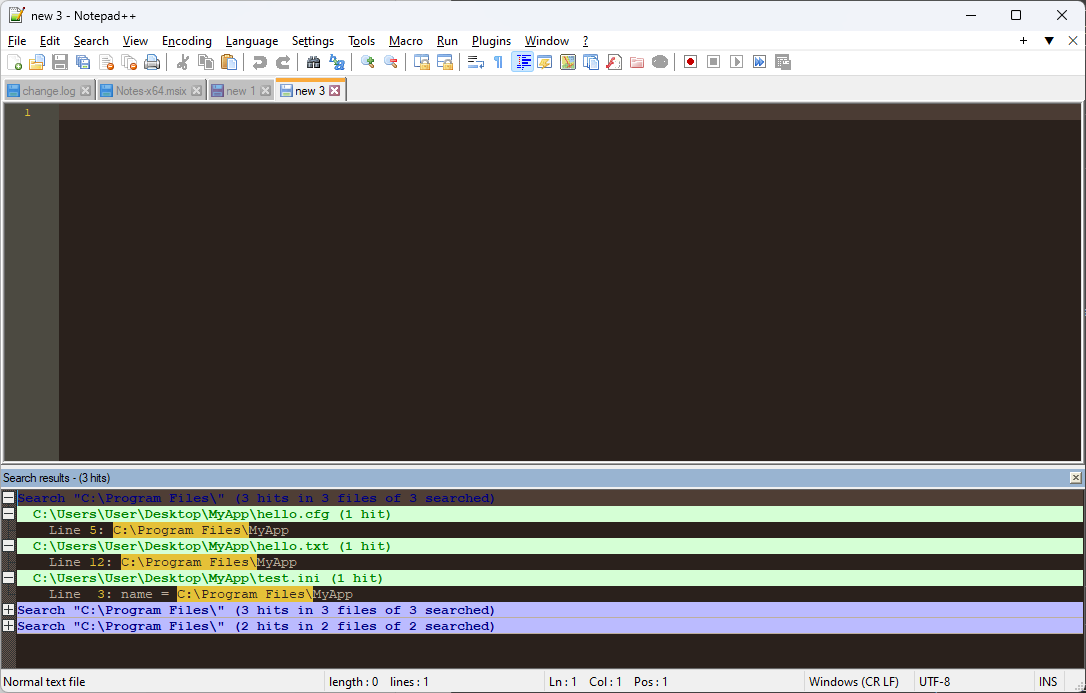
If there are any matches found, Notepad++ will show you at what file and line you can find the string.

How Does Automatic INI De-hardcoding Work?
As you can see from above, Notepad++ found our location inside an INI file. However, working with INI files becomes a straightforward process when using Advanced Installer. During the repackaging process, the Advanced Installer imports all INI files into the project and de-hardcodes them automatically.
Additionally, when you add a new INI file while editing your project, Advanced Installer easily identifies potential variables and automatically de-hardcodes the file.
Want to see Advanced Installer in action? Check it out through our 30-day full featured free trial and elevate your installation process today!

De-hardcoding Files Using VBScript Custom Actions
When it comes to other types of files, we must perform additional steps to de-hardcode the locations we need. In this case, we’ll use the MSI's custom actions capability.
For VBScript Custom Actions, you can use the following script:
'On Error Resume Next
'Option Explicit
Const ForReading = 1, ForWriting = 2, ForAppending = 8
Dim strFilePath, strToReplace, strNewValue, path1, path2
strArgs = Session.Property("CustomActionData")
arrArgs = Split(strArgs, ";", -1, 1)
path1 = arrArgs(0)
path2 = arrArgs(1)
Function ReplaceInFile(strToReplace, strNewValue, strFilePath)
    Dim objFSO, objFile, strText, re
    Set objFSO = CreateObject("Scripting.FileSystemObject")
    if objFSO.FileExists(strFilePath) Then
   	 Set objFile = objFSO.OpenTextFile(strFilePath, ForReading, True)
   		 strText = objFile.ReadAll
   	 objFile.Close
   	 Set objFile = Nothing
   	 strText = Replace(strText, strToReplace, strNewValue, 1, -1, 0)
   	 Set objFile = objFSO.CreateTextFile(strFilePath, True)
   	 objFile.Write strText
   	 objFile.Close
   	 Set objFile = Nothing
    End If
    Set objFSO = Nothing
End Function
strToReplace = "C:\Program Files\"
strNewValue = path1
ReplaceInFile strToReplace, strNewValue, path2 & "hello.cfg"The script is quite long, so let’s try to understand what it does.
Up to line 8, we are using Session.Property("CustomActionData"); this allows VBScript to catch any arguments passed to it.
Check out our article and learn How to set an installer property using custom actions.
At line 9, the ";" separates the parameters, and path1 represents the first argument. The path2 represents the second argument that we pass.
Next, we can see the ReplaceInFile function, which takes the following arguments:
- strToReplace - the string we want to replace.
- strNewValue - the new value we want to add.
- strFilePath - the file path where we want to do the replacement.
The function opens the file mentioned in the strFilePath and parses all the text via objFile.ReadAll.
Then, we use the Replace function to replace the string. We can write it in the file with objFile.Write strText and close the file with objFile.Close. After that, we can dispose of the object with Set objFile = Nothing.
The values for strToReplace and strNewValue are defined below the function. Lastly, we call the function to perform the actions with ReplaceInFile strToReplace, strNewValue, path2 & "hello.cfg".
Now that we have our script ready, let’s create the Custom Action in Advanced Installer and run it. For this, follow the next steps:
1. Navigate to the Custom Actions Page.
2. Search for the Launch attached file custom action and add it to the sequence.
3. Select the VBScript that we created previously.
4. In the Action Data field, we need to add the proper variables. Remember, the first one is the string we want to replace C:\Program Files\ with, and the second one is the location where the hello.cfg file can be found. For this example, we created an additional property called MYPROPERTY which only contains a string.
5. Since the action is set to Immediately as the Execution Time, we will place it after the Finish Execution stage.
6. Build and install your package.

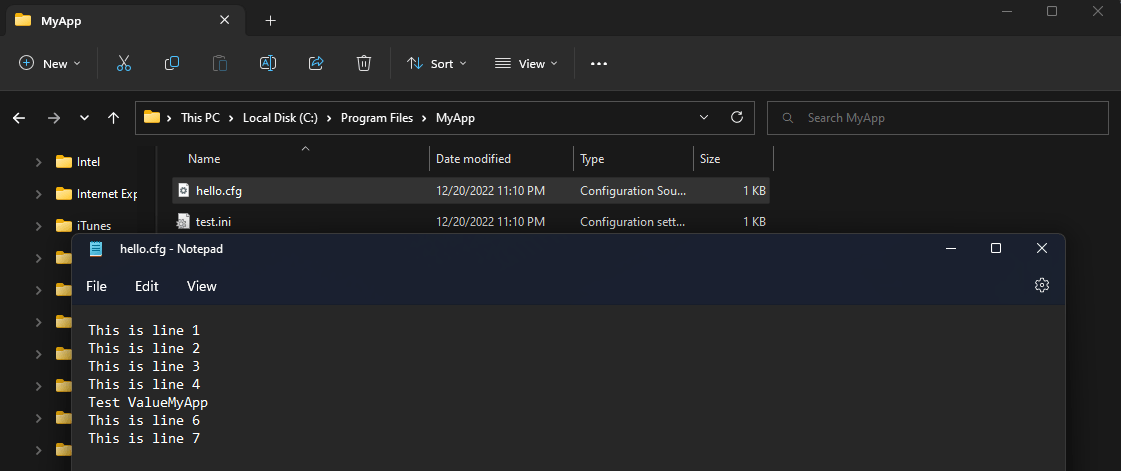
After the package is installed, if we check the hello.cfg file in the INSTALLDIR, we can see that it has been successfully de-hardcoded.

De-hardcoding Files using PowerShell Custom Actions
With PowerShell, the code is much cleaner, shorter, and easier to understand:
$propValue = AI_GetMsiProperty MYPROPERTY
$propDir = AI_GetMsiProperty APPDIR
$fileDir = $propDir + "hello.cfg"
$content = [System.IO.File]::ReadAllText($fileDir).Replace("C:\Program Files\",$propValue)
[System.IO.File]::WriteAllText($fileDir, $content)First, we use the AI_GetMsiProperty to retrieve our two properties that we used for VBScript, and define the file directory.
Next, we read all the files and replace everything we find as C:\Program Files\ in it with our property value then write all the text back in.
To add the PowerShell script in Advanced Installer:
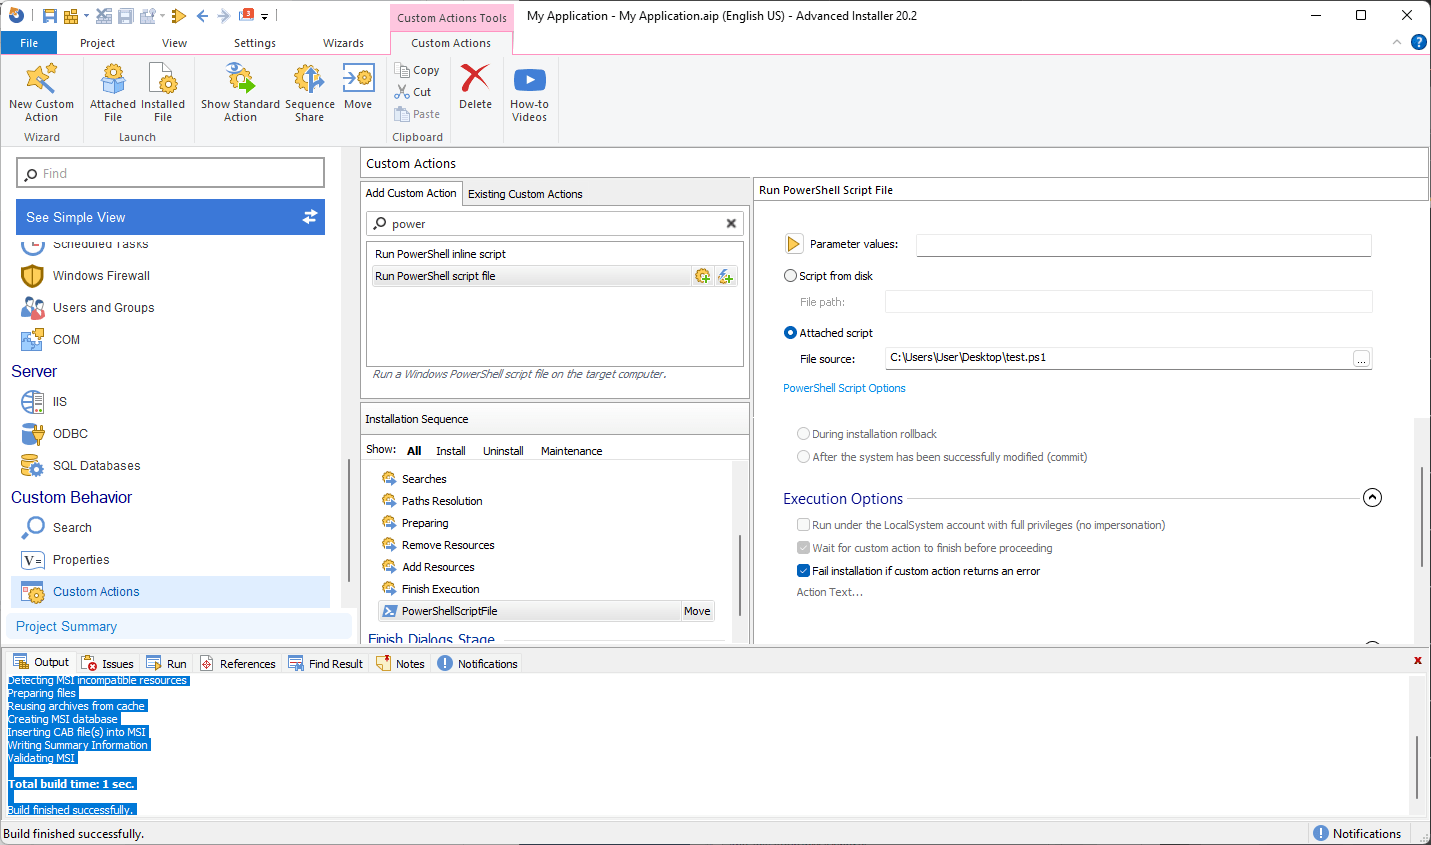
1. Navigate to the Custom Actions Page.
2. Search for the Run PowerShell script file and add it to the sequence.
3. Click Attached script and select the file created above.
4. Place the sequence last after the Finish Execution.
5. Build and run the installation.

The behavior is the same as with VBScript, and the hello.cfg file is correctly de-hardcoded.
Conclusion
In this article, we've explored various methods for replacing hardcoded paths or variables within files using custom actions. We've shown you the convenience of using Notepad++ and Advanced Installer for identifying and de-hardcoding INI files.
Additionally, we've discussed how to use VBScript and PowerShell custom actions in Advanced Installer to de-hardcode other file types in an automatic way.
