How to Handle Desktop Shortcuts through MSIX Packages
MSIX packages lack built-in support for installing a desktop shortcut. This is mainly because Microsoft recommends that user preferences are exclusively chosen by the user. So, for instance, creating a Desktop shortcut or pinning it to the Taskbar or Start Menu are not things we can control.
But, if you want to deploy an application shortcut on a user’s Desktop using an MSIX package, I have good news for you.
In this article, we will go through a few ways to achieve that.
How to Create Desktop Shortcuts Through MSIX?

Starting with version 19.3, Advanced Installer comes with a new feature to help you create desktop shortcuts straight from our easy-to-use GUI.
All you need to do is to:
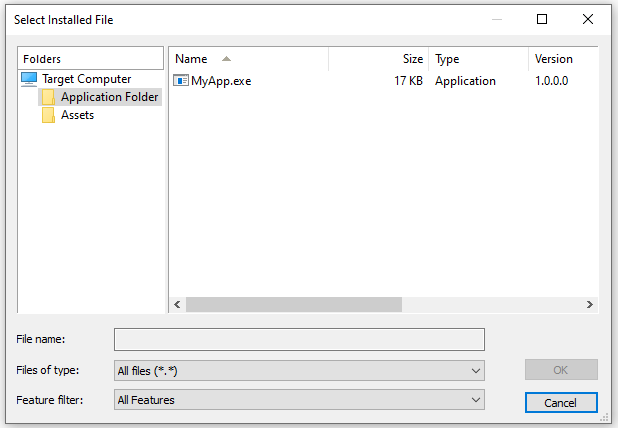
1. Browse to the “Shortcuts” page and add a new shortcut for an “Installed File”;
2. Select the target file for your new shortcut;
3. From “Properties” pane, set the “Shortcut Folder” to “DesktopFolder”
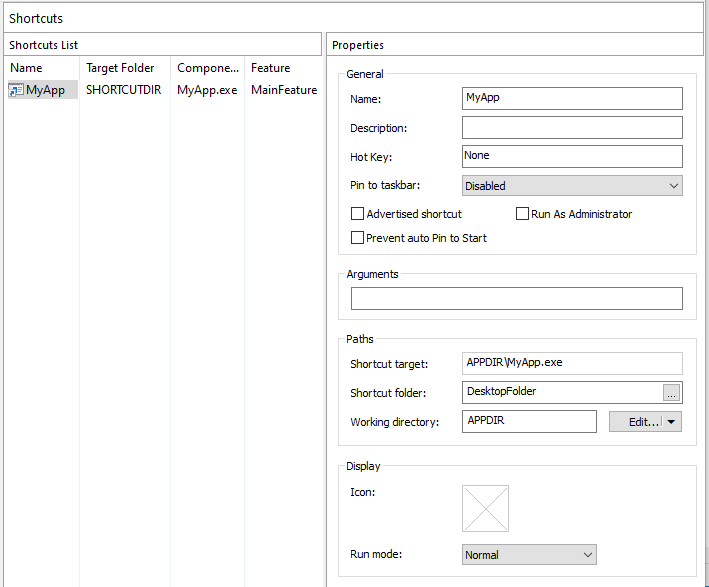
And that’s it. Now, you can build your MSIX package.
Once you launch your application you will see the Desktop shortcut is created.
You can use the current version of Advanced Installer with our 30-day full-featured free trial: https://www.advancedinstaller.com/trial.html
Next, let’s see how it works on an older version of Advanced Installer or if you use a different tool for creating your MSIX packages.
How to create a desktop shortcut using Advanced Installer (prior to 19.3 version)

1. Configure App Alias in your MSIX setup projectOnce you create your Advanced Installer setup project that includes an MSIX build:
Declare an application alias for your application file from “Declarations” view.

2. Build and install the MSIX package on your build machineOnce you have built the MSIX package – including your application alias – you have to install it on your build machine. After installing the MSIX package, just make sure the application alias is working.
To do that:
- Open a Run window;
- Type your app alias;
- Make sure the installed MSIX app is successfully launched;
- If it is, you are good to go and can move on with the desktop shortcut creation step.
3. Manually create a shortcut on Desktop pointing to your application alias
Create a Desktop shortcut pointing to your application alias.
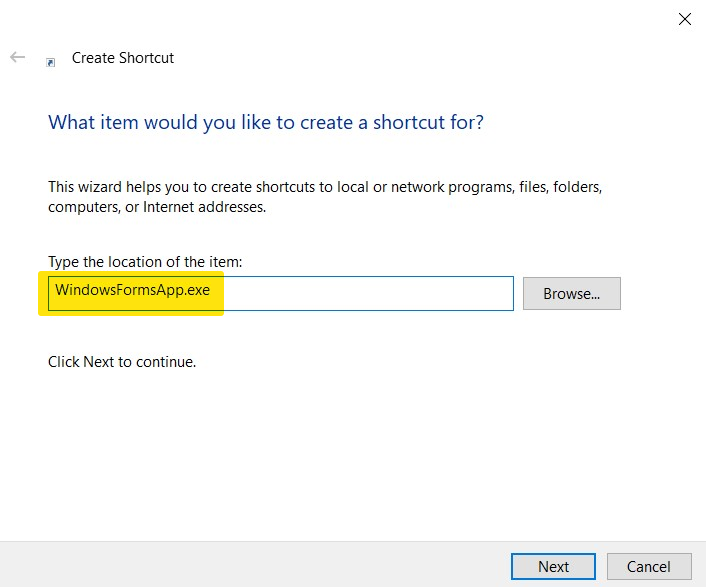
After creating the shortcut, edit its properties to use the %localappdata% environment variable –instead of default hard-coded paths– when pointing to your application executable file.
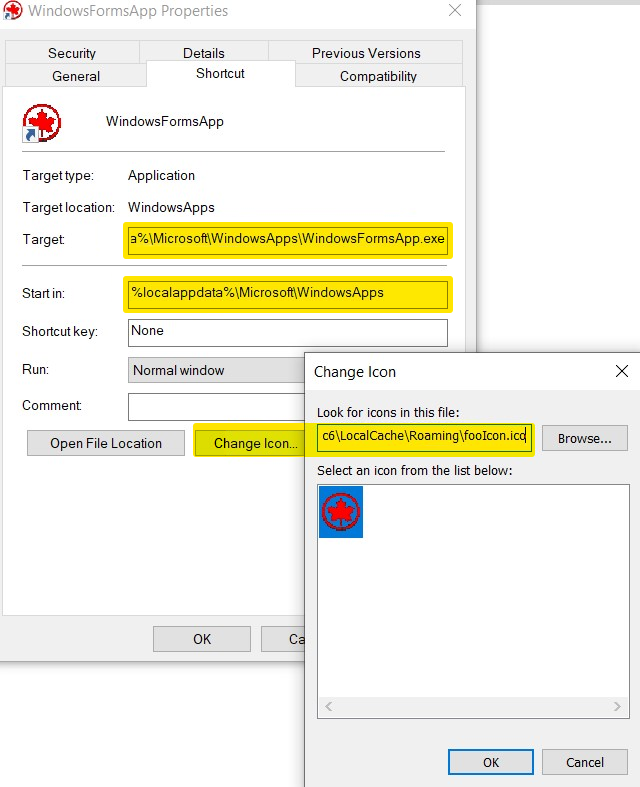
Also, manually copy your application icon in the Application Data location of your installed MSIX package. For instance, under this location:
%localappdata%\Packages\DemoPackage.MSIXDesktopShortcut_8njdae5dphm2p\LocalCache\Roaming\fooIcon.ico |
|---|
Then set this icon for your shortcut created on your Desktop.
4. Include the shortcut file and its icon file in your MSIX setup project
Now that you have manually created the shortcut file, you can include it into your setup project.Just add the shortcut file under "Application Folder" directory in “Files and Folders” view.
Do not import the shortcut file in Windows Installer format.
Add the shortcut icon file under "User Profile > Application Data" directory.5. Configure a Start PowerShell script to copy your app shortcut on user’s Desktop
The last step of the workaround solution is to include a PowerShell script to run on the first application launch only. The script will only copy the shortcut file on user’s Desktop.
On your build machine create a .ps1 file and use this code for your .ps1 script:
Copy-Item "WindowsFormsApp.lnk" "$env:USERPROFILE\desktop\WindowsFormsApp.lnk" |
|---|
Then simply add it into your MSIX setup project in “AppCompat” view. Configure it to run as a Start PowerShell Script, only on your application's first run.
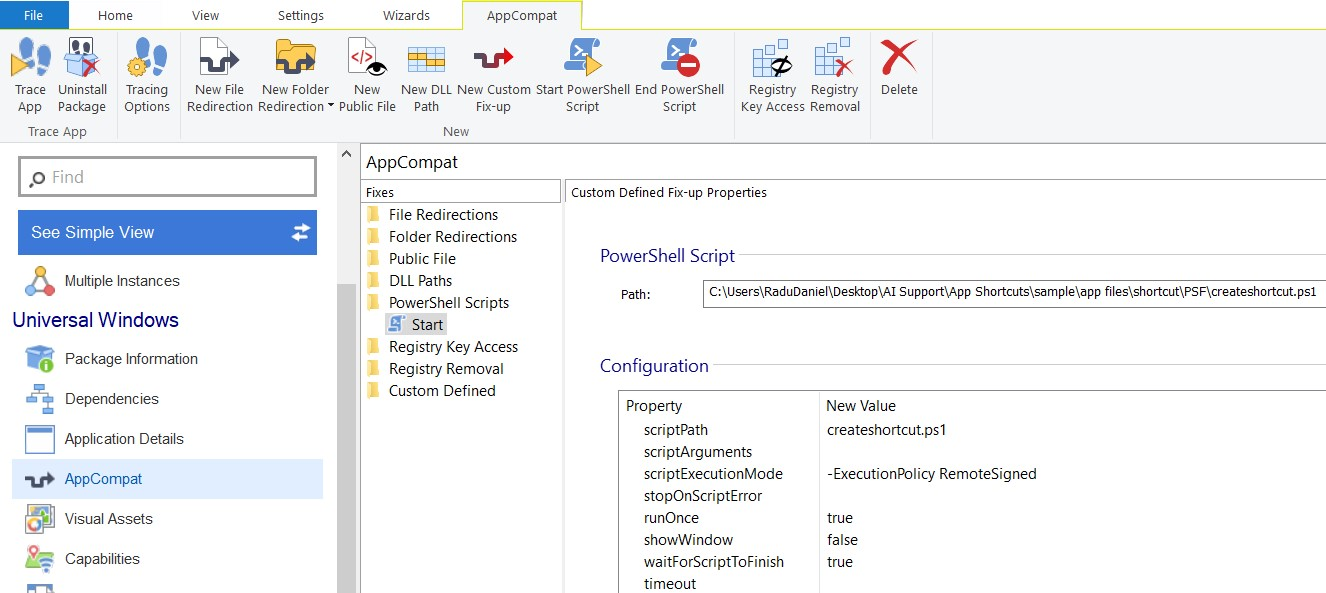
Build your MSIX setup project and run a few tests for your MSIX package installation to see how this works. After installing, once you launch your application, you will see the Desktop shortcut is created.
You can find a sample project attached to our forum post “Create Desktop Shortcut through an MSIX package”.
How to create desktop shortcuts using MSIX Packaging Tool and PSF? 

Aside from the steps we shared above, you also have the option of using a workaround solution shared by Microsoft: “Create an application shortcut by running a script using Package Support Framework”.It consists of creating and deploying an application alias with your MSIX package.
Once you create and deploy the application alias, you have to manually create a shortcut to your application alias on your build machine. Then, include this shortcut file in your MSIX package.
The shortcut will be deployed just beside your application files.
You can then apply a PowerShell script to copy the shortcut file from MSIX's install folder to the user's Desktop location in your MSIX package. This could be done way easier if you take advantage of Advanced Installer's Start PowerShell script support.
Lastly, you can take advantage of our Start PowerShell script support in Advanced Installer. It allows you to include a PowerShell script that will copy the shortcut file from MSIX install folder to user’s desktop location into your MSIX package. The script will run on your first application launch only, after the MSIX package installation.
Due to not being natively supported in MSIX, using this workaround to create a desktop shortcut comes with the following downsides:
- The shortcut installed using this workaround is a traditional .lnk desktop and not a modern application entry.
- The application must be launched first in order for the script to get executed and the Desktop shortcut to get copied. You may need to send comms to the end-user and detail the end-user experience.
- MSIX uninstall does not cater for the Desktop shortcut removal so that needs to be dealt with separately.
- If the Desktop shortcut gets deleted accidentally, then a repair of the MSIX package will not copy it back. The MSIX package must be uninstalled and then re-installed.
As per Microsoft guidelines, we advise you not to abuse this workaround and use it only when absolutely necessary. The user preferences in Windows OS should be primarily set on user’s choice rather than configuring them automatically (i.e. through an installation setup).
Conclusion

As you can see, you have a few options here to handle desktop shortcuts in your MSIX packages. We hope you find these useful.
Let us know if you have any questions or topics that you would like us to cover.
Subscribe to Our Newsletter
Sign up for free and be the first to receive the latest news, videos, exclusive How-Tos, and guides from Advanced Installer.