How to Create an Installer for a Windows Service (.NET Framework) using Visual Studio
Windows Services are applications that run in the background without displaying any user interface. They are a great option for performing tasks without disrupting the user’s workflow on the machine.
In this article, we’ll guide you through:
- Creating and configuring a Windows Service targeting .Net Framework using Visual Studio.
- Building an installer for the service using Visual Studio.
- Additionally, we’ll introduce a simpler alternative using Advanced Installer.
For those of you looking for a way to create a modern .NET Worker Service that runs as a Windows service using Visual Studio and build an installer for it, this article will guide you.
How to Create a Windows Service in Visual Studio?

First, let’s walk through the steps to create the Windows Service project in Visual Studio:
- Go to File → New → Project.
- Select the Windows Service (.NET Framework) project template.
- In the configuration dialog, set a name for the service and choose the appropriate .NET Framework version.
Once the project is created, you should see it in the Solution Explorer. In my case, I renamed the Service.cs file to MyWinService.cs.

How to Configure the Windows Service in Visual Studio?

After creating the project, the next step is to add the logic for the service. Its main functionality is defined in the MyWinService.cs file. Here you can specify what happens when the service starts, stops, pauses, etc.
namespace MyService
{
    public partial class MyWinService : ServiceBase
    {
        public MyWinService()
        {
            InitializeComponent();
        }
        protected override void OnStart(string[] args)
        {
              //Method called by the OS when the service starts
        }
        protected override void OnStop()
        {
             //Method called by the OS when the service stops.
        }
       // You can also override OnPAuse(), OnContinue(). etc.
    }
}The Program.cs file is used to start the service; it serves as the entry point. Its main role is to create an instance of the service and register it.
Add Installation Components to the Service 

Once the service’s core logic is created, we need to add installer components to the project. They provide the metadata and the logic required by the Windows operating system to correctly manage the service.
If you’re looking for an easier alternative to create the installer package for your service, consider using the Advanced Installer tool. It automatically manages service registration eliminating the need to add the Install Components.
To add the components:
- Open MyService.cs
- Right-click in the designer view → Add Installer.
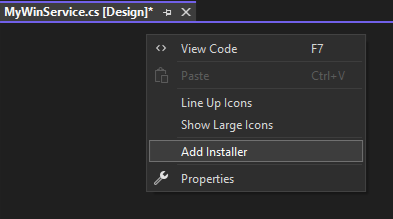
This action will automatically generate a new file called ProjectInstaller.cs.
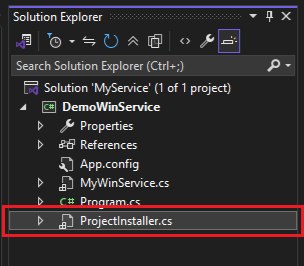
The ProjectInstaller.cs file is meant for the service’s installation, not for its runtime logic. It contains two components (visible if you double click it):
- serviceInstaller - provides information about the service (name, description, start type).
- serviceProcessInstaller - defines the account under which the service runs.

Configure the Installer Components

After adding the installer components, it’s time to configure how the service will run and be registered. This involves setting properties for serviceInstaller and serviceProcessInstaller components.
For the service properties:
- Right-click on serviceInstaller1 and select Properties.
- Here you can find some properties that you can set.
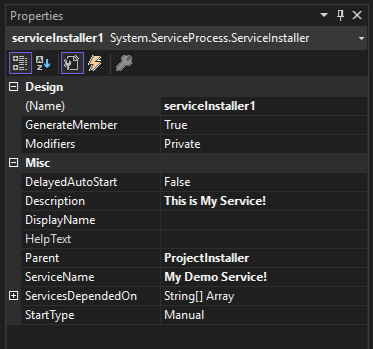
For our example service:
- We set the StartType to Manual so that the service starts manually. You can also change it to Automatic if you want it to start with the operating system at system start-up.
- The service name is My Demo Service!. This property is used by the system to identify the service.
- We’ve added a description to our service - This is My Service!. This description will appear in the Services Management console, providing more context about the service purpose.
To configure how the service runs:
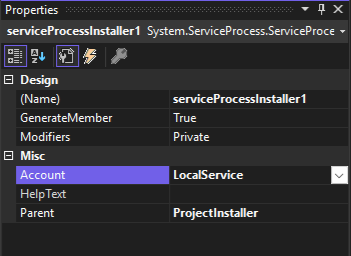
- Select serviceProcessInstaller and go to the Properties section.
- Here, let’s change the Account property from User (which requires specifying username and password) to LocalService to prevent the system from prompting for user credentials.
Add the Microsoft Visual Studio Installer Projects Extension

Once you configure the service with its installation components, you have to create the installer package for your service application.
To do this, use the Setup project template which is available only if you have the Microsoft Visual Studio Installer Projects extension installed.
To add the Microsoft Visual Studio Installer Projects extension:
- In Visual Studio go to Extensions → Manage extensions.
- Search for the extension in the Browse tab and click Install.
- The extension will be automatically installed after you close the IDE. When you reopen Visual Studio, the extension will be ready to use.
Add the Setup Project to Your Service Application

Once the extension is installed, here's how you can add the Setup project:
1. Right-click on the project solution → Add → New Project.
2. Select the Setup Project template from the list of templates and give it a name (e.g. ServiceInstaller).
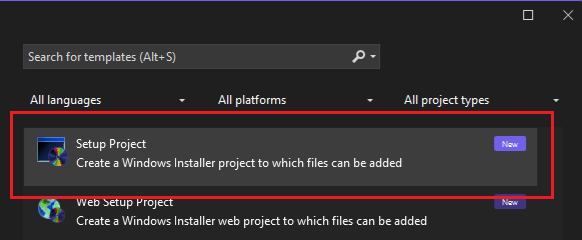
3. Once the setup project is created, you should see it in Solution Explorer.
4. To see its structure, right-click on the Setup Project → View → File System.

Add the Project Output to the Setup Project

Next, we need to add the project output (the compiled files from the service) to the Setup Project:
1. Right-click on the Application Folder in the File System → Add → Project Output.
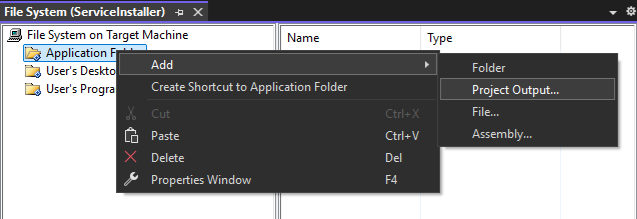
2. Choose the Primary output option from the opened dialog.

Add a Custom Actions to Install the Service

To register the service with the Windows Service Control Manager (SCM) during installation, you need to add a custom action that points to the service’s primary output. This way, the installer executes the service’s built-in installation logic (from ProjectInstaller.cs) handling the service registration.
When using Advanced Installer to build the setup for your service, there's no need for custom actions or additional installer components. The service registration is handled automatically.
To add the custom action:
- Right-click on ServiceInstaller →View →Custom Action.
- Right-click on the Install folder under Custom Actions and select Add Custom Action.
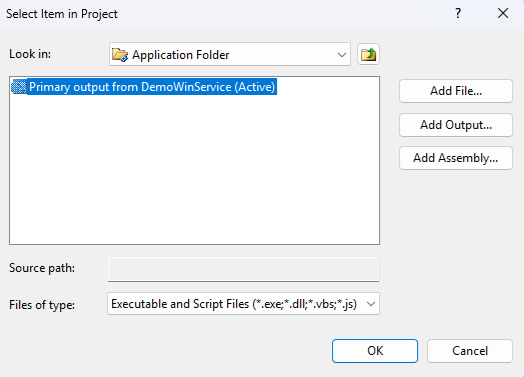
- In the opened dialog, look in the Application Folder and select Primary output.
What If You Need to Uninstall the Service? 

Similarly, to unregister the service during uninstall, you should also add a custom action to the Uninstall step.
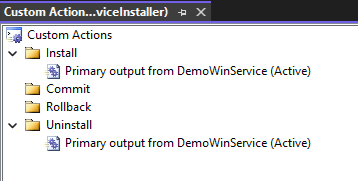
- Go to the Uninstall folder from Custom Actions and follow the same steps as you did for the Install step.
- After this, you will see your custom actions as shown below.
Build and Install the Setup Project

Now that the Setup Project is configured, it’s time to build it to generate the installer.
You should find it in the Debug or Release folder (depending on the build mode) of the Setup Project.
Finally, run the setup. After the installation, look for your service in the Service Control Manager. You should identify the service by the name set along with the description.

We can identify the service (My Demo Service!) along with the description we set. The service is running because we started it manually. If you set the Start type to automatically, it should start on its own.
How to Create the installer using the Advanced Installer tool?

For a more streamlined and user-friendly experience when creating installers for service applications, consider using a dedicated GUI packaging software like Advanced Installer.
This tool simplifies the process of service customizations. You just simply add your compiled service executable to an Advanced Installer project, and then configure everything via its intuitive graphical user interface.
You can download Advanced Installer for Visual Studio here.
For a visual guide on how to create an installer for a Windows Service using the Advanced Installer extension for Visual Studio, check out this tutorial:
Video Tutorial

Step-by-Step Guide to Creating a Service Installer with Advanced Installer

1. Create a New Project:
1.1 Launch Advanced Installer.
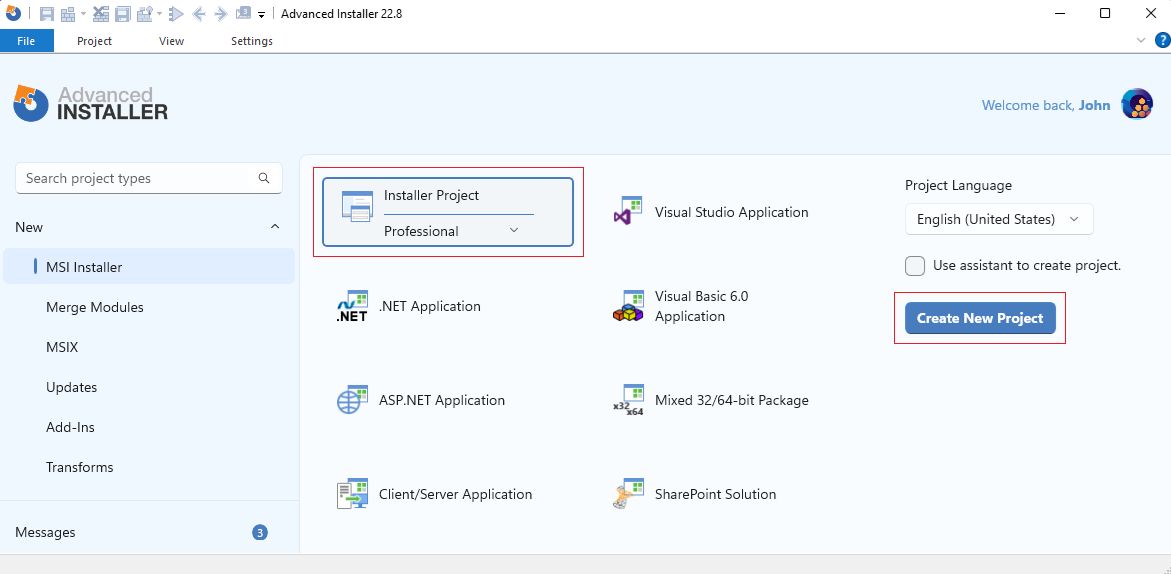
1.2 On the Start Page, select Professional Project or higher and then click Create New Project.
2. Add the Service Files:
2.1 Go to the Files and Folders view.
2.2 Add the service files to the Application Folder.

3. Define a New Service:
3.1 Navigate to the Services view.
3.2 Click New Service.
3.3 Select the service executable file in the opened dialog.

4. Customize the Service:
4.1 After adding the service, access a wide range of customization options in the right-side panel to configure properties as needed.
After setting up the service, build the project to create the installer.
Run it to install the service on your machine. You should see it listed in the Windows Services Control Manager.
Creating the Service Installer with Visual Studio vs. Advanced Installer

Feature | Visual Studio | Advanced Installer |
|---|---|---|
GUI-based configuration | Limited | Full-featured |
Automatically service register/unregister | No (requires custom actions) | Yes (handled automatically) |
Creation of installer components | Yes | Not required (registration managed automatically) |
Control over service operation parameters | Very limited ( requires custom code) | Full control via GUI |
Supports additional UI (dialogs, branding) | No (limited control) | Yes (custom UI dialogs, themes) |
Suitable for complex service configuration | Limited | Highly suitable |
Conclusion

In addition to creating a Windows Service, Visual Studio offers the possibility to create an installer for it. This approach is straightforward for simple services but can become complex if the service requires many advanced configurations.
If you’re looking for richer customization and handling services automatically, Advanced Installer is a flexible alternative, offering full control through its user-friendly GUI.
FAQ: How to Create an Installer for a Windows Service using Visual Studio
What project template is used in Visual Studio for a service targeting .NET Framework?

You should use the Windows Service (.NET Framework) project template. It is specifically designed for building services that run in the background without user interaction.
What are the installer components of a .NET Framework service?

The installer components include two key classes: ServiceInstaller (handles service-specific properties such as service name, description or start type) and ServiceProcessInstaller (responsible for setting the account under which the service will run).
How do I configure a Windows Service?

A Windows Service configuration involves implementing the service logic in the OnStart() and OnStop() methods of the service class and configuring the ServiceInstaller and ServiceProcessInstaller properties in the ProjectInstaller class.
