How to troubleshoot an MSIX package failure with the Package Support Framework
MSIX applications can behave differently when running in an MSIX container.
It often happens that an application that was originally developed for a native installation as MSIX, doesn't work as we want it to. Has your MSIX package ever crashed at startup? Or did it completely fail to launch? This is often due to runtime restrictions within the MSIX container.
In this article, we will show you how to trace the root cause of these MSIX restrictions with the Package Support Framework.
As you know, we can apply predefined PSF Fixups to our package to repair specific issues and be able to run the app successfully. However, before applying those fixups, we first need to locate the root cause of the issue – let's see how we can do that.
The Package Support Framework is intended only for fixing applications that are no longer under active development. If you want to learn more about PSF, check the Introduction to Package Support Framework article.
How to identify the root cause of an MSIX package crash?

When trying to debug an application, the first challenge we encounter is identifying the root cause of the problem. Let's look at a practical example to evaluate our options when we need to identify an issue.
Imagine we have an application that tries to write a file within the installation folder - and it crashes. This is an expected behavior, because this operation is not permitted within the MSIX container.
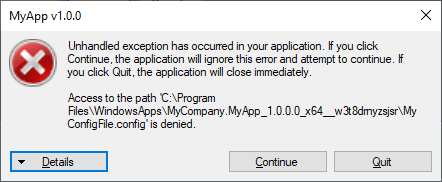
In some instances, you could find useful information in the error description, like in the example below.

As you see, the error reports that access was denied to the configuration file where the application is trying to write.
In this case, you could use the error description as a starting point in your investigation and apply the corresponding PSF Fixup to your MSIX package. In our example, the fixup is to redirect MyConfigFile.config to a location where the application has "write permission".
But what if there is no hint in the error description and you have no clue what the root cause of your issue is? Then, we can use Process Monitor, and we'll go into it next.
Using Process Monitor to Trace the Root Cause of an Issue of an MSIX Package

Process Monitor is a powerful monitoring tool for Windows that captures the application’s file and registry operations, along with their corresponding results. It is a helpful alternative when you need information that is not found in the error description.
All you need to do is to take a ProcessMonitor snapshot of the process, and then go through the captured log to identify what caused your application to fail.
You will find that this Process Monitor log is massive and it's easy to get lost within it. So, a good approach to save time is to check the “Result” column.

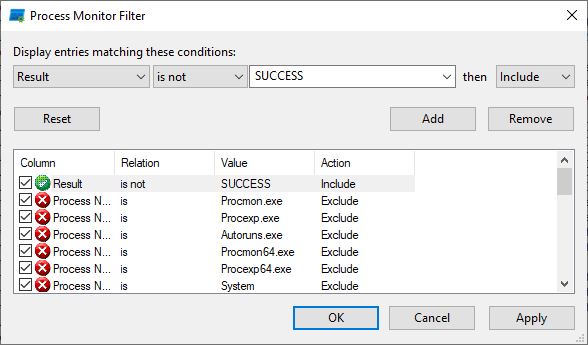
You can see that most of the events show "Success" below that column – but we're not interested in those. We're looking for an issue, so let's filter the events to show online Failures.

After you apply the filter Result is not SUCCESS then Include to show only failures, we still end up with a huge list of events to go through - which is not ideal.
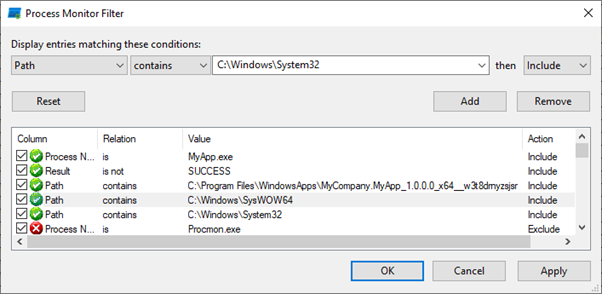
I'd recommend you add these two additional filters to sift through the noise:
1. Process Name – it is very likely that the event that caused the application to crash is triggered by your application executable. Use this filter to show only the events where the Process Name is the same as the app executable name.
2. Path – if you suspect a filesystem failure, then you can filter to show only the events that are under System32/SySWOW64 or the MSIX Package Root Directory.

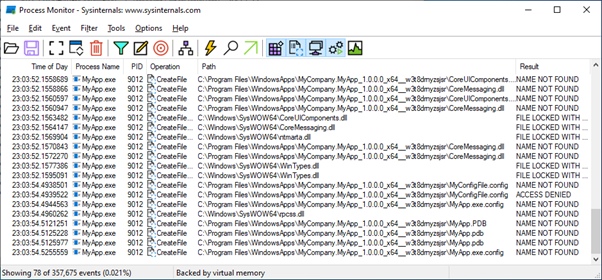
These filters help you to drastically reduce the list of potential events that could have caused the application to crash. In our example, we went from over 350k to less than 80.

Most recent events are shown at the bottom of the list. So, it's best to start at the bottom of the list and scroll up, paying more attention to those events that have the following tags in the Result column:
- Access Denied
- Path Not Found
- Name Not Found
Going back to our example, we can identify our CreateFile Operation for the path returns an “Access Denied” Result:
“C:\ProgramFiles\WindowsApps\MyCompany.MyApp_1.0.0.0_x64__w3t8drnyzsjsr\MyConfigFile.config”
This is the root cause of our application failure, since it returns an Access Denied result.

Now, let's apply those PSF fixups we talked about.
Applying PSF Trace Fixups Using MSIX Packaging Tool

The PSF Trace Fixup DLL is included in the Package Support Framework and provides an alternative mechanism to trace the root cause of your issue, similar to Process Monitor.
To add the PSF Trace Fixup into your MSIX package, follow the next steps:
1. Create a new config.json and insert the following code into it:
{
    "applications": [
        {
            		"id": "",
            "executable": ""
        }
    ],
"processes":[
        {
            "executable" : ".*",
            "fixups":[
            	{
                	"dll": "TraceFixup.dll",
                	"config": {
                        "traceMethod": "outputDebugString",
                        "traceLevels": {
	                        "default": "allFailures"
                    	}
                	}
            	}
            ]
        }
	]
}For more information about PSF Trace Fixup and how to configure it via the elements within the config.json, please check Trace Fixup readme.md on GitHub repository.
2. Open the MSIX package in the MSIX Packaging Tool – Package Editor.
3. Open the AppxManifest.xml file.
4. Copy the value in the “Id” field within the AppxManifest.xml file to the Applications “id” field in the config.json file.

5. Then, copy the value in the “Executable” attribute of the “Application” element within the AppxManifest.xml file to the Applications “Executable” field in the config.json file.

6. Save the config.json file and copy it into the MSIX package (directly in the Package Root Directory).
{
    "applications": [
        {
            		"id": "",
            "executable": ""
        }
    ],
"processes":[
        {
            "executable" : ".*",
            "fixups":[
            	{
                	"dll": "TraceFixup.dll",
                	"config": {
                        "traceMethod": "outputDebugString",
                        "traceLevels": {
	                        "default": "allFailures"
                    	}
                	}
            	}
            ]
        }
	]
}7. Depending on your application architecture, add the corresponding PSF files into your MSIX package (directly in the Package Root Directory, next to the config.json file)
- PsfLauncher32.exe/PsfLauncher64.exe
- PsfRunDll32.exe/PsfRunDll64.exe
- PsfRuntime32.dll/PsfRuntime64.dll
- TraceFixup32.dll/TraceFixup64.dll
- WaitForDebuggerFixup32.dll/WaitForDebuggerFixup64.dll
8. Edit the manifest file by changing the value of the “Executable” attribute of the “Application” element to point to the PsfLauncher executable instead of the original executable of your application.

Once the MSIX package includes the trace fixup, you can use a debugger or a diagnostic tool like Debug View to see the output of all the operations that your app executed - based on the configuration set in config.json.
In our example scenario, if we open the Debug View and then launch the application with the Trace Fixup included, you’ll see a “CreateFile” operation for “C:\Program Files\WindowsApps\MyCompany.MyApp_1.0.0.0_x64__w3t8drnyzsjsr\MyConfigFile.config” returns an “Access Denied” result and this is the root cause of our application failure.

Alternatively, starting with version 1.2023.118.0, you can inject the PSF Trace Fixup automatically straight from MSIX Packaging Tool - Package editor GUI. All you need to do is to “Enable tracing of API calls”.

The corresponding config.json should look like the one below:
{
  "applications": [
	{
  	"id": "MYAPP",
  	"executable": "VFS\\ProgramFilesX64\\MyApp\\MyApp.exe",
  	"workingDirectory": "VFS/ProgramFilesX64/MyApp",
  	"monitor": {
    	"executable": "PsfMonitor.exe",
    	"arguments": "",
    	"asadmin": true
  	}
	}
  ],
  "processes": [
	{
  	"executable": "MyApp",
  	"fixups": [
    	{
      	"dll": "TraceFixup.dll",
      	"config": {
        	"traceMethod": "eventlog",
        	"traceLevels": {
          	"default": "always"
        	}
      	}
        }
  	]
	}
  ]
}As you can see, PSF Launcher supports running an additional program, in our case PSF Monitor, that has to be launched before starting the primary application.
So when you launch the application, PSF Monitor gets automatically triggered and in there, you’ll see a “CreateFile” event for “C:\Program Files\WindowsApps\MyCompany.MyApp_1.0.0.0_x64__w3t8drnyzsjsr\MyConfigFile.config” returns a failure.

Applying PSF Trace Fixups and Debug MSIX Failure Using Advanced Installer

Advanced Installer comes with “TraceApp” functionality which is a built-in feature to trace the MSIX package and identify if any fixups need to be applied to it.
To use the “TraceApp” option in Advanced Installer, go to the “AppCompat” page and click on the “TraceApp” button.
And that’s it! Advanced Installer will automatically inject the PSF Trace Fixup into your MSIX package, trace it and return to the PSF Fixups that need to be applied to your package, if any is identified during the tracing.
If you want to see how the TraceApp functionality works, give it a try through the Advanced Installer 30-day full-featured free trial.

You can also configure the PSF Trace Fixup that you will apply to your MSIX package using the "Tracing Options" button, located next to "Trace App".

Conclusion

Now you can identify the root cause of an issue in your MSIX package and fix it with the Package Support Framework.
With Advanced Installer, you save time and avoid going through the Process Monitor or DebugViewer logs to identify the root cause of the issue.
It's worth noting that Advanced Installer doesn't just trace the MSIX package. It also suggests all the PSF fixups you need to apply to your package if it finds any issues during the tracing.
Did you find this article useful? Let us know what we should discuss next.
