Handle fonts on Windows with PowerShell (and a faster alternative)
Windows fonts are a set of digital files that define how text appears on the screen or in print.
Fonts control the style, shape, and spacing of letters, numbers, and symbols and are used by both the operating system and installed applications.
Fonts aren’t usually the first thing that comes to mind when you think about PowerShell scripts. From an IT professional’s perspective, you may have to script the font installing or uninstalling.
In this blog post, we’ll explore how to handle fonts using PowerShell, including how to install and uninstall them.
How Windows Handles Fonts 

Fonts in Windows aren’t just files you drop into a folder. They are located in C:\Windows\Fonts, yet copying a font file there isn’t enough.
Why? Because Windows needs to register that font in the Registry:
HKEY_LOCAL_MACHINE\SOFTWARE\Microsoft\Windows NT\CurrentVersion\Fonts
As of Windows 10, version 1803+, you can install fonts for a single user under %LocalAppData%\Microsoft\Windows\Fonts.
Installing Fonts with PowerShell

Here’s a simple PowerShell script that copies the font file to the Fonts directory and registers it in the registry.
$FontSourcePath = "C:\Fonts\CustomFont.ttf"
$FontDestinationPath = "C:\Windows\Fonts\CustomFont.ttf"
$FontRegistryName = "Custom Font (TrueType)"
$FontFileName = "CustomFont.ttf"
# Copy to Fonts directory
if (-Not (Test-Path -Path $FontDestinationPath)) {
	Copy-Item -Path $FontSourcePath -Destination $FontDestinationPath -Force
}
# Add Registry Entry
$FontRegPath = "HKLM:\SOFTWARE\Microsoft\Windows NT\CurrentVersion\Fonts"
if (-Not (Get-ItemProperty -Path $FontRegPath -Name $FontRegistryName -ErrorAction SilentlyContinue)) {
	New-ItemProperty -Path $FontRegPath -Name $FontRegistryName -PropertyType String -Value $FontFileName -Force
}Uninstalling Fonts with PowerShell

Removing fonts is just the same process in reverse. Delete the file, clean up the registry, and it’s done:
$FontFile = "CustomFont.ttf"
$FontRegName = "Custom Font (TrueType)"
$FontPath = "C:\Windows\Fonts\$FontFile"
# Remove font file
if (Test-Path -Path $FontPath) {
	Remove-Item -Path $FontPath -Force
}
# Remove registry entry
Remove-ItemProperty -Path "HKLM:\SOFTWARE\Microsoft\Windows NT\CurrentVersion\Fonts" -Name $FontRegName -ForceA Faster Way: Advanced Installer 

Here’s the thing: if your application is already packaged in an MSI, you don’t have to touch PowerShell or the Registry at all.
With Advanced Installer, you just:
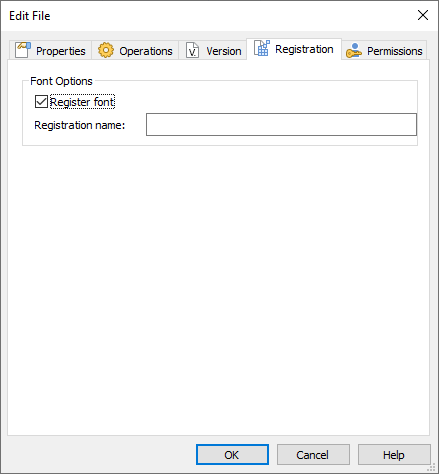
- Go to the “Files and Folders” page and in there browse to the “Fonts” folder then add your file.

- Right-click on the font you just added and then click “Properties”; within the newly opened window, select the “Registration” tab and check the “Register font” box

That’s it. When users install your MSI, the font is copied and registered automatically. When they uninstall, the font gets removed. No extra scripts, no manual cleanup.
Conclusion

PowerShell is great when you need automation across many machines, or if you’re just experimenting. But if you’re already building an installer, why reinvent the wheel? Advanced Installer takes care of font registration and cleanup for you, so you can focus on shipping your app instead of dealing with registry keys.
