How to Easily Install Windows Registry Keys and Entries
Registry keys play an important role in the Windows operating systems.They store configuration data and settings for both the system and applications. By adding registry keys, you can properly configure and optimize your app for each user’s system.
In this article, I’ll show you how to install registry keys and entries alongside your application using Advanced Installer.
Create a Project in Advanced Installer

To get started, let’s create a package project in Advanced Installer:
- Open Advanced Installer.
- On the Start Page, select Simple Installer Project and then click Create New Project.

- Once the project is created, in the left pane, navigate to the Product Details page to set your product info.
Download the free edition of Advanced Installer to start creating reliable MSI packages for your Windows applications. Just sign up and get started with the “Simple” project template.
Download Advanced Installer Free
Add the Application Files

After setting up the package, you need to add your app resource files:
- Go to the Files and Folder page.
- Click on the Add Files button and then select the files.
- After adding the files, you should see them listed in the right-side pane of the view.
Add a Registry Key

With the app configured, it’s time to add a registry key:
- Navigate to the Registry page in the left pane of Advanced Installer.
- Locate the hive Current user / Local machine. Here, by default, Advanced Installer creates the following registry entries: Path and Version.

- To add a key, simply click on the [New Key] button and provide the name for the key. Let’s name it AppSettings.
Add a Registry Entry

To add an entry within a specific registry key:
- Select the key where you want to add the value.
- Use the [New Value] button.
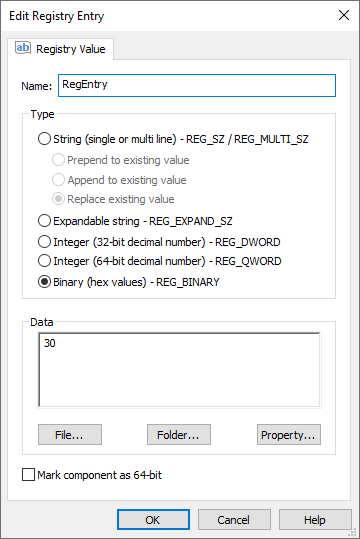
- In the Edit Registry Entry dialog, set the following:
- Assign a name for the entry – I’ll name it RegEntry.
- Choose its type – let’s choose the ‘Binary’ type.
- Enter a value in the Data field – I’ll enter ‘30’.
- If you want to create a 64-bit registry value, you need to enable the ‘Mark component as 64-bit’ option.

Once the registry entry is added, it will appear in the right-side pane of the view.
Build and Install

Now, let’s build the project and install the application. Once the application is installed, go to the registry editor to check if the registry key has been created.
Conclusion

Installing a registry key using the free version of Advanced Installer is as simple as that. With this powerful tool, you can easily and quickly add registry keys to your installation package, ensuring smooth operation of your software on users' computers.
