How to Read Values from an INI File in Your Installer
When creating an installer for your application, it's often necessary to read configuration values during the setup process.
INI files are a popular choice for storing such values. They can help you customize the installation, such as setting installation paths, user preferences, or system configurations.
To learn more about what an INI file is, how to create, open and edit one, check out this article.
Now, let’s explore how to read values from an INI file and use them in your installer created with Advanced Installer.
If you need help creating a package project in Advanced Installer, check out the tutorial here.
If you haven't used Advanced Installer yet, you can try it for free with a 30-day trial.
Here is the content of the INI file we will use for this tutorial.
[About]Name=Ethan Smith
Email=ethan_smith@gmail.com
[Settings]
InstallPath=D:\Demo
To set the installation directory, we’ll retrieve the InstallPath key from the [Settings] section. Additionally, I will display the key values from the [About] section in a dialog during the installation process.
Step1: Create a Custom Dialog

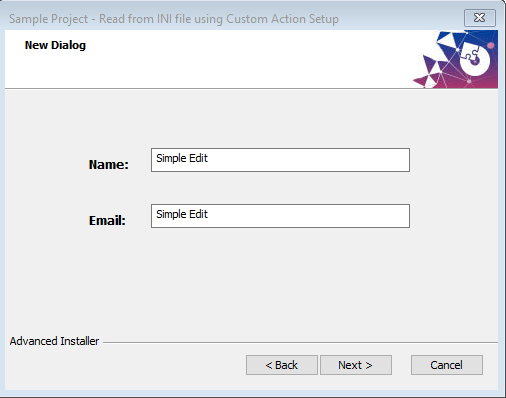
First, we need to create a custom dialog with two edit boxes to display the Name and the Email values.
- Navigate to the Dialogs page in Advanced Installer.
- In the First Time Install sequence, select the WelcomeDlg dialog.
- Click on the New Dialog toolbar button to create the new dialog. You should see it placed after the WelcomeDlg dialog.
- In the Properties pane, set the dialog’s name (e.g., CustomDialog).

Add Controls to the Dialog

Once the dialog is created, it’s time to add the controls by using the Control toolbar button:
1. Select the Edit Box control from the list of controls.
2. Optionally, add two static text labels for clarity.

3. Link each edit box to a specific property:
- Select the edit box and go to the Properties pane. Assign the NAME property and EMAIL property to the two edit boxes.
Step 2: Add the INI File as a Temporary File

To ensure the INI file is available during the Dialog Stage, we need to add it as a temporary file:
- Navigate to the Files and Folders view
- Click the ‘Add Temporary Files’ toolbar button and select the INI file.
Step 3: Create a Custom Action to Read the INI file

To read values from the INI file, we will use a PowerShell script:
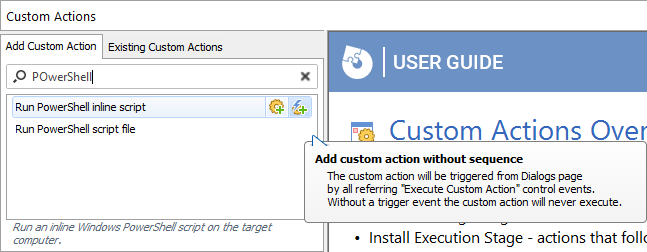
1. Navigate to the Custom Actions view.
2. Go to the Add Custom Action tab.
3. Search for Run PowerShell inline script and add it as a custom action without sequence.

4. After creating the custom action, add the following script into the text field.
#Requires -version 3
Param()
# adding the assembly so we can use the MessageBox class - debug purposes
Add-Type -AssemblyName PresentationFramework
function Get-IniFile
{
    param(
        [parameter(Mandatory = $true)] [string] $filePath
    )
    $anonymous = "NoSection"
    $ini = @{}
    switch -regex -file $filePath
    {
        "^\[(.+)\]$" # Section
        {
            $section = $matches[1]
            $ini[$section] = @{}
            $CommentCount = 0
        }
        "(.+?)\s*=\s*(.*)" # Key
        {
            if (!($section))
            {
                $section = $anonymous
                $ini[$section] = @{}
            }
            $name,$value = $matches[1..2]
            $ini[$section][$name] = $value
        }
    }
    return $ini
}
# get the path to the TempFolder, where our INI file was added
$tempFolder = AI_GetMsiProperty TempFolder
# as the path to the .INI file is %temp%\NameOfTheIniFile.ini, we join the paths to create the full path to our INI file
$pathToIni = Join-Path -Path $tempFolder -ChildPath "sampleINI.ini"
# get the content of the INI file in a variable
$sampleINI = Get-IniFile -filePath $pathToIni
# get the value of each element we need and store it in an installer property so we can further display it on our custom dialog
AI_SetMsiProperty NAME $sampleINI.About.Name
AI_SetMsiProperty EMAIL $sampleINI.About.Email
AI_SetMsiProperty APPDIR $sampleINI.Settings.InstallPathExplanation of the Script

You can notice at the end of the script that the custom action retrieves the values of the INI file’s keys and stores them in the installer properties linked to the edit boxes. Additionally, the installation path property is set based on the InstallPath key.
Step 4: Schedule the Custom Action

We’ll schedule the custom action to run before displaying the custom dialog.
Specifically, it will be triggered when the Next button on the Welcome dialog is clicked. This ensures the values are available when the dialog is shown:
- Navigate to the Dialogs page and select the WelcomeDlg dialog.
- Select the Next button on the dialog and go to the Published Events tab.
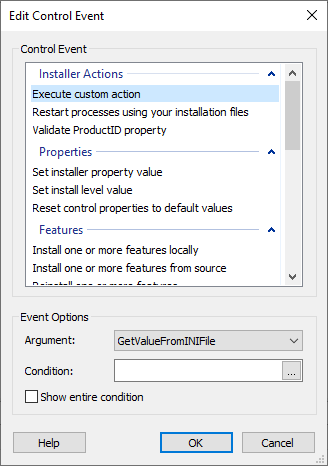
- Click the New button to add a new control event.
- In the Control Event section select Execute Custom Action
- In the Argument field in the Event Options section, select the previously created custom action.

And that’s all. Build the project and run the installer. The Name and Email values should appear in the custom dialog. The installation path should be set to the location specified in the INI file.
Explore the power of INI file support in Advanced Installer and enhance your installer's functionality through our 30-day free trial.
