How to set the ASP.NET Version for a Website or Application
To make websites or applications available online, you need to host them on a web server.
Nowadays, we have several options to choose from, but one of the most reliable and popular is Internet Information Services (IIS). IIS was created to run on the Microsoft .NET platform on the Windows OS.
IIS has support for a wide range of protocols and tools that make it easy to register websites. It also has the benefit of being able to host ASP.NET applications without the need for additional software.
One common task we perform during the deployment of an ASP.NET website or application is "setting the corresponding version".
In this article, I will show you how to set the ASP.NET version for a website or application installed and configured on an IIS server.
What is ASP.NET on IIS?

ASP.NET is the successor of ASP (Active Server Pages) development framework, and it was introduced as a new programming infrastructure to simplify web app development.
The ASP.NET file extension web pages are .aspx and .ascx. When a request with one of these extensions is received by IIS, an ISAPI dll (aspnet_isapi.dll) is called to process the request. This dll contains all the ASP.NET functionalities.
Every .NET Framework version that is installed has its own ISAPI extension, which is associated with the ASP.NET IIS Registration Tool (aspnet_regiis.exe). This tool allows an installer to update the script maps for an ASP.NET application – this way the application points to the correct ASP.NET ISAPI version associated with the tool.
To perform various configuration tasks, you can use Aspnet_regiis.exe, which can be found in this location: %systemroot%Microsoft.NETFrameworkversionNumber.
How to configure the ASP.NET version of your project?

Let’s suppose you created a package for an ASP.NET website or application, and you need to set the ASP.NET version.
You can use Advanced Installer to deploy a website or application. Find out how in the “How to deploy a website using Advanced Installer” article.
To configure the ASP.NET version for your package, follow the next steps:
For this tutorial, we will be using Advanced Installer. If you are new to Advanced Installer, you can try it through our 30-day full feature trial. (After the trial ends, you will have access to Freeware edition).
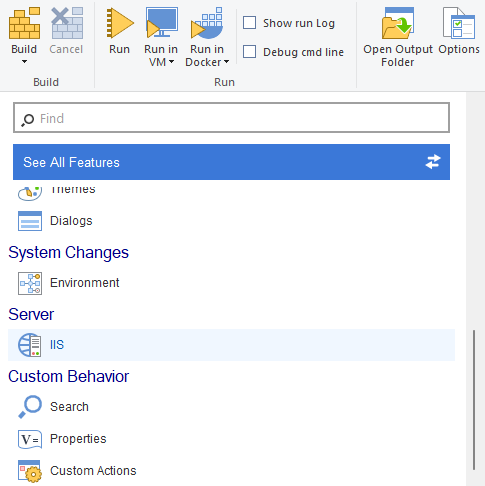
1. Go to the IIS Serverpage in Advanced Installer.

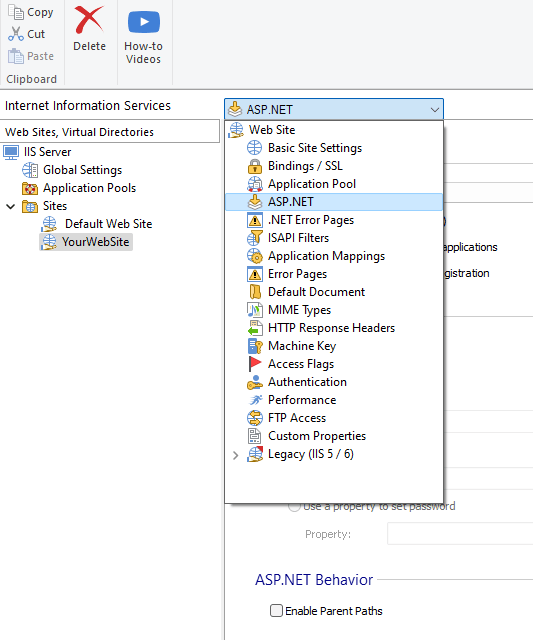
2. In the IIS view, select the ASP.NET tab.

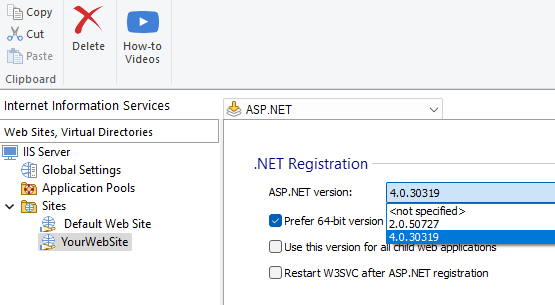
3. In the .NET Registrationsection select the ASP.NET version for your website or application.

There are three options available:
- <not specified> - no ASP.NET registration is made
- 2.0.50727 - register your application with .NET 2.0, 3.0 or 3.5
- 4.0.30319 - register your application with .NET 4.0
If you select the 2.0.50727 or 4.0.30319 option, make sure to check if the corresponding Windows feature is installed on the machine. If not, it will be automatically installed.
When installing the Windows features, the Apphost.config file will be updated by adding global modules, ISAPI filters and restrictions.
Extra step: You can call the Aspnet_regiis.exe tool corresponding to the version you select. The installer then runs the tool to map the website or application to the ISAPI version associated with the tool.
Conclusion

Setting the ASP.NET version is one of the common steps taken when deploying websites or applications. Thanks to Advanced Installer’s GUI, you are able to speed up this process – the installer will map your website or application to the selected version automatically, without manual intervention.
We hope you found this article useful.
Subscribe to Our Newsletter
Sign up for free and be the first to receive the latest news, videos, exclusive How-Tos, and guides from Advanced Installer.