How to install the .NET framework as a prerequisite using Inno Setup
Software applications often require certain components, like runtime environments, databases, or other software to run properly. It’s important to make sure the right versions of these components are installed before the main application runs.
This article guides you through the steps to add .NET Framework as a prerequisite using Inno Setup. Additionally, we’ll use a simpler alternative using Advanced Installer.
Create the Script

First, we need to create the setup script that will define the installer parameters. We have two options in the Inno Setup Welcome dialog:
- Create the script files using the Script Wizard. This option allows you to define some basic installer properties through a user interface.
- Create an empty script file.
For full control over the script, we will choose to create an empty script file.
Once we’ve selected the empty script, we will add only the essential sections to the setup script and define them manually.
Define the Installer Parameters

In the empty script file, Once the setup script is created, we need to define two key sections:
- [Setup] section that defines the global settings.
[Setup]
AppName=MyApp
AppVersion=1.0
DefaultDirName={pf}\MyApp
DefaultGroupName=MyApp
OutputDir=D:\MyAppInstaller
OutputBaseFilename=MyApp_Setup
Compression=lzma
SolidCompression=yes
PrivilegesRequired=admin- [Files] section that defines the files to be installed on the user’s system.
[Files]
Source: "D:\MyApplication\sample.exe"; DestDir: "{app}";
Source: "D:\MyApplication\NDP481-Web.exe"; DestDir: {app}; Flags: deleteafterinstall; Check: FrameworkIsNotInstalledAdd .NET Framework as a Prerequisite using Inno Setup

Next, we need to add the .NET Framework 4.8.1 as a prerequisite.
This requires the [Code] section, where we can define some key procedures and functions:
1. Extract the .NET Framework Installer
This procedure extracts the .NET Framework installer from the installation package to a temporary directory. It uses the ‘ExtractTemporaryFile’ function that targets the files listed in the [Files] section of the script.
procedure ExtractFrameworkInstaller;
begin
  ExtractTemporaryFile('NDP481-Web.exe');
end;2. Install the .NET Framework
This procedure attempts to install the .NET Framework 4.8.1 and displays an error message if the installation fails.
procedure InstallFramework;
var
  ResultCode: Integer;
begin
  if not Exec(ExpandConstant('{tmp}\NDP481-Web.exe'), '/passive', '', SW_SHOW, ewWaitUntilTerminated, ResultCode) then
  begin
    MsgBox('.NET Framework installation failed with code: ' + IntToStr(ResultCode) + '. Please install .NET Framework 4.8.1 manually and try again.', mbError, MB_OK);
    Abort;
  end;
end;3. Check if the .NET Framework is Installed
This function checks the registry to determine if .NET Framework 4.8.1 is already installed on the system.
function FrameworkIsNotInstalled: Boolean;
var
  success: Boolean;
  releaseVersion: Cardinal;
begin
  success := RegQueryDWordValue(HKLM, 'SOFTWARE\Microsoft\NET Framework Setup\NDP\v4\Full', 'Release', releaseVersion)
             or RegQueryDWordValue(HKLM, 'SOFTWARE\Microsoft\NET Framework Setup\NDP\v4\Client', 'Release', releaseVersion);
  Result := success and (releaseVersion >= 533320);
end;4. Initialize the Setup
This function initializes the setup process by following the next steps:
- Extracts the .NET Framework installer using the ‘ExtractFrameworkInstaller’ procedure.
- Checks if the .NET Framework is installed using the ‘FrameWorkIsNotInstalled’ function.
- Prompts the user and starts the installation if the framework is not installed.
function InitializeSetup(): Boolean;
begin
  ExtractFrameworkInstaller;
  if FrameworkIsNotInstalled() then
  begin
    MsgBox('This application requires .NET Framework 4.8.1. The installer will now attempt to install it.', mbInformation, MB_OK);
    InstallFramework;
  end;
  Result := True;
end;Add .Net Framework as a Prerequisite Using Advanced Installer

Advanced Installer offers a much simpler, GUI-based approach to handling prerequisites, including the .NET Framework.
Here's how we can create an installer and add .NET Framework as a prerequisite:
1. Create a New Project
- Open Advanced Installer and choose the installer project type. For Prerequisites, you need at least the Professional edition.
- Select the Professional project type or higher and click the ‘Create New Project’ button.

2. Add Application Files
Once the project is created, you need to add the application files:
- Navigate to the Files and Folders page in Advanced Installer.
- Add the file to the Application Folder.

3. Add .NET Framework Prerequisite
To include the .NET Framework as a prerequisite, just follow the next steps:
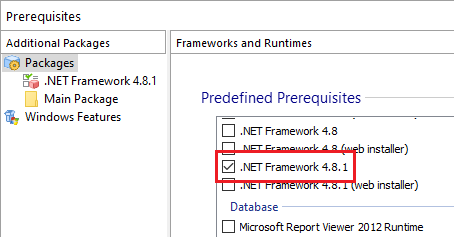
- Navigate to the Prerequisites page.
- Select the .NET Framework from the Predefined Prerequisites.

Will be prompted that the prerequisite is using an online location. You can choose to either download the prerequisite during the installation or include it directly in your package.
If you don’t include it in your installer package, a predefined launch condition “Run only if an active Internet connection is found” is automatically added. This will ensure the installation will proceed only if the user has internet connection to download the prerequisite.
4. Configure the Prerequisite
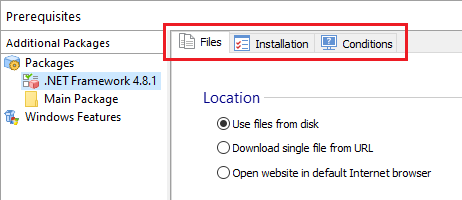
To configure your prerequisite, navigate to one of the following tabs based on your needs:
- Files - to configure the prerequisite files.
- Installation - to edit the properties of the prerequisite.
- Conditions - to set the install condition of the prerequisite.

5. Build the Installer
Once all the settings are configured, all you need to do is build the project to generate the installer. Then, run the installer to install the application and check if the prerequisite is installed correctly.
Conclusion

Adding .NET Framework as a prerequisite in Inno Setup requires writing custom code. This can be challenging and time-consuming, particularly for developers unfamiliar with scripting.
In contrast, Advanced Installer simplifies the process significantly, providing a user-friendly interface that reduces setup time and effort. Advanced Installer also offers greater flexibility in managing prerequisites with fewer manual steps, making it an excellent choice for software developers who need a streamlined solution.
See how Advanced Installer can work for you—enjoy a 30-day full-feature trial.
