PowerShell & Intune, Automate your Work - Part 1: Retrieve Win32 Apps
In this article, we will: Have a look over the AZ module, Understand how authentication with Azure works, Explore Microsoft Graph and Microsoft.Graph.Authentication module and Learn how to put all of this together to get the list of Win32 applications from Intune via PowerShell.
So let’s dive in.
PowerShell Is Your Key to Mastering Azure

Imagine stepping into a vast library where every book holds the secrets to managing different facets of the digital realm.
That's kind of what it feels like when you start to manage Azure with PowerShell.
Azure is this sprawling cloud platform where you can do just about anything related to computing, from hosting websites and applications to analyzing data lakes filled with information.
But navigating this can feel a bit like being a kid in a candy store—overwhelming yet exciting.
That’s where PowerShell comes into the picture, acting as your guide, helping you make sense of it all.
PowerShell is like that cool gadget you’ve always wanted: versatile, powerful, and surprisingly fun to use once you get the hang of it.
It lets you talk directly to Azure, asking it to do things for you, like creating a new virtual machine or setting up a network, and it’s all done with a few lines of text. Imagine typing a simple command and seeing a new virtual machine spring to life. That’s the power of PowerShell at your fingertips.
But why PowerShell, you might ask?
Well, it's all about automation and efficiency.
In the old days, you’d have to click around in a web interface to get things done in Azure.
With PowerShell, you script these tasks once, and then it’s just a matter of running your scripts.
This not only saves you time but also reduces the chance of human error. You know, the kind of error that happens when you’re setting up something for the umpteenth time and accidentally click the wrong button. Oops!
The thing about PowerShell is that it’s not just a one-trick pony.
It can handle almost every service Azure has to offer.
Need to manage storage accounts, configure virtual networks, or automate deployment processes?
PowerShell has got your back.
And the beauty of it is that you don’t need to be a coding wizard to make it work for you. Sure, having a bit of scripting knowledge is helpful, but many have trodden this path before you, meaning there’s a wealth of scripts and commands readily available for you to use and adapt.
If you are new to PowerShell and need a guide on understanding the core basics, cmdlets, queries, local OS changes, WMI, and more, I recommend checking out the PowerShell for Beginners free eBook.
The first step to unlocking this potential is to get your workstation set up with the right tools. In the context of PowerShell and Azure, this means installing the Azure PowerShell module, a collection of cmdlets specifically designed to manage Azure resources directly from the PowerShell command line.
Getting started with Azure PowerShell is easier than you might think.
It requires an installation step that brings all the Azure management capabilities to your local PowerShell environment. This process is akin to downloading a new app on your phone that suddenly gives you capabilities you didn’t have before. Only in this case, the app turns your command line into a powerful control panel for cloud resources.
In essence, harnessing the power of Azure with PowerShell is about making the complex world of cloud computing accessible, manageable, and enjoyable.
Whether you’re a seasoned IT professional or a curious enthusiast looking to explore what cloud computing can offer, PowerShell is your gateway to mastering Azure. It’s about taking the reins and controlling the cloud, rather than letting the cloud control you.
So, open up that command line, and let’s start scripting our way through the clouds.
Getting Started with the AZ Module

Diving into the world of Azure with PowerShell is like unlocking a new level in a game where the challenges are complex but the rewards are huge. The first quest in this adventure? Installing the AZ Module.
The AZ Module is a collection of commands, or cmdlets as they're known in the PowerShell realm, specifically designed to manage Azure resources. Installing it is like downloading the ultimate app for cloud management—suddenly, you've got all these amazing capabilities at your fingertips, from deploying virtual machines to managing blob storage.
Let's break down the installation process into simple steps. No technical jargon or complicated procedures here, just simple, step-by-step guidance.
First, you need PowerShell. If you're using a recent version of Windows, it's probably already on your system. PowerShell is that powerful tool you've probably heard about but might not have used much. It's time to change that. Just search for PowerShell in your Start menu, right-click it, and select 'Run as administrator'. This gives you the necessary permissions for the installation process.
With PowerShell up and running as admin, you can now install the AZ Module. Type in the command:
Install-Module -Name Az -AllowClobber
This is like telling your computer, "Hey, go get me the toolkit that'll make me a cloud wizard."
The `-AllowClobber` part? That's just a safety measure, ensuring that if there are any conflicts with commands you already have, this new module will take priority.
After you hit enter, your system will start fetching the AZ Module from the internet. This might take a moment, so it's a good time to grab a coffee, think about your future as an Azure magician, or just watch the progress bar move forward. After all, it's downloading the keys to the Azure kingdom.

Once the installation wraps up, you might want to ensure everything's in place. Run to see all the Az-related cmdlets now at your disposal:
Get-Module -ListAvailable Az*
This command is like opening your toolbox and checking that all the tools you were promised are there, ready and waiting.
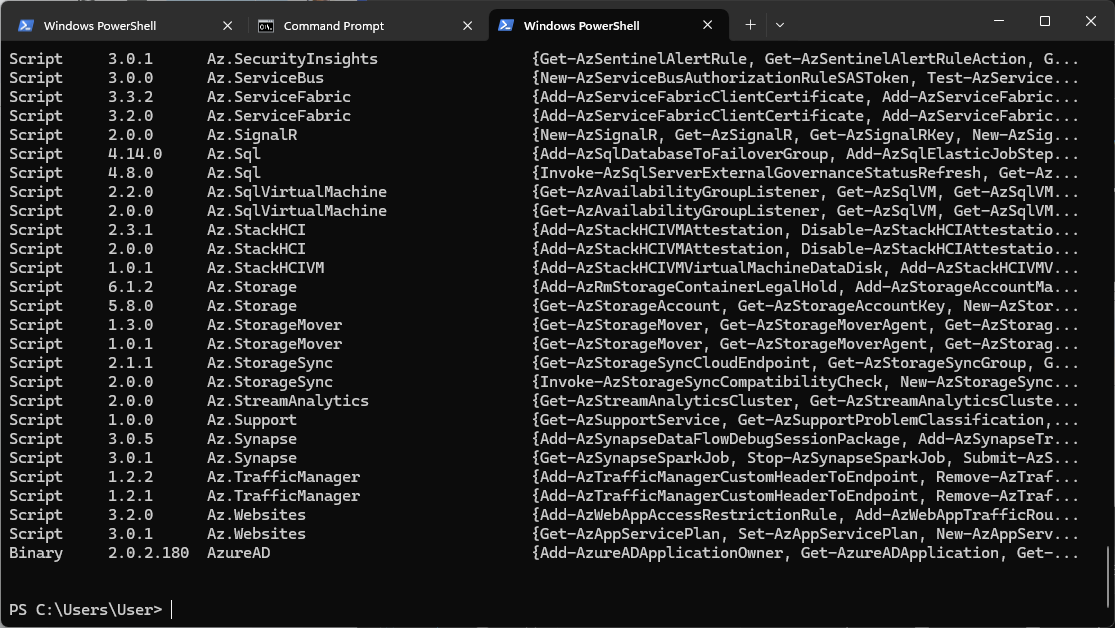
And that's it! You're now equipped with the AZ Module, ready to start casting your spells in the Azure cloud. This toolkit transforms PowerShell into a control center for Azure, allowing you to manage resources, automate tasks, and do pretty much anything Azure allows, all from the comfort of your command line.
Installing the AZ Module is the first step in your journey through Azure with PowerShell.
Understanding Authentication with Azure

So, you've got PowerShell and the AZ Module ready to go. The next big thing you need to tackle is authentication.
This ensures Azure knows who you are before letting you do anything.
The Connect-AzAccount cmdlet is your first real action step into Azure through PowerShell.
Running this command is like logging into your Azure account but through the command line. It's the official handshake between you and Azure, confirming your identity and letting you access your resources.
When you run Connect-AzAccount, a login window pops up. Here, you enter your Azure credentials – your email and password associated with your Azure account. Once you're authenticated, you're good to go. This step is crucial because, without it, you can't do anything in Azure.
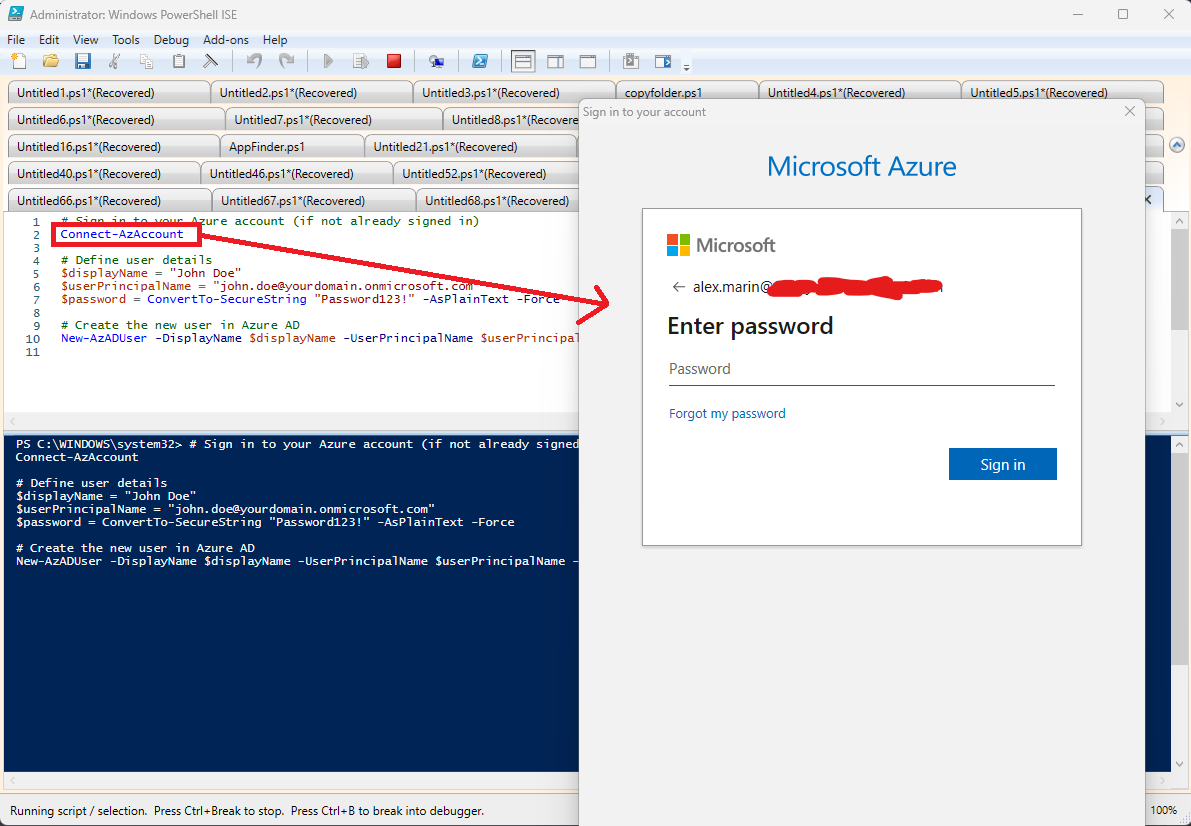
Here’s what happens after you successfully authenticate:
- You Get a Security Token: This token is like a temporary pass that confirms your identity to Azure services. It's proof that you've logged in successfully, and it's what allows you to make calls to Azure and manage resources.
- A Session Starts: This isn’t just any session. It’s a secure link between your PowerShell and Azure, ensuring that the commands you run and the changes you make are securely communicated back and forth.
- Access Boundaries Are Set: Depending on your account and the permissions it has, you might have a wide range of capabilities or be limited to specific areas within Azure. It’s all about what roles and access rights are associated with your account.
The authentication step might seem like just a formality, but it's super important. It ensures security (so that not just anyone can mess with your Azure setup) and customizes your PowerShell session to reflect what you can and cannot do in Azure. It’s about making sure that your session is both secure and tailored to your role.
Remember, the token you get when you authenticate isn't permanent. It expires after a while for security reasons. This means you'll need to re-authenticate from time to time to keep your session active and secure. Think of it as refreshing your access so you can keep working without interruption.
Getting through the authentication gate is a must-do if you want to start doing actual work in Azure with PowerShell. It’s the setup that lets you dive into the real action, like deploying resources, configuring services, and automating tasks. Once you're authenticated, the whole Azure platform is at your command, ready for whatever tasks you have in mind.
Understanding Microsoft Graph

Microsoft Graph is at the center of the Microsoft 365 universe, connecting you to the wealth of data across Microsoft’s cloud services. It’s an incredibly powerful tool for developers and IT professionals, enabling access to information and actions across services like Office 365, Azure Active Directory (Azure AD), OneDrive, and more. At its core, Microsoft Graph is about making all these different services work together seamlessly.
Microsoft Graph uses REST (Representational State Transfer) APIs to communicate. REST APIs are a standard method for interacting with web services. They work over HTTPS, the same protocol that powers most of the internet, making them universally accessible and easy to use. REST APIs are stateless, meaning each request from a client to a server must contain all the information the server needs to fulfill the request. The server doesn't retain any session information between requests.
If you want to have sample queries or just strictly work with Microsoft Graph before jumping to PowerShell REST requests, you can go to the official Graph Explorer website, log in with your tenant credentials, and start exploring the different sample queries that are available.
For a list of all possible queries, simply run this query:
https://graph.microsoft.com/v1.0/
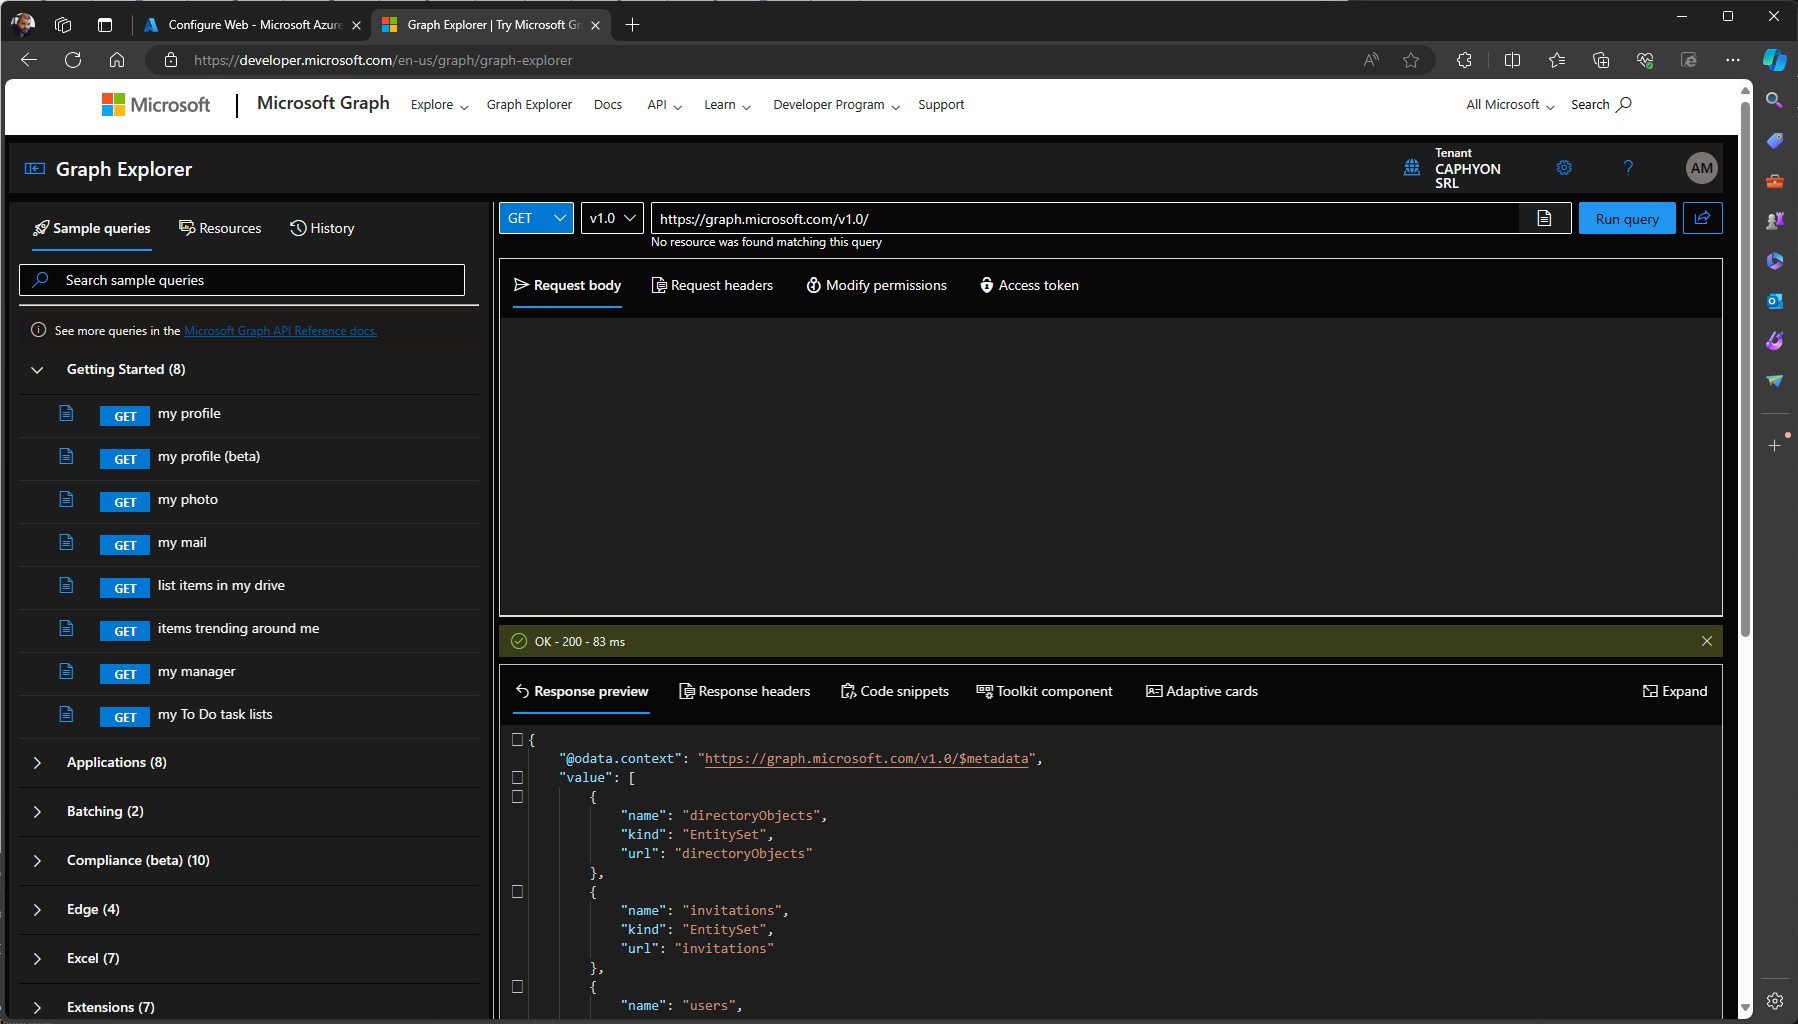
The Main Methods of REST APIs:
- GET: This method is used to retrieve information from the specified source. For example, accessing `https://graph.microsoft.com/v1.0/me` would return information about the currently authenticated user. This is a way to read data without affecting what’s stored on the server.
- POST: It is used to send data to a server to create or update a resource. It’s often used when submitting form data or uploading a file.
- PUT: This method replaces all current representations of the target resource with the uploaded content. It’s used to update the state of a resource entirely.
- PATCH: Similar to PUT, PATCH applies partial modifications to a resource. It’s useful for updates where you only want to change specific fields without touching the rest.
- DELETE: As the name suggests, this method deletes the specified resource.
Each of these methods corresponds to standard CRUD (Create, Read, Update, Delete) operations, enabling you to manage data across Microsoft’s services in a structured way.
When you request Microsoft Graph via a REST API, you’re sending a structured URL that specifies what you want to interact with, along with an HTTPS method that defines the action you want to perform.
For instance, a GET request to `https://graph.microsoft.com/v1.0/me` returns a JSON representation of the user profile associated with the authenticated user making the request.

The data returned from REST API calls to Microsoft Graph is in JSON (JavaScript Object Notation) format.
JSON is a lightweight data-interchange format that's easy for humans to read and write and easy for machines to parse and generate. It’s essentially a collection of name/value pairs and array data types, making it a universal language for APIs on the web.
A GET request to `https://graph.microsoft.com/v1.0/me` might return something like this:
{
  "displayName": "John Doe",
  "jobTitle": "Software Developer",
  "mail": "johndoe@example.com",
  "id": "12345678"
}This JSON response includes basic profile information for the authenticated user. Each piece of information (like `displayName`, `jobTitle`, etc.) is clearly labeled, making it straightforward to extract and use in your applications or scripts.
Understanding how to work with Microsoft Graph and REST APIs expands your toolkit for building custom solutions and automations within the Microsoft ecosystem. By mastering these technologies, you can streamline operations, enhance productivity, and ultimately harness the full power of Microsoft 365’s suite of services.
Understanding Connect-MgGraph cmdlet

Focusing on the Connect-MgGraph cmdlet, we're stepping into a crucial phase of our journey through automating tasks with Microsoft Graph and PowerShell. This cmdlet is part of the Microsoft Graph PowerShell SDK, which allows you to make Microsoft Graph API calls directly from your PowerShell scripts.
Before you can start using `Connect-MgGraph`, you need to have Microsoft.Graph.Authentication module installed. This module includes the authentication cmdlets needed to connect to Microsoft Graph from PowerShell.
If you've been working with PowerShell for Azure (AZ Module), the process will feel familiar. All you need to do is the same as with the AZ module, just run the command inside an elevated PowerShell console:
Install-Module -Name Microsoft.Graph.Authentication
This downloads and installs the module from the PowerShell Gallery. If you're prompted to trust the PSGallery, confirm that you do proceed with the installation.
With the Microsoft.Graph.Authentication module installed, you're ready to use `Connect-MgGraph`. This cmdlet is your gateway to interacting with Microsoft Graph API, handling the authentication process.
When you run `Connect-MgGraph`, you'll be prompted to sign in with your Microsoft account credentials. This sign-in process authenticates your session, allowing your PowerShell scripts to make API calls to Microsoft Graph under your user identity. It's similar to logging into the Azure portal but tailored for automated, script-based access to Microsoft resources.
One of the powerful features of `Connect-MgGraph` is the ability to specify scopes.
Scopes define the permissions your connection has, limiting what data and actions your scripts can access and perform on Microsoft Graph.
For example, if you're working with user data, you might specify the `User.Read.All` scope. This granularity ensures that your scripts operate within the bounds of what they're supposed to do, enhancing security and compliance.
Connect-MgGraph -Scopes "User.Read.All", "Mail.Read"
In this command, we're connecting to Microsoft Graph with permission to read all user profiles and their mail. The exact scopes you'll need depend on the tasks your script is performing.
Since are working with the applications side, we need the "DeviceManagementApps.Read.All" and "DeviceManagementApps.ReadWrite.All" scopes, so our command would be:
Connect-MgGraph -Scopes "User.Read.All", "Group.ReadWrite.All", "DeviceManagementApps.Read.All", "DeviceManagementApps.ReadWrite.All"
After successfully running `Connect-MgGraph`, your PowerShell session is authenticated against Microsoft Graph, and you're ready to start making API calls. Your session will carry the authentication token, allowing you to fetch data, manage resources, and execute actions across the Microsoft ecosystem, all from your PowerShell prompt.
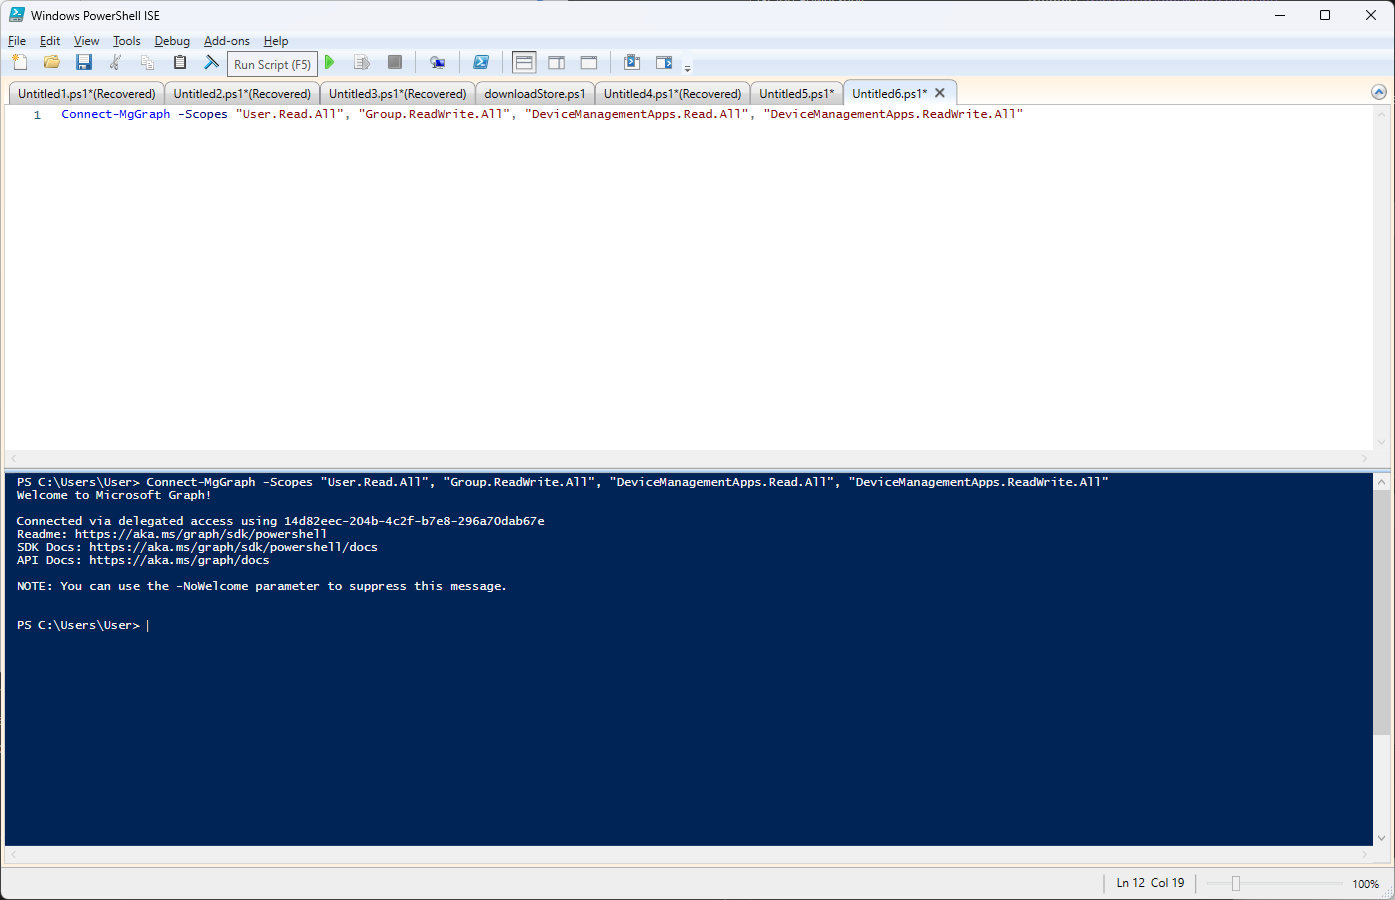
`Connect-MgGraph` is more than just a login step; it's about setting the stage for secure, controlled interactions with Microsoft's cloud services.
By specifying scopes, you're tailoring the session to the needs of your script, ensuring that you have just the right level of access needed to get the job done without oversharing permissions. It's a critical step in building PowerShell scripts that interact with Microsoft services efficiently and securely.
Understanding Invoke-MgGraphRequest cmdlet

After establishing a connection with Microsoft Graph using `Connect-MgGraph`, the next essential step in your automation journey is mastering Invoke-MgGraphRequest. This cmdlet is the powerhouse for making direct API requests to Microsoft Graph, enabling you to retrieve, create, update, or delete resources across the Microsoft 365 ecosystem. It’s how you put your plans into action and interact with data more dynamically and flexibly.
`Invoke-MgGraphRequest` is your primary tool for sending HTTPS requests to Microsoft Graph. With it, you can execute commands that affect your Microsoft 365 environment directly. Whether you’re pulling user lists, updating calendars, managing devices, or any number of tasks, `Invoke-MgGraphRequest` is the cmdlet that communicates your desires to Microsoft Graph.
The beauty of `Invoke-MgGraphRequest` lies in its flexibility. You specify the HTTPS method (GET, POST, PATCH, DELETE, PUT) to match the action you want to perform. Then, you provide the endpoint URL for the resource you’re targeting, along with any necessary headers or body content for the request.
Let’s suppose you want to retrieve details about your user. You’d use a GET request like so:
Invoke-MgGraphRequest -Method GET -Uri "https://graph.microsoft.com/v1.0/me"

To truly leverage `Invoke-MgGraphRequest`, it’s helpful to familiarize yourself with the Microsoft Graph documentation. Knowing the endpoints available, the structure of the resources you’re interacting with, and the specific requirements for each type of request (such as required headers or request body formats) will enable you to craft effective and efficient API calls.
Now that we've navigated through the essentials of using PowerShell with Microsoft Graph, including setting up authentication with `Connect-MgGraph` and mastering the art of making API requests with `Invoke-MgGraphRequest`, let's stitch these components together. T
his will culminate in a practical example, showcasing how to leverage these powerful tools to manage Win32 apps in Microsoft Intune.
Get all Win32 Apps from Intune via PowerShell

Imagine you're tasked with managing applications within your organization's devices. You need a streamlined way to list all Win32 applications currently managed through Microsoft Intune. This process involves connecting to Microsoft Graph, fetching a list of apps, and then processing this information to focus on just the Win32 apps.
Here’s how you would approach this task, broken down into actionable steps that utilize the cmdlets and concepts we've discussed:
1. Authenticate Your Session: First, you use `Connect-MgGraph` to authenticate your session. This step ensures you have the necessary permissions to access application information within your tenant.
Connect-MgGraph -Scopes "User.Read.All", "Group.ReadWrite.All", "DeviceManagementApps.Read.All", "DeviceManagementApps.ReadWrite.All"
This command connects you to Microsoft Graph with the specific scope needed to read application data in Intune.
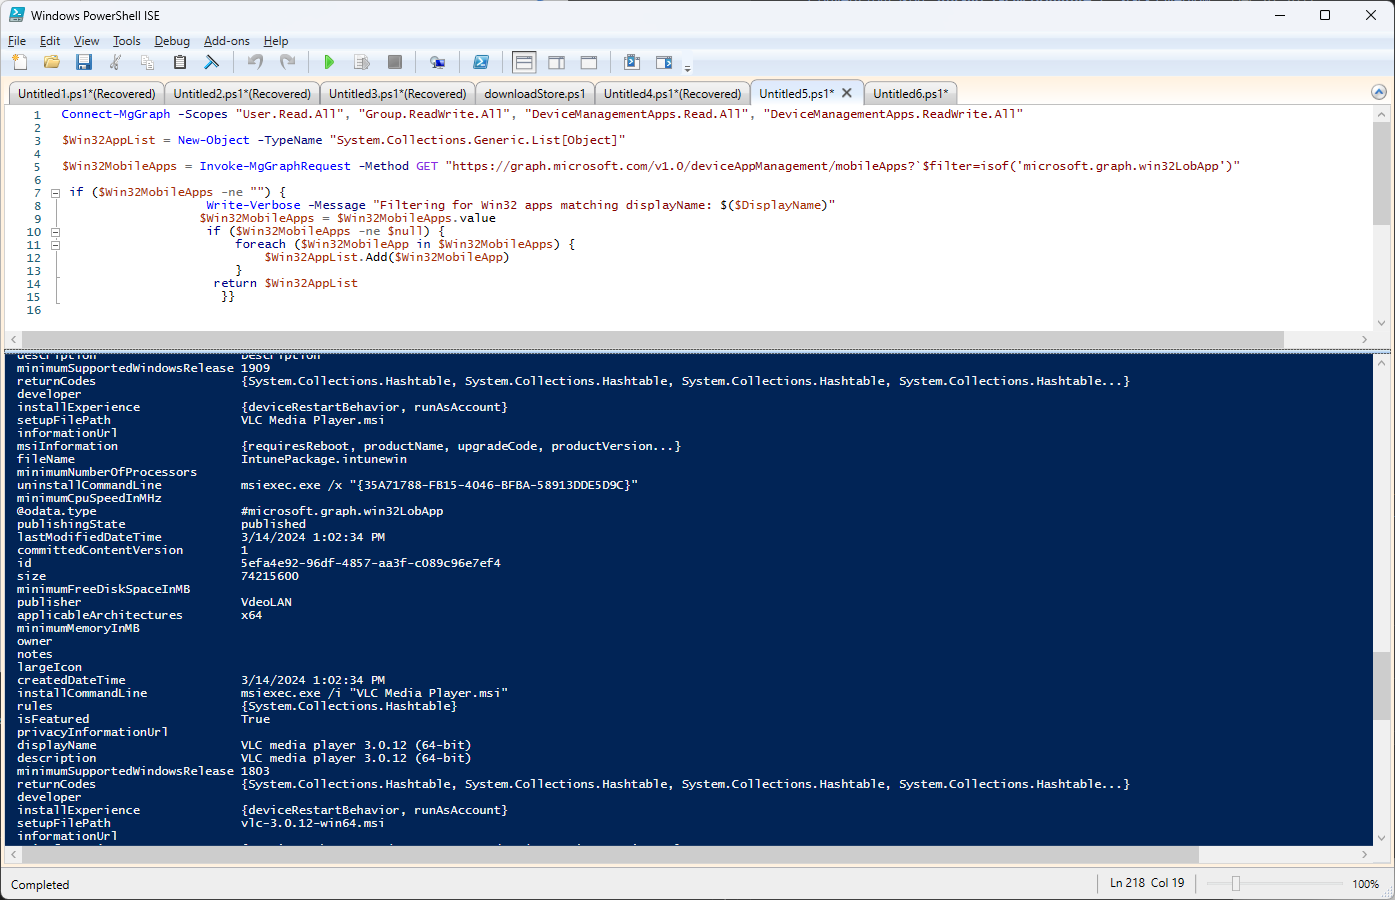
2. Retrieve Application Data: With your session authenticated, you now turn to `Invoke-MgGraphRequest` to retrieve a list of all mobile apps managed by Intune, filtering specifically for Win32 apps.
$Win32MobileApps = Invoke-MgGraphRequest -Method GET "https://graph.microsoft.com/v1.0/deviceAppManagement/mobileApps?`$filter=isof('microsoft.graph.win32LobApp')"3. Process and Filter Data: This GET request fetches all mobile apps, applying a filter to return only those that are instances of Win32 Line of Business (Lob) apps.
We also need to create an object where we keep all the parsed data:
$Win32AppList = New-Object -TypeName "System.Collections.Generic.List[Object]"
We then parse the response from Microsoft Graph to inspect or manipulate the data. In this case, you might iterate through the list of apps, extracting relevant details such as name, publisher, and version.
if ($Win32MobileApps -ne "") {
                	Write-Verbose -Message "Filtering for Win32 apps matching displayName: $($DisplayName)"
               	$Win32MobileApps = $Win32MobileApps.value
                	if ($Win32MobileApps -ne $null) {
                    	foreach ($Win32MobileApp in $Win32MobileApps) {
                        	$Win32AppList.Add($Win32MobileApp)
                    	}
                 	return $Win32AppList
}}The result of this script is a clear, concise list of all Win32 applications managed through Microsoft Intune, along with their key attributes.
This not only provides you with a snapshot of your app management but also serves as a foundational technique for further automation tasks, such as updating app versions or managing app assignments.
Conclusion

Putting it all together like this showcases the practical value of PowerShell and Microsoft Graph in managing Microsoft 365 services. By automating tasks that would otherwise be tedious and time-consuming, you can save time, reduce errors, and increase the efficiency of your IT operations.
Moreover, this example illustrates a methodical approach to solving problems with PowerShell and Microsoft Graph: authenticate, request, and process. This framework can be adapted to a wide range of tasks beyond managing applications, making it a versatile toolkit for any IT professional working with Microsoft 365.
Automating your work with Win32 applications is just one example of this powerful approach.
In sum, leveraging PowerShell and Microsoft Graph to automate and manage tasks in Microsoft 365 isn't just about writing scripts. It's about creating a seamless workflow that enhances your IT processes, making management tasks more manageable and allowing you to focus on more strategic initiatives.
This example of managing Win32 apps in Intune is just a starting point for the myriad possibilities that open up when you combine PowerShell's scripting prowess with the extensive API capabilities of Microsoft Graph.
