How To Backup and Restore Files during a Major Upgrade using Custom Actions
One of the main things we need to consider when performing a Major Upgrade is how we will backup and restore our previous files and folders.
To create a file and folder backup, we will use Custom Action Scripts.
In this article, we will be going through how a major upgrade works, what happens during the uninstall process, and then we will dive directly into how to backup and restore your previous files and folders.
Let's have a look!
How does Major Upgrade work?

A Major Upgrade is used as a standalone application or an update to the previous version – the latter being the most common scenario within enterprises.
During a Major Upgrade, Windows Installer performs two actions:
- Uninstalls the old product version (if it's installed).
- Installs the latest product version (bringing the application version up to date).
If you want to learn more about updates and patches, check out our
Updates Deployment: Major Upgrade
vs Patch article.
How does the "Uninstall" of a product work?

During the uninstall process of a product, Windows Installer removes all the files and folders that were copied on the target device during the installation in a per-machine location. With one exception: it will keep the files included in the components set as “permanent”.
Keep in mind: The above is not applicable to the files created at runtime. Windows Installer will ignore and leave them behind after the uninstall of the product because they are not part of a package.
How to backup and then restore a file during a Major
Upgrade?

Now that we know what happens during a Major Upgrade and how the uninstall of a product works, let's see how to backup and restore files during a Major Upgrade.
One of the options Windows Installer provides is to use a component attribute: NeverOverWrite.
Find more information about Component Attributes directly from the Windows documentation.
When a component is set to NeverOverWrite and the keypath exists on the target device, Windows Installer does not install or reinstalls the component.
Since we want to backup our files, setting a component to NeverOverWrite is not a viable option for our scenario. The reason being that during a Major Upgrade, the old product version gets uninstalled and all its files are removed before the new version is installed.
If the component that includes the file you want to keep is not set as Permanent, then your file will be removed during the uninstall of the old product version.
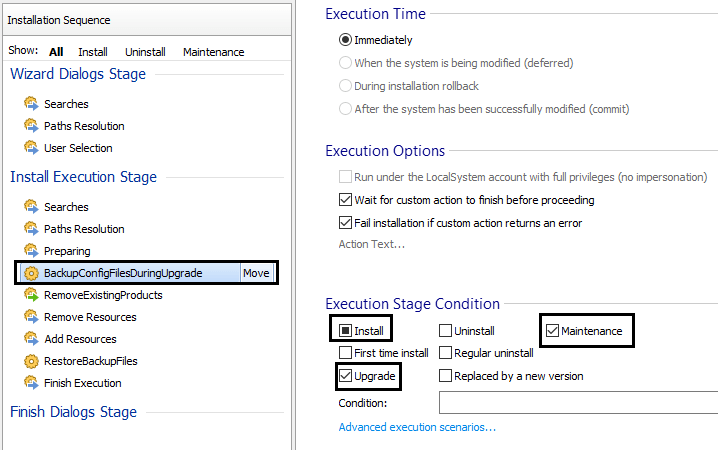
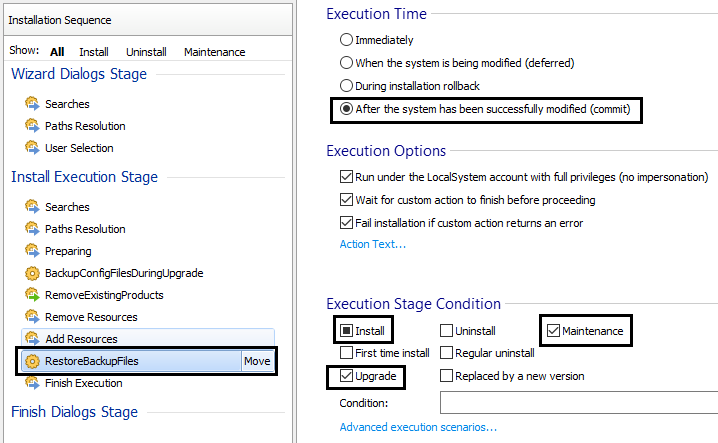
Instead, you should create two Custom Actions:
1. One Custom Action to backup the file from the initial install location to another backup location.
This Custom Action must be placed before the RemoveExistingProducts
standard action within the InstallExecute sequence to make sure it is
executed before the old product version gets uninstalled.
2. The other Custom Action to restore the file from the backup location to its initial install location.
It must be placed after “Add resources” to avoid the file from being
overwritten and replaced by the one included within the new product
version.
Using VBScript Custom Actions to Backup and Restore Your
Files

Let’s say we have the following two scripts written in VBScript.
Do not forget that a Custom Action can call a script written in one
of the following scripting languages: VBScript, JavaScript, or
PowerShell; or even an executable or a DLL so you have plenty of options
to choose from in case you do not want to use our VBScripts.
1. The first script backs up the file from its initial install location to another given location – in our case from C:\Program Files\MyApp to C:\Program Files\MyApp\BackUp.
Dim objFSO
Set objFSO = CreateObject("Scripting.FileSystemObject")

Const OverWrite = True

InstallFolder = "C:\Program Files (x86)\MyCompany\MyApp\"
BackUpFolder = InstallFolder & "BackUp\"

CreateFolderRecursively BackUpFolder
'create BackUp folder if it does not exist
objFSO.CopyFile InstallFolder amp "config.xml", BackUpFolder, OverWrite
'copy file from InstallFolder to BackUp folder

Sub CreateFolderRecursively (FolderPath)
            	Dim arrFolderPath, i, objFSO, strFolderPath, strFolderPathBuild
            	Set objFSO = CreateObject( "Scripting.FileSystemObject" )
            	strFolderPath = objFSO.GetAbsolutePathName( FolderPath )
            	arrFolderPath = Split( strFolderPath, "\" )
            	strFolderPathBuild = arrFolderPath(0) amp "\"
            	' Check each (sub)folder and create it if it doesn't exist
            	For i = 1 to Ubound( arrFolderPath )
                            	strFolderPathBuild = objFSO.BuildPath( strFolderPathBuild, arrFolderPath(i) )
                            	If Not objFSO.FolderExists( strFolderPathBuild ) Then
                                            	objFSO.CreateFolder strFolderPathBuild
                            	End if
            	Next
    	        Set objFSO= Nothing
End Sub2. The second script restores the files from the backup location to its initial install location – in our case from C:\Program Files\MyApp\BackUp back to C:\Program Files\MyApp.
Dim objFSO
Set objFSO = CreateObject("Scripting.FileSystemObject")

Const OverWrite = True

InstallFolder = "C:\Program Files (x86)\MyCompany\MyApp\"
BackUpFolder = InstallFolder & "BackUp\"

objFSO.CopyFile BackUpFolder & "config.xml", InstallFolder, OverWrite  'copy file from BackUp folder to InstallFolder
objFSO.DeleteFile(BackUpFolder & "config.xml")   'delete file
Set objFolder = objFSO.GetFolder(BackUpFolder)
If (objFolder.Files.Count = 0) and (objFolder.SubFolders.Count = 0) Then  'check if folder is empty
            	BackUpFolder = Left(BackUpFolder, Len(BackUpFolder)-1)  'remove the backslash at the end
            	objFSO.DeleteFolder BackUpFolder  'delete folder
End IfHere is how the two corresponding Custom Actions look like in Advanced Installer:


You can try Advanced Installer for free through the 30-day, Full-Featured Trial. Download from here.
Conclusion

Now you know how to use Custom Actions to set up the backup and restore of your files when performing a Major Upgrade.
We hope you found the VBScript example useful to help you backup and restore your files - please let us know if you have any suggestions.
Happy coding!
Contributor: Horatiu Vladasel
Subscribe to Our Newsletter
Sign up for free and be the first to receive the latest news, videos, exclusive How-Tos, and guides from Advanced Installer.