How to launch or call .BAT file from an MSIX shortcut
Applications behave differently when running within an MSIX container. For example, you cannot set a non-executable file as a target for your application by default.
In MSIX, there are no traditional .lnk Start Menu shortcuts. They are all gone. Instead, they were replaced by “modern application entries” – which can leverage all the advantages of modern APIs.
As a downside though, the new modern application entries come with a few limitations – like for instance, no built-in support for non-executable files.
Find all the other MSIX shortcut limitations here: The most common MSIX limitations and how to fix them with the Package Support Framework (PSF).
This limitation can be a bit of a pain, especially for enterprises that use legacy applications within their environment. The reason behind it is that these legacy applications could have shortcuts pointing to various script files: BAT (batch) files, Visual Basic, or PowerShell scripts.
Thankfully, though – we've got your back and a workaround for this: the Package Support Framework. In this article, we will show you how it works when launching a BAT file from an MSIX shortcut.
How does the Package Support Framework work?

The Package Support Framework is an open-source framework from Microsoft. It uses the Detour technology under the hood, to help with API redirection and hooking.
The whole idea behind the Package Support Framework or PSF is built around the PSF Launcher. The PSF launcher is an executable that acts as a wrapper to inject the psfRuntime into the application process and then activates it based on the application launch configuration in the config.json file.
The config.json file format consists of three sections or arrays: “Applications”, “Processes” and “Fixups”. In this article, we'll focus on the “Applications” array.
The “Applications” array comes with various customizable keys. All of them are optional except the “id” and “executable” keys.
The “id” is the application's unique identifier, and it must match the “Id” attribute of the “Application” element in the package manifest.
The “executable” key must contain the path to the executable file that the application entry triggers when it is launched.
Let’s assume you want your application shortcut to point to a batch script that first runs a “pre-launch” action, before going and launching the application itself (application executable).
For the example below, the BAT or batch script file is included in the MSIX Package Root Directory.
How to launch a BAT script with the MSIX Packaging Tool?

Starting with v2021.09.26, the Package Support Framework extended its functionalities to offer support when launching a batch script straight from the PsfLauncher “executable” key.
Let’s now see a step-by-step of what that means:
1. Open the AppxManifest.xml file and choose one of the following actions:
a. Create a new “Application” element there and set the “Executable” attribute to point to the PsfLauncher executable.
b. Update the “Application” element and set the “Executable” to point to the PsfLauncher executable.

2. Create a config.json file and follow these steps:
a. Set the “id” attribute to the value in the “Id” attribute of the “Application” element you create/updated at Step 1.
b. Set the “executable” attribute to point to the batch script.
{
    "applications": [
        {
            "id": "MYAPP",
            "executable": "MyAppLauncher.bat"
        }
	]
}3. Add the corresponding PSF files along with the config.json file created at step 2 into your MSIX package.
a. PsfLauncher32.exe/PsfLauncher64.exe
b. PsfRunDll32.exe/PsfRunDll64.exe
c. PsfRuntime32.dll/PsfRuntime64.dll
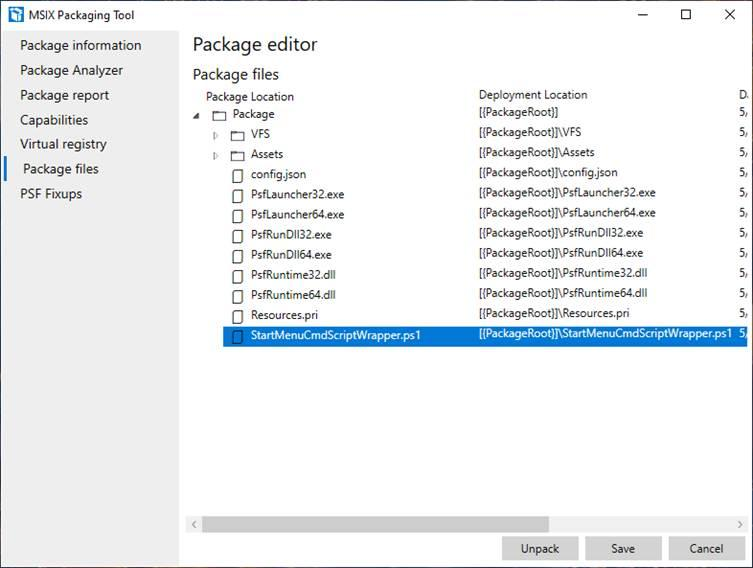
d. StartMenuCmdScriptWrapper.ps1
You can also use the MSIX Packaging Tool’s PSF support to add the PSF Launcher into your package – this feature is only in the latest version of the MSIX Packaging Tool. Here’s how to do it:
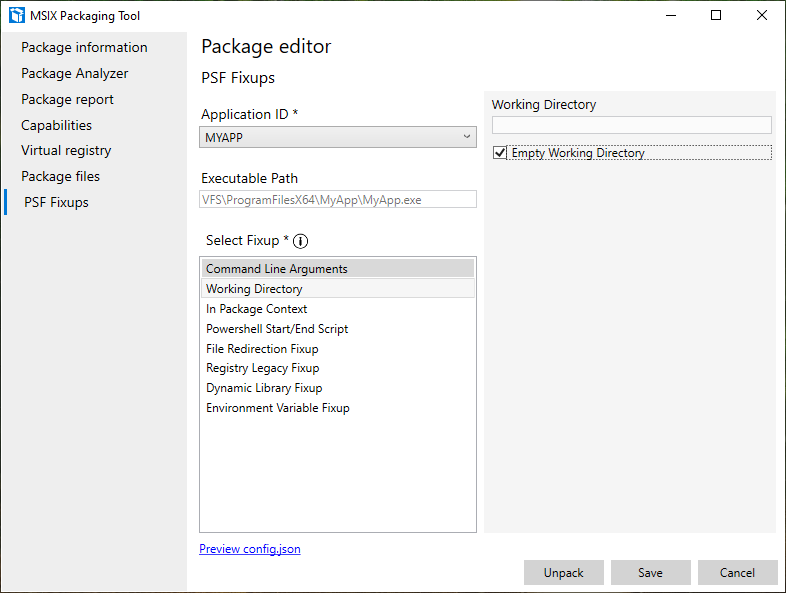
1. Go to the “PSF Fixups” page.
2. Set the “Application ID” to point to your batch file. If you need to generate a new one, you can do that by updating the manifest file first.
3. Select “Working Directory” Fixup and enable “Empty Working Directory”.

4. Save your MSIX package.
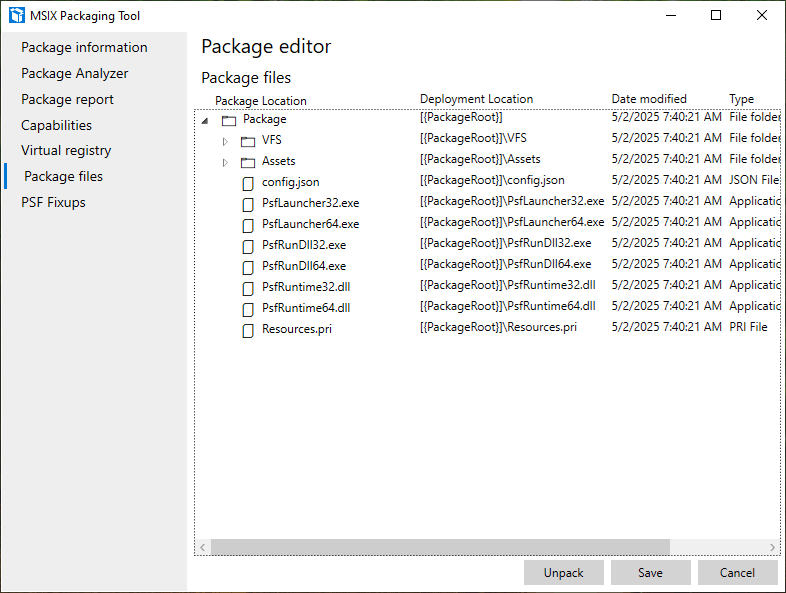
5.Open the MSIX package, go to the “Package files” page, locate the config.json file, and open it for editing.

6. Replace the “executable” value with the path to the batch file. Your config.json should look like the one bellow:
{
  "applications": [
	{
  	"id": "MYAPPREADME",
      "executable": "VFS\\ProgramFilesX64\\MyApp\\MyAppLauncher.bat",
      "workingDirectory": ""
	}
  ]
}7. Save and close the config.json.
8. Go to “Package files” page and add the StartMenuCmdScriptWrapper.ps1 file.

How to use Advanced Installer to set a batch file?

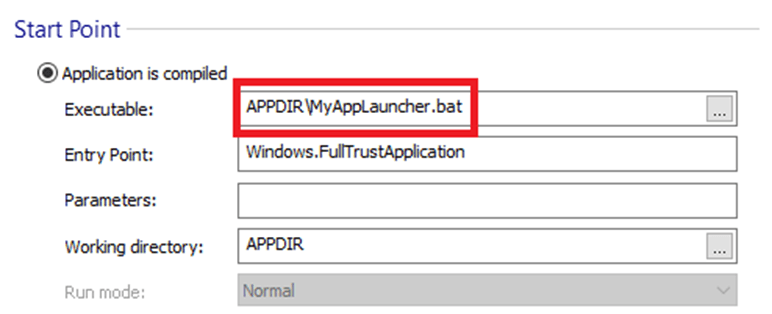
Setting a batch file as a target for your application in Advanced Installer is super easy. All you have to do is to:
1. Go to the “Application Details” page.
2. Go to the “Start Point” section.
3. Set the “Executable” field to point to the batch file.

Conclusion

It is true that MSIX installers have a lot of limitations when compared to the traditional Windows Installer (MSI). Thankfully, the Package Support Framework proves once again to be very helpful in the transition to MSIX.
In this case, we saw how to overcome the lack of support for non-executable files as an application entry point.
- How to debug an MSIX package failure with the Package Support Framework (PSF Trace Fixups)
- The most common MSIX limitations and how to fix them with the Package Support Framework (PSF) that covers the following scenarios:
- How to set the current working directory for MSIX target application
- How to set command line arguments for MSIX target application
- How to set non-executable files as MSIX target application
For more information about the Package Support Framework and how it works, check Introduction to Package Support Framework blog article.
Did you find this trick useful? Let us know what you'd like us to cover next.
