How To Configure Azure Key Vault to Sign your MSIX Packages: A Step-by-Step Guide
If there's something we've mentioned over and over again about MSIX is that it requires digital signing. We have a diversity of resources regarding this topic, from why it is a good practice to include a timestamp when signing a package, to automating the whole digital signing process of MSIX Packages.
You can digitally sign your packages automatically with Advanced
Installer's free tool: MSIX Tweaker - Download
it here.
When signing our MSIX packages, we generally used a generated certificate available on our machines. Advanced Installer now offers more options with its support for digital signing your MSIX packages with Azure Key Vault and Device Guard Signing.
In this article, we will go through a step-by-step guide on how to configure Azure Key Vault to successfully sign your packages with Advanced Installer. Here are the topics we will discuss:
1. Creating a Key Vault in Azure Key Vault.
2. Creating a certificate in Azure Key Vault.
3. Registering and configuring the application in Azure Active Directory.
4. Adding necessary permissions to the app.
5. Signing the MSIX packages with Advanced Installer.
How To Create a Key Vault in Azure Key Vault?
1. First, log in to your Microsoft Azure Portal and navigate to Key Vaults.
2. Once there, click on +New to create our Key Vault:
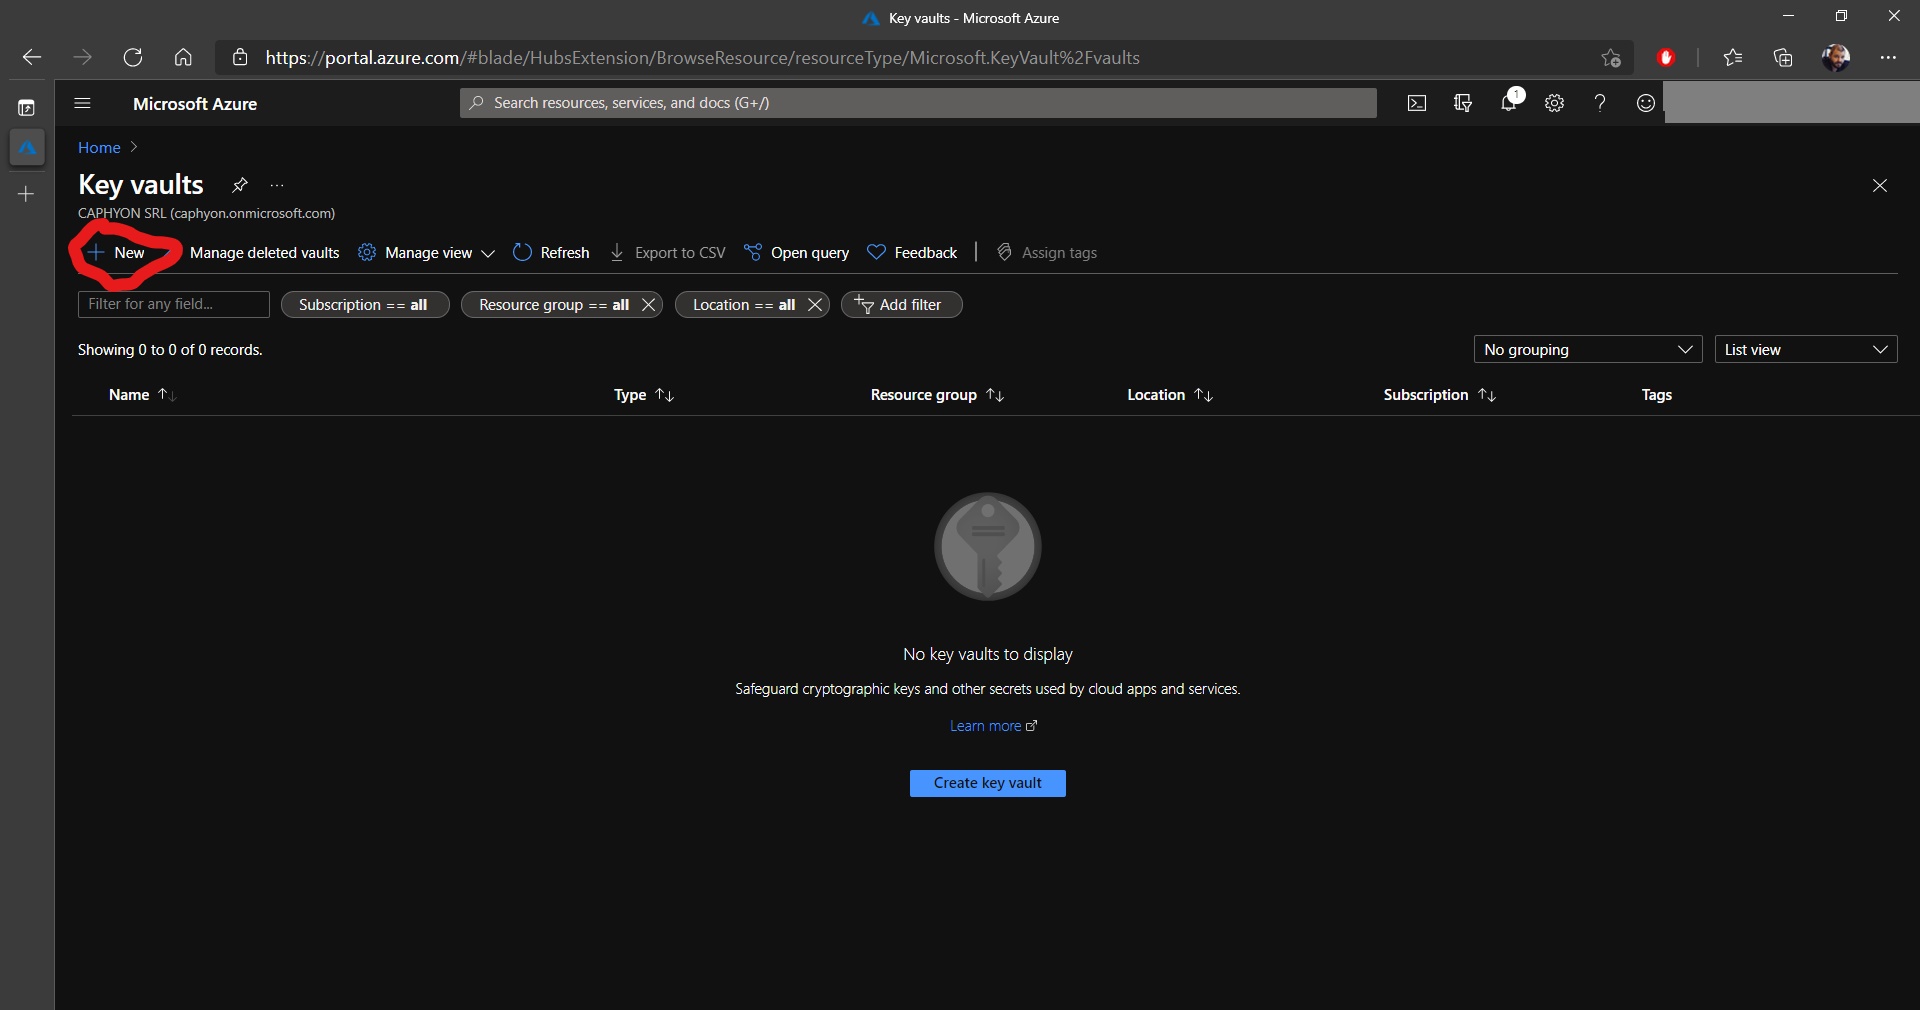
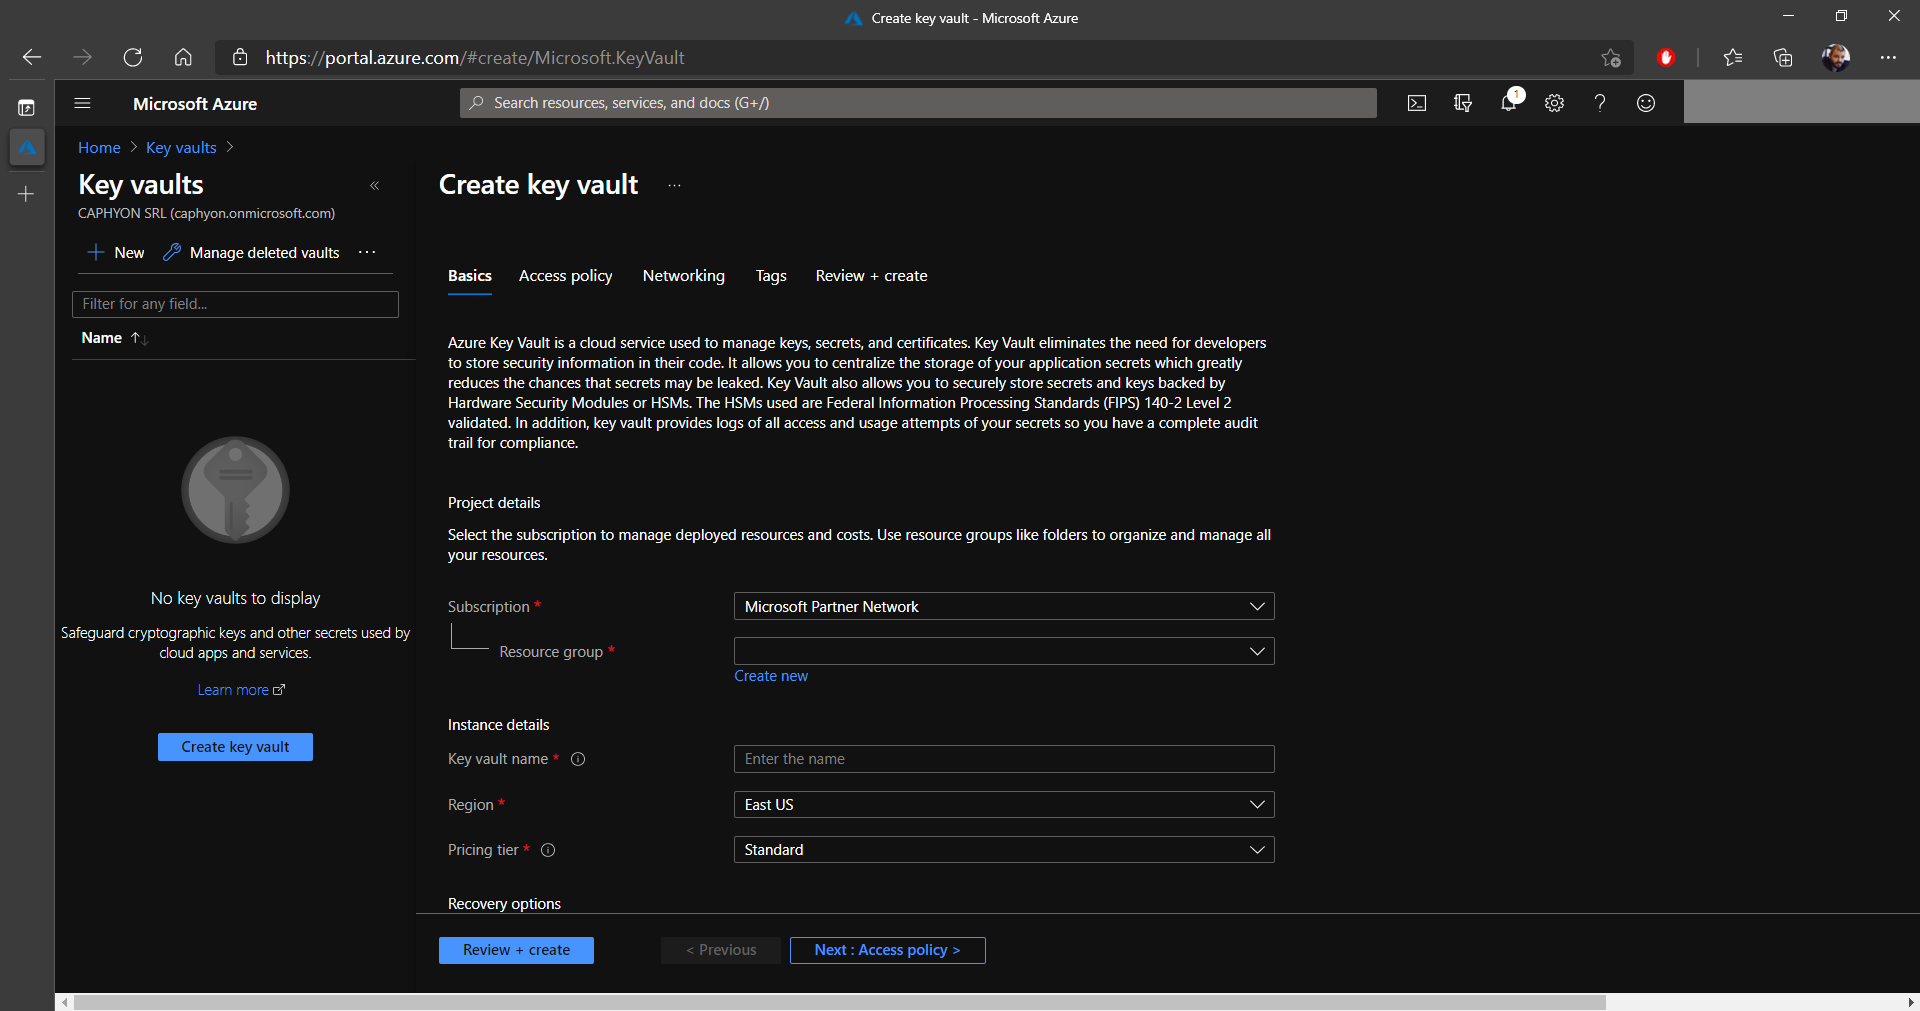
3. In the Basics tab, choose a Subscription and a Resource Group. If you don’t have a resource group already created, you can create one now.
4. In the Instance details section, we need to set a Name for the Key Vault and select the Region where it is available, as well as the Pricing Tier.
5. When everything is set, click on Next: Access policy.
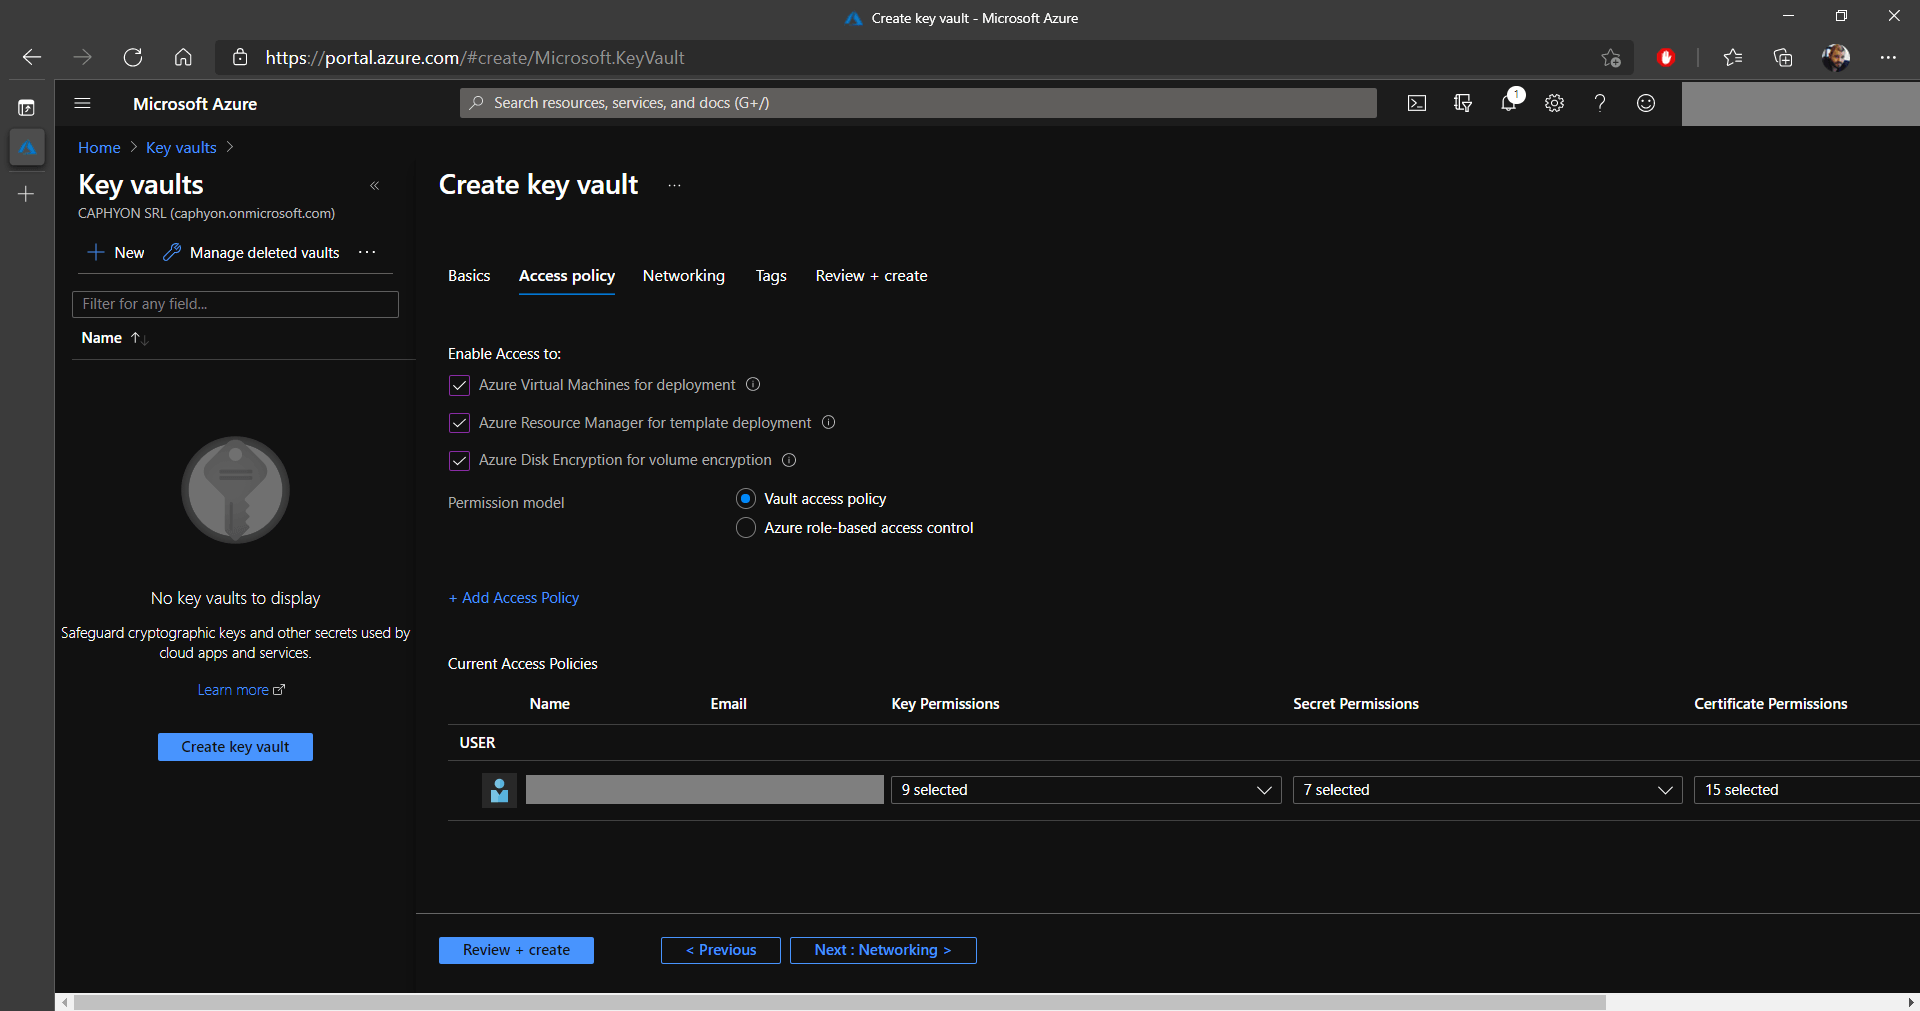
6. In the Access policy tab, make sure that all the options below Enable Access to: are checked and that the Permission model is set to Vault access policy.
7. Under Current access policies, you will see that your user will be automatically added with full rights.
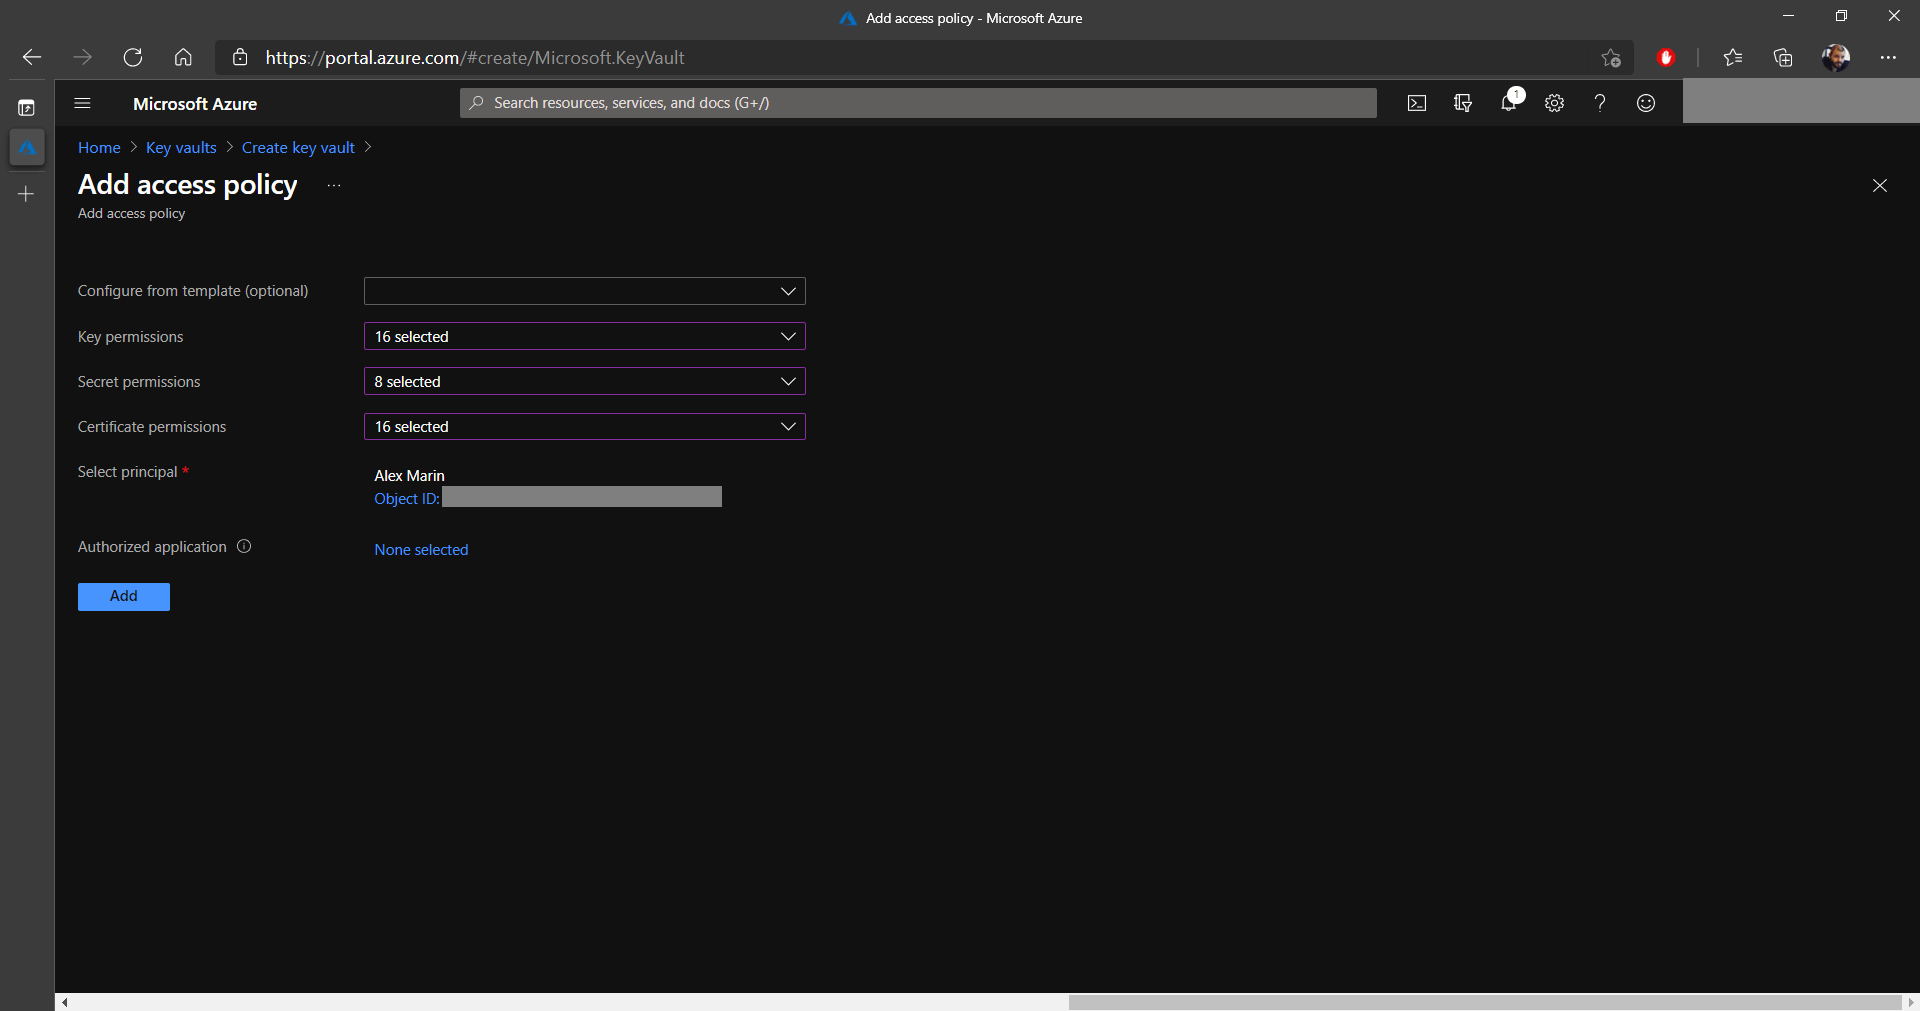
If you want to add access to other users from your infrastructure,
click on Add Access Policy. This will bring up a new page
where you can select the permissions for keys, secrets, and
certificates. See the two images below:
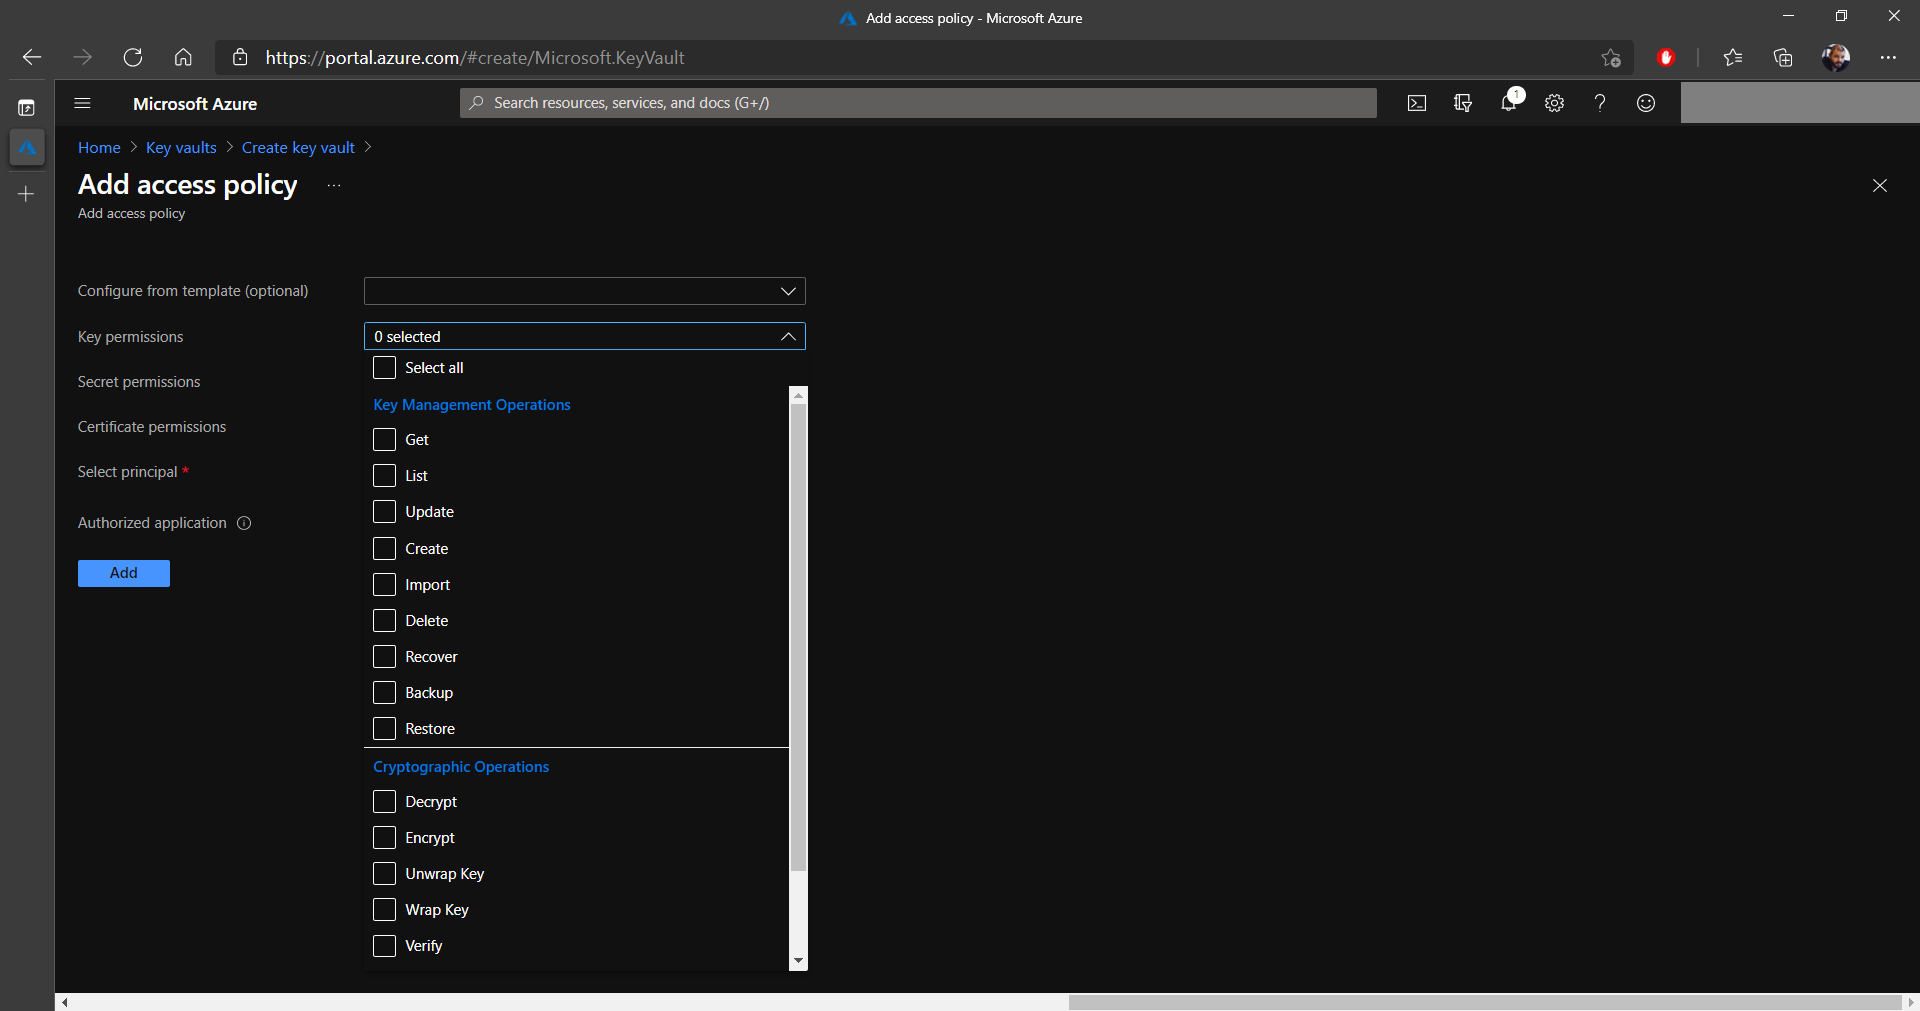
8. After you configure the permissions, it's time to Select a principal on which these will be applied. In this example, I selected one of my alternative accounts.
9. Once you reach the end of the screen, click Add.
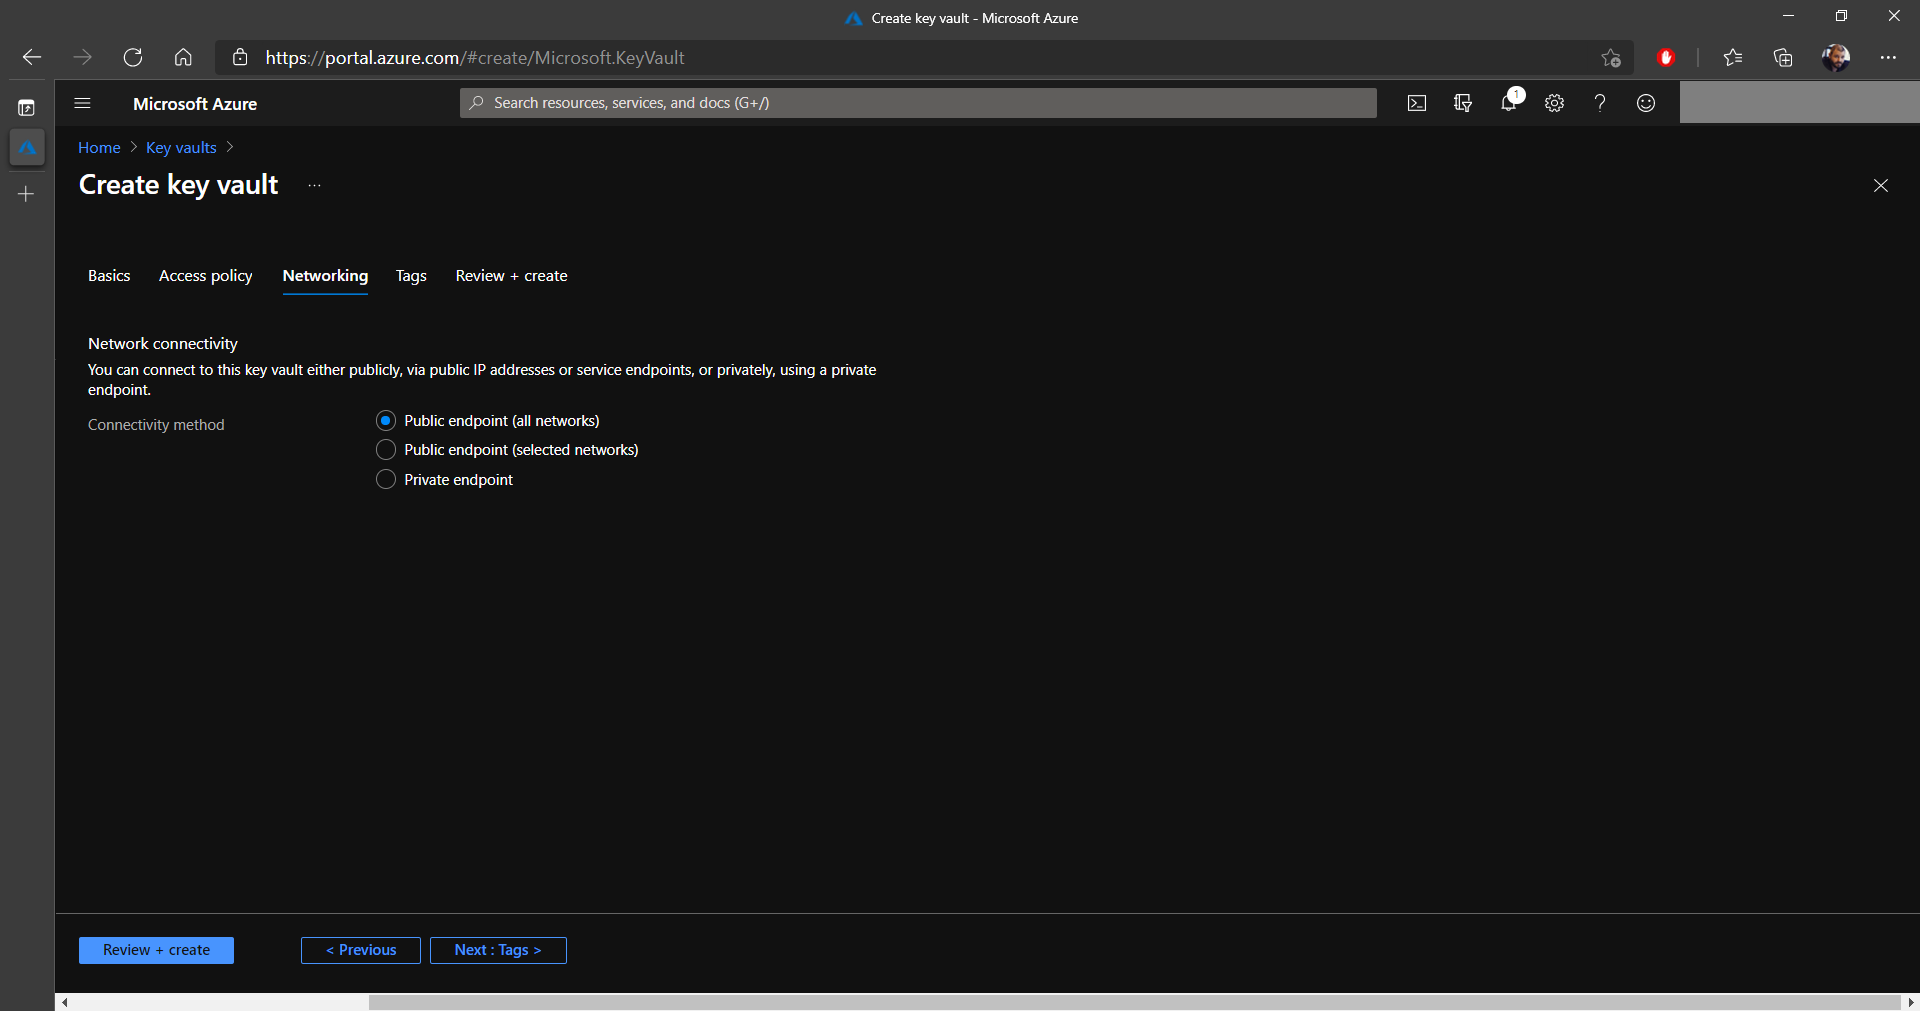
10. Next, configure your Key Vault's endpoints, either publicly for all networks, only for certain networks or through a private endpoint. For most purposes, a Public endpoint (all networks) will do the job.
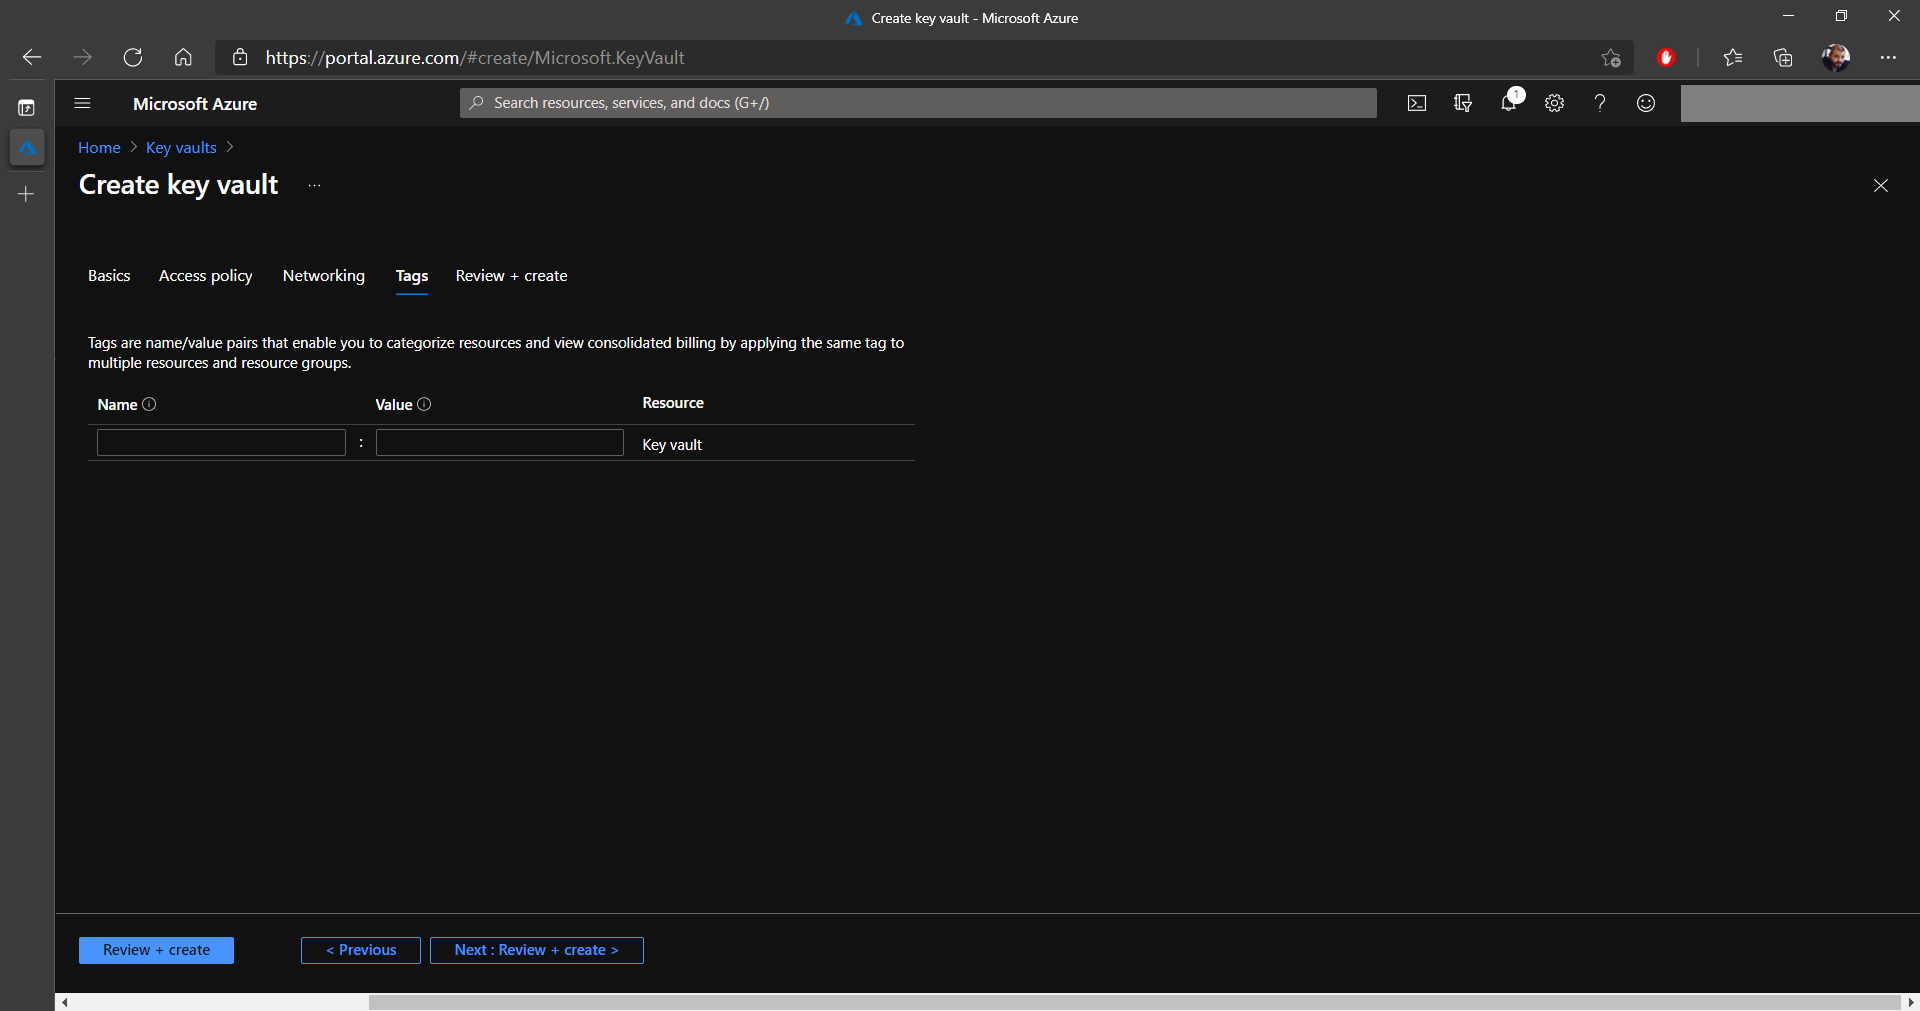
11. In the Tags tab, you can apply a tag to resources to categorize the resources and view consolidated billing. In our case, we didn't configure anything in this section and directly clicked on Next: Review + Create.
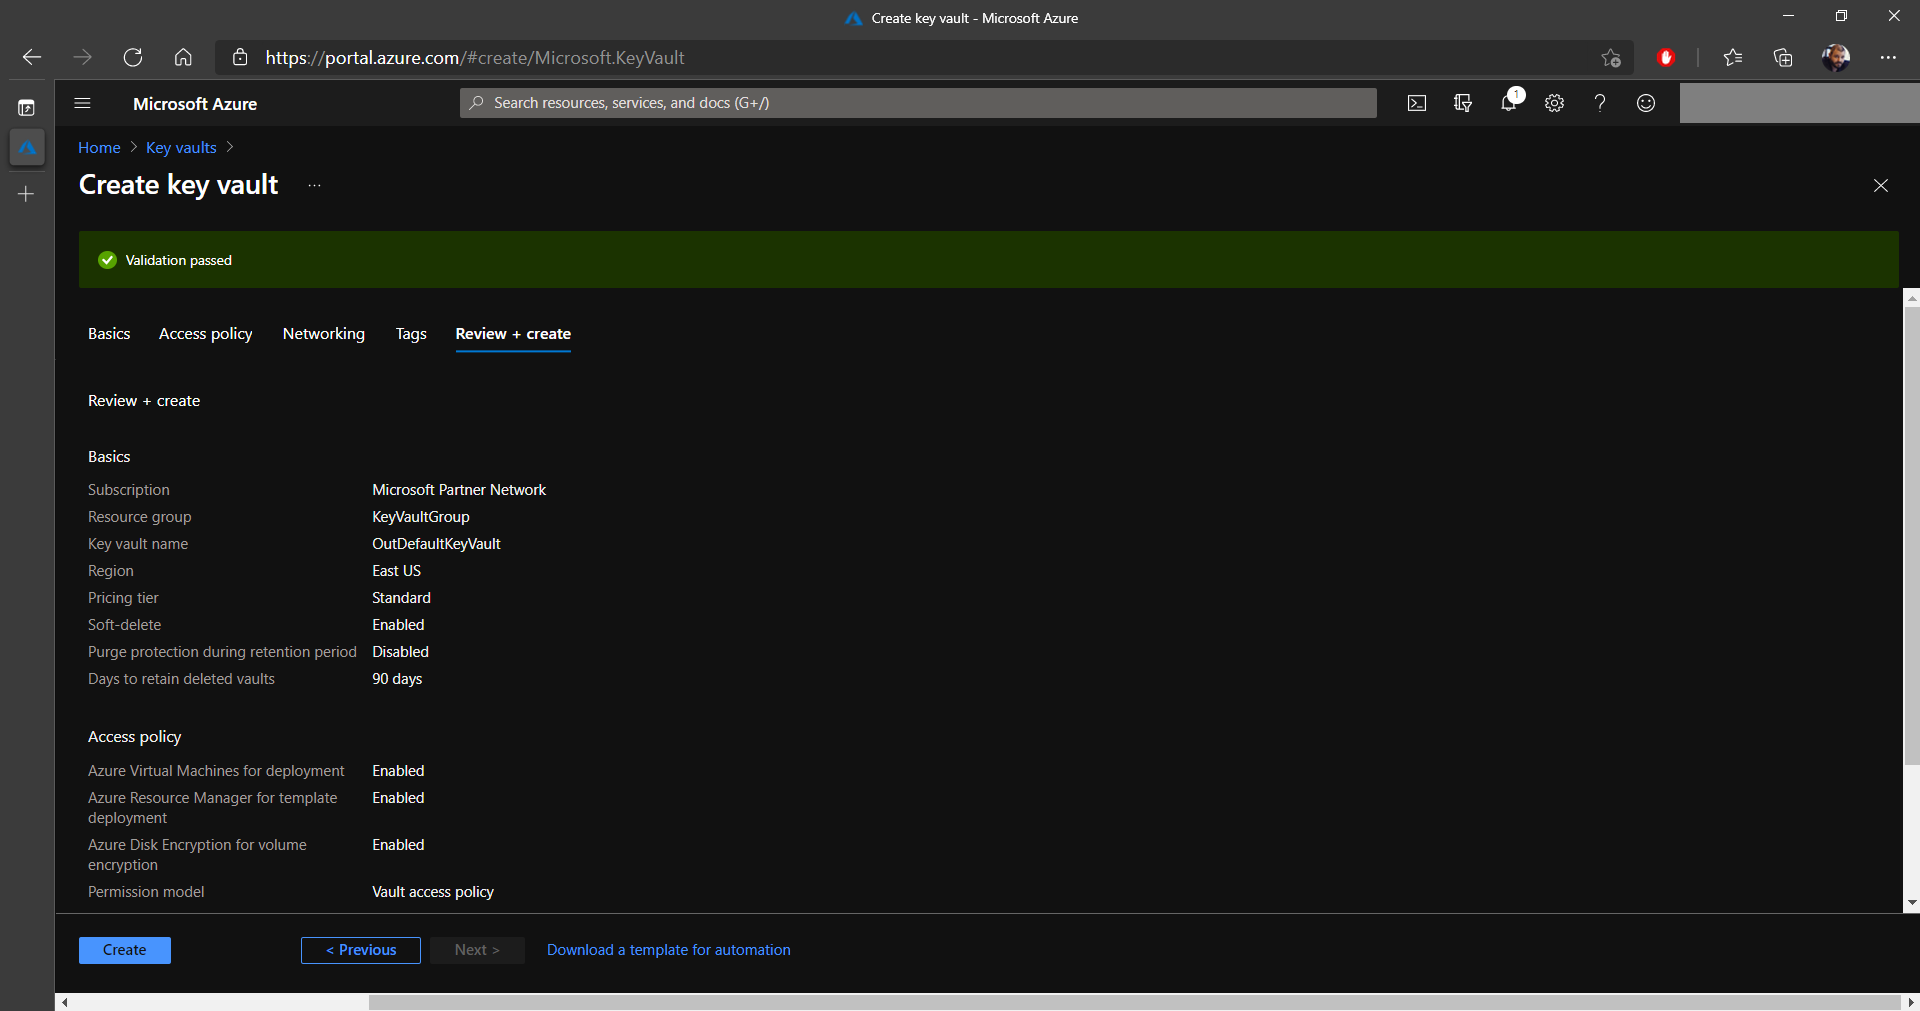
12. Once the validation is passed, click on the Create button.
13. At the end, the new Key Vault should be created and visible in Microsoft Azure. We will need the Key Vault's name later on, so keep it handy.
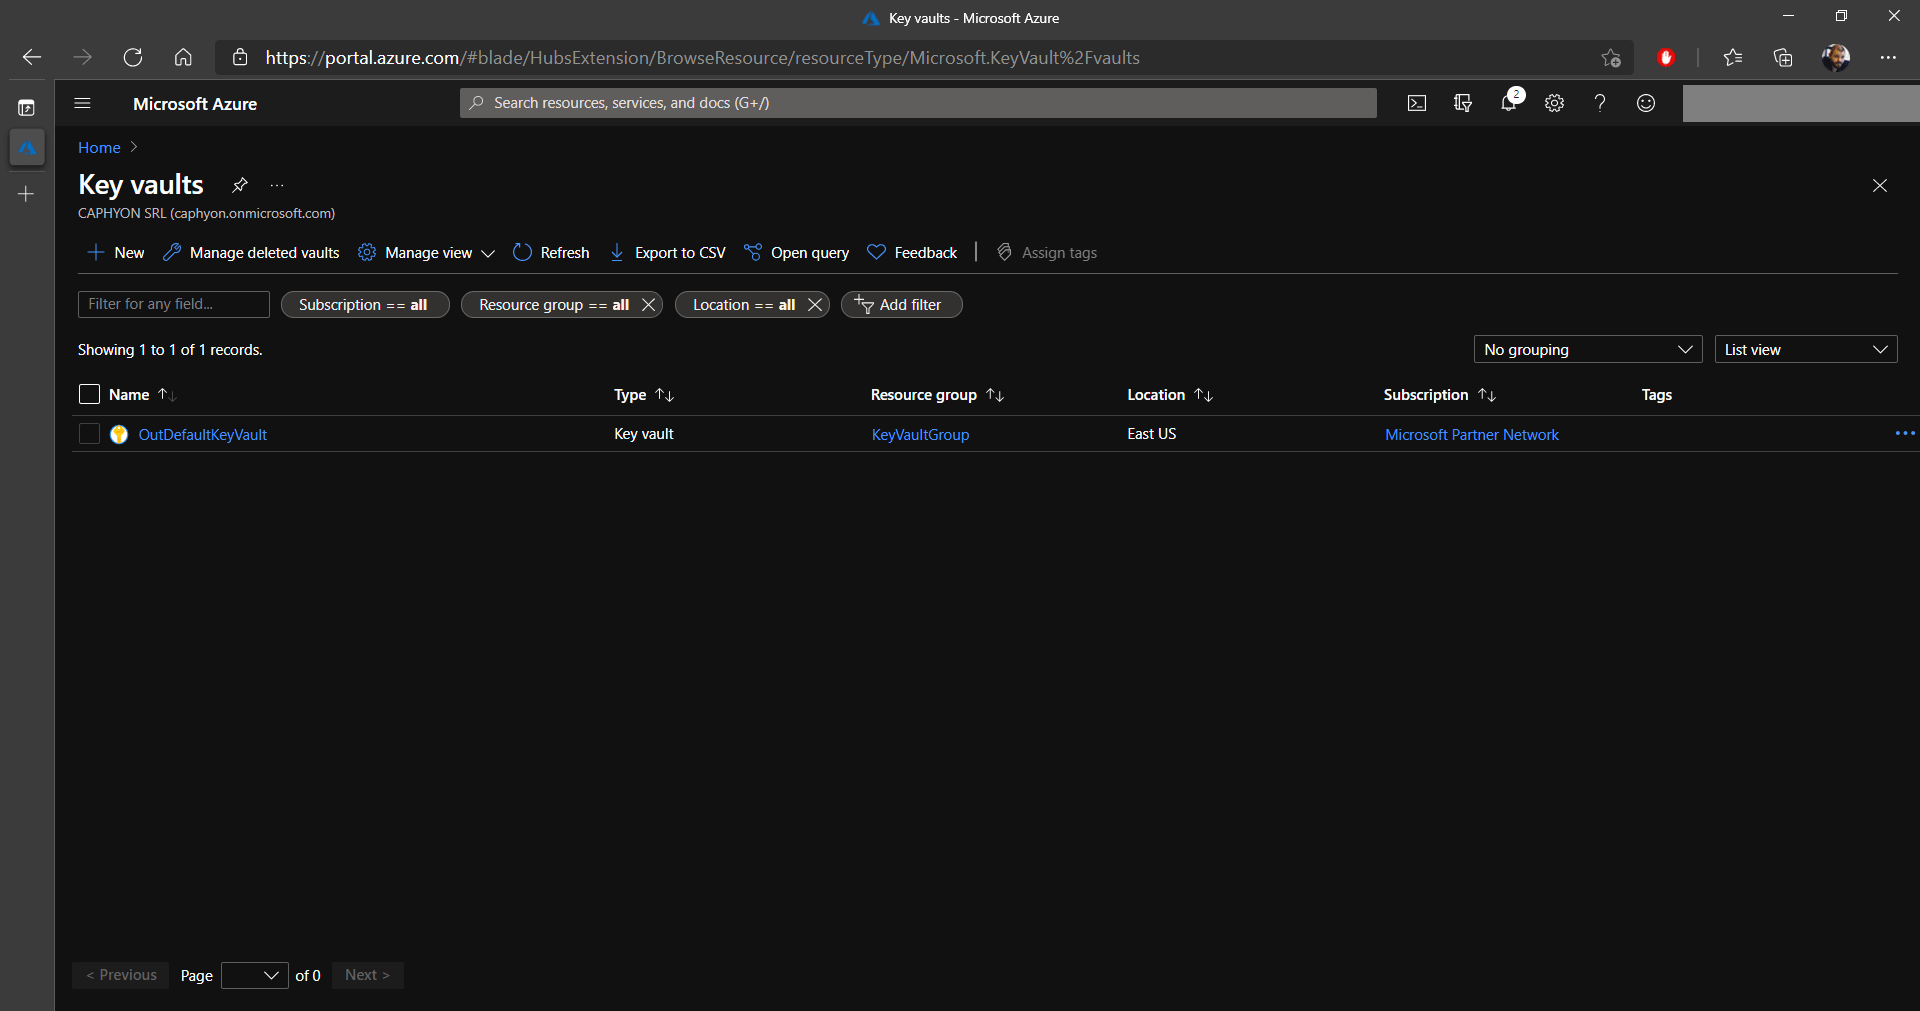
How to Create a Certificate in Azure Key Vault
With Azure Key Vault, you can instantly generate a digital certificate, or import one of your own certificates. For the purpose of this guide, we will generate a new digital certificate. Let's see how to achieve this.
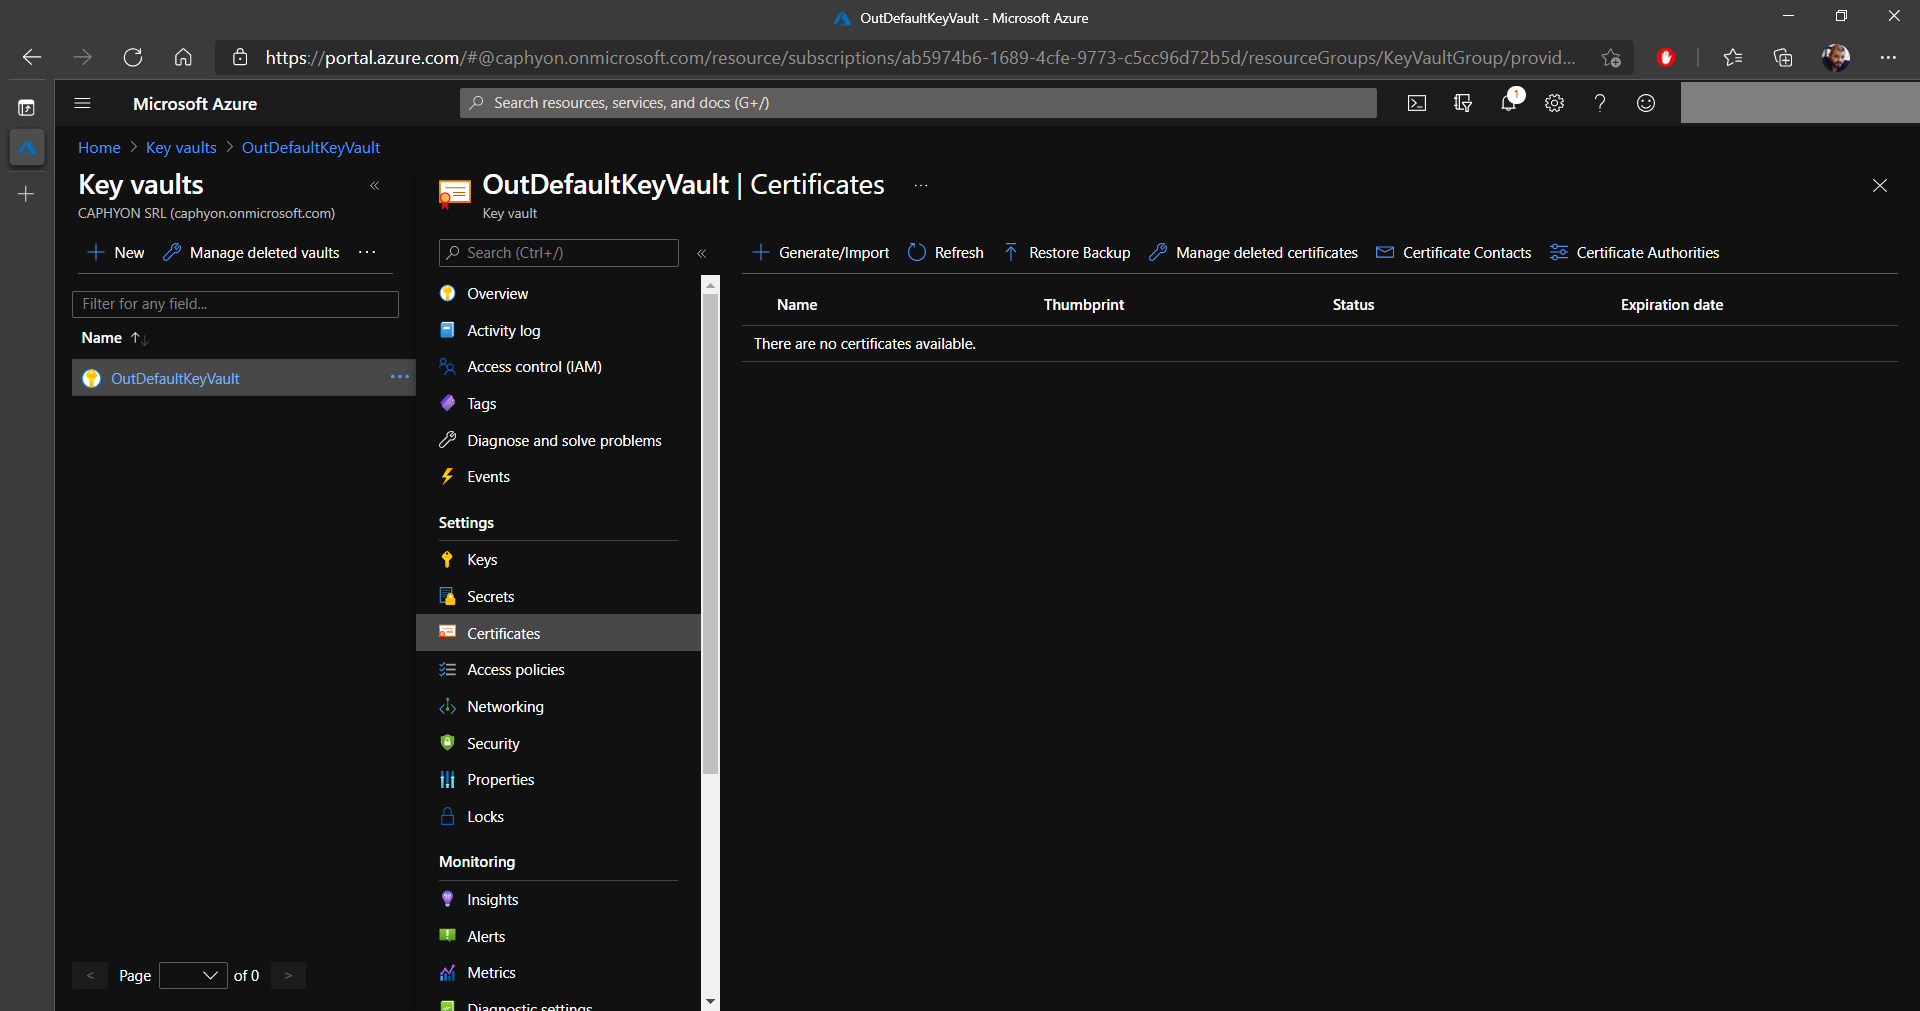
1. In the Key vaults section, select your previously created key vault (you can see ours is called OutDefaultKeyVault) and click on Certificates.
2. Next, click on Generate/Import and configure the certificate as shown in the image below (you can choose a different certificate name and subject).
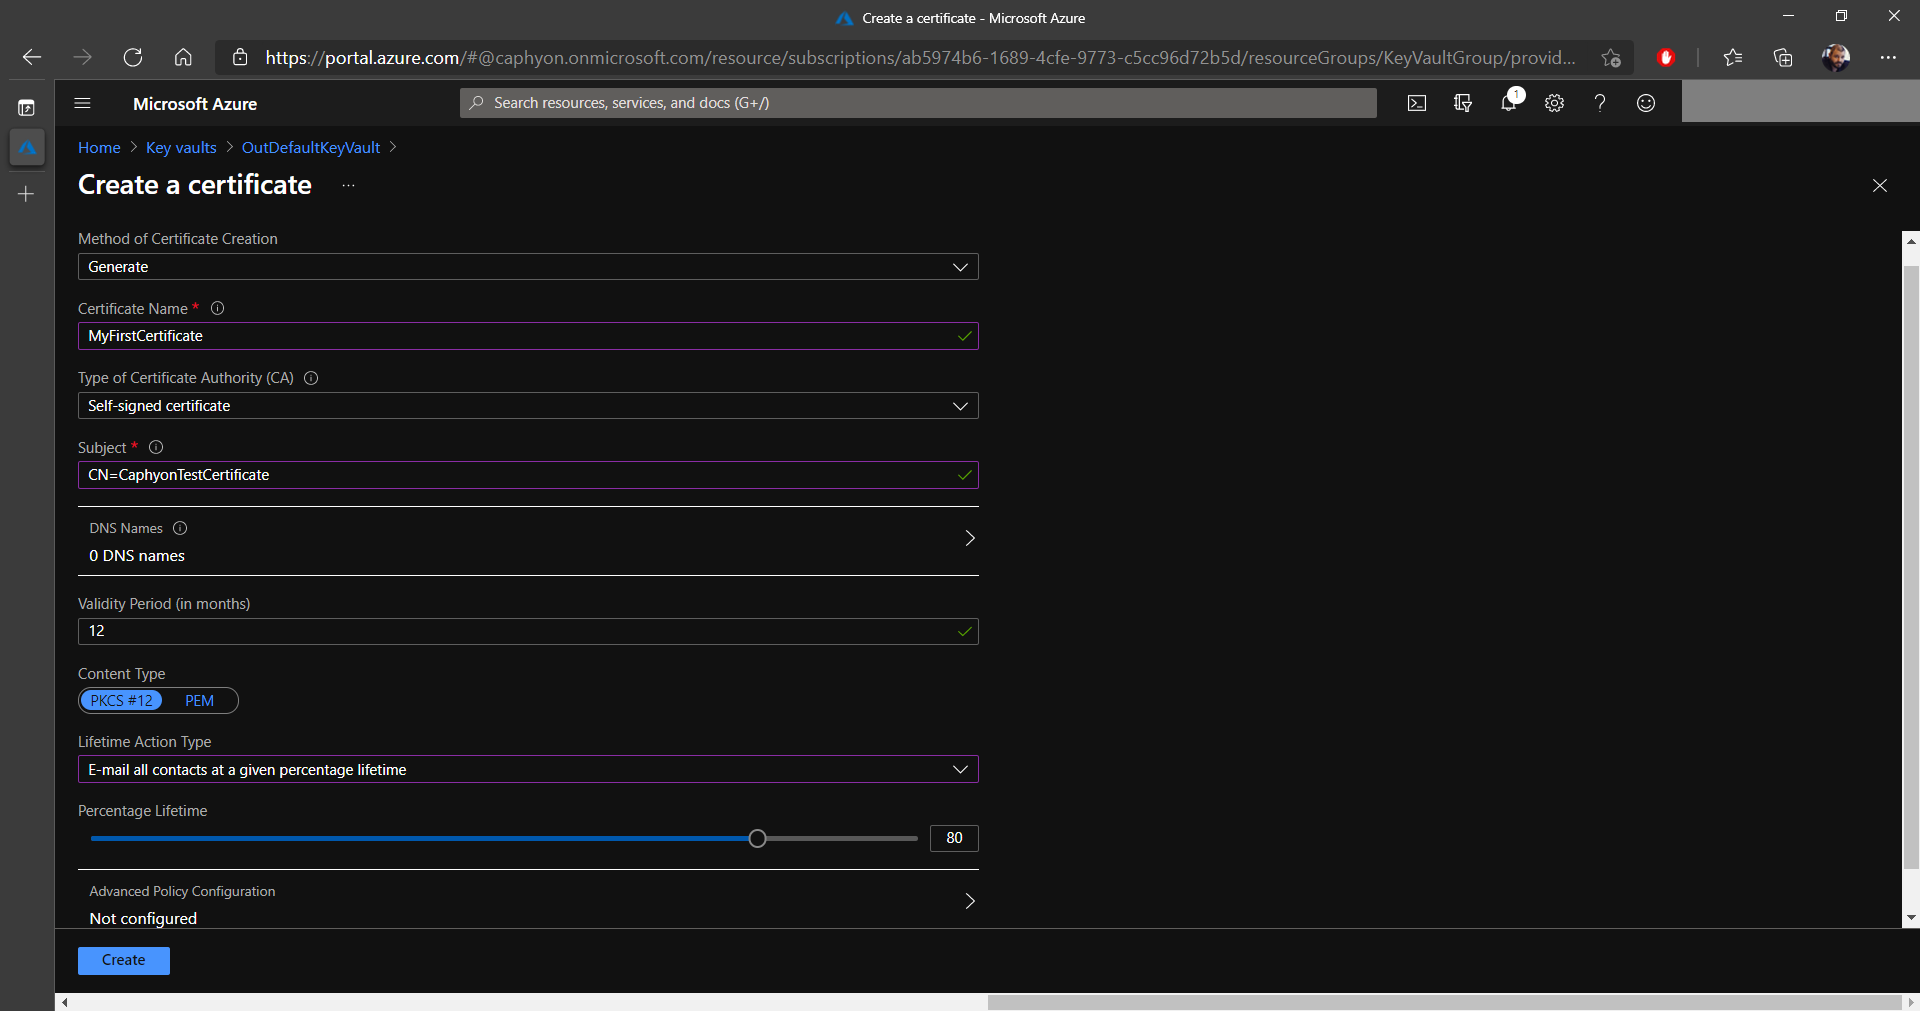
3. Once everything is configured, click on Create. In a few moments, your new certificate will appear in your Key Vault.
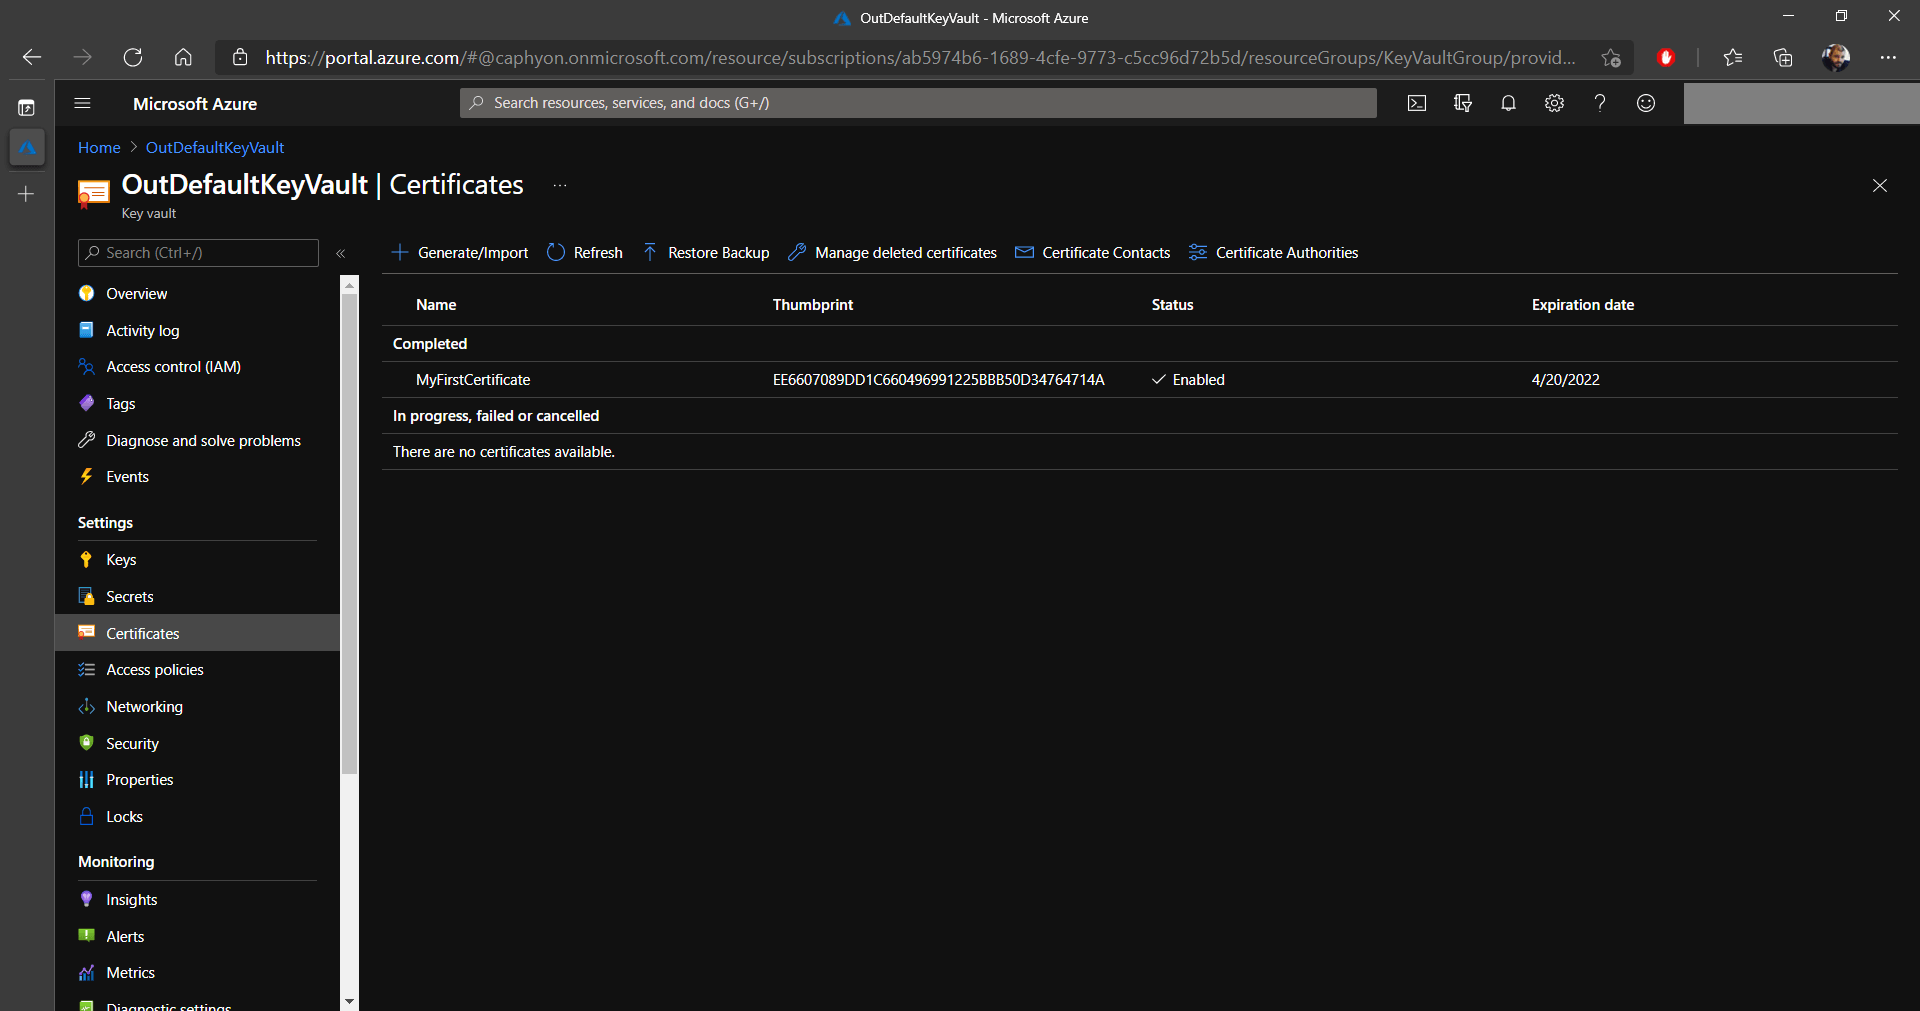
Keep your certificate name close by, as it will be used later
on.
Registering and configuring your application in Azure Active Directory
By now, we already created a Key Vault and a certificate, but we have a few more steps to go before digitally signing our MSIX package.
1. Let's begin by registering our application, which in our case is Advanced Installer.
When we mention registering an application in Azure Active Directory, we are not talking about
defining an executable that is allowed to use the AAD, but rather to
create an Application ID and secret (password) that will be allowed to
have access to the Azure Key Vault via the APIs. You can find more
information about this on the Microsoft website.
2. To register an application, navigate to the Microsoft Azure portal and click on Azure Active Directory.

3. In AAD, click on App Registrations and select New Registration.
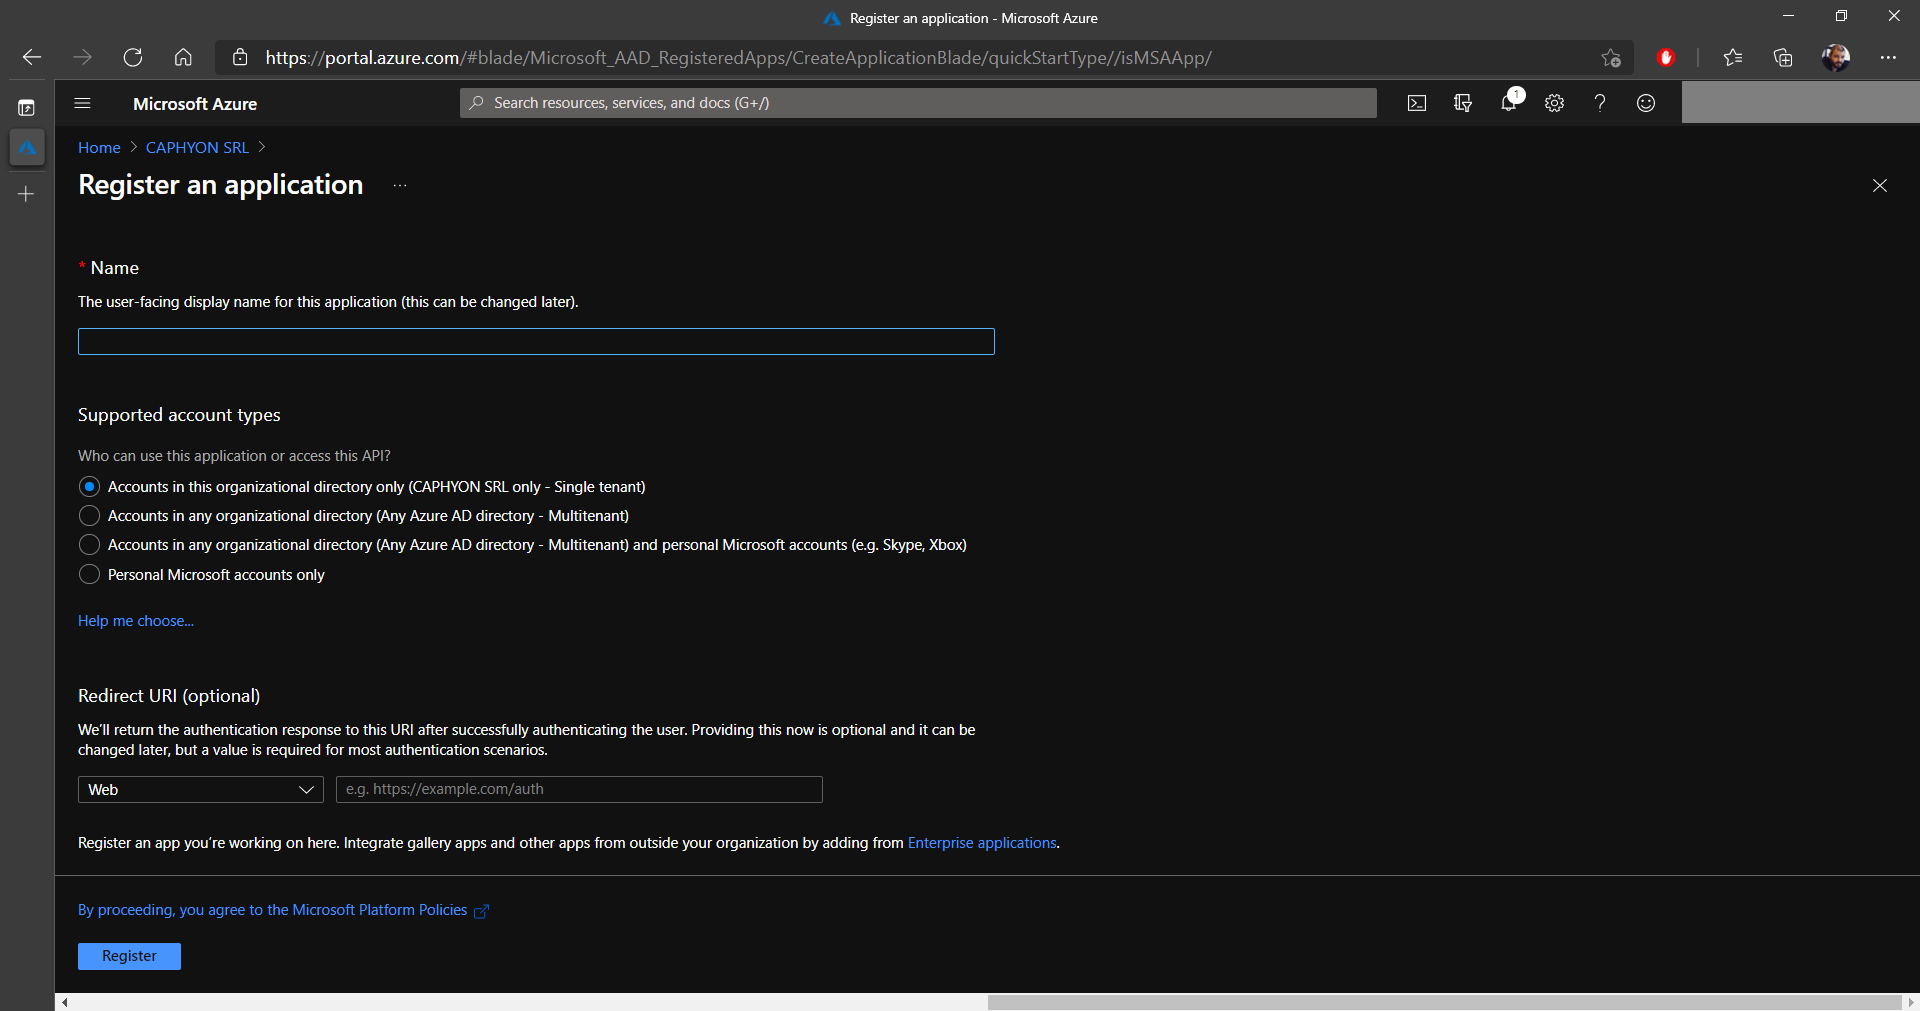
4. In the new registration page, select a name for your application (this doesn’t have to be the name of the application you are using, you can use whatever name you like).
5. Define the Supported account types.
If you are operating on a multi tenant infrastructure, and you are
going to give access to people from multiple tenants, you must choose
Accounts in this organizational directory (Any Azure AD
Directory - Multitenant). In our case we only have one tenant,
so we went with the first option.
6. At the end of the screen, click on Register.
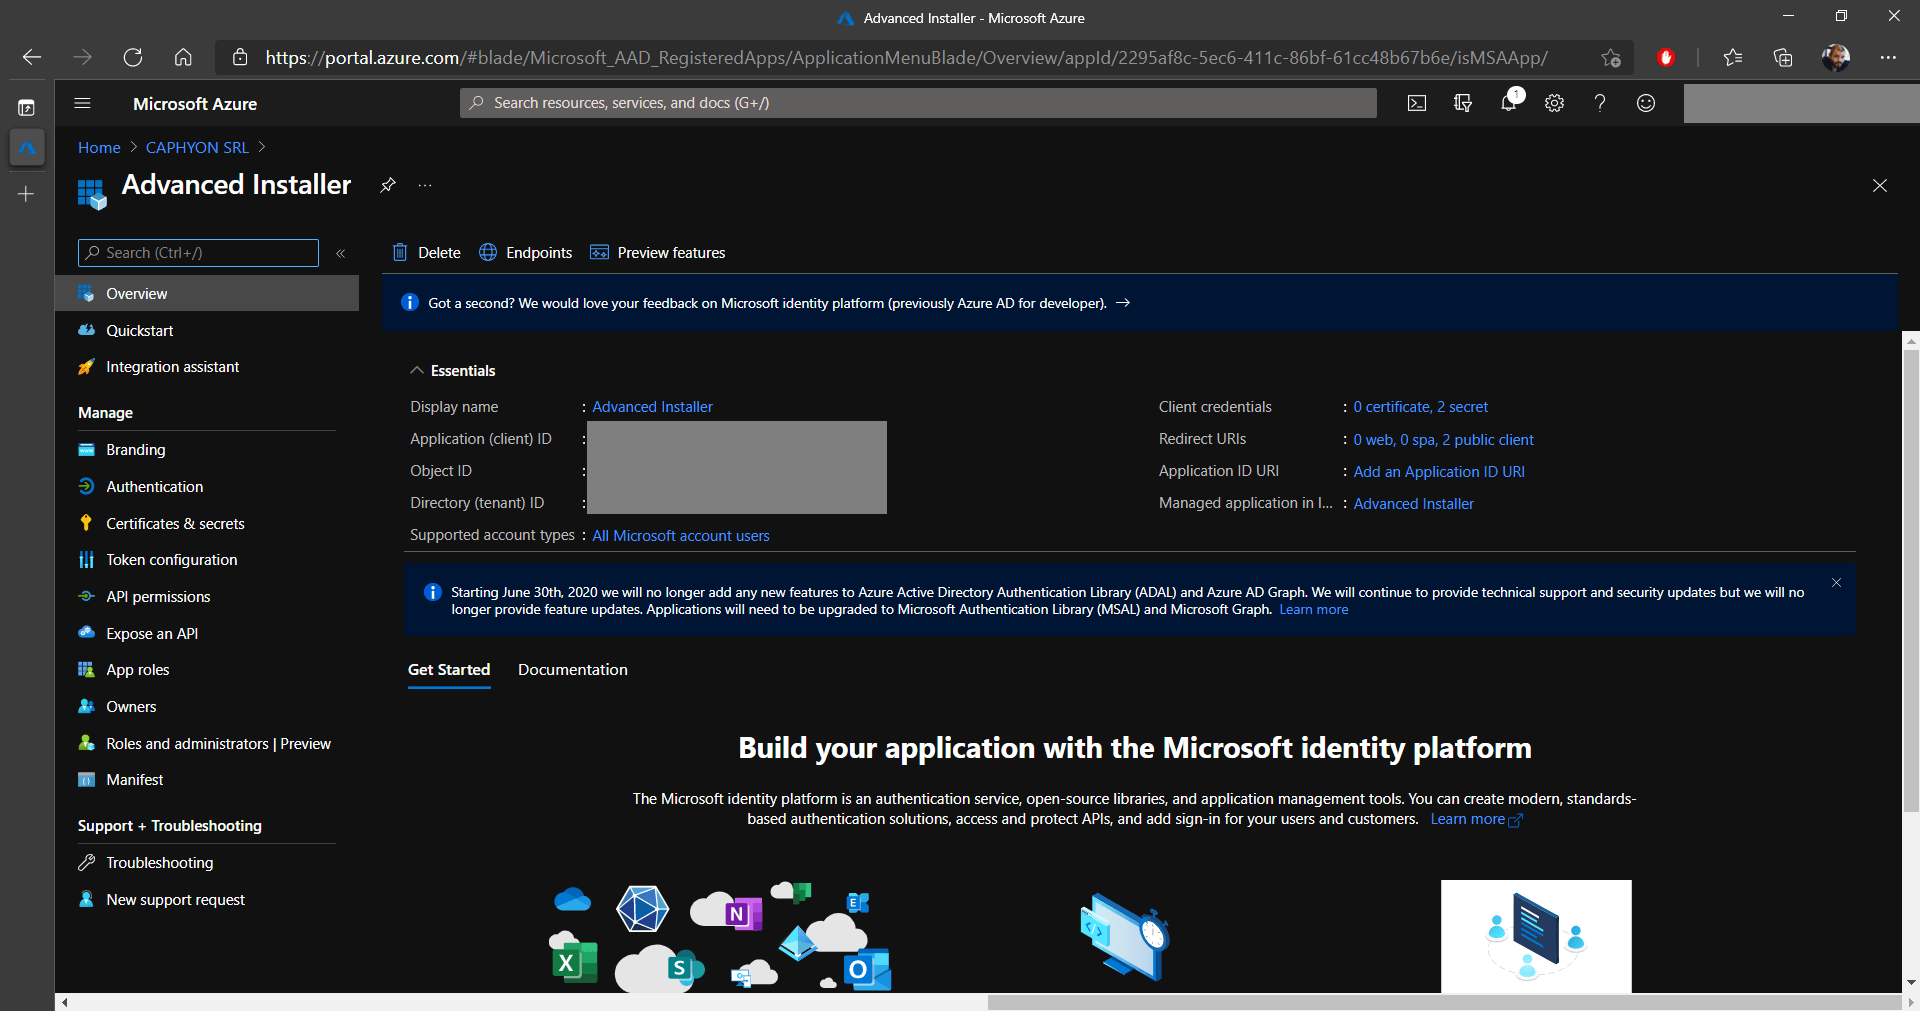
7. When the new app registration is in the Azure Active Directory, click on it.
The Overview provides useful information that will be
necessary a bit later when signing your MSIX packages in Advanced
Installer: Application (client) ID and Directory
(tenant) ID. Keep them at hand.
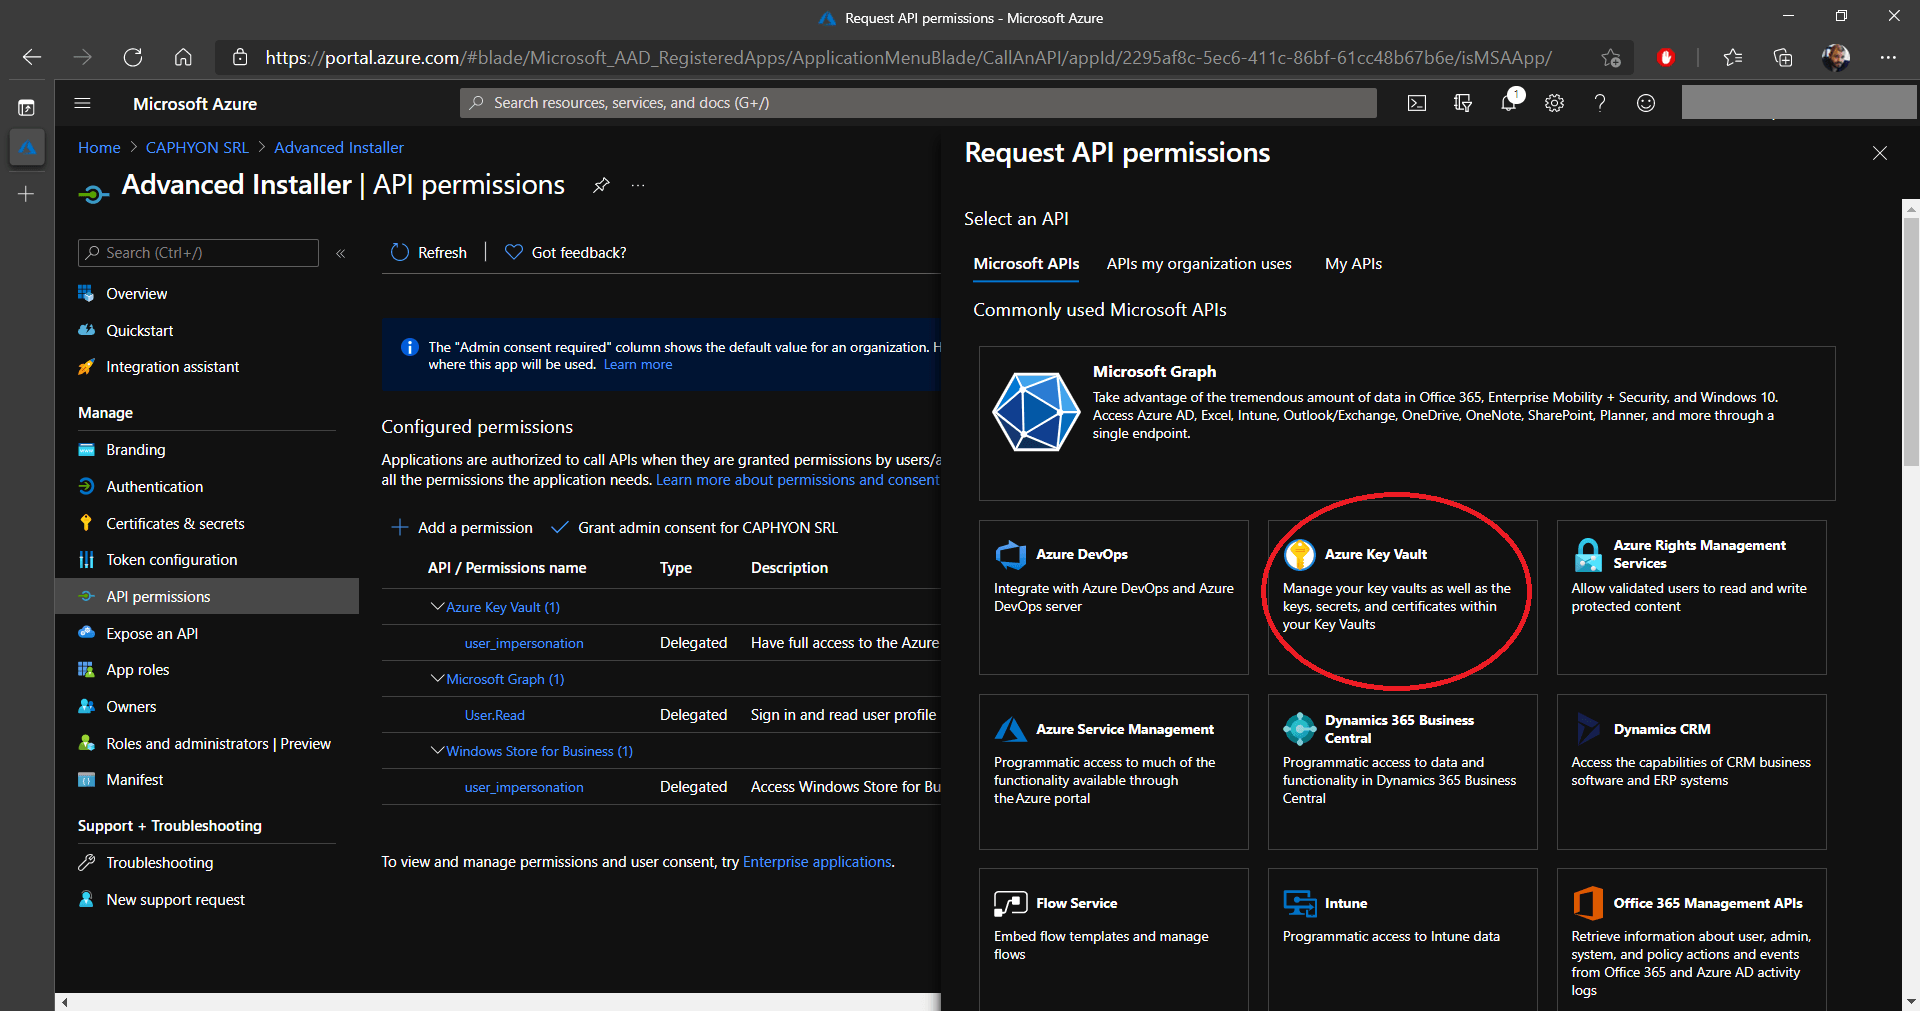
8. Next, navigate to API Permissions and click on Add permission. This will bring up multiple options, but what we are interested in is the Azure Key Vault. What we are doing is granting access to this application to use the Azure Key Vault API.

9. Click on Delegated permissions and under Permissions down below, select the user_impersonation and click on Add Permissions.
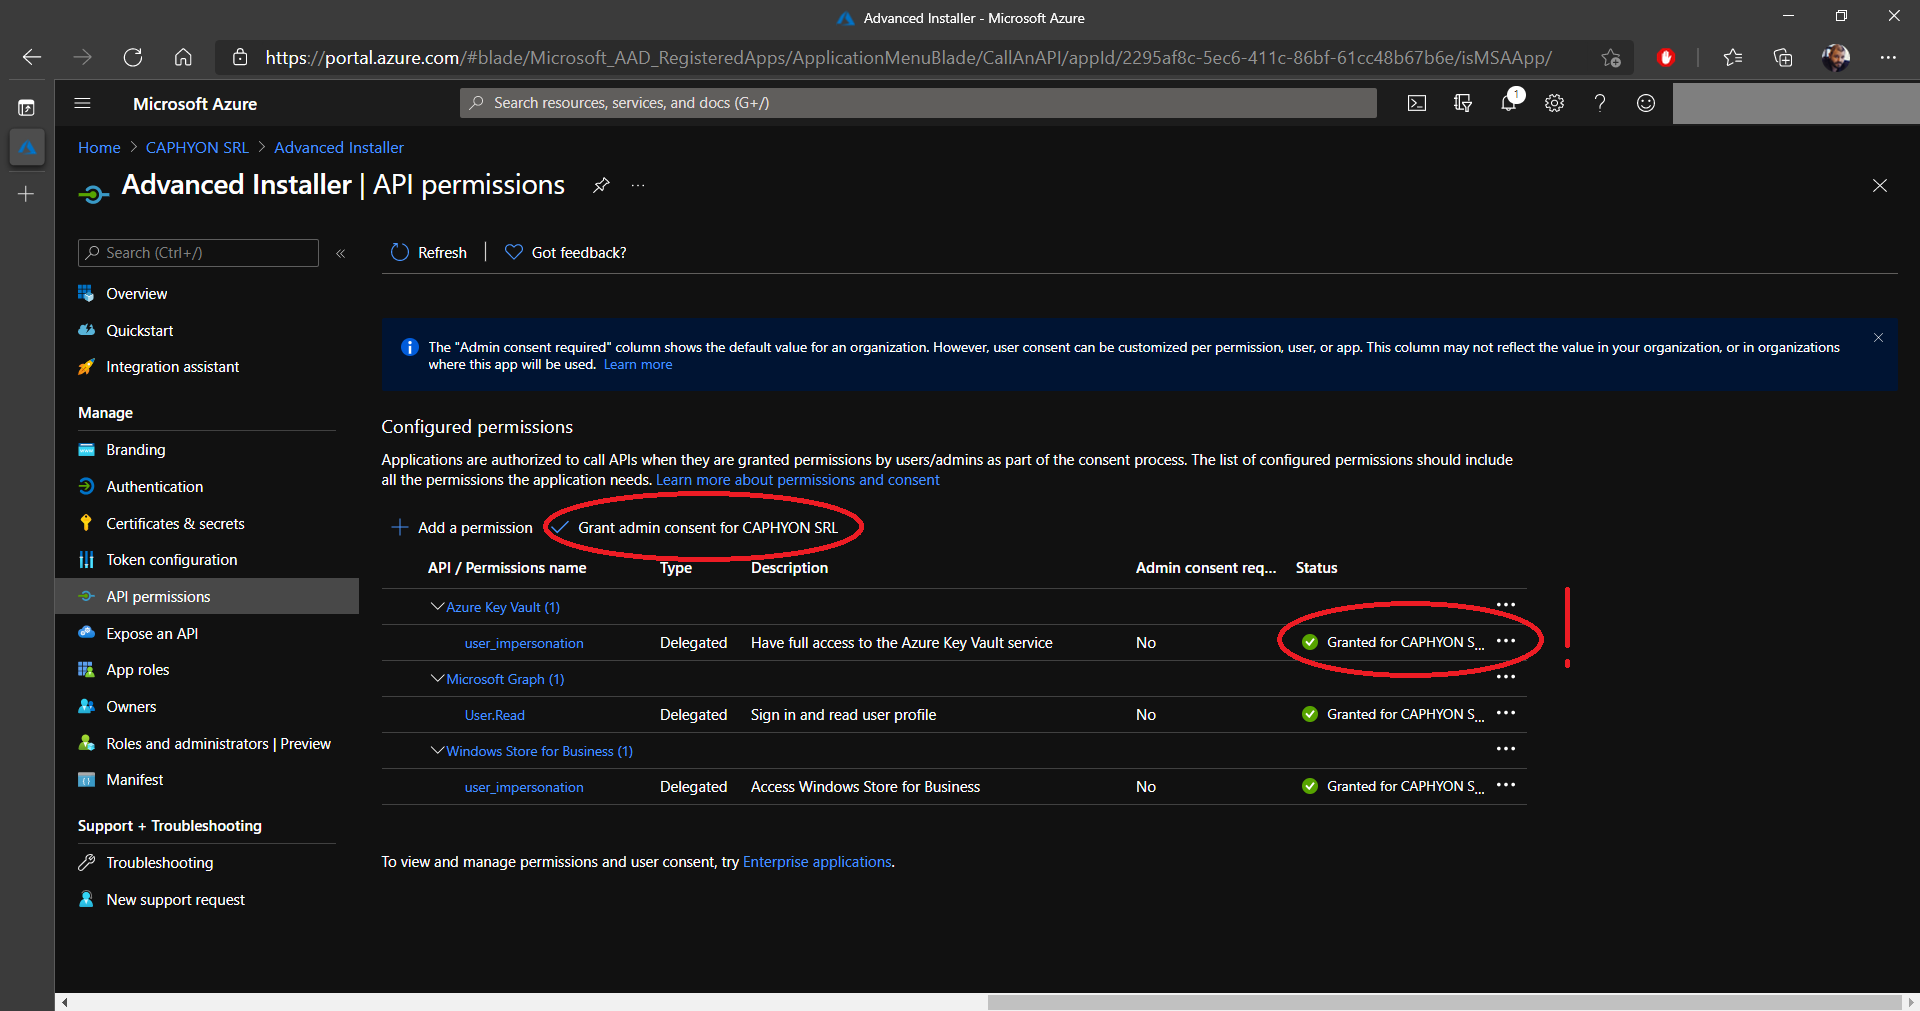
10. Once the new permission appears in the list, click on Grant admin consent for %Your Tenant%. At the end, the status of the permission should be green and Granted for %Tenant Name%.

11. The last step for the application is to create a secret (password) that will be required by AAD when you try to sign an MSIX package. To do this, navigate to Certificates & secrets.
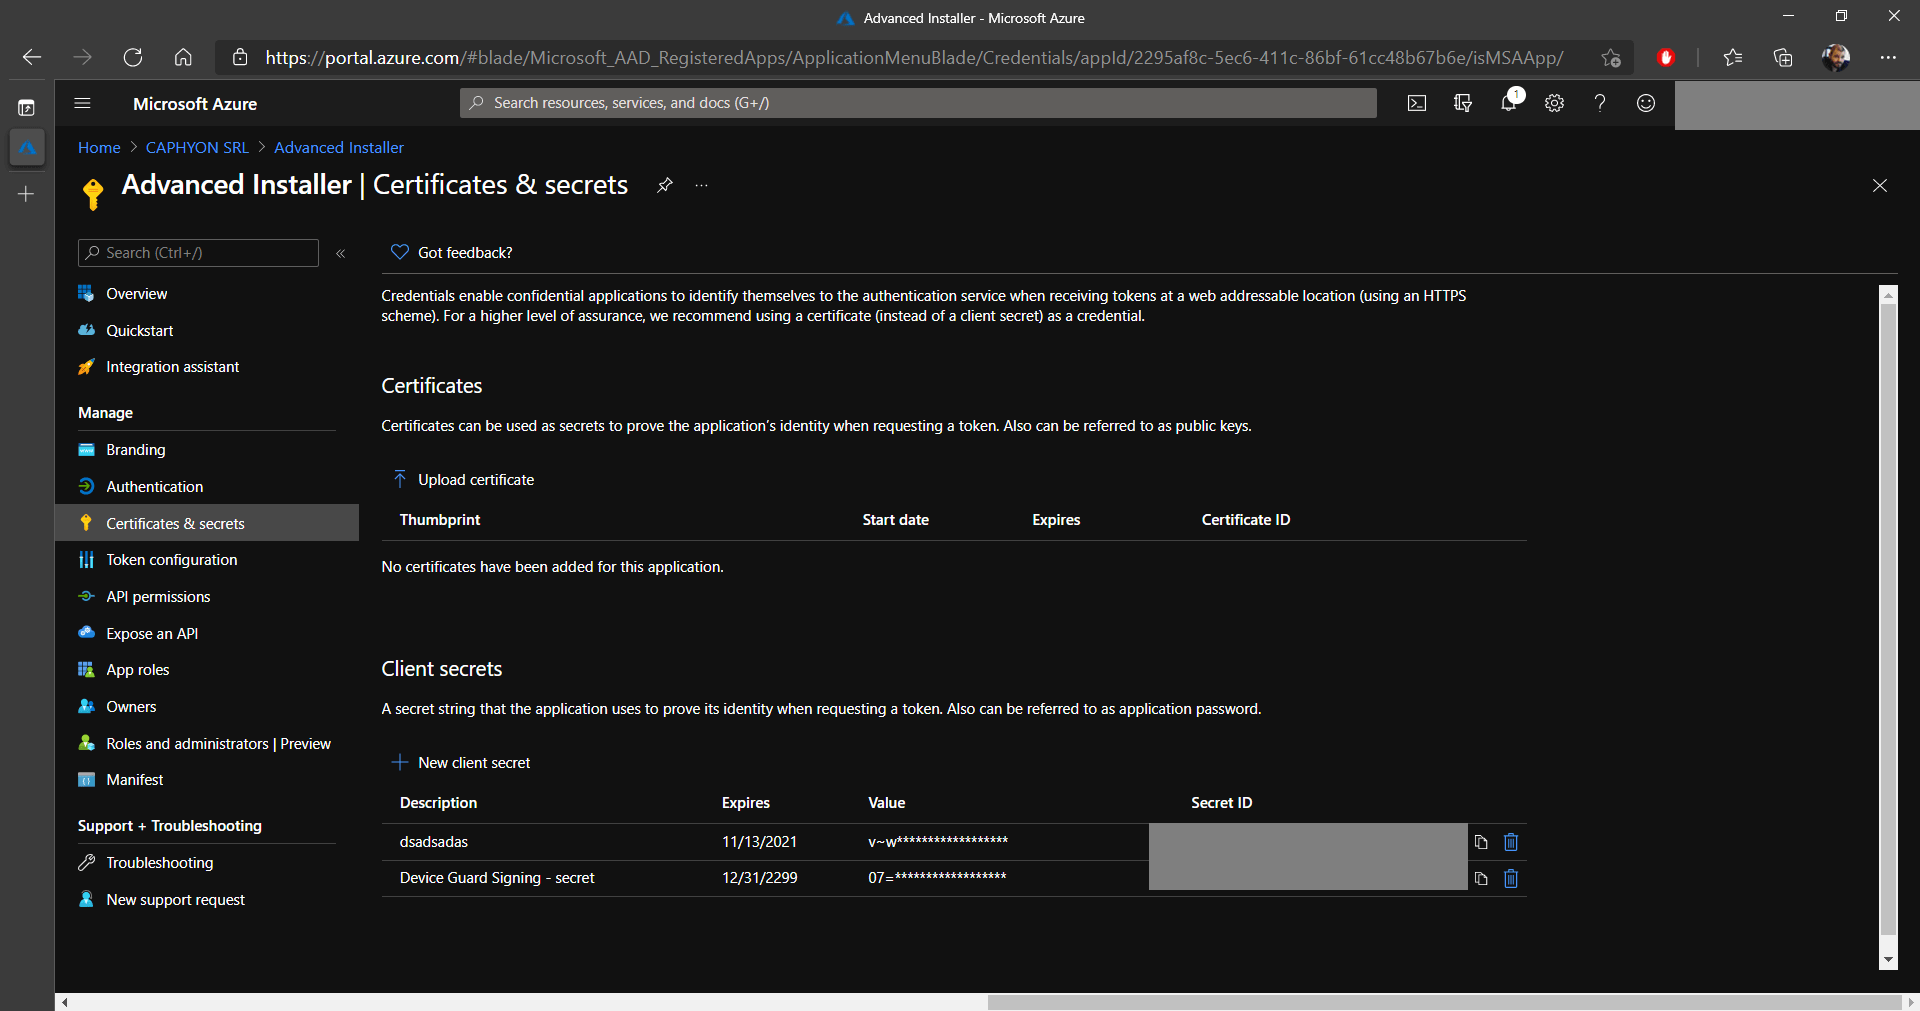
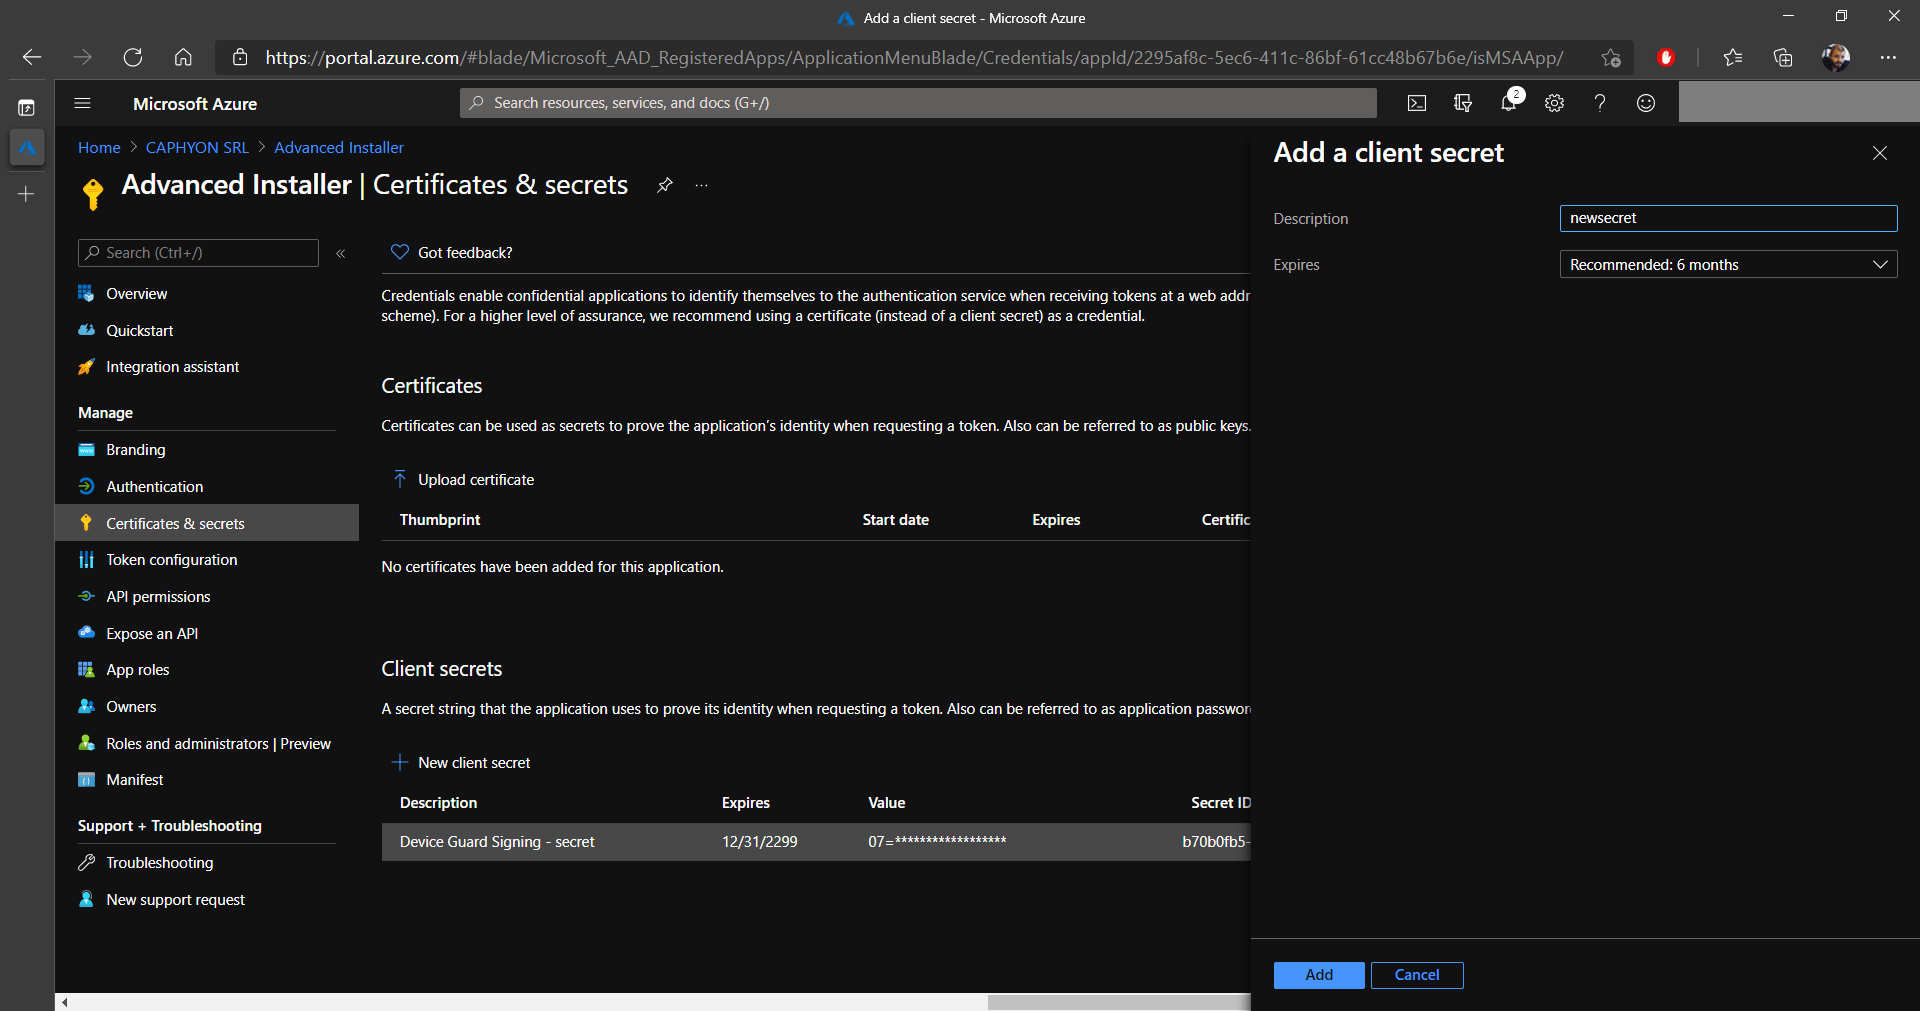
12. Click on New client secret and add a description.
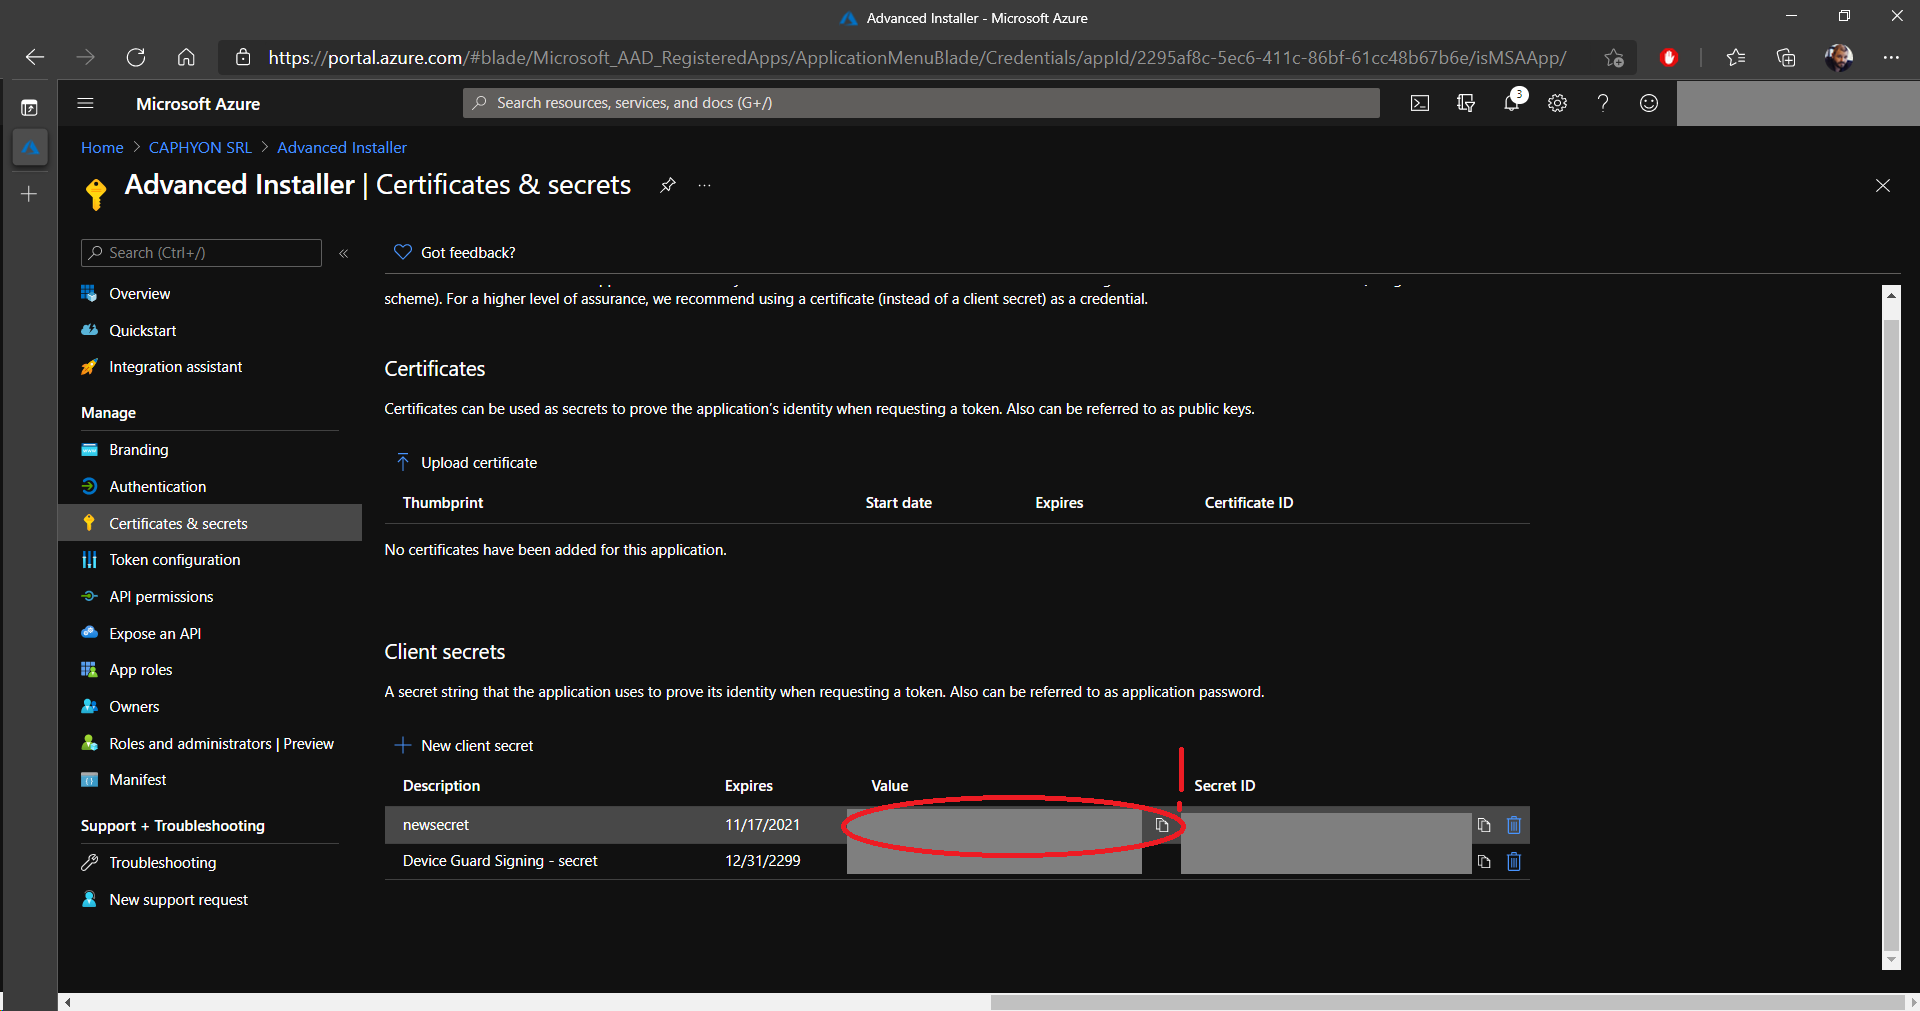
Once the secret is created, it is important to copy the
Value and store it somewhere safe. When you sign
out/close the page, the secret cannot be copied again!
Adding permissions to the application for using Azure Key Vault
Now, we need to give permissions to the application to access the Key Vault and perform the necessary operations.
1. Navigate to the Key vaults section, select your previously created Key Vault and go to Access policies.
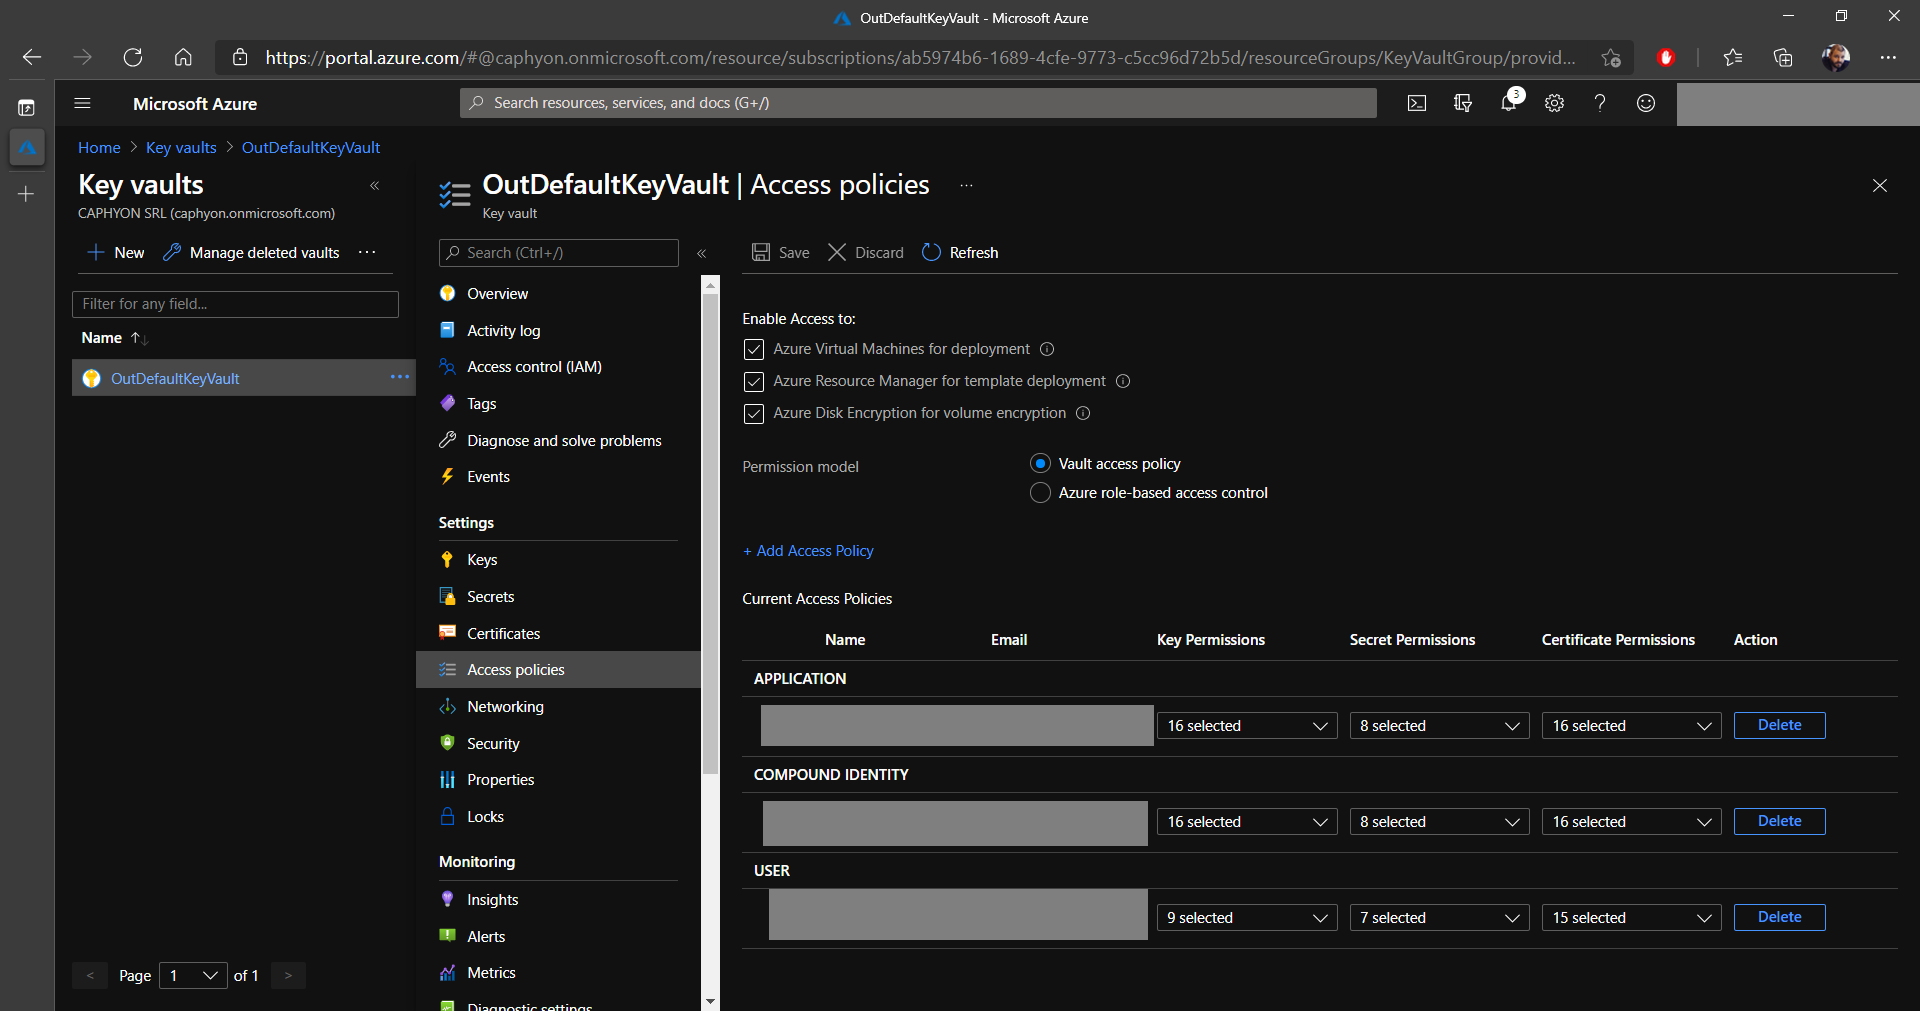
2. Click on Add Access Policy and choose the required Key permissions, Secret permissions, and Certificate permissions (in our case we selected them all, but only a few operations are required).
3. In Select principal, choose the previously created application.
4. Click on Select and Add.
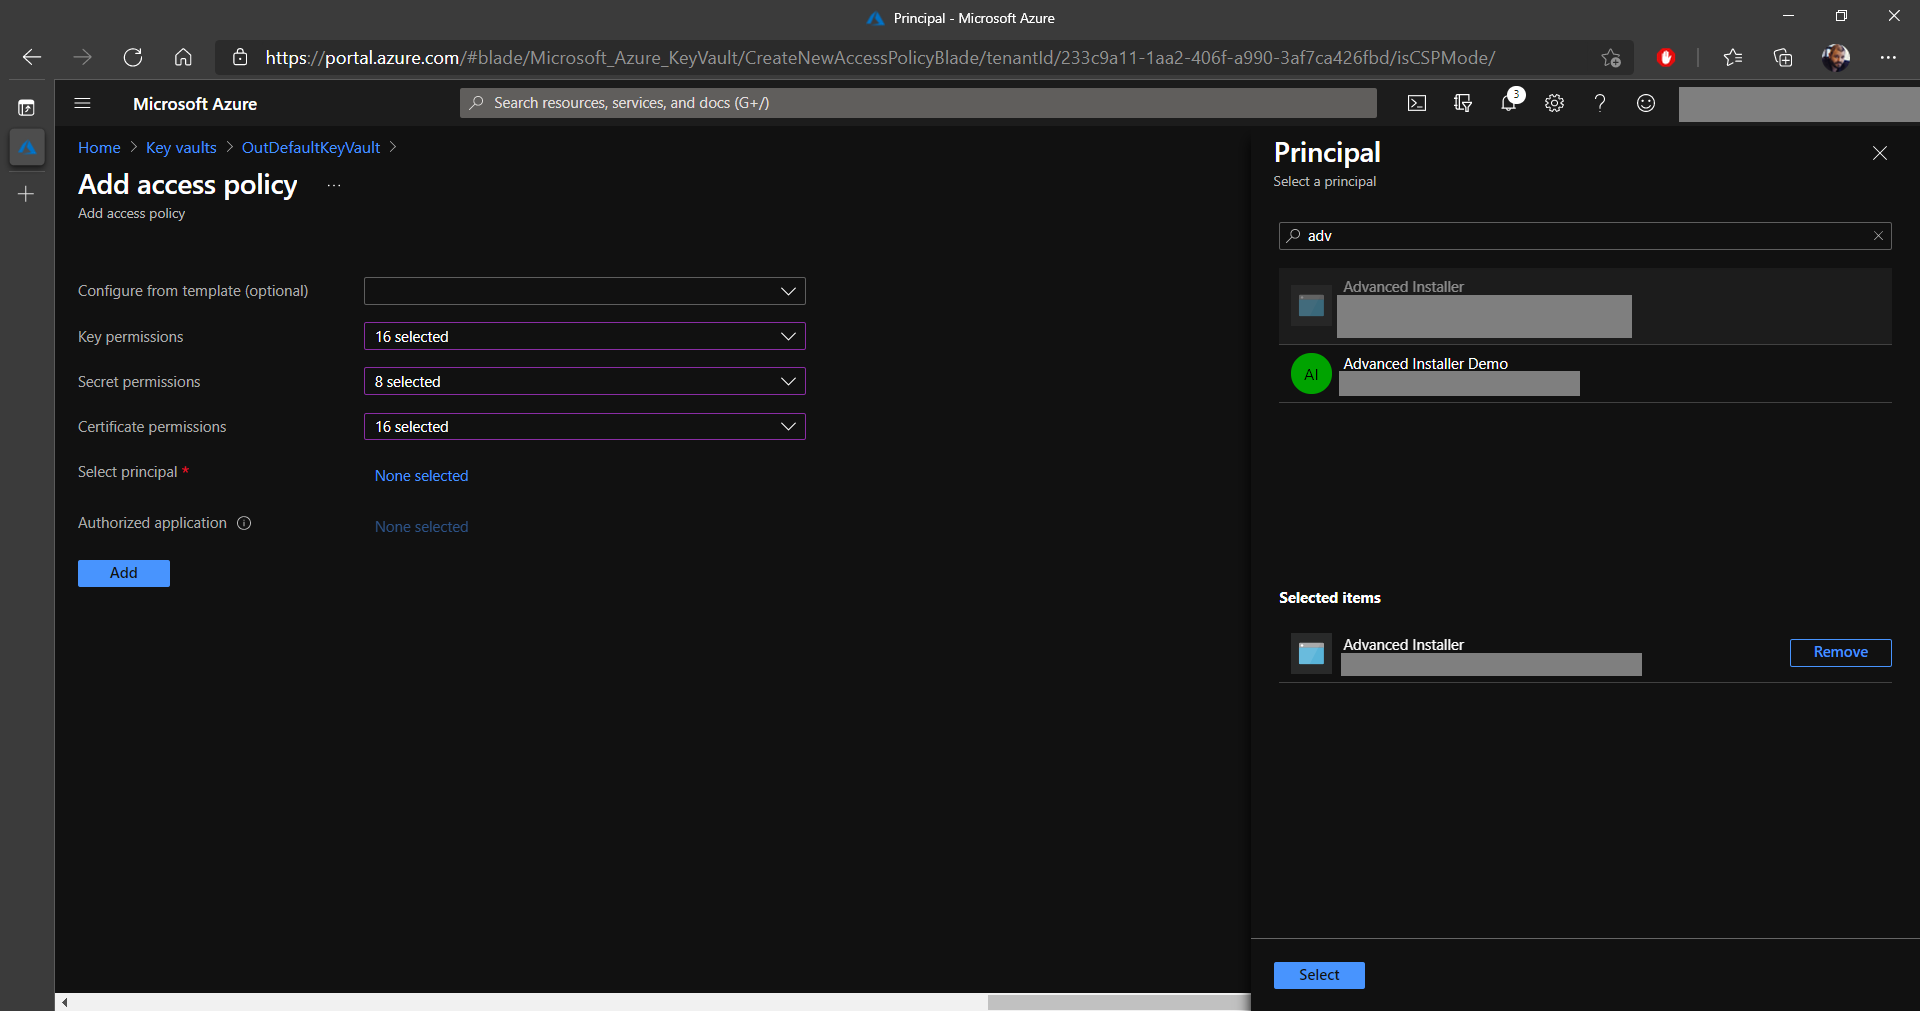
5. Don’t forget to Save!

Signing the MSIX Package with Azure Key Vault and Advanced Installer
Once Azure Key Vault is completely configured, it’s time to sign your MSIX packages with Advanced Installer.
If you want to learn more about creating an MSIX Package with
Advanced Installer, follow our MSIX
Packaging Tool: Guide me in! article.
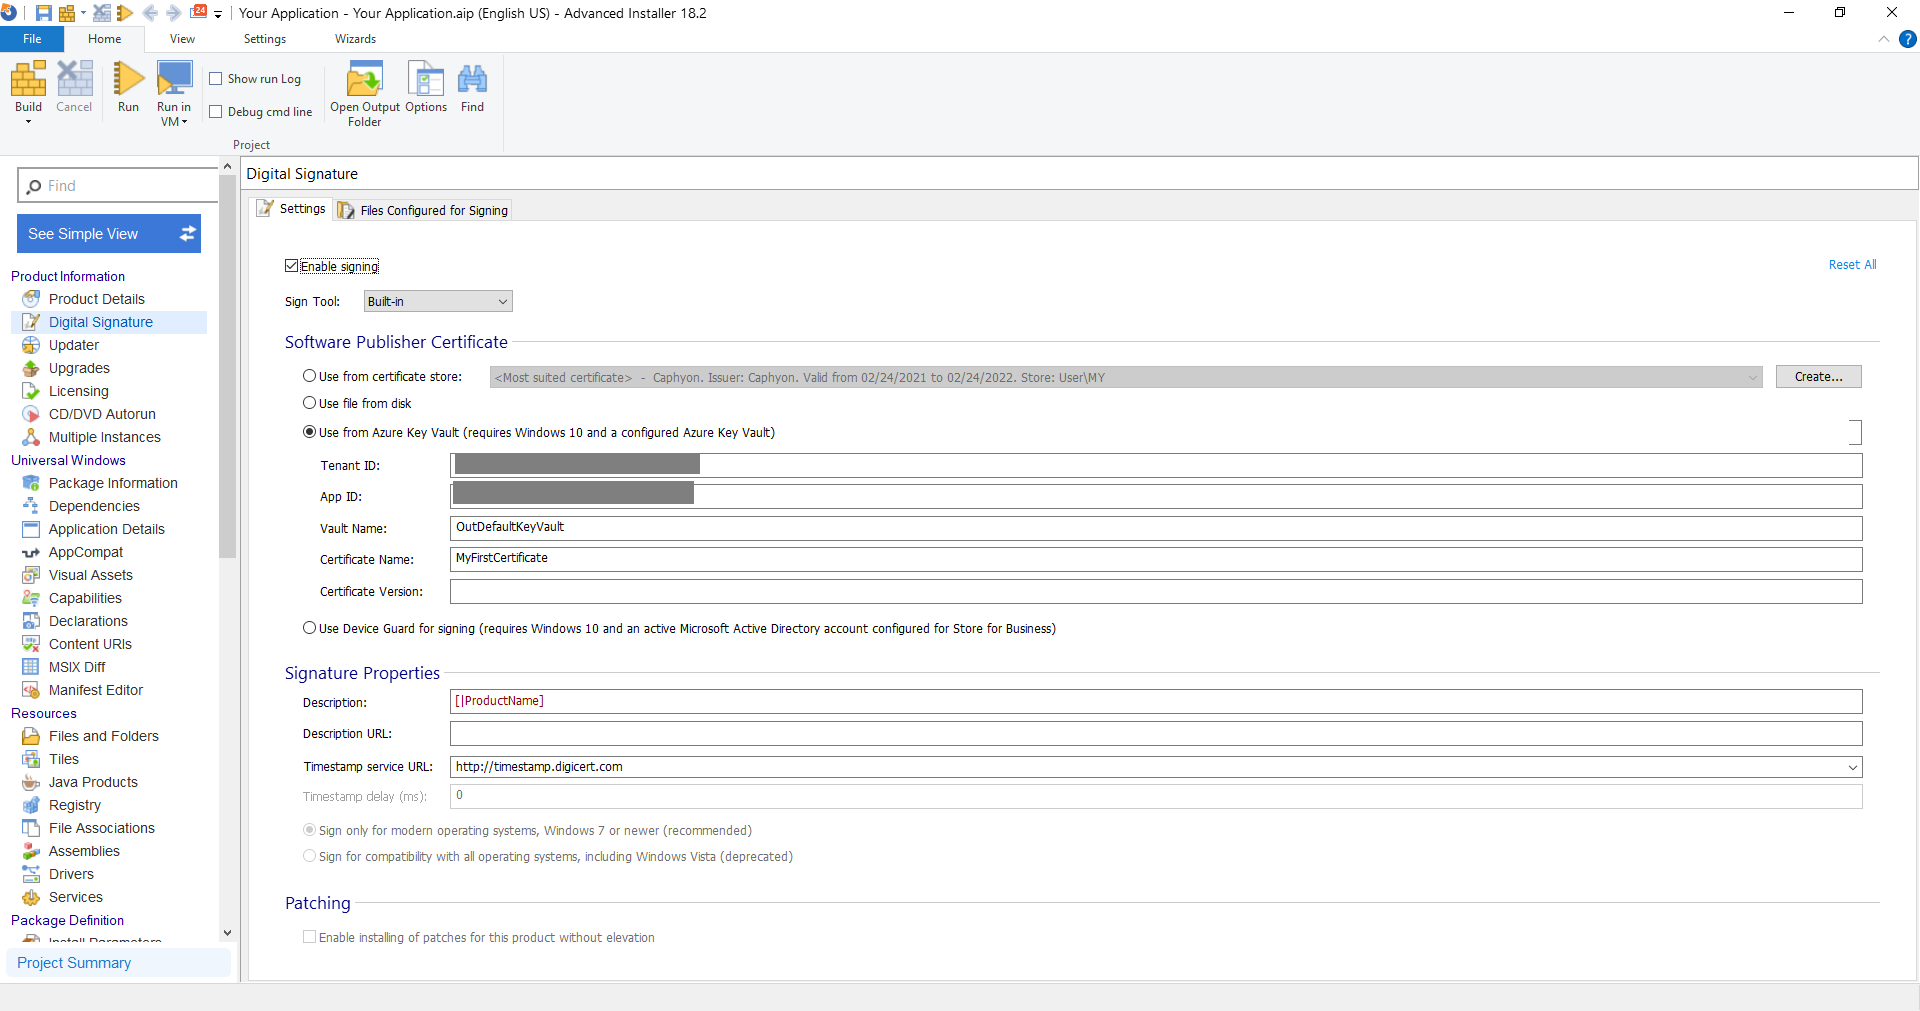
1. Open an MSIX project and navigate to the Digital Signature page.
2. There, click on Use from Azure Key Vault and input the following details:
- Tenant ID
- App ID
- Vault Name
- Certificate Name
- Certificate Version (optional)
The Tenant ID and App ID can be retrieved from the registered
application that we created earlier, and the Vault Name, Certificate
Name, and Certificate version can be retrieved from the Azure Key
Vault.
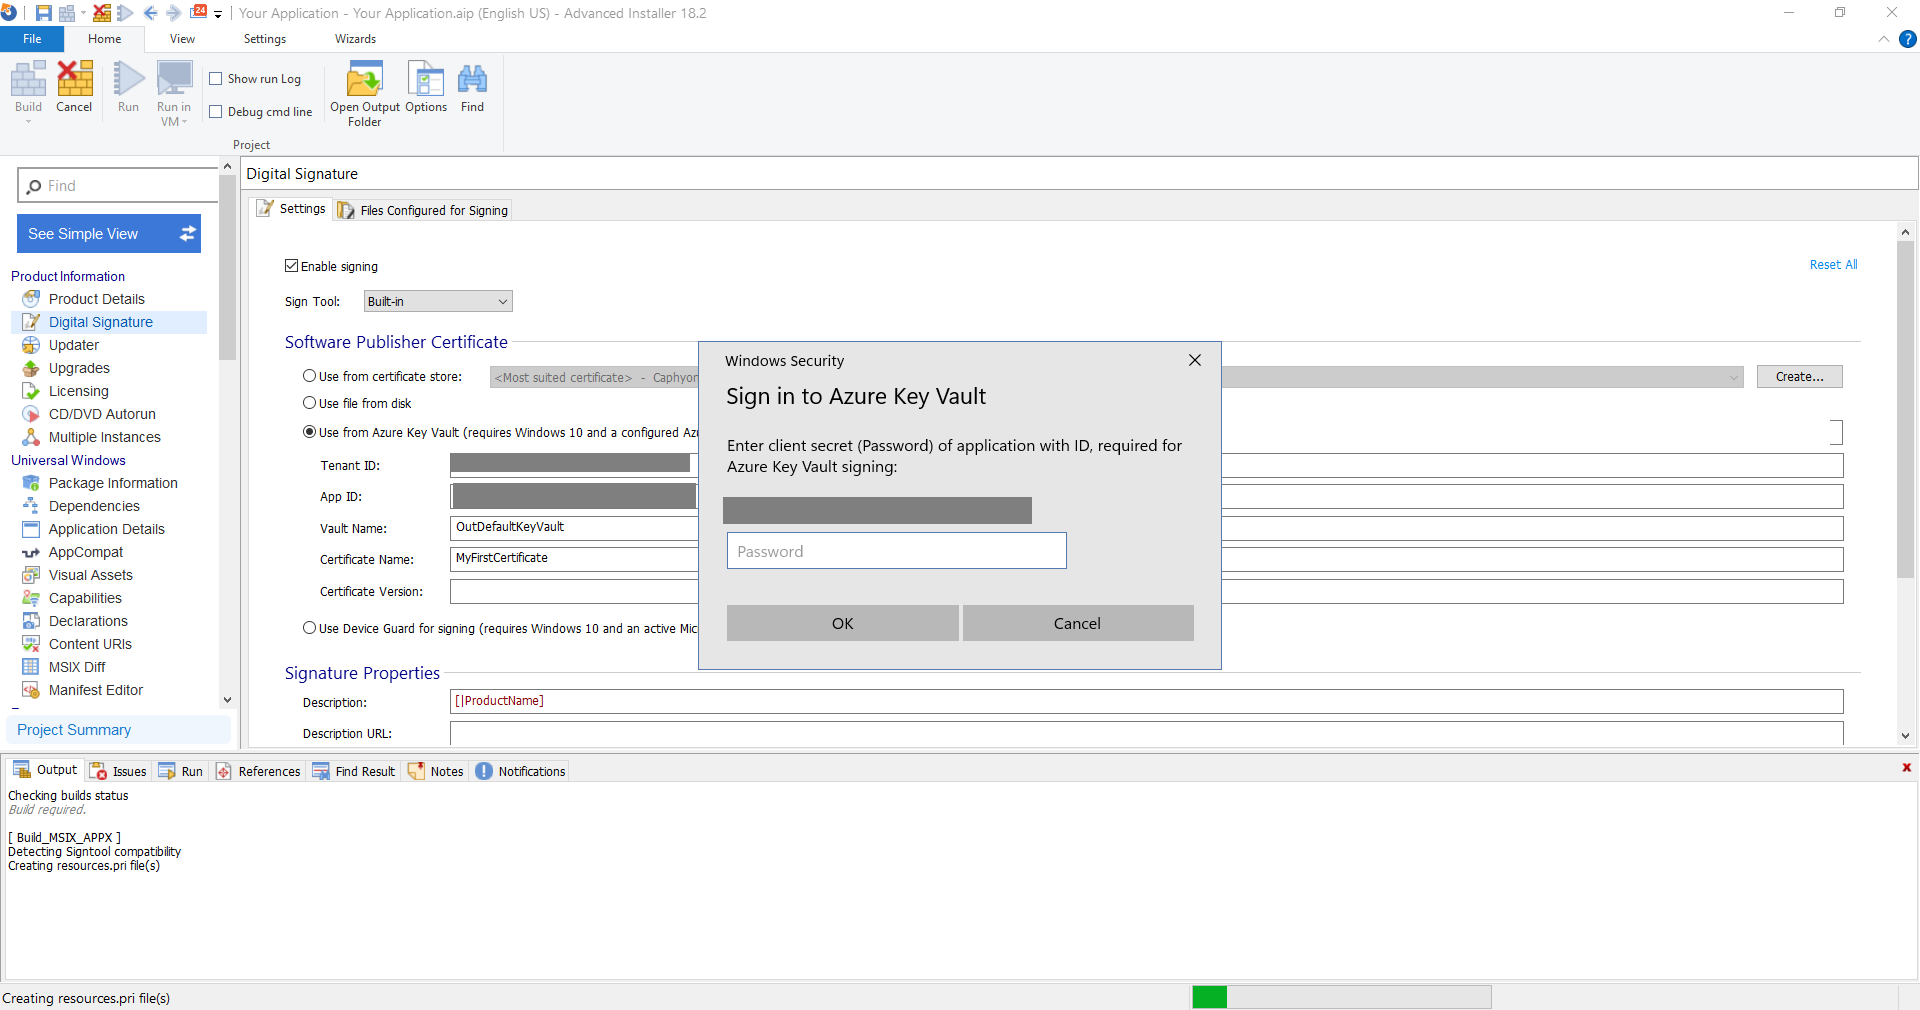
3. Once you click on Build from the upper-left corner, a prompt to input the secret (Password) will be displayed. Here, use the App Secret - which we said we needed to keep safe:
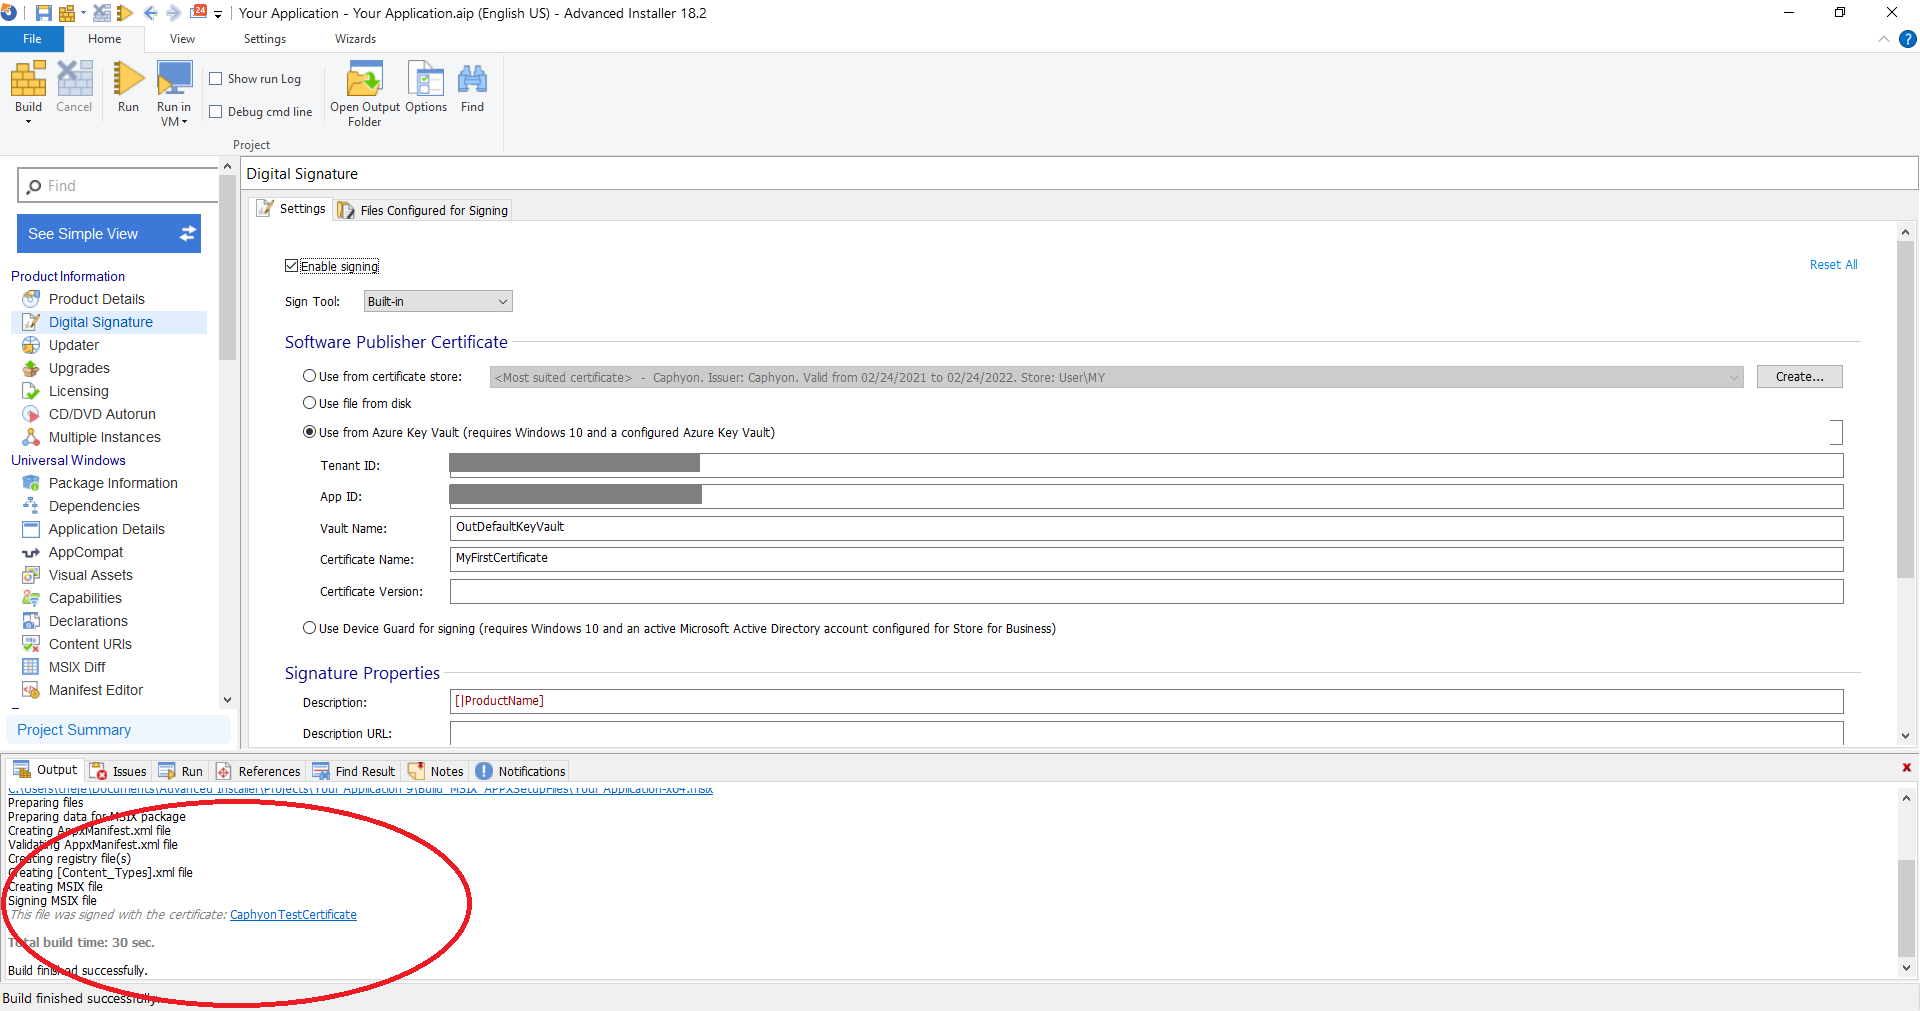
4. At the end, the package will be digitally signed:
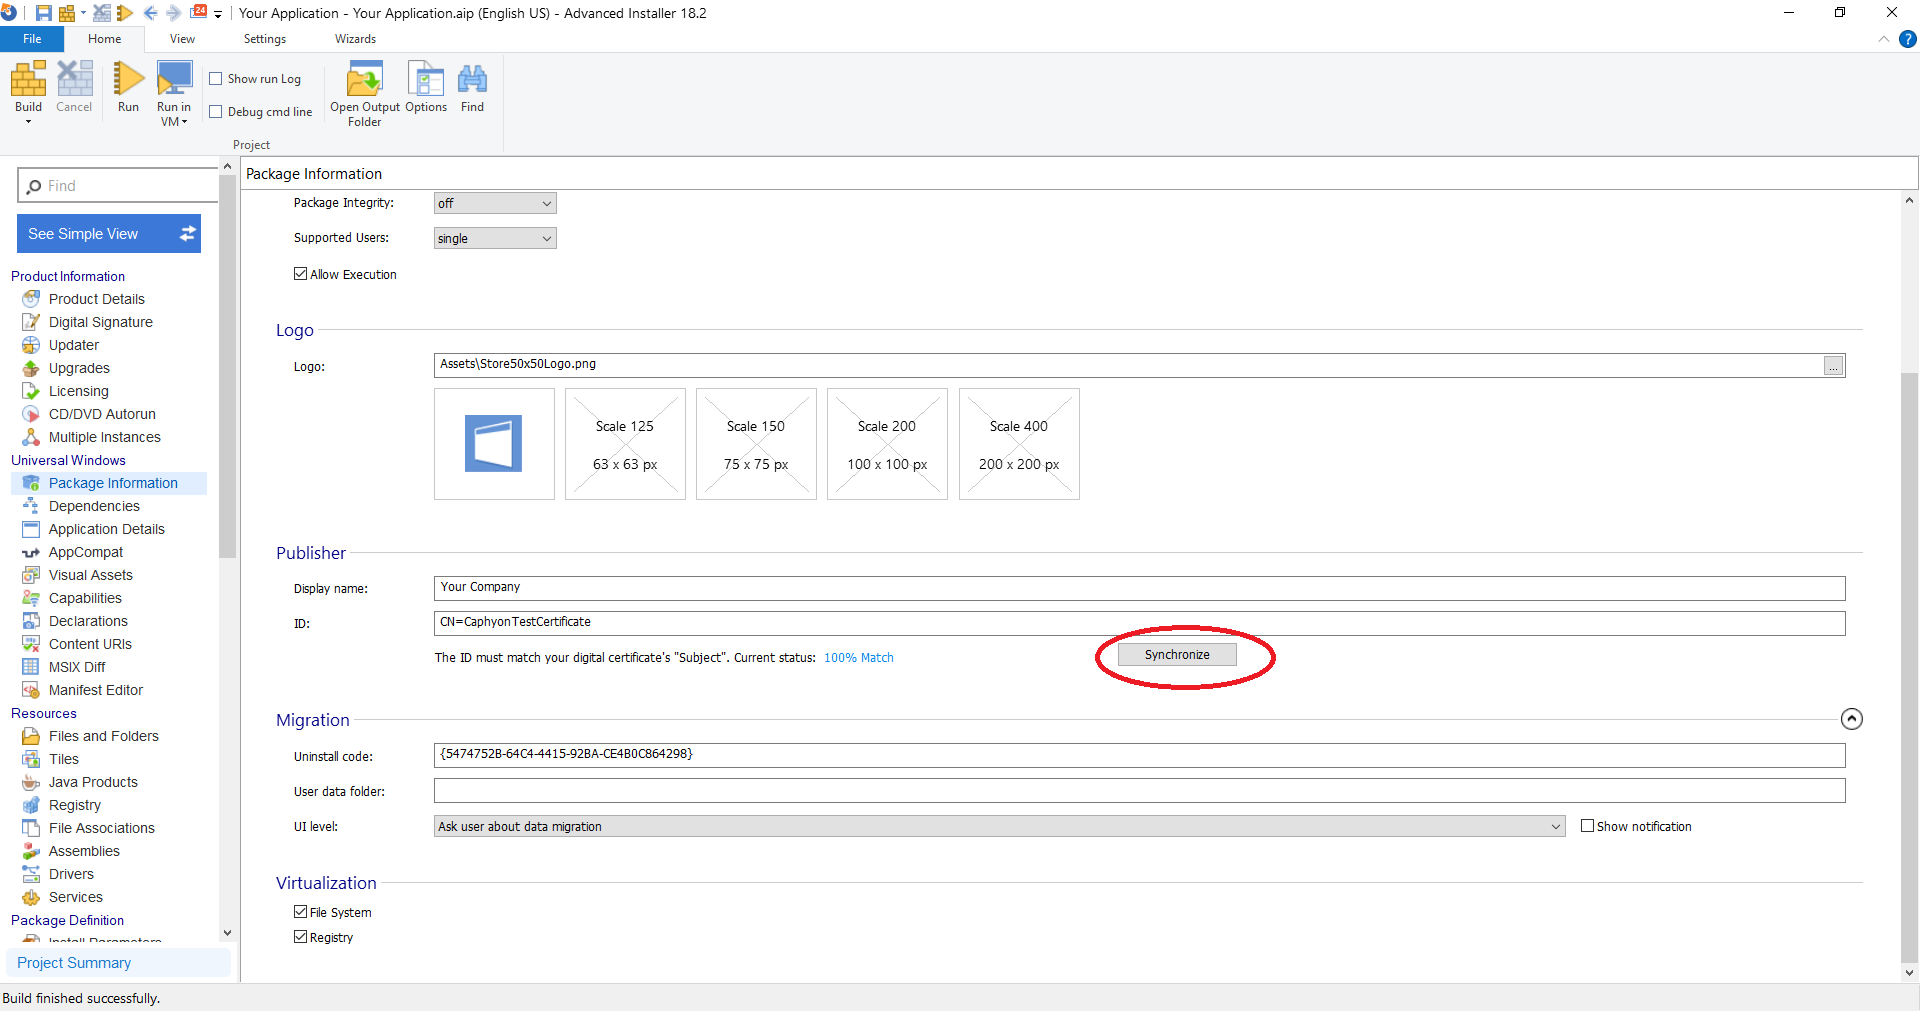
There are cases where the Publisher ID might not match with the
certificate. In this case, navigate to the Package Information Page
and under Publisher click on Synchronize.
Afterwards, you can Build your package so that the digital
signing process can begin.
Conclusion
Configuring the Azure Key Vault to be used for digitally signing MSIX packages may seem like a lot of work, but it’s actually not that complicated. We hope this guide was helpful in showing you how to achieve this.
In this article we didn’t take into consideration the security factors of the permissions granted for the application on Key Vault, that is something that you must decide on your end.
If you want to learn more about Azure Key Vault and Device Guard
Signing with Advanced Installer, you can check our user guide.
If you have any questions leave a comment down below.
Subscribe to Our Newsletter
Sign up for free and be the first to receive the latest news, videos, exclusive How-Tos, and guides from Advanced Installer.