How to Automatically Uninstall a Previous Application Version with Inno Setup
Updates are crucial in software development, enabling developers to add new features, fix bugs, and enhance security. Regular updates are essential to maintaining the performance and reliability of applications.
But how do you set up an installer using Inno Setup to automatically uninstall the previous version of your app before installing the new one?
This article will guide you through that process. Moreover, I will show you an easier alternative for streamlining the update process using Advanced Installer.
Setting Up the Installer 

Let’s say you’ve developed an application and need to create an installer using Inno Setup. This will be version 1.0 of your app.
Here’s what you need to do:
- Open Inno Setup and create an empty script.
- Add the following code to your script, which includes the basic sections necessary for an Inno Setup script.
[Setup]
AppName=DemoApp
AppVersion=1.0
DefaultDirName={pf}\DemoApp
DefaultGroupName=Demo App
OutputDir=C:\Users\R\OutputDir
OutputBaseFilename=DemoApp_Setup
Compression=lzma
SolidCompression=yes
PrivilegesRequired=admin
ArchitecturesInstallIn64BitMode=x64
[Files]
Source: "C:\Users\R\DemoApp\sample.exe"; DestDir: "{app}"; Flags: ignoreversion
[Icons]
Name: "{group}\DemoApp"; Filename: "{app}\sample.exe"
Name: "{commondesktop}\DemoApp"; Filename: "{app}\sample.exe"; Tasks: desktopicon
[Tasks]
Name: "desktopicon"; Description: "Create a &desktop icon"; GroupDescription: "Additional icons:"; Flags: uncheckedOnce the script is ready, run it to create the installer and install version 1.0 of the application.
Adding the Uninstall Functionality to the Inno Setup Installer

Now, let’s suppose you’ve added new features or fixed some bugs, and you want to release version 2.0 of your app. To ensure the installer automatically uninstalls the previous version, add the following code to the [Code] section:
1. Declare a constant for the registry key that contains the uninstaller information. Adjust the path to match your app's registry entry. Inno Setup uses the ‘_is1’ suffix to identify an installer application entry.
const
UninstallerRegPath = 'Software\Microsoft\Windows\CurrentVersion\Uninstall\' + '{#emit SetupSetting("AppName")}' + '_is1';2. Define a function to retrieve the uninstaller path from the registry key. You need to check for the value named ‘UninstallString’ in the path declared above. Display an error message if the uninstaller path is not found.
function GetUninstallerExePath(): String;
var
    UninstallerExePath: String;
begin
    Result := '';
    if RegQueryStringValue(HKLM, UninstallerRegPath, 'UninstallString', UninstallerExePath) then
    begin
        Result := UninstallerExePath;
    end
    else
    begin
        MsgBox('Uninstaller location not found in the registry.', mbError, MB_OK);
    end;
end;3. Create a procedure to run the uninstaller of the previous version of the app.
procedure UninstallPreviousVersion();
var
    UninstallerExePath: String;
    ResultCode: Integer;
begin
    UninstallerExePath := GetUninstallerExePath();
    if (UninstallerExePath <> '') then
    begin
        MsgBox('Executing uninstaller: ' + UninstallerExePath, mbInformation, MB_OK);
        if ShellExec('runas', UninstallerExePath, '/NORESTART', '', SW_SHOWNORMAL, ewWaitUntilTerminated, ResultCode) then
        begin
            MsgBox('Previous version uninstalled successfully.', mbInformation, MB_OK);
        end
        else
        begin
            MsgBox('Failed to uninstall the previous version. ResultCode: ' + IntToStr(ResultCode), mbError, MB_OK);
            Abort();
        end;
    end;
end;4. Trigger the uninstallation during the installation process using the built-in Inno Setup event.
procedure CurStepChanged(CurStep: TSetupStep);
begin
    if (CurStep = ssInstall) then
    begin
        UninstallPreviousVersion();
    end;
end;Run the script to generate the installer for version 2.0. When you run it, the installer will automatically uninstall version 1.0 before installing version 2.0.
How to Automatically Uninstall Previous Versions Using Advanced Installer

Now, I’ll show you how to use Advanced Installer to build an installer that automatically uninstalls the previous version of your application. With its easy-to-navigate GUI, Advanced Installer significantly simplifies the process of creating and customizing installers.
Create the Installer using Advanced Installer

To start, let’s create a package project for version 1.0 of your app:
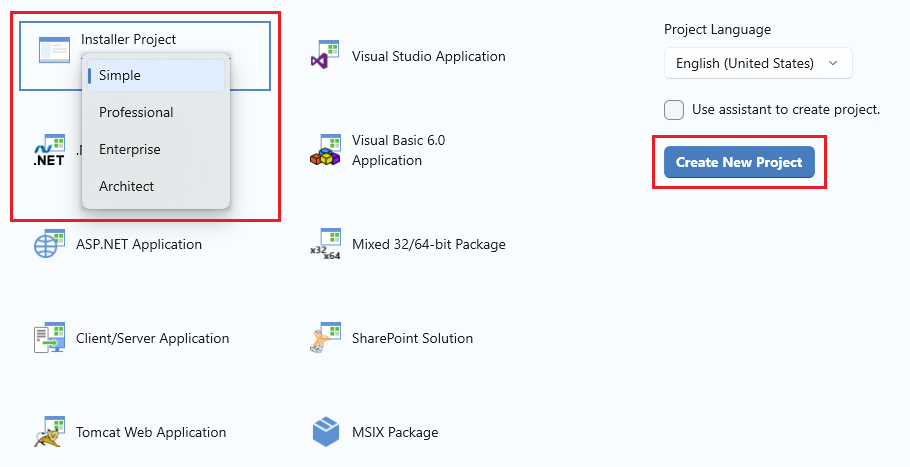
1. Open Advanced Installer, select the project type and click the ‘Create New Project’ button.

2. Add your application files to the project:
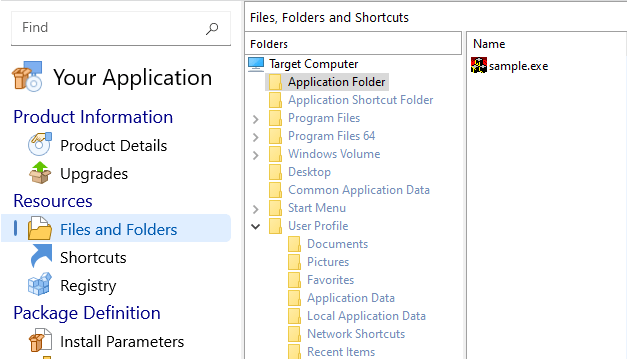
2.1 Navigate to the Files and Folder page.
2.2 Add the files to the Application Folder.

3. Use the ‘Build’ toolbar button on the toolbar to build the project and generate the installer for version 1.0. Once the build is complete, run the installer to install version 1.0 of the application.
Configuring the Installer for Automatic Uninstallation

When you're ready to release an updated version of your app (e.g., version 2.0), follow these steps to ensure the installer automatically uninstalls the previous version:
- Navigate to the Product Details page.
- Under the ‘Product Details’ section’ increase the version number from 1.0 to 2.0.
- When prompted to generate a new ProductCode, select “Generate New”.

To synchronize the folder in your package project with the source folder on the disk when making modifications to your app, you can use the Advanced Installer Synchronization Folder functionality. You can refer to the article here for more information.
Finally, rebuild the project and run the installer. The product will automatically uninstall the older version before installing the updated one.
Conclusion

Configuring an installer with Inno Setup to automatically uninstall a previous version can be somewhat challenging and time-consuming, as it requires manual coding.
In contrast, Advanced Installer streamlines this process, allowing you to configure automatic uninstallation quickly and easily through its user-friendly graphical interface, without the need for coding
Streamline your software deployment with Advanced Installer.
Start your free trial now and simplify building and managing installers—no coding needed.
Start Your 30-Day Free Trial.
