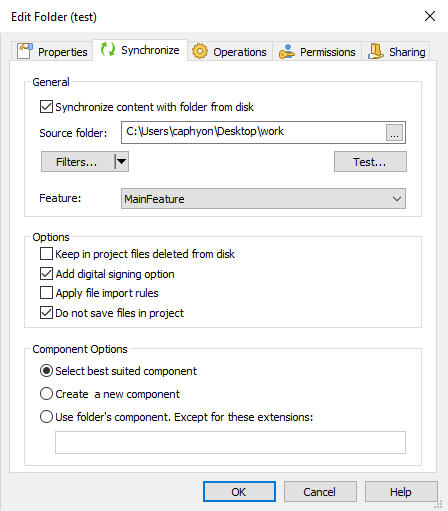
Synchronize Folder Tab

In this dialog you can make a folder synchronized to a source folder on disk. Basically, the folder synchronization works like this:

- the synchronized folder from your project will be identical in content with the source folder from the disk.
- if the files and folders in the synchronized folder on the disk change, this change is also made in the synchronized folder from your project.
- if you add regular files and folders in a synchronized folder, these elements will not be affected by the synchronization.
- the synchronization is refreshed when you open the project, when you use the button in the "Files and Folders" page or when you built the project.
- when using Advanced Installer in GUI mode, the synchronization is not refreshed on project Save.
It is strongly recommended not to use the synchronization feature:
- in Patch packages because the
synchronization may re-create some components when refreshed and therefore new GUIDs will be
generated for them;
- in Upgrade packages when using the Install new version first and then uninstall old version option because the
synchronization may create new GUIDs for components when refreshed resulting in the files
being deleted when upgrading the product.
General

Synchronized content with folder from disk

Enable this option in order to activate the synchronization of a folder from the project with a folder from the disk.
Source Folder

Use the button to select the source folder from the disk.
Synchronized folders will be marked visually with this icon:![]() .
.
You can edit filters that will allow you to specify which files will be added to the package. Use the button to do that.
If you want to use the same filters for multiple synchronized folders, use the and menu options from the drop-down menu that appears by clicking the black arrow from the ... button.
To preview the changes done to the project you can use the button. A dialog will be displayed showing what files will be added to the project, removed of left unchanged.
Read more about Synchronized Folders.
Feature

Select the feature that will contain the components resulted after the synchronization process.
Options

Keep in project files deleted from disk

When this option is used, the files from the project that are not found on disk are left in the project but with a size of 0 bytes. This can help avoid eventual build failures due to missing files.
Add digital signing option

If this option is used, all EXE files are automatically marked for digital signing at build time.
Apply file import rules

If this option is used, all synchronized INI or XML files will be imported rather than added as plain files.
Do not save files in project

If this option is enabled, the files contained by the synchronized folder will not be added to the project (e.g. in Files and Folders page) but they will be included in the package at bulid time.
When this option is set for a synchronized folder, the synchronized files that
were present in that folder before will be removed from the project.
Component Options

When a file is added to the project by synchronization, a component is selected or created for it. The component option selected here is applied only to new files added by synchronization, from the moment it is selected. Components for existing files are untouched when this option gets changed.
- Select best suited component
- Selects the component by following
Windows Installer recommendations: EXE, DLL, PDB, CHI, CHM files should be alone in component and
other files from the same folder should share the same component.
These rules are also applied when manually adding a new file to project.
- Selects the component by following
Windows Installer recommendations: EXE, DLL, PDB, CHI, CHM files should be alone in component and
other files from the same folder should share the same component.
- Create a new component
- Every new file added by synchronization is added in its own new component. No other rules apply.
- Use folder's component. Except for these extensions:
- All
files from a folder are added in the same component. This applies to any file extension
unless it is specified in the exception list.
Extensions can be added in the exception list without leading "." and separated by a blank space " ". The rules recommended by Windows Installer are applied for these exceptions.
- All
files from a folder are added in the same component. This applies to any file extension
unless it is specified in the exception list.
Topics
- Edit Filters Dialog
Edit filters for synchronized folders.