How to Bind the SSL Certificate During the Upgrade Process Using Custom Actions
During the installation process of WebApps, there are cases where users are asked to select an SSL certificate. This is because this certificate is used by the IIS elements.
However, when it comes to an upgrade, you may not want your users to get asked for the SSL certificate again. To achieve that, we will need to implement two custom actions based on the type of installation:
- During the first time install, a custom action that will configure the website with the selected certificate by the user
- During the upgrade process, a custom action that will get the certificate assigned for the website and used when installing the package.
Keep in mind that the website will be removed and reinstalled when
the upgrade is applied.
Before applying the custom actions, we first need to:
- Create the IIS dialog.
- Create the IIS page.
Creating the IIS Dialog

This dialog contains the IIS elements that the user will be prompted to complete. As a first step, let's create the dialog where the user will enter the IIS elements:
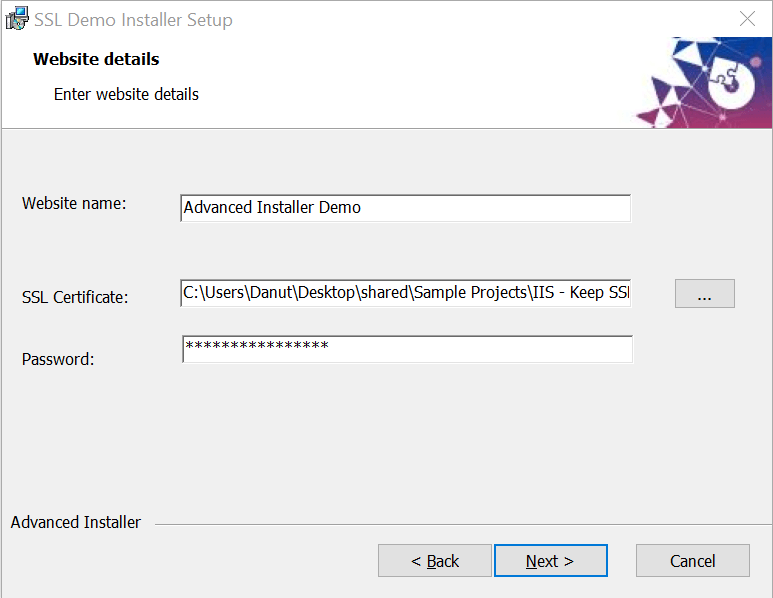
To allow the user to select the SSL certificate during installation,
read this article to see which settings you need to put in place: How to select an external file during the
installation. For more information about dialog customizations,
check the Dialogs Page in
our User Guide.
Since we will not be requiring the user to select the certificate during the upgrade, we can hide the dialog by applying a show only if event, and a NOT OLDPRODUCTS condition.

Creating the IIS page

Next, we need to navigate to the IIS page and create the IIS Website.
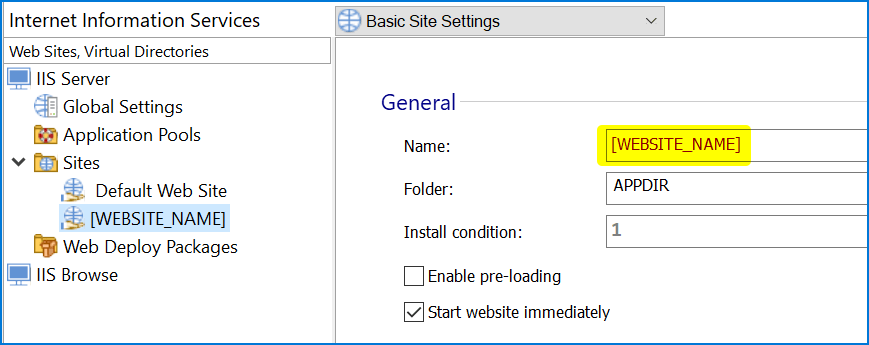
You can configure the website's name during installation. In the example above, we kept the default values and made no other changes.
Once we get that out of the way, we can move on to the custom actions we will use to bind the SSL certificate for a website.
Configure the website for a first time install

It's time to add the custom action that will configure the website for the first time install, as we mentioned earlier.
To achieve this, navigate to the Custom Actions Page and add the Run Inline PowerShell Script custom action:
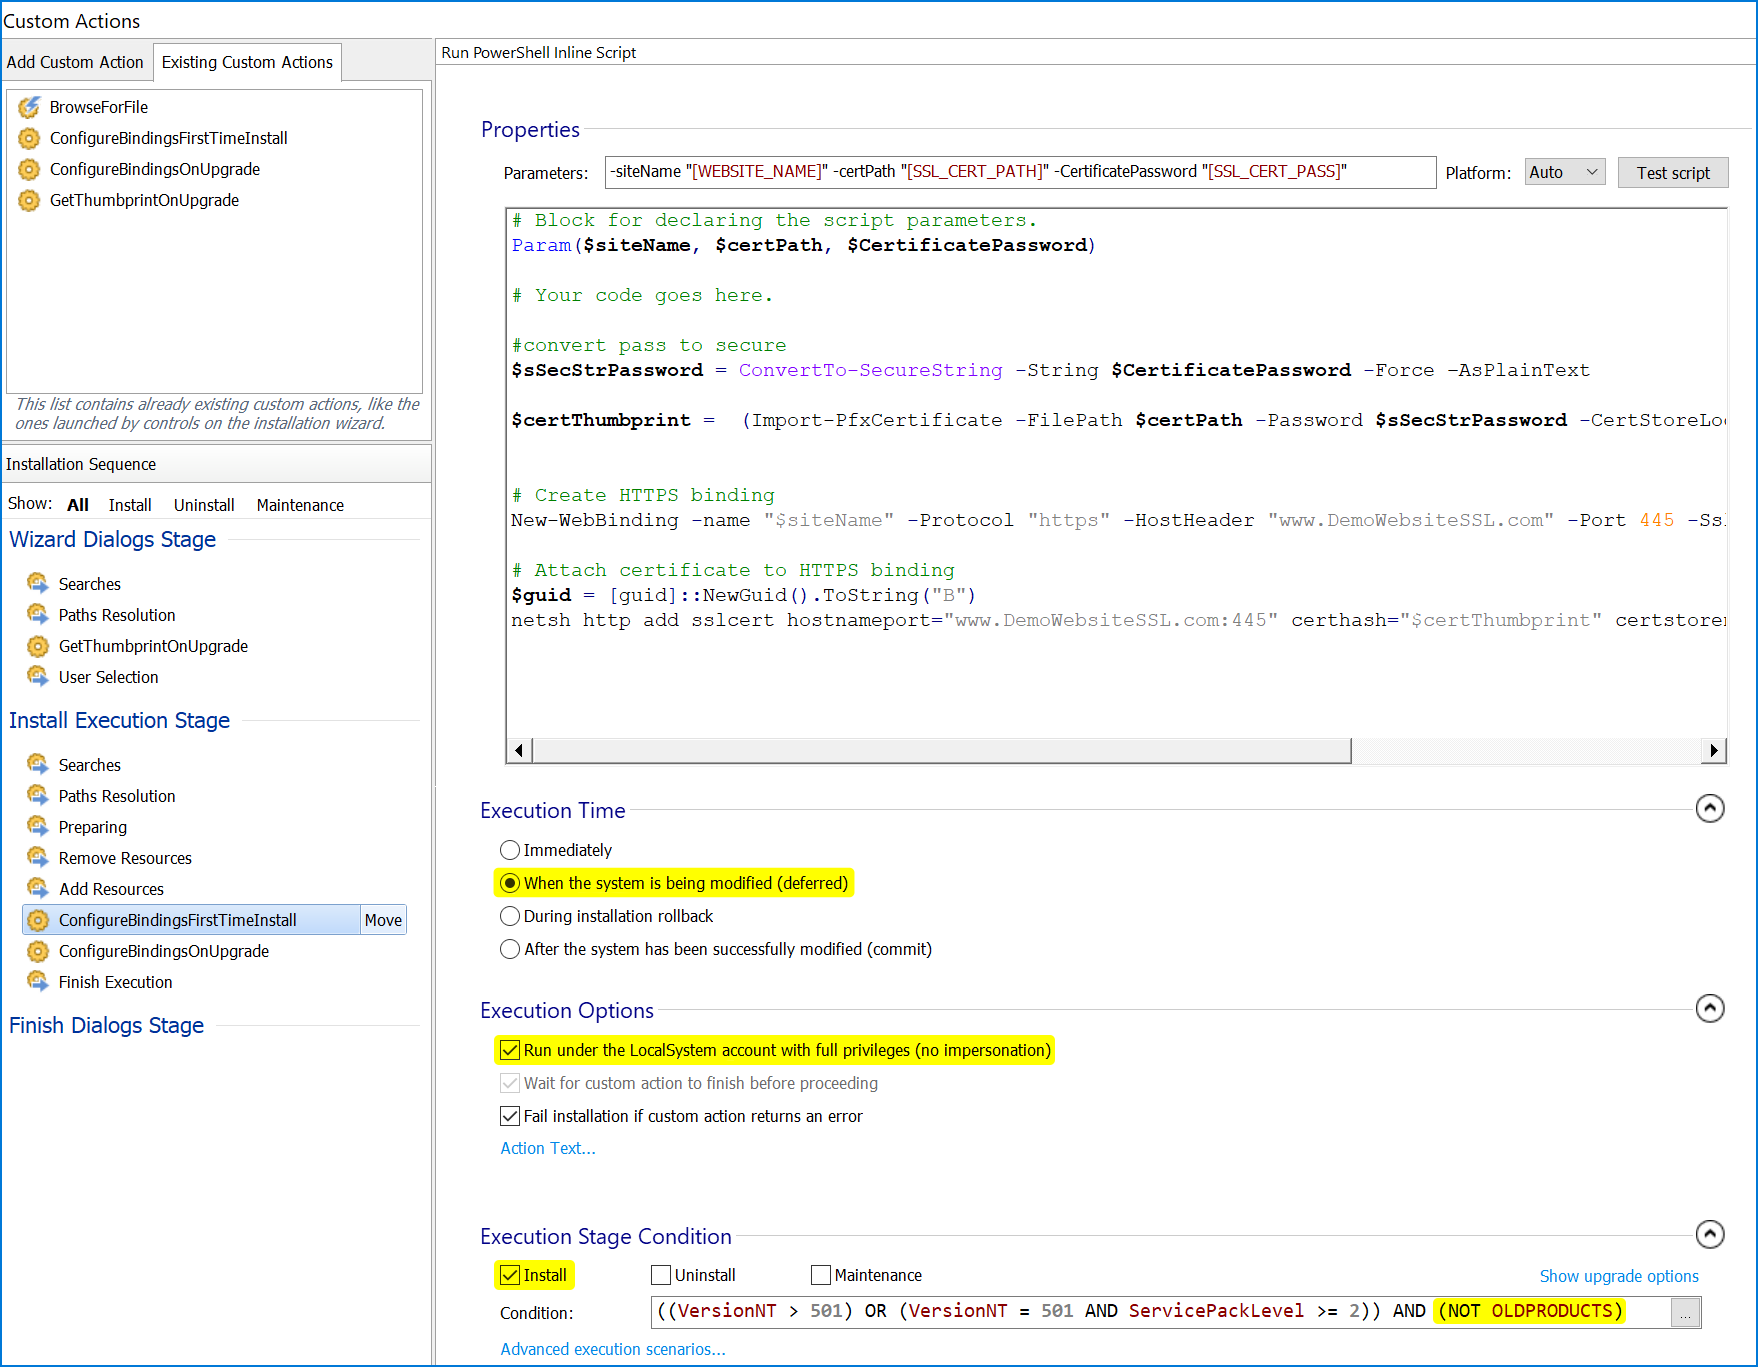
As you can see from the image above, we need to add some code and configurations to this custom action. The code for the custom action is:
# Block for declaring the script parameters.
Param($siteName, $certPath, $CertificatePassword)

# Your code goes here.

#convert pass to secure
$sSecStrPassword = ConvertTo-SecureString -String $CertificatePassword -Force –AsPlainText

$certThumbprint =  (Import-PfxCertificate -FilePath $certPath -Password $sSecStrPassword -CertStoreLocation Cert:\LocalMachine\My).Thumbprint


# Create HTTPS binding
New-WebBinding -name "$siteName" -Protocol "https" -HostHeader "www.DemoWebsiteSSL.com" -Port 445 -SslFlags 1

# Attach certificate to HTTPS binding
$guid = [guid]::NewGuid().ToString("B")
netsh http add sslcert hostnameport="www.DemoWebsiteSSL.com:445" certhash="$certThumbprint" certstorename=My appid="$guid"Use the following parameters for the custom action:
-siteName "[WEBSITE_NAME]" -certPath "[SSL_CERT_PATH]" -CertificatePassword "[SSL_CERT_PASS]"
Some important aspects to point out:
- The Execution Time must be set to “When the system is being modified (deferred)".
- The Execution Options must have the “Run under the LocalSystem account with full privileges (no impersonation)” checkbox marked.
- The Execution Stage Condition must be set to “Install”.
Aside from those, the condition of the custom action must be set to:
((VersionNT > 501) OR (VersionNT = 501 AND ServicePackLevel >= 2)) AND (NOT OLDPRODUCTS)
Getting the certificate thumbprints
Once the custom action that configures the website for the first time install is ready, we can set up the process for obtaining the thumbprint of the certificate used for the website during the upgrade.
We will get the thumbprint using a new custom action. So, navigate to the Custom Actions Page and add the Run Inline PowerShell Script custom action:
# Block for declaring the script parameters.
Param()

# Your code goes here.


# on upgrade, get certHash since cert is already installed
$websiteName = AI_GetMsiProperty WEBSITE_NAME


# on upgrade, get certHash since cert is already installed
$certThumbprint  = (Get-WebBinding -Name "$websiteName" | ? { $_.Protocol -eq "https" }).certificateHash

AI_SetMsiProperty CERT_THUMBPRINT $certThumbprint
For this custom action:
- The execution time must be set to “Immediately”
- The dialogs stage condition must be set to “Install”
- The condition must be set to:
((VersionNT > 501) OR (VersionNT = 501 AND ServicePackLevel >= 2)) AND OLDPRODUCTS
How to bind the certificate to the upgraded website?

After we get the thumbprint of the certificate used for the website, we need to add one last custom action into the package to bind the certificate to the upgraded website.
Navigate to the Custom Actions Page and add the Run Inline PowerShell Script custom action:
# Block for declaring the script parameters.
Param($certThumbprint, $siteName)

# Your code goes here.

# Create HTTPS binding
New-WebBinding -name "$siteName" -Protocol "https" -HostHeader "www.DemoWebsiteSSL.com" -Port 445 -SslFlags 1

# Attach certificate to HTTPS binding
$guid = [guid]::NewGuid().ToString("B")
netsh http add sslcert hostnameport="www.DemoWebsiteSSL.com:445" certhash="$certThumbprint" certstorename=My appid="$guid"
Use the following parameters for the custom action:
-certThumbprint "[CERT_THUMBPRINT]" -siteName "[WEBSITE_NAME]"
For this custom action:
- The Execution Time must be set to “When the system is being modified (deferred).
- The Execution Options must have the “Run under the LocalSystem account with full privileges (no impersonation)” checkbox marked
- The Execution Stage Condition must be set to “Install”
- The condition set to: ((VersionNT > 501) OR (VersionNT = 501 AND ServicePackLevel >= 2)) AND OLDPRODUCTS
Modify the install sequence
When we create the IIS page, an action that configures the IIS element is generated in the InstallExecuteSequence.
We must make sure that this action runs the latest in the install sequence, so we need to go to the Table Editor Page and check that the PowerShell custom actions are running after it.
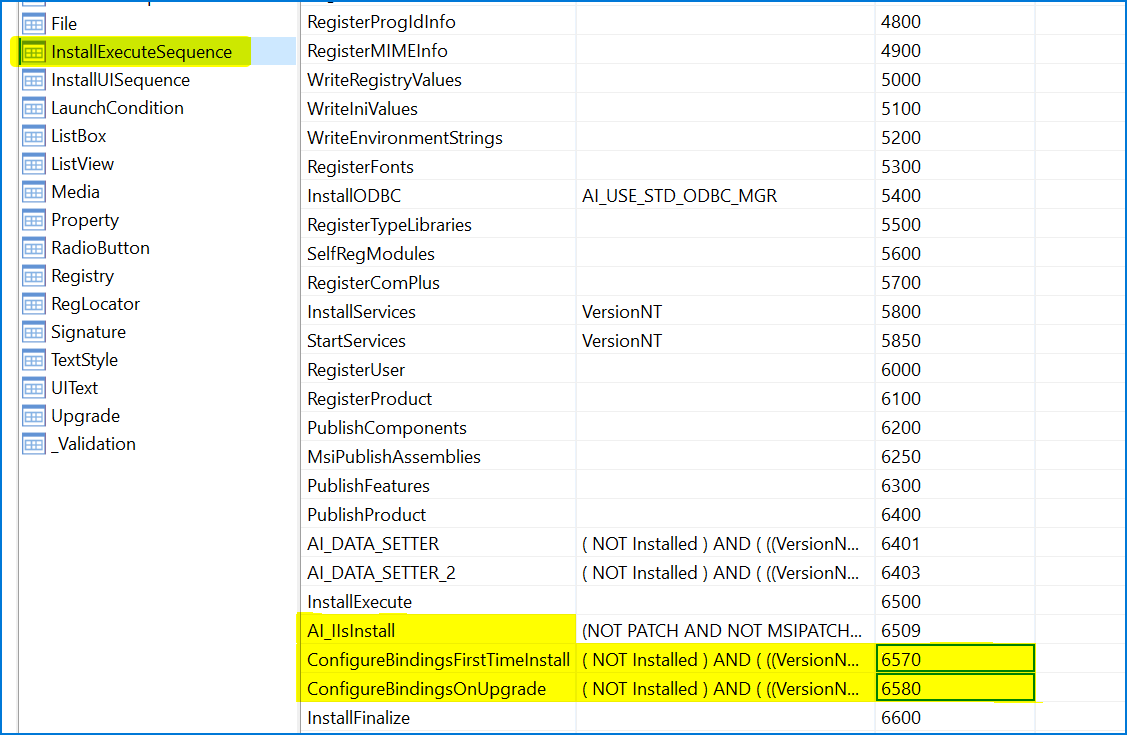
All that's left to do now is increase the sequence number for the “ConfigureBindingsFirstTimeInstall” and “ConfigureBindingsOnUpgrade” custom actions.
The numbers must be higher than “AI_IIsInstall”, but lower than
“InstallFinalize”.
Don't Forget to Enable Admin Privileges

Any operation on IIS requires admin privileges, so you will have to enable the run as admin option in the Install Parameters Page.

If this option is not selected, the custom action that retrieves the Thumbprint of the certificate that was used during the first time installation will fail.
Also, the property (found in the Install Parameters Page) that is attached for the website must be set to persistent.
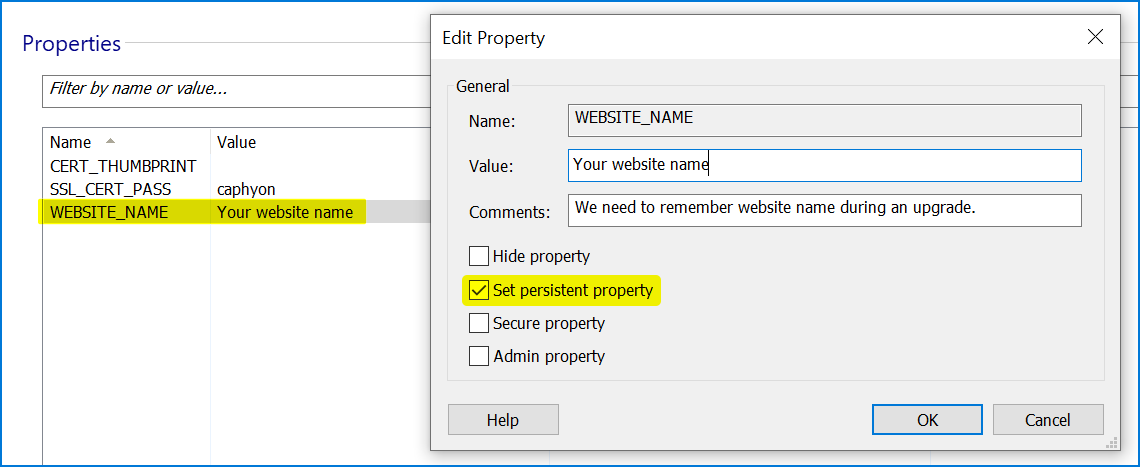
In order to set a Property to be persistent, double click the property (in our case WEBSITE_NAME) and check “Set persistent property”.
Once you've reached this point, you will have successfully bound the SSL certificate for your website and users will not be asked for it during the upgrade process.
If you found this article useful, feel free to tell us what other topics to cover.
Contributor: Alex Marin
Subscribe to Our Newsletter
Sign up for free and be the first to receive the latest news, videos, exclusive How-Tos, and guides from Advanced Installer.