MSI Permissions Guide: Three Ways to Add Rights With your Installer
Applications often require different types of permissions to operate smoothly - so adding permissions to files, folders, and registry keys is a standard practice in MSI.
Adding permissions is not something native to the Windows Installer
technology, hence why there are many workarounds to tackle this
action.
In this article, we are exploring three ways to add permissions with your MSI installer:
- VBScript: the most common method used worldwide.
- INI file: which allows you to directly add changes to your files.
- Using a tool (e.g. Advanced Installer GUI): making it direct and easy to use.
You'll often need an extra tool to add rights or permissions - so in our case, we are using Advanced Installer to complete these steps.
Remember Advanced Installer offers a 30 days Fully-Featured Free Trial (no credit card required).
Before we go into these three methods, we first need to mention Secedit - as two of them (VBScript and INI files) rely on it.
What is Secedit?

The secedit tool comes by default with Windows OS. It configures and analyzes system security by comparing your current security configuration against its security templates.
To apply permissions with secedit, you need an .inf file that specifies which folders or registry needs to be targeted for permissions.
Let’s assume we want to apply “Modify” permissions for all the “Authenticated Users” on a folder called “MyApplication” located in %ProgramFiles”.
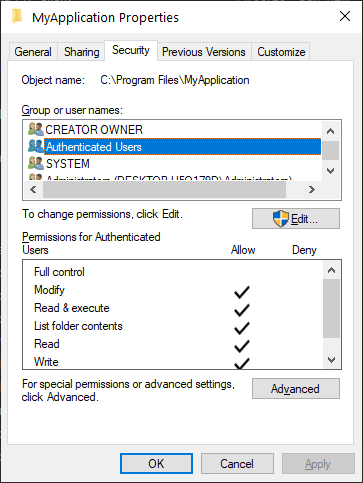
First, we need to create the .inf file (and this is not a trivial step). The .inf file for this operation will look something like this:
[Unicode]
Unicode=yes
[Version]
signature="$CHICAGO$"
Revision=1
[Registry Values]
[File Security]
"%ProgramFiles%\MyApplication",0,"D:AR(A;OICINP;0x1301ff;;;AU)"
[Profile Description]
Description=Security
The “D:AR(A;OICINP;0x1301ff;;;AU)” is the actual access control that specifies all the permissions in our list.
You can check the Access Control on Microsoft
docs to find all the necessary information to create the
.inf file.
After we create the .inf file, the secedit tool is executed as follows:
secedit.exe /configure /db %PathToFolder%\secpolicy.sdb /cfg %PathToInfFile%\secpolicy.inf /overwrite /quiet
*secpolicy.inf is the .inf file created that contains the information mentioned previously.
Once the command above is executed, the permissions we mentioned will be applied to the “MyApplication” folder.
There are various permission controls within secedit, here's a breakdown of what each control means:
- D:AR - The security descriptor represents a token that indicates each of the four main components: owner (O:), primary group (G:), DACL (D:), and SACL (S:). The AR token is for the Windows NT 4.0 file system, which indicates that the inheritance of entries from parent to child is required.
- A - Allowed ace_types. The ace_flags for inheritance are the ruling factors for the inheritance of ACEs.
- OICINP - OI (OBJECT_INHERIT_ACE flag) + CI (CONTAINER_INHERIT_ACE flag) + NP (NO_PROPAGATE_INHERIT_ACE flag). These are flags that indicate the inheritance of the folder/registry you want to use. For example, using the NP flag, none of the subfolders of “MyApplication'' will receive permissions.
- 0x1301ff - The actual rights (in our case "Modify") are indicated by a string that denotes the access rights controlled by ACE. This string can be a hexadecimal string representation of the access rights, such as "0x1301ff".
- AU - Common or Well-Known Accounts and Their SID Strings. In this case, AU represents the Authenticated Users' account.
VBScript: Using a Custom Action to Set Permissions to Your
Installer

VBScript is probably one of the oldest methods to configure permissions, and it is still widely used by IT Pros.
With VBScript, we can combine two actions:
- Creating the .inf file
- Executing the secedit.exe with the .inf file
The code for the script is as follows:
‘Declare variables
Dim oSH, fso,f
Dim cmd, wrkDir
Dim returnVal
Dim regkeycontents1

‘Initialize objects
  Set fso = CreateObject("Scripting.FileSystemObject")
  set oSH = CreateObject("WScript.Shell")


‘Catch MSI arguments. We will pass the folder for which the permissions will be applied by using Windows Installer Properties
  strArgs = Session.Property("CustomActionData")
  arrArgs = Split(strArgs, ";", -1, 1)
  WrkDir = arrArgs(0)

‘Create the .inf file in the folder where the permissions are applied
  Set f = fso.CreateTextFile(WrkDir + "secpolicy.inf", True)
  f.WriteLine "[Unicode]"
  f.WriteLine "Unicode=yes"
  f.WriteLine "[Version]"
  f.WriteLine "signature=" + QStr("$CHICAGO$")
  f.WriteLine "Revision=1"
  f.WriteLine "[File Security]"
  f.WriteLine WrkDir + ",0," + QStr("D:AR(A;OICINP;0x1301ff;;;AU)")
  f.Close

‘Run the secedit.exe and apply the permissions
  cmd = "secedit.exe /configure /db " + QStr(WrkDir + "secpolicy.sdb") + " /cfg " + QStr(WrkDir + "secpolicy.inf") + " /overwrite /quiet"
  returnVal = osh.Run (cmd, 0, true)

‘Delete the resulting .sdb file and the previously created .inf file
  fso.DeleteFile(WrkDir & "secpolicy.sdb")
  fso.DeleteFile(WrkDir & "secpolicy.inf")
function QStr(S)
  QStr = """" + S + """"
end functionThe script checks what arguments are passed through it by leveraging the Windows Installer Properties.
The argument we pass is the folder we want to add permissions to. Inside the folder, the script will:
- create the .inf file,
- apply the permissions with secedit.exe,
- delete the .sdb and .inf files.
Now, let's implement this custom action into MSI using Advanced Installer:
1. Open Advanced Installer and create a new MSI Project.
2. Navigate to the Files and Folder Page and create a new folder (if you don’t already have one). For this scenario, we created a folder called “MyApplication” under “Program Files 64”.

3. Navigate to the Custom Actions Page.
4. Add a new Set Installer Propertys custom action with the sequence.
5. In the Property field, type the name you want to use. We called it CS_SetRights.(This will be the name for the custom action that contains the script).
6. In the Value field, type “[“ and select your folder. This time, we selected the “MyApplication” folder, which has the [MyApplication_Dir] ID internally in the MSI.
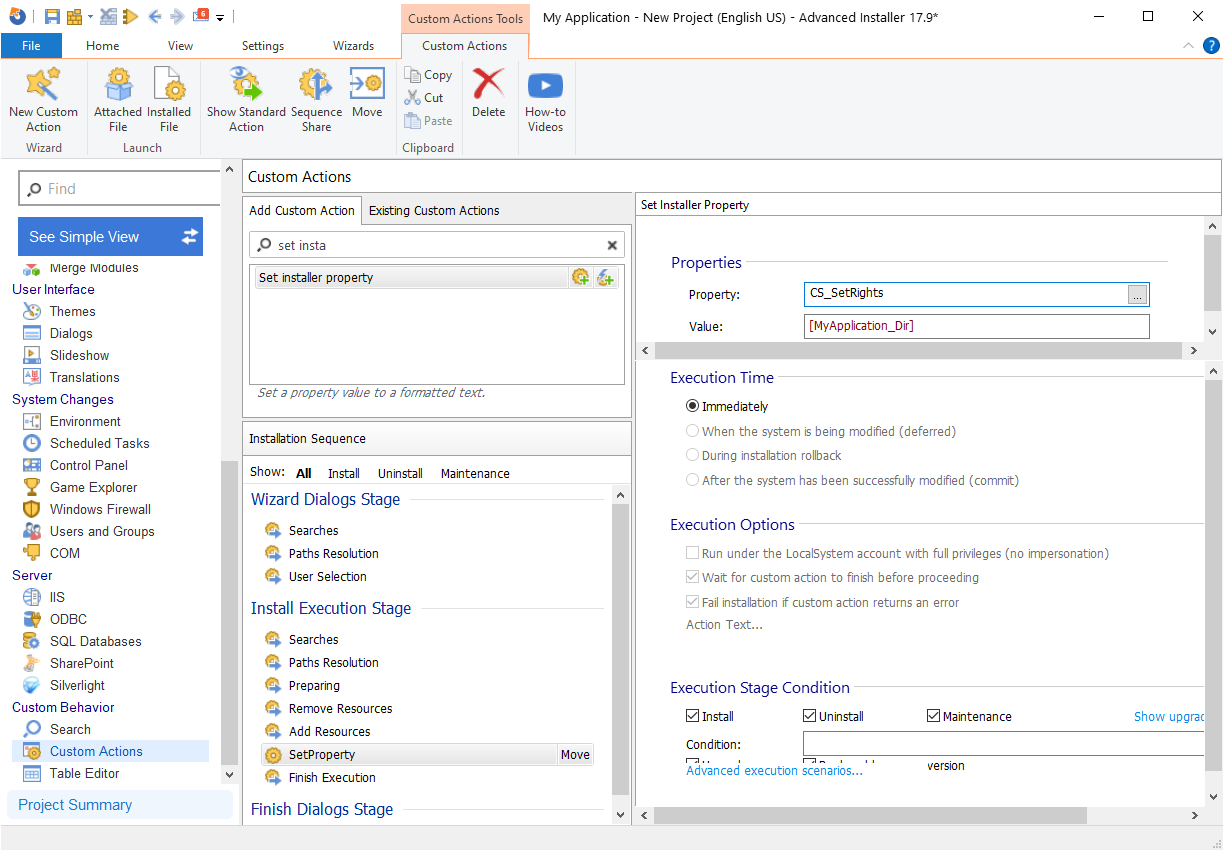
7. Add a new Launch attached file custom action with sequence. This will open up a new window. From where you can select the VBScript file we created before.
8. Rename the custom action to CS_SetRights.
9. Set the custom action to execute after the SetProperty custom action.
10. The Execution Time must be set to When the system is being modified (deferred).
11. Under Execution Options, tick Run under the LocalSystem account with full privileges (no impersonation) and Wait for custom action to finish before proceeding.
12. Under Execution Stage Condition, type NOT Installed in the Condition field. This ensures that the permissions are only applied during the installation.

13. Click Build in the upper left corner.
After the package is installed, MyApplication folder should have the permissions set as needed.
INI Files: Directly add changes to your .inf files

Working with INI files directly is easier than using VBScript because it allows adding changes to the .inf file directly, rather than modifying the script and importing it back to the MSI database.
Advanced Installer offers solutions for creating the .ini file from
scratch, or it can automatically import your existing .ini
files.
It is recommended to create/import the .inf file into the project rather than adding it directly into the Files and Folders page. When an .inf file is created/imported in the project, .inf entries are added into the INI table, making it easier for Windows Installer to manage.
Since the .inf file is already created, let’s see how it can be imported in Advanced Installer, and how we can trigger the secedit afterwards:
1. Navigate to the Files and Folder Page.
2. Create a folder structure under Windows Volume > Windows > security > Templates.

3. Select Import Files > Import INI and select the previously created .inf file.
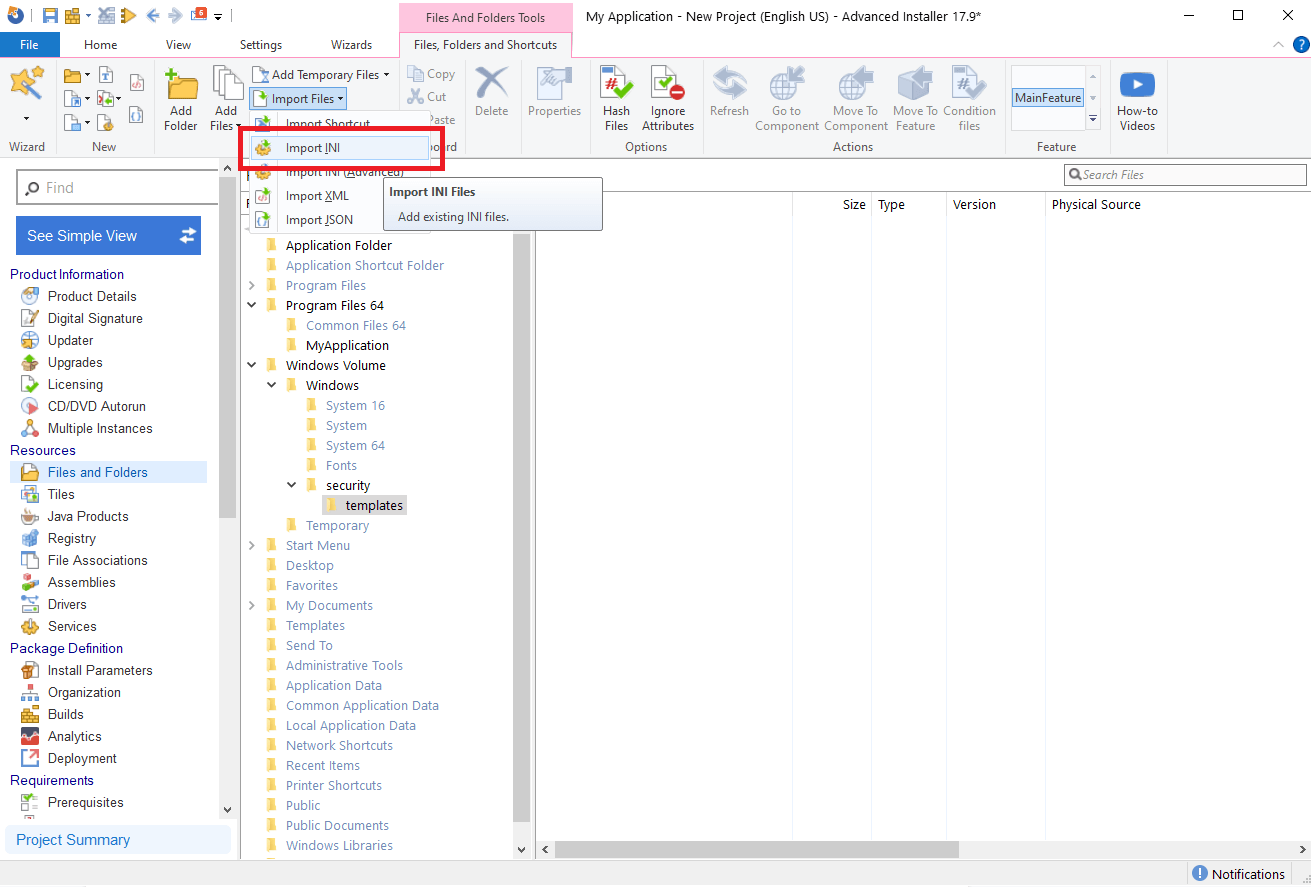
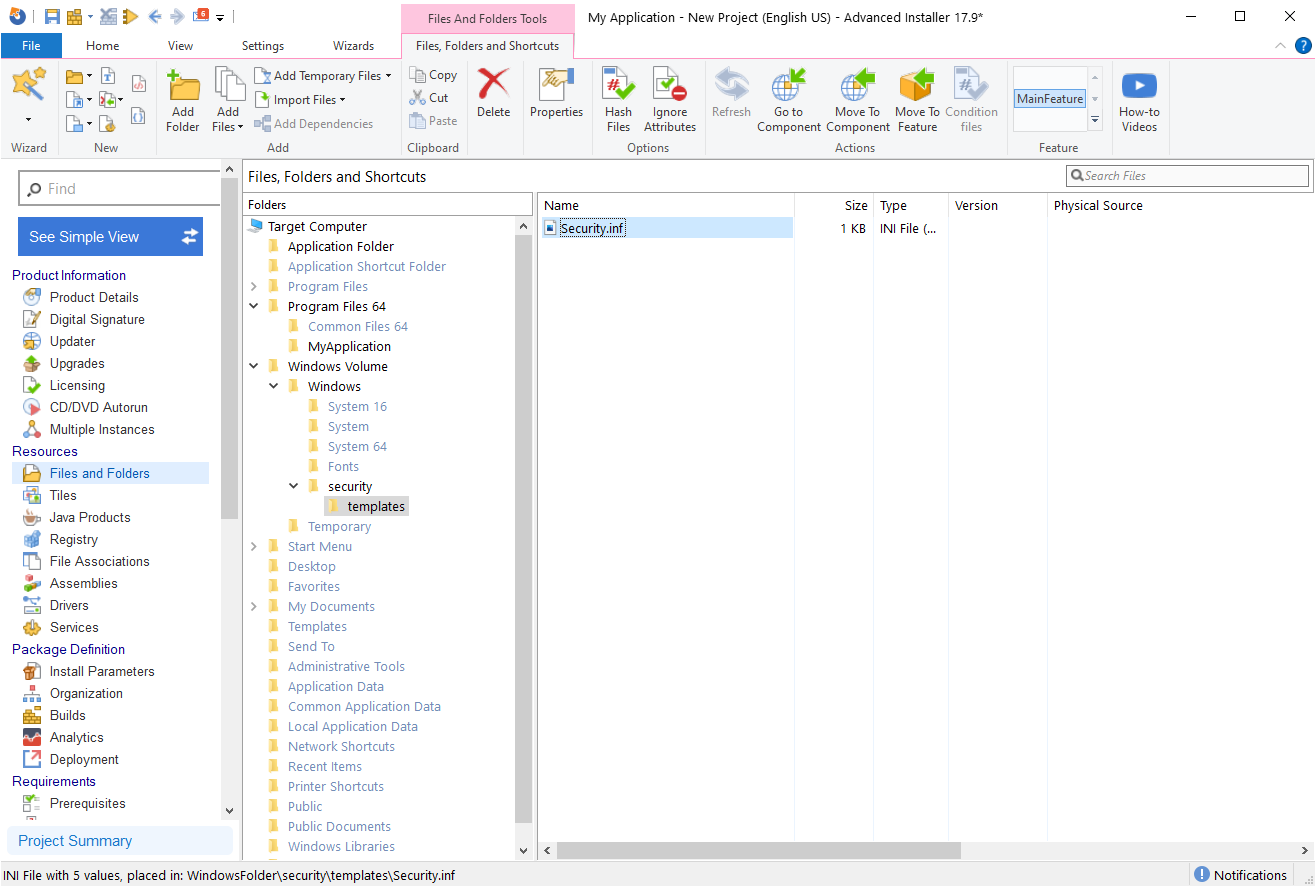
4. The .inf file is now imported. Additional changes on the file can be done directly from Advanced Installer by double-clicking on it.
5. Navigate to the Custom Actions Page.
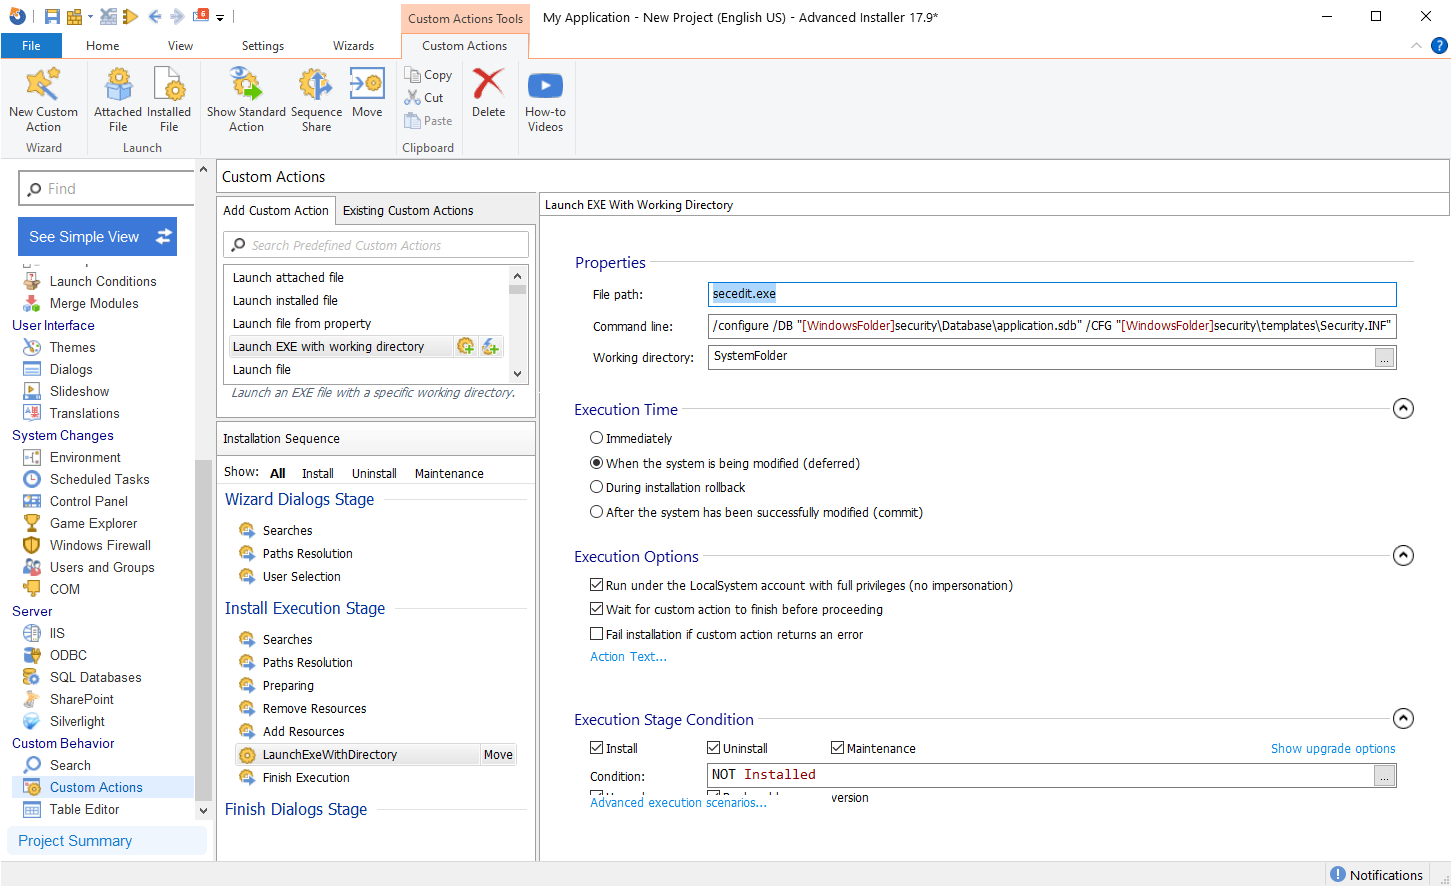
6. Add a new Launch EXE With Working Directory custom action with sequence.
7. In the File Path field, type secedit.exe.
8. In the Command Line file, place the following command:
/configure /DB "[WindowsFolder]security\Database\application.sdb" /CFG "[WindowsFolder]security\templates\Security.INF"
9. In the Working Directory field, select SystemFolder.
10. The Execution Time must be set to When the system is being modified (deferred).
11. Under Execution Options, tick Run under the LocalSystem account with full privileges (no impersonation) and Wait for custom action to finish before proceeding.
12. Under Execution Stage Condition, type NOT Installed in the Condition field. As we mentioned before, this ensures that the permissions are only applied during installation.
13. Click Build in the upper left corner.
As you can see, this method has the exact outcome as the VBScript, since we are using the same secedit tool. However, it makes managing INI files much simpler in the project.
Advanced Installer: Handling permissions directly from the GUI 

Advanced Installer offers a quick and easy way to manage permissions, skipping all the steps presented above.
You can add all the permissions right through the GUI and no coding is required. In order to apply permissions on our “MyApplication” folder with Advanced Installer, this is what you have to do:
1. Navigate to the Files and Folder Page.
2. Right-click the folder you wish to apply permissions on (in our case “MyApplication).
3. Select Properties.
4. A new window will appear. There, navigate to the Permissions tab.
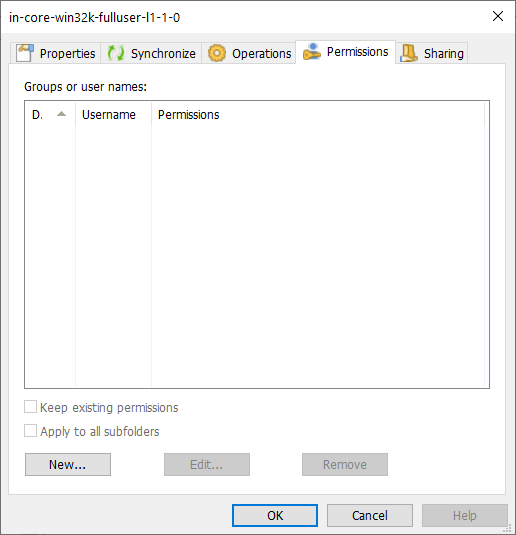
5. Click on New.
6. Select the permission for the folder, in our case we went with “Modify”.
7. Select the username/group by pressing the [...] button. We selected Everybody.
8. Click OK.
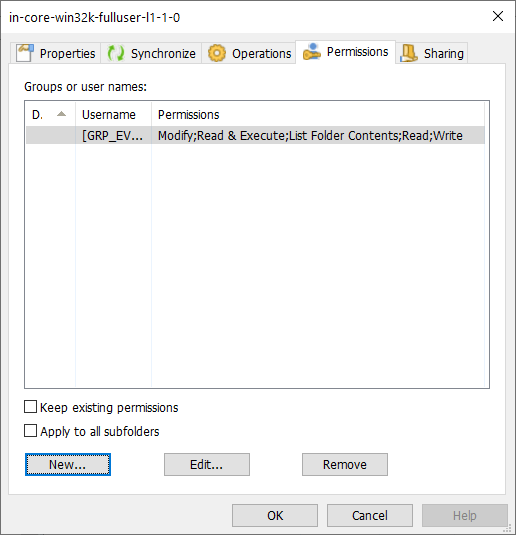
9. If any additional settings like Apply to all subfolders or Keep existing permissions are needed, click on them.
10. Click Builds in the upper left corner.
Conclusion

There are various ways to apply permissions on files, folders, and registries - and in this article, we went through four helpful options.
Aside from these, you can also use other scripting languages like PowerShell, or a .DLL/.EXE (C#).
To save time, we recommend you simplify the process by taking advantage of MSI editing tools like Advanced Installer.
What is your preferred method for applying permissions? Comment below.
Subscribe to Our Newsletter
Sign up for free and be the first to receive the latest news, videos, exclusive How-Tos, and guides from Advanced Installer.