How to Sign an EXE With a Code Signing Certificate
Signing an executable (EXE) file with a code signing certificate is essential for ensuring the authenticity and integrity of the software, especially in security-conscious environments.
Code signing is becoming a standard practice not only for large enterprises but also for independent software vendors (ISVs) who want to publish their software on websites or marketplaces like the Microsoft Store.
For a better understanding, I truly recommend exploring topics such as:
- The role of trusted signing services in modern software development,
- Challenges and solutions for digitally signing installers in cloud-based environments,
- Azure trusted signing authentication,
- Best practices for continuous signing in CI/CD pipelines,
- Generate a self-signed certificate from the command line.
In this article, I will walk you through the process of signing an EXE file using a code signing certificate.
Sign an EXE Using SignTool

To sign your EXE, you need a code signing certificate from a trusted certificate authority (CA). This certificate verifies your identity and assures users that the software comes from a legitimate source and has not been tampered with.
Once you have your certificate, the next step is to prepare your environment.
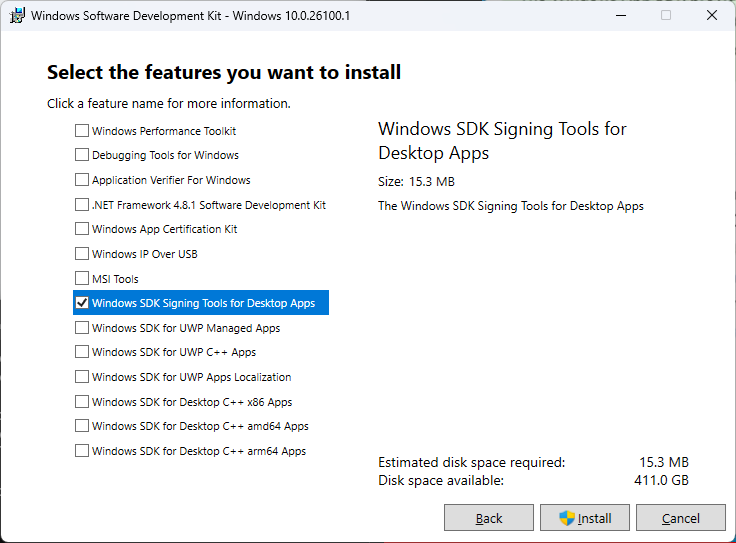
You'll need the Windows Software Development Kit (SDK), which includes the `SignTool.exe` utility. This tool allows you to digitally sign your executable files. If you don't have the SDK installed, you can download it from the official Microsoft website. During installation, select only the signing tools to minimize the installation size.

After installing the SDK, find the `SignTool.exe` utility in the installation directory, typically found under:
C:\Program Files (x86)\Windows Kits\10\bin\%version%\x64\
Now, you’re ready to sign your executable.
Open the command prompt with administrative privileges and navigate to the directory containing your EXE file.
Use the `SignTool.exe` command to sign your file with your certificate.
The command looks like this:
SignTool sign /f "path\to\your\certificate.pfx" /p "your-password" /fd SHA256 /t "http://timestamp.url" "path\to\your\executable.exe"
Command Breakdown:
- `/f` specifies the path to your certificate file.
- ‘/fd’ specifies the digest algorithm
- `/p` is the password for your certificate.
- `/t` is the timestamp server URL, which provides a trusted timestamp to your signature, ensuring it remains valid even after your certificate expires.
- path\to\your\executable.exe is the path to your EXE file.

In the image above, no timestamp server was used.
If you don’t use a timestamp server, your signature will expire when the certificate does.
Common timestamp servers include DigiCert or Sectigo.
After executing this command, your EXE file will be digitally signed.
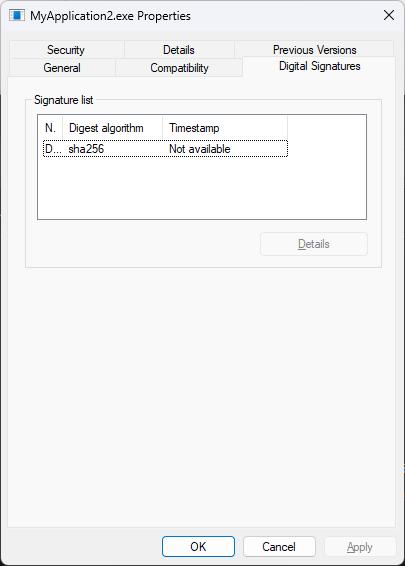
To verify the signature, right-click the signed EXE, select "Properties," and check the "Digital Signatures" tab. You should see the details of the signature, confirming that the process was successful.

Digitally signing your EXE files is a crucial step in software distribution, enhancing security, and trustworthiness. By following the steps outlined above, you can ensure that your software is protected and meets the necessary security standards.
Signing an EXE With Advanced Installer

Advanced Installer makes it easy to sign your EXE packages with its built-in digital signing capabilities.
It offers multiple options for signing such as:
- Using an existing certificate from your certificate store.
- Using a certificate from a disk file (.cer, .pfx).
- Trusted Signing.
- Azure Key Vault.
- Device Guard.
For this article, we won’t go through all the options.
Using a Certificate From the Certificate Store

If you already have a digital certificate issued, import it into your personal certificate store. Advanced Installer will automatically detect it, and you can select it from the Digital Signature page. From there, it will automatically apply the certificate during the build process.

Using a Certificate From a File

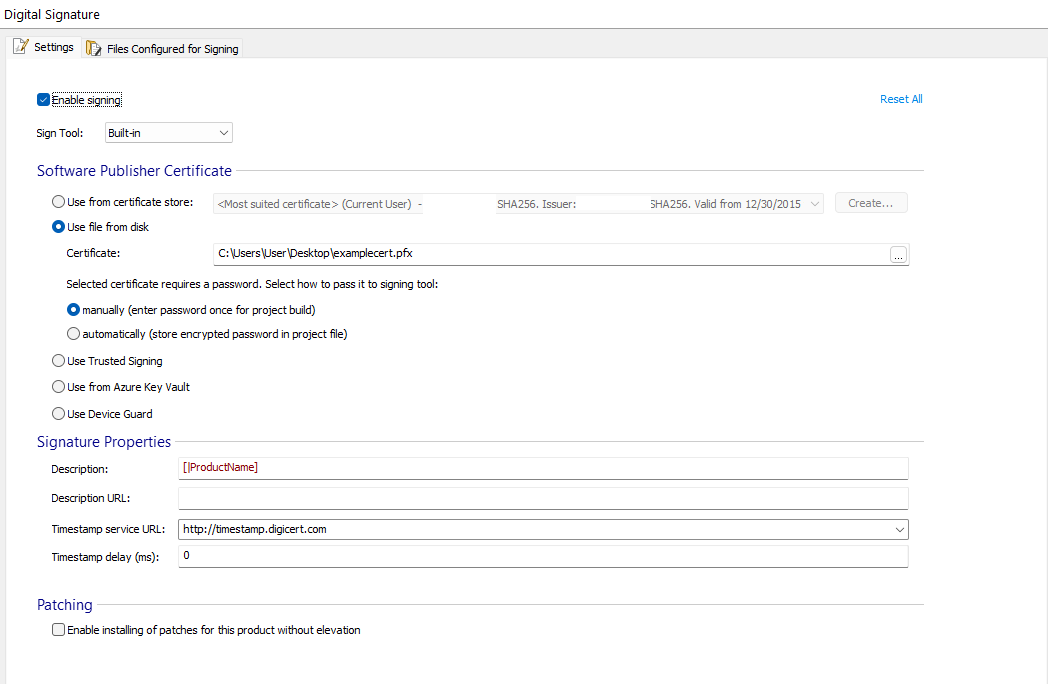
If you prefer not to import your certificate into the certificate store, you can use the “File from disk” option in Advanced Installer.
Navigate to the Digital Signature page, select “Use file from disk,” and choose the certificate file (.cer or .pfx). Once selected, proceed to the build process, and the EXE installer will be signed.

Once you have selected the preferred approach, all you need to do is click on the Build icon in the upper left corner, and during the build process, your EXE installer will be automatically signed with the selected certificate.
Conclusion

Digitally signing your EXE files is a vital step in software distribution.
It enhances security and assures users that your software comes from a verified source.
Whether using SignTool from the Windows SDK or Advanced Installer's built-in features, code signing ensures your software is trusted and protected against tampering. Following the steps outlined in this article will help ensure your EXE packages meet the necessary security standards and improve your software's trustworthiness.
For seamless integration, Advanced Installer offers a robust solution for managing digital signatures with minimal effort, supporting various signing options tailored to your workflow.
Try Advanced Installer for free and take advantage of its easy-to-use digital signing features.
Start your 30-day full-feature trial.
