How to Register File Types/Extensions with a WiX Installer?
File associations play a key role in enhancing user experience and streamlining workflows.
They allow users to open files with a particular extension directly with your application. But how can you define a file association using WiX?
This article will guide you through the process of creating a file association for a particular extension so that files open directly in your app when selected.
How to Create the Setup Project
For this tutorial, I’ve prepared a sample WinForm app.
The next step is to add the setup project that will generate the installer. For this, follow the next steps:
- In Visual Studio go to File → New → Project.
- From the template list, choose the Setup Project for the WiX template. Note that you need to have the WiX extension installed to access the template.
- Set a name for your setup project and create it.
How to Add the Project Output?
Once the setup project is created, it’s time to configure it by editing the Product.wxs file. First, we have to add the project output:
<Fragment>
	<ComponentGroup Id="ProductComponents" Directory="INSTALLFOLDER">
		<Component Id="DemoApp.exe"
             Guid="8078e14d-7970-48a2-8791-56b583763f4b">
		   <File Id="DemoApp.exe" Name="DemoApp.exe"
                Source="$(var.DemoApp_TargetDir)DemoApp.exe" KeyPath="yes"/>
		</Component>
		<Component Id="DemoApp.exe.config"
             Guid="1401f94a-8f82-4bbd-b1e2-836862c6bf74">
		   <File Id="DemoApp.exe.config" Name="DemoApp.exe.config"
                Source="$(var.DemoApp_TargetDir)DemoApp.exe.config" />
		</Component>
	</ComponentGroup>
</Fragment>How to Create the File Association?
After adding the project output, the next step is to create the file association.
Let’s consider the application can open files with the extension .ai-ext (you can replace it with your extension). Defining the association involves two steps:
1. Define a ProgId to link the .ai-ext extension with your application.
<ProgId Id="DemoApp.ProgId" Description="DemoApp AI-EXT Handler"
Icon="DemoAppExe">
<Extension Id="ai-ext" ContentType="application/ai-ext">
<Verb Id="open" Command="open" TargetFile="DemoAppExe"
Argument=""%1"" />
</Extension>
</ProgId>In this code, the action (verb) that can be performed on the files is defined. The open verb specifies the action for opening the file, and the Argument "%1" refers to the absolute path of the file being opened.
2. Add registry keys to ensure Windows recognizes the file association. The registry entry instructs Windows how to open the files with the .ai-ext extension.
<RegistryKey Root="HKCR" Key="DemoApp.ai-ext\shell\open\command"
Action="createAndRemoveOnUninstall">
<RegistryValue Type="string" Value="[INSTALLFOLDER]DemoApp.exe
"%1"" />
</RegistryKey>Build and Install
Once you’ve defined the file association, build the project to generate the installer. Then, run it to install the application.
If everything is set up correctly, your application should launch the files with the associated extension when they are selected.
How to Register File Types Using Advanced Installer
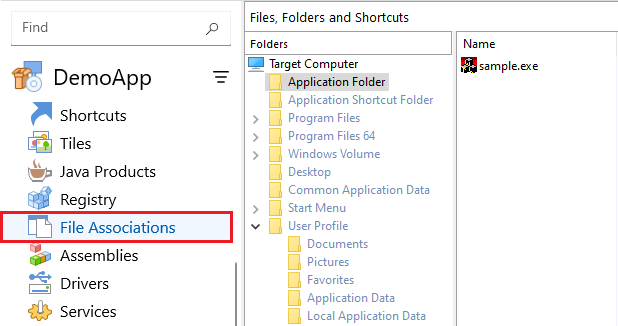
Assuming you’ve already created a package project in Advanced Installer and added the app resources, here’s how to define the file association for the .ai-ext extension:
1. Go to the File Association page in the left pane.

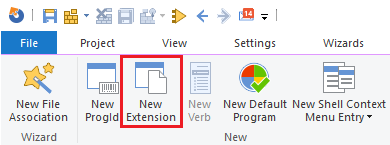
2. Use the [New Extension] toolbar button to create a new extension.

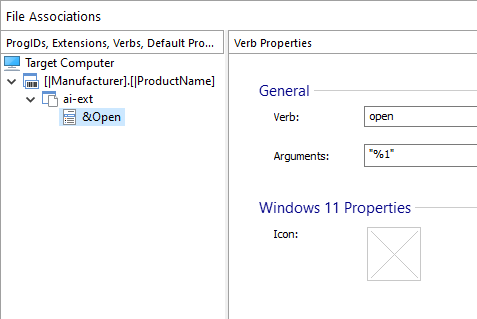
3. Once created, rename the extension (in my case I’ve named it ai-ext). The Open verb is the default verb. But, you can also add new verbs using the [New verb] toolbar button. Then, you can go to the Verb Properties view to define the action of the verb.

For a complete tutorial on how to create new file extensions and set up file associations, refer to the detailed article here.
Conclusion
Creating a file association with WiX is a straightforward process.
However, if you are looking for an even simpler solution, Advanced Installer offers a more user-friendly approach.
With no coding needed, you can complete all steps through its graphical user interface, making it ideal for those who prefer a streamlined solution.
Try Advanced Installer for yourself and see how easily you can create file associations and manage your installation packages.
Start your 30-day full-featured free trial today and experience hassle-free package creation.

