How to create a Windows installer package - Beginner Guide
In this article, you will get an overview of Windows Installer packages, what application packaging formats are available, and how to create your first MSI package.
Introduction to Application Packaging Formats

The .MSI file extension stands for Microsoft Software Installer. It is a Windows Installer format that uses Microsoft's Windows Installer service to configure installer packages, such as Windows applications or update packages.
Although people are used to .exe installers, many vendors are offering both MSI and EXE on their websites, or even the EXE installers as wrappers over an MSI installation.
While both options offer the same end result, the EXE installation is more commonly used amongst the general public, while MSI installers are more widely used inside companies.
Microsoft also presented MSIX technology in 2018 as an improved version of the AppX package (initially used only for UWP apps).
MSIX is a new universal package format for Windows 10 and Windows 11 apps. It works on desktop, mobile, and other devices, and it includes strong features from MSI, App-V packages, and the Desktop Bridge program.
MSIX offers extended support for Win32 applications, which are the standard desktop applications that we’ve used for years. This particular factor allows packages to leverage all the new advantages and APIs accessible to an MSIX container when packaging and publishing a standard desktop application.
MSI technology and why it’s still the most popular Windows Installer package type

There is no doubt that there are many ways to create an installation package. Let’s take a look at the packaging industry before and after the arrival of MSI technology.
Before MSI Technology - Creating setup applications

Before Windows Installer, software products used various technologies at the application’s setup request - each of them containing specific installation rules.
Some installers were just archives containing the files, and as an installation operation, they only extracted the necessary application files, not configuring further system settings or letting you configure installation sequences.
That’s why it was common to encounter errors during installation. For example, you could find an older version of a file installed on top of a newer version. Certain setups didn’t consider the resources used along with other applications - resulting in compromising the functionality of other applications when installing and uninstalling them.
After the Release of MSI Technology

To mitigate the issues we just mentioned and to implement a set of common rules in the applications’ administration (installing, repairing, uninstalling), Microsoft released in 2000 the Windows Installer service and MSI files.
An MSI package contains all the information Windows Installer needs for installing or uninstalling an application or a software product.
It includes all the details for rolling the graphical interface for the user, which includes the database and the data streams for different parts of the installation. An .msi file can also have one or more transforms (.mst files), internal or external files, needed for the installation.
Moving on, we will go through the benefits of the MSI installer and how to create a Windows Installer package.
Why is the MSI installer recommended?

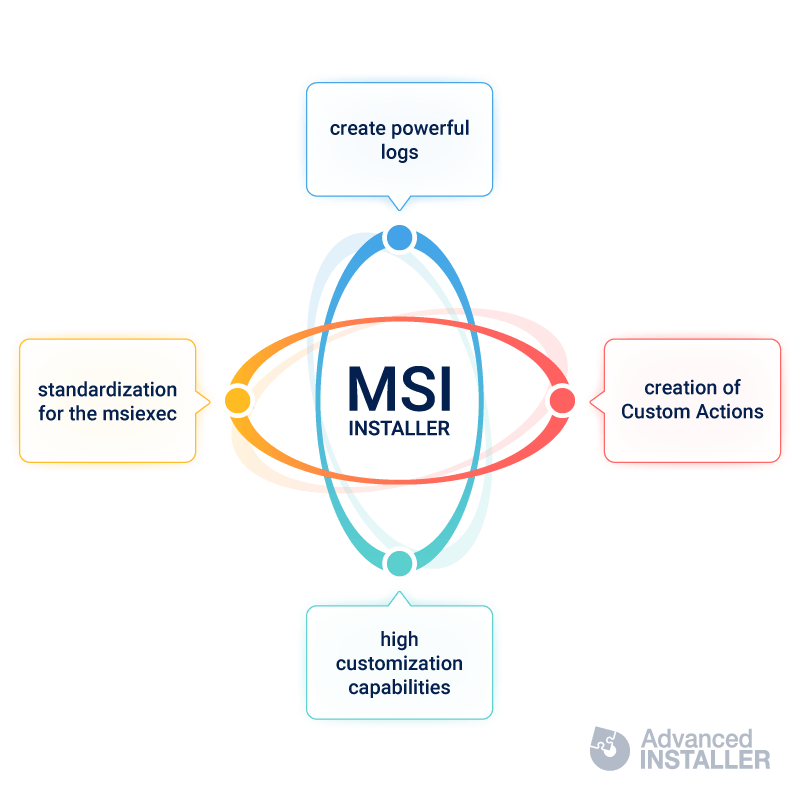
High customization capabilities

The MSI installer became popular due to its high customization capabilities, allowing the creation of Custom Actions that can be placed anywhere in the Standard Sequences. Even standard sequences can have the standard order rearranged to better suit the user's needs.
Powerful Logs

Another reason why MSI is the recommended approach for the vendors is the ability to create powerful logs. While this might sound boring to the standard user, in a corporate environment, this ability will save countless hours in the debugging process of a failed installation.
Standardization of the command line for the msiexec

The last reason why MSI is the best choice out there is the standardization of the command line for the msiexec. Without standardization, the deployment of specific software can only be done if proper documentation is available on the vendor's website, a step that is commonly skipped by software vendors.

We can go with many reasons why MSI is the preferred choice, and you’ll see that many of the comparisons tilt the balance towards the PROS.
If you want a more in-depth knowledge of the technology, we strongly recommend reading our free MSI Packaging & Virtualization eBook.
How to create a Windows Installer package for your application?

There are many tools you can use to create MSI packages. However, Advanced Installer offers a quick solution to create MSI packages through its free edition that can be used for both commercial and non-commercial purposes.
While the MSI technology has stuffy documentation, which makes it difficult to work with, Advanced Installer comes with a intuitive GUI that automates most of the steps a user takes when building an installation package. Additionally, it saves the user from potential human errors by scanning and repairing the package with a set of industry best practices.
Give Advanced Installer a try with our Advanced Installer FREE edition. Start off on the right foot when creating your first package.
Get started with Advanced Installer Free edition now!
Here's how you can create an MSI package:
1. Create a project

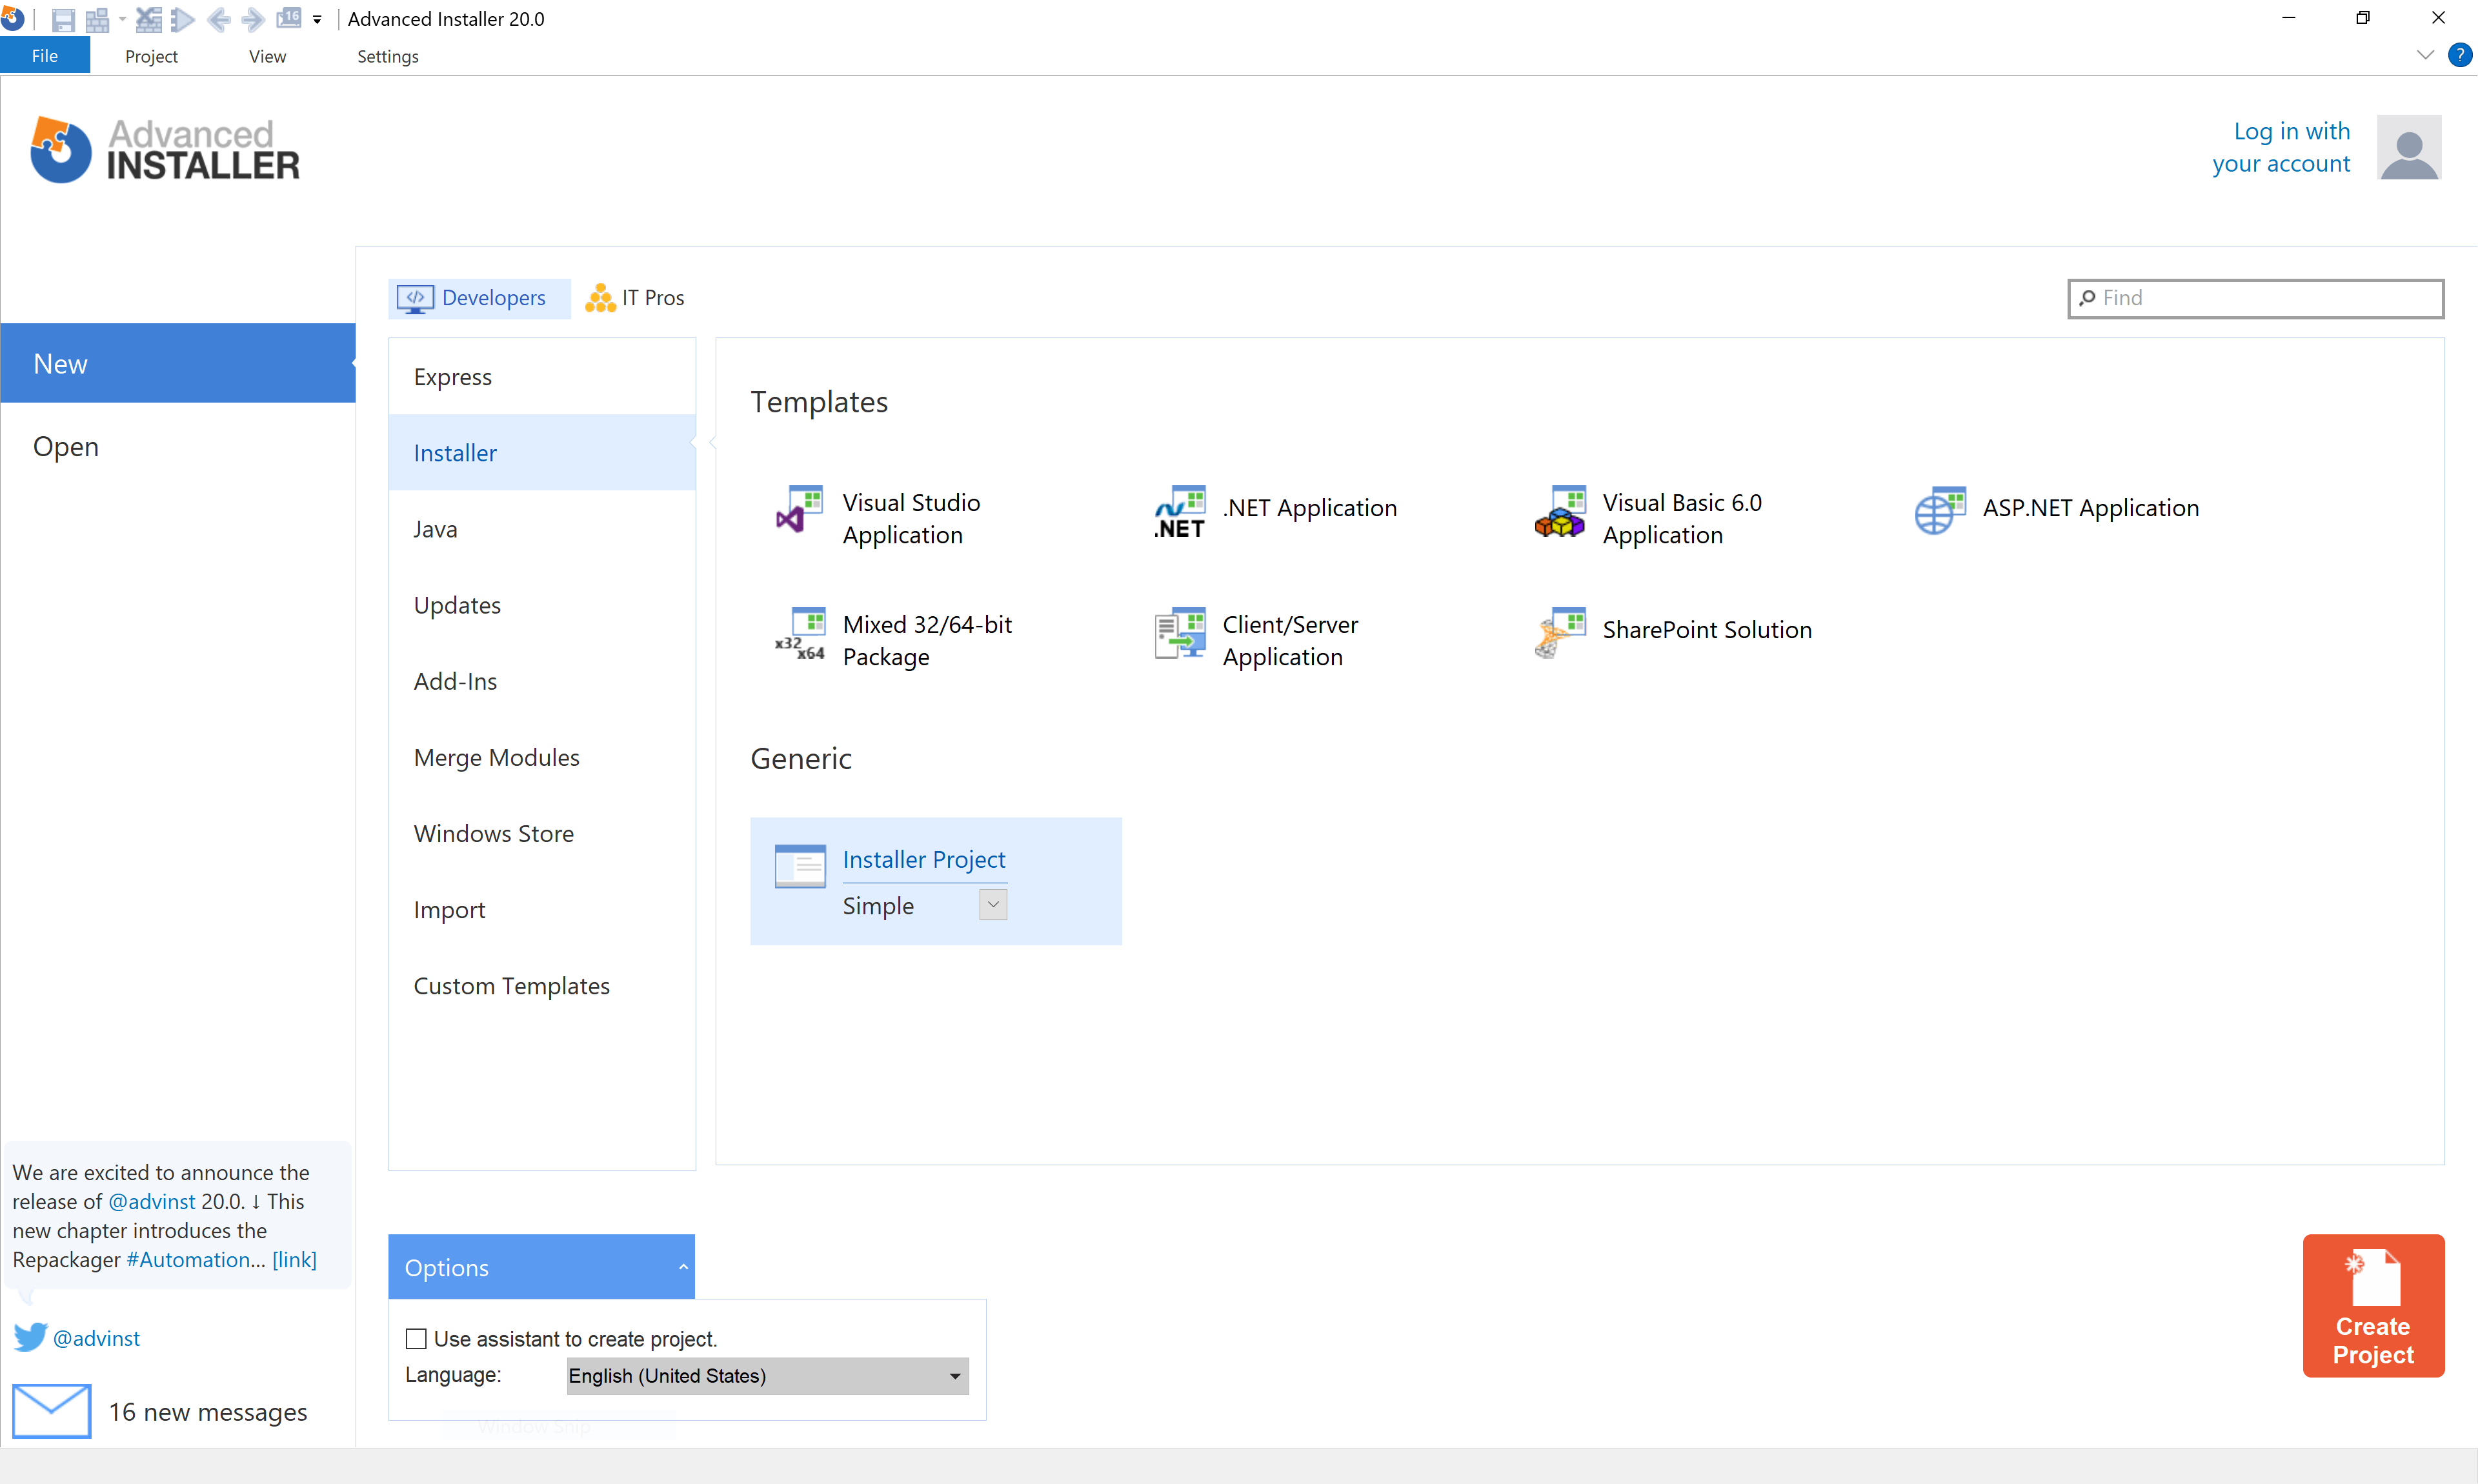
Let's assume that we have a simple application executable that only outputs some lines. After launching Advanced Installer, you will be prompted with a dialog where you can choose the type of project you want to create. You can use our Sample Application to test.

- Select the “Simple” type.
- Uncheck the “Use wizard...” option.
- Click on the [ Create Project ] button.
- The new project has been created, and from now on you start editing it.
2. Add files to the project

Now that the project is created, let’s add the file to it.
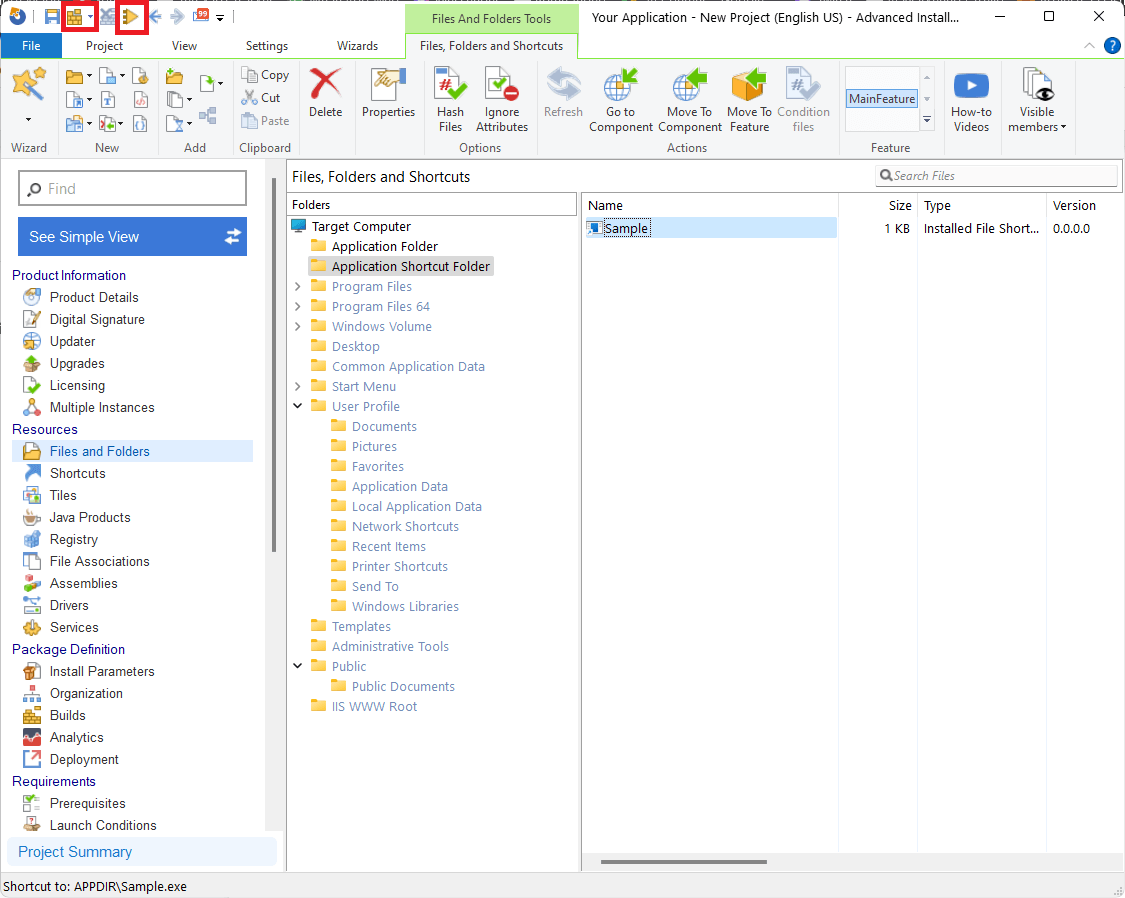
1. Go to the “Files and Folders” page by selecting it in the left-side panel. The folders that interest you most are “Application Folder” and “Application Shortcut Folder”.
In the Application Folder, we will place all the necessary files we want to copy on the machine during installation, while in the Application Shortcut folder, we can add shortcuts to our applications, help files, or URLs.
2. Now, in the Files and Folders page, click on the [ Add Files ] button and select your files. In our case we added the Sample.exe.

Create shortcuts to the MSI Installer

Adding a shortcut to your application in the Start Menu makes it easier for users to access it.
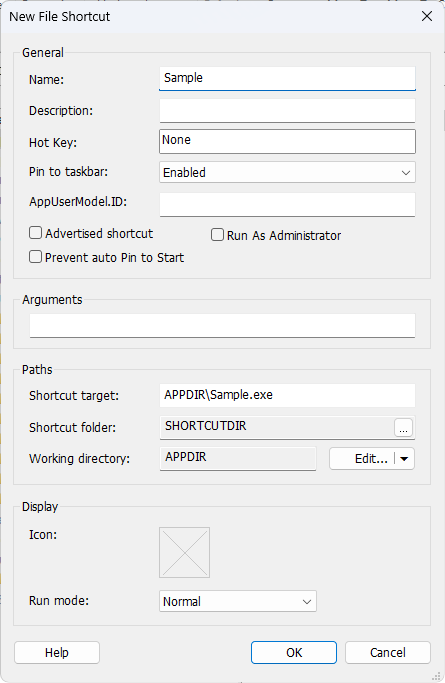
To create a shortcut for our Sample.exe, we need to right-click it and select New Shortcut To > Installed file.
The “New File Shortcut” dialog will appear, allowing you to customize the new shortcut.

The new shortcut will be added to the Application Shortcut Folder. That means that this shortcut will be installed in the “Start > All Programs > Product Name” menu of the Target Computer.
4. Build and install the MSI package

To build and install the MSI package, follow these steps:
1. Click on the [ Build ] toolbar button, and a “Build Project” dialog will appear, showing you the build evolution.
2. Once the build is complete, run the project by clicking on the [ Run ] toolbar button.
3. A setup wizard will appear that will guide you through the installation process of the “story.txt” file.

Congratulations! You created your first MSI installer.
What are other tools for building an application installer?

Advanced Installer is not only capable of delivering powerful MSI packages according to best practices, but it can also deliver other types of package formats like MSP, APP-V, APPX and MSIX.
Another option you have is to use the open-source project released by Microsoft called WiX Toolset.
WiX Toolset stands for Windows Installer XML, and unlike other software packaging tools that provide a graphical interface, WiX uses XMLs - so you need to declare and define what elements should be inside a package, and what should happen during an installation.
If you are a developer, you can also create MSI packages directly from Visual Studio. Check out the Advanced Installer Free Extension for Visual Studio and test it out.
Visual Studio automates the process of creating an MSI package on your development PC. All you have to do is create a new Setup Project into Visual Studio. The project is empty, so you must add all of your program files to the package.
Conclusion

MSI packaging isn’t going anywhere. Aside from its powerful features, MSI technology is the most popular type of Windows Installer package used by IT professionals when creating a setup package for their applications.
There are quite a few tools available on the market for creating an MSI installer package, and it’s up to you to decide which one suits you the most.
