How to add Java Runtime Environment (JRE) as a prerequisite

When installing a Java-based application, you must add the Java Runtime Environment (JRE) as a prerequisite to ensure the application runs correctly after the installation.
In this content, we will go through the following aspects:
- 1. What is Java Runtime Environment (JRE)?
- 2. Getting the Java Runtime Environment (JRE)
- 3. Including the Java Runtime Environment (JRE) as a Prerequisite to Your Installation Package
- 4. How do you add Java Runtime Environment (JRE) as a pre-install prerequisite in Advanced Installer?
- 5. Conclusion
- 6. Video Tutorial
1. What is Java Runtime Environment (JRE)?

Java Runtime Environment (JRE) is a software development platform used to create and run Windows applications. When the application is developed using JRE, it includes components and logic behind, dependent on the runtime environment core package.
That is why, as mentioned earlier, we add the Java Runtime Environment (JRE) as a prerequisite to the installation package so when the end user runs the application, it will work correctly. Otherwise, users may encounter an error message like the one below:

2. Getting the Java Runtime Environment (JRE)

You can download Java Runtime Environment (JRE) from the official Java website.
However, be aware that Java has changed its licensing policy:
- You can download and use any version for free as long as it is for personal or development use.
- For commercial use, you need to pay a license fee. You can learn more here.
3. Including the Java Runtime Environment (JRE) as a Prerequisite to Your Installation
Package

Advanced Installer simplifies the process of adding JRE as a prerequisite using its intuitive GUI. Simply follow the below steps:
1. Go to Requirements -> Prerequisites tab.
2. Select Packages, scroll through the Predefined Prerequisites list and choose one of the "Java Runtime Environment (JRE)" predefined prerequisites.

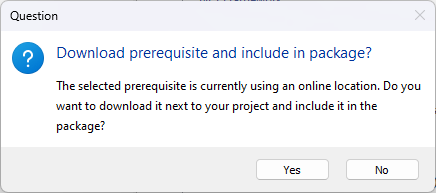
A prompt message will appear (see below). Choose “Yes”. As a best practice,
you want your installer package to include the prerequisite install files as well so it can
support install in offline mode, when no internet connection is available.

3. The "Location" combo can be left at its default value.

If you chose “NO” in the previous step and opted for the “download” prerequisite during
the installation, ensure the "URL" field contains a URL that points to the correct Java
Runtime Environment (JRE) installation package.
To verify that the URL is
correct, paste it into a web browser (Edge, Chrome, Firefox, etc).
It
should act the same way when you download something over the internet, prompting you with a
"Save As..." dialog with the "Run", "Save" and "Cancel" options. (this may vary depending on
your browser settings. The file might download the file automatically in a predefined
folder).
4. "Folder" field can be left as default, or it can be customized to your preference if you have a specific folder to where the prerequisite files will be located, extracted, or downloaded.

If you choose to go for “Download single file from URL”, use the [ Browse... ] button in
the "Integrity Check" section to select the JRE installation package you want to add as a
prerequisite. The "Exact Size" and "MD5" fields will be populated automatically.

5. In the "Install Command Lines" section, you have the option to declare command line parameters to pass to the Java Runtime Environment (JRE) prerequisite during the installation of your main setup.
For example, if you want the prerequisite to install silently along with the main package, use the /S parameter. You can also add the /S parameter in the Basic UI field to ensure the prerequisite always installs silently.

6. In the "Install Conditions" tab you can set a “requirement rule” to define which Windows versions, bit rate, and other conditions, support the prerequisite installation. The "Search" section does not need any modification since it is automatically configured.

That’s all! Now you can build your package. The generated setup package will include your prerequisites, which are going to get installed during the setup process.
4. How do you add Java Runtime Environment (JRE) as a pre-install prerequisite in Advanced
Installer?

Advanced Installer provides three options for adding prerequisites to your main installation package:
- Before Main Package (Pre-Install): Install an additional package before your main application is installed.
- During Main Package (Feature-based): Install an additional package as a feature. This happens when your installer allows the user to select which features of your application to install.
- After Main Package (Post-Install): Install an additional package after your main application is installed.

Just like .Net Framework or Visual C++ Redistributables, Java Runtime Environment (JRE) should be installed before installing your main application as a best practice. This will improve the user experience and it will ensure compatibility while preventing installation and runtime errors.
At Advanced Installer, we follow this recommendation because certain components of your main application rely directly on the resources provided by the prerequisites.
5. Conclusion

Java Runtime Environment (JRE) is a crucial component for running Java applications.
By using Advanced Installer, you can effortlessly add the Java Runtime Environment (JRE) as a prerequisite directly to your application, using its predefined list of prerequisites.
Have you tried Advanced Installer’s predefined support for
prerequisites yet? Let us know in the comments section below.
6. Video Tutorial

The process of adding .NET framework as a prerequisite to an installation package is similar to the one for JRE, so we present you the video tutorial for it.