Configure MS-SQL Server Connection

The following article uses options that are available starting with the Enterprise edition and project type.
This tutorial makes use of the preconfigured SQLConnectionDlg dialog and all settings will be collected and provided to the installer throughout the installation process. To do this, public public properties will be utilized.
1. Create project

Launch Advanced Installer, select Enterprise and press the button.

2. Add SQL connection dialog

![]() Go to
Dialogs Page and select
FolderDlg dialog. Select “Add Dialog” toolbar option or
“Add Dialog...” context menu option.
Go to
Dialogs Page and select
FolderDlg dialog. Select “Add Dialog” toolbar option or
“Add Dialog...” context menu option.
The Add Dialog dialog will appear. Select SQLConnectionDlg from the list and press "OK". The new dialog will be added in the chain after the FolderDlg dialog.
Select the "ODBC Resource" static text control in the SQLConnectionDlg dialog and set the Visible attribute to False in the Properties pane on the right side.
For the "ODBC Resource" edit box control, you should follow the previous steps.
3. Create the SQL connection

![]() Navigate to the SQL Databases Page, Database server and from the toolbar or context menu, go
for the “New Connection -> Predefined” option.
Navigate to the SQL Databases Page, Database server and from the toolbar or context menu, go
for the “New Connection -> Predefined” option.
This will change the installation type to "Per-machine only".
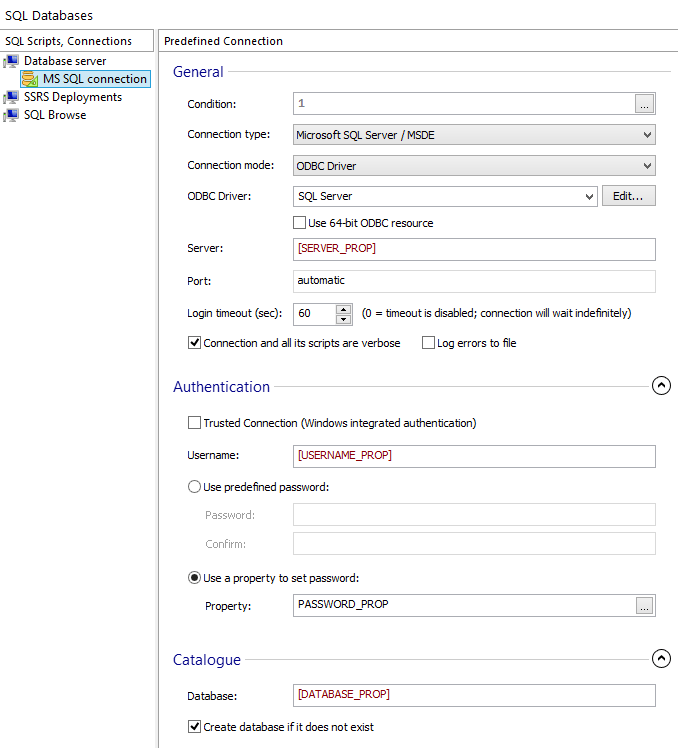
Change the name of the connection to anything you like. Do the following settings in the "SQL Connection" properties window on the right side:
| Parameter name | Value |
|---|---|
| Connection Type | Microsoft SQL Server / MSDE |
| Connection Mode | ODBC Driver |
| ODBC Driver | SQL Server |
| Server | [SERVER_PROP] |
| Port | automatic |
| Username | [USERNAME_PROP] |
| Use a property to set password | [PASSWORD_PROP] |
| Database | [DATABASE_PROP] |
Given that this connection will be used with Microsoft SQL Server, we will not utilize a property to configure the "ODBC Driver" option but will instead hard-code it.

![]() Add all the necessary
resources like files and folders to the project, build and run it.
Add all the necessary
resources like files and folders to the project, build and run it.
4. Test the installation package

It is advisable to test the package's proper connection to the SQL Server prior to distributing it to your customers.
The Test SQL Connection How To article shows the
steps needed to take in order to test your SQL connection.
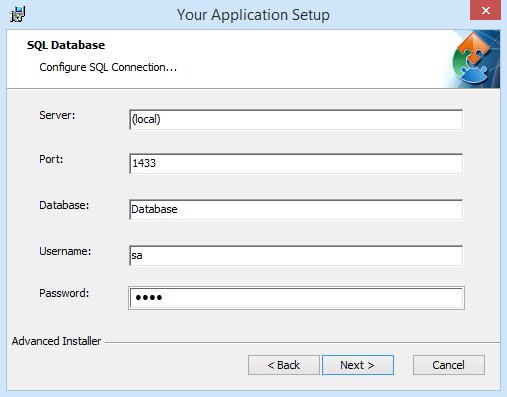
After running the installation package, browse to the "SQL Database" window and enter the following information:
- Server
- The name of the SQL Server. Use the Computer-name format to specify a default instance, or (local) when the server is hosted on the local machine, otherwise for a named instance use the following format: Computer-name\Instance-name.
- Port
- The port that the SQL Server uses. The 1433 port is preset to be used by the Microsoft SQL Server.
- Database
- The name of the database to which the install package will connect to.
- Username
- The username under which the connection will be initiated. This user must have privileges to connect to the SQL Server. By default, Microsoft SQL Server comes with the sa user (System Administrator).
- Password
- The password set by the user. For the sa user this password is set during the SQL Server installation.
