Creating a Java Product Installation

The following article uses options that are available starting with the Professional edition and project type.
This tutorial will present in detail how to achieve this goal. In order to replicate it on your own machine, you need to have a Sun JDK installed (the latest version is recommended).
1. Create project

First you must download and unzip the Java Product Example. It contains all the files necessary to finish this tutorial, including a sample Advanced Installer project.
Let's say that we want to create a Windows Installer package for the included Java Product example. Start Advanced Installer and choose “Intaller Project” > “Professional” as the project type.

![]() A good idea is to save and name the project at this point. Use the “Save” menu
item under the “File” menu or the Ctrl+S keyboard shortcut
and let's name it JavaProductExample.aip.
A good idea is to save and name the project at this point. Use the “Save” menu
item under the “File” menu or the Ctrl+S keyboard shortcut
and let's name it JavaProductExample.aip.
2. Enter Product Details


Note that these details are completely fictive.
3. Add Installation Files

![]() Go to the Files and Folders page by
clicking on “Files and Folders” on the left side page menu.
Go to the Files and Folders page by
clicking on “Files and Folders” on the left side page menu.
![]() Click on the toolbar button. Browse to where your
downloaded the example folder, then select DemoJar.jar file and click
.
Click on the toolbar button. Browse to where your
downloaded the example folder, then select DemoJar.jar file and click
.

4. Define Java Products

![]() Go to the Java Products page by clicking on
“Java Products” on the left pane.
Go to the Java Products page by clicking on
“Java Products” on the left pane.
![]() Create a new Java Product by clicking on the
toolbar button. Let's call it Java Product Example.
Create a new Java Product by clicking on the
toolbar button. Let's call it Java Product Example.

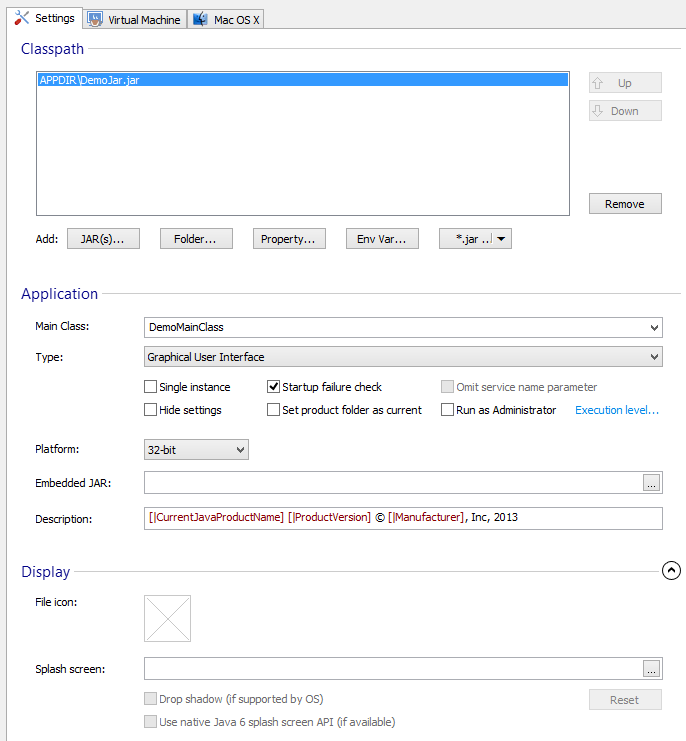
In the "Settings" tab, click on the button and select the DemoJar.jar file and click OK.
Edit the Main class to: DemoMainClass
Go to "Virtual Machine" tab and set the JVM parameters:
- Initial heap size - 64 MegaBytes
- Maximum heap size - 256 MegaBytes
Specify the JRE version min and max to whatever version you have installed on your machine.
You can set the parameters by clicking on [...] button from the JVM Parameters field
this way accessing the Edit Java Virtual Machine Parameters Dialog.
Back in the "Settings" tab select GUI Application. Optionally set a splash screen for your java product.

Now a new file has appeared in the Files and Folders Page: Java Product Example.exe.
5. Create program shortcut

![]() Go to the Files and Folders page by clicking on
“Files and Folders” on the left pane.
Go to the Files and Folders page by clicking on
“Files and Folders” on the left pane.
![]() Select the Java Product Example.exe file and click on the toolbar button. Set the description to: Java Product Example
Application. Find yourself a nice icon on your computer. Click
OK.
Select the Java Product Example.exe file and click on the toolbar button. Set the description to: Java Product Example
Application. Find yourself a nice icon on your computer. Click
OK.

6. Build

![]() Click on the toolbar button.
Click on the toolbar button.
7. Run, test and remove

![]() Click on the toolbar button to run and test the MSI you created. After
installation you should have a Java Product Example folder in your “Start” menu.
Run the application by selecting Java Product Example.
Click on the toolbar button to run and test the MSI you created. After
installation you should have a Java Product Example folder in your “Start” menu.
Run the application by selecting Java Product Example.

To remove the installed package, simply Run it again and select Remove.