Install files in a Custom Folder

It is common to encounter situations where you need to deploy files in custom disk locations, for example on "c:\" or "c:\folder\subfolder"
In the current sample, we will demonstrate how to configure the setup package to achieve this.
1. Create project

After launching Advanced Installer, you will be presented with a dialog where you can choose the type of project you want to create.

Select Simple and press the Create Project button. The new project has been created and from now on you will edit it.
![]() Save the project and give it an appropriate name - let's say "Install Files in
Custom Folder" for this example.
Save the project and give it an appropriate name - let's say "Install Files in
Custom Folder" for this example.
2. Enter product details

Now you can see the main view split into two panes. In the left pane, you can see all the options you have to edit in your current project, grouped in categories.
![]() Switch to “Product
Details” page to set the information seen by the user for your installation
package. Fill the fields in the right pane with the corresponding data.
Switch to “Product
Details” page to set the information seen by the user for your installation
package. Fill the fields in the right pane with the corresponding data.

The information from this view will be displayed in the Control Panel.
3. Create a property that will store the custom installation path

![]() Go to “Properties” from the “Custom
Behavior” menu on the left pane. Then Click on New Property
and create a property named, for example, MY_DIR. Make sure the name
contains only capital letters (public property).
Go to “Properties” from the “Custom
Behavior” menu on the left pane. Then Click on New Property
and create a property named, for example, MY_DIR. Make sure the name
contains only capital letters (public property).

4. Create a property based folder

![]() Select “Files and Folders” from the
“Resources” menu on the left pane.
Select “Files and Folders” from the
“Resources” menu on the left pane.
Then click on New Folder toolbar button and select Property Based option to add a new Property Based Folder in your project.
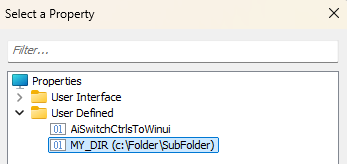
You will be prompted to select a property for this folder. Just select the property created in the previous step:

5. Add files and folders to your project

The next step is to add the files and/or folders that compose your application to the project.
![]() In “Files and Folders” page select the newly created
MY_DIR Property Based Folder.
In “Files and Folders” page select the newly created
MY_DIR Property Based Folder.
![]() Then click on the toolbar button and select the
files of your application, or use the drag-and-drop to add resources
from the disk to the project. In our case, the EXE file is a text editor which will be
launched during the install process.
Then click on the toolbar button and select the
files of your application, or use the drag-and-drop to add resources
from the disk to the project. In our case, the EXE file is a text editor which will be
launched during the install process.

Another method to install files in certain locations besides the one using a
Property Based Folder is to use Windows Volume location from ![]() Files and folders page
Files and folders page

6. Build and install

When running the current sample, the My Text Editor application will be installed in c:\folder\subfolder. Also test.ai-txt resource will be installed in the Your App Files on the root of the Windows Volume Control Panel.