How to Register a URI Scheme Using Advanced Installer

A URI scheme enables external applications, scripts, or web services to communicate with a desktop application installed on your computer using your own protocols (like yourscheme://). Some common use cases include:
- Launching Applications: A URI scheme can launch a specific application installed on your system.
- Deep Linking: It can point to a specific feature or action within the application (e.g., opening a chat in Teams, starting a Zoom meeting).
- File Handling: A URI can pass parameters (like file paths) to an application for processing.
- Web and Desktop Integration: Enables seamless transitions from a browser to a desktop app, such as clicking a link in a browser that opens a document in Word.
In this article, we'll walk you through the process of creating a custom URI scheme using PowerShell and Advanced Installer. We'll cover:
- Registering the custom URI scheme during installation
- Handling the custom URI and extracting parameters
- Executing additional scripts or applications upon invocation
This tutorial uses options available with the Professional edition and project
type of Advanced Installer.
1. Register the custom URI scheme in the Windows Registry

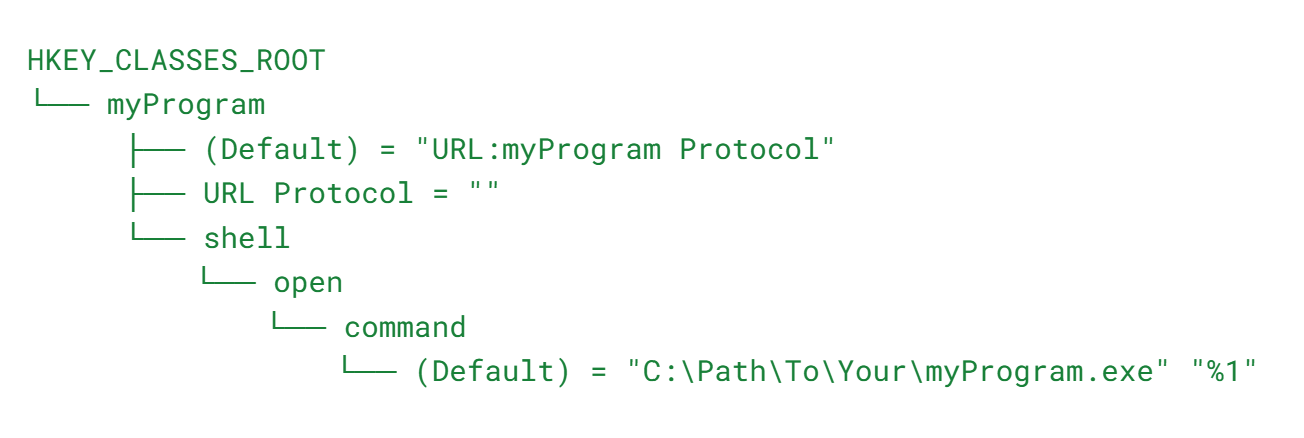
The registers will create the custom URI scheme in the Windows Registry under HKEY_CURRENT_USER. This avoids the need for administrative privileges and ensures that the scheme is registered for the current user.

In the registry view you can define the entries for the URI scheme:

Details:
- Custom Scheme Name: We set the scheme name to youscheme.
- Handler Executable Path: Specifies where the handler executable (YourApp.exe) is located.
- Registry Entries: Creates the necessary registry keys and values under HKEY_CURRENT_USER\SOFTWARE\Classes.
- Command to Execute: Sets the command that Windows will execute when the custom URI is invoked.
- Launching the Web Page: Opens the initial URL in the default browser to start the workflow.
2. Creating the Handler Script

The handler script is executed when the custom URI scheme is invoked. It receives the full URI as an argument, parses it, and performs the necessary actions. In the below example we’ll receive some tokens and save them in config files. Since we need to create those files on disk, we’ll use a location where we don’t need admin permissions for writing.
yourscheme://callback?authToken=ABC123&collectorId=45&accountId=789
Param(
    [string]$url
)

# Load necessary assemblies
Add-Type -AssemblyName System.Web

# Logging for troubleshooting
$logFile = "$env:USERPROFILE\AppData\Local\Programs\YourApp\HandlerLog.txt"
"Handler script invoked at $(Get-Date)" | Out-File -FilePath $logFile -Append
"URL: $url" | Out-File -FilePath $logFile -Append

# Extract the parameters from the URL
$decodedUrl = [Uri]::UnescapeDataString($url)
$uri = New-Object System.Uri($decodedUrl)
$queries = [System.Web.HttpUtility]::ParseQueryString($uri.Query)

$authToken = $queries['authToken']
$collectorId = $queries['collectorId']
$accountId = $queries['accountId']  # Use 'locationId' if that's the parameter name

# Log extracted parameters
"AuthToken: $authToken" | Out-File -FilePath $logFile -Append
"CollectorId: $collectorId" | Out-File -FilePath $logFile -Append
"AccountId: $accountId" | Out-File -FilePath $logFile -Append

# Verify that all parameters are received
if ([string]::IsNullOrEmpty($authToken) -or [string]::IsNullOrEmpty($collectorId) -or [string]::IsNullOrEmpty($accountId)) {
    "Error: Missing required parameters." | Out-File -FilePath $logFile -Append
    Exit 1
} else {
    "Received required parameters." | Out-File -FilePath $logFile -Append

    # Paths for storing data
    $appDataDir = "$env:USERPROFILE\AppData\Local\Programs\YourApp"
    if (!(Test-Path $appDataDir)) {
        New-Item -ItemType Directory -Path $appDataDir -Force | Out-Null
    }

    # Store the authToken in plain text (for testing purposes)
    $authTokenPath = "$appDataDir\AuthToken.txt"
    $authToken | Out-File -FilePath $authTokenPath -Encoding UTF8

    # Store collectorId and accountId in a config file
    $config = @{
        CollectorId = $collectorId
        AccountId = $accountId
    }
    $configPath = "$appDataDir\AgentConfig.json"
    $config | ConvertTo-Json | Out-File -FilePath $configPath -Encoding UTF8

    # Set file permissions
    $files = @($authTokenPath, $configPath)
    foreach ($file in $files) {
        $acl = Get-Acl $file
        $accessRule = New-Object System.Security.AccessControl.FileSystemAccessRule($env:UserName, "FullControl", "Allow")
        $acl.SetAccessRule($accessRule)
        Set-Acl $file $acl
    }

    "Agent configuration completed successfully." | Out-File -FilePath $logFile -Append

    }
Details:
- Parameter$url: Receives the full URI passed by Windows.
- Logging: Writes logs to HandlerLog.txt for troubleshooting.
- URI Parsing:
- Decodes and parses the URI.
- Extracts authToken, collectorId, and accountId.
- Data Storage:
- Saves authToken in plain text (for testing purposes).
- Saves collectorId and accountId in AgentConfig.json.
- File Permissions: Sets permissions so only the current user can access the files.
3. Converting the Handler Script to an Executable

Although Windows can be configured to invoke a PowerShell script from a URI scheme, we recommend converting HandlerScript.ps1 into an executable for simpler management and distribution.
Tools like PS2EXE can compile PowerShell scripts into a self-contained .exe file. Then your protocol handler simply runs that .exe instead of calling PowerShell. This way the script will not be exposed to the end user directly as plain text.
In a PowerShell window, follow these steps:
- Install PS2EXE Module:
- Install-Module -Name ps2exe -Scope CurrentUser -Force
- Convert the Script:
- Invoke-PS2EXE -InputFile "HandlerScript.ps1" -OutputFile "HandlerScript.exe" -NoConsole
4. Build and test the installer

- Build the Installer:
- Generate your MSI or EXE installer package.
- Test Installation:
- Run the installer on a test machine.
- Verify that the custom URI scheme is registered.
- Check that the initial URL opens in the browser after installation.
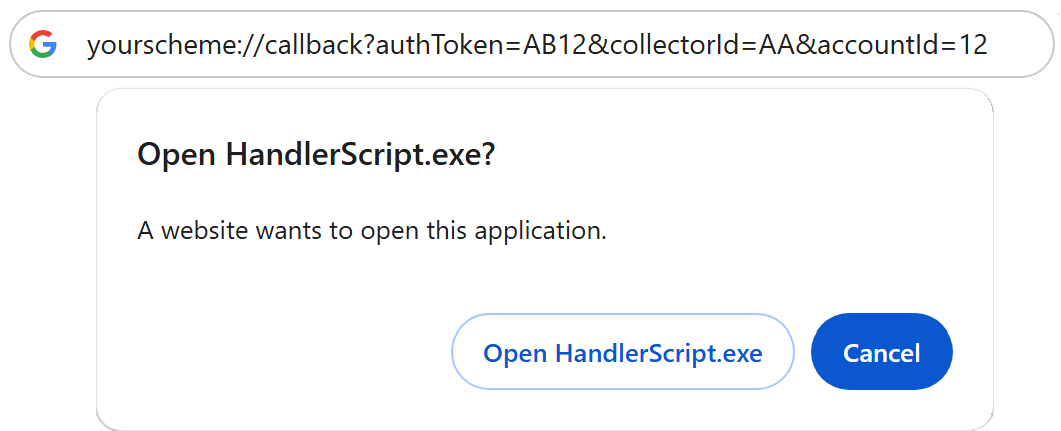
Browser Invocation:
- Open the Browser
- Enter link: yourscheme://callback?authToken=ABC123&collectorId=45&accountId=789
- Handle Browser Prompt: If prompted, allow the browser to open the application.
- Verify Execution: Check log files
If everything was correctly executed, you should see the following prompt in the browser:

The URI scheme can also be fired when a user clicks a link like:
<a href="yourscheme://callback?authToken=ABC123&collectorId=45&accountId=789">Open in Your App</a>
The browser will pass that URI (yourscheme://callback?authToken=ABC123&collectorId=45&accountId=789) to Windows, which checks HKEY_CLASSES_ROOT\yourscheme, and then runs your app with the URI as an argument.
Basically, when clicked, the browser will delegate to the Operating System to handle the yourscheme:// protocol.
And the content of the disk for configuration files and logging file:

Best Practices and Considerations – Security

When implementing custom URI schemes or handling sensitive data, it's crucial to prioritize security. Avoid storing sensitive information like authToken in plain text, especially in production environments, as this can expose critical data to unauthorized access. Instead, use encryption techniques to protect such data at rest.
Additionally, enforce strict access controls to ensure that only the intended users or processes can access stored files. Properly configured file permissions can prevent accidental or malicious access, reducing the risk of data breaches and enhancing the overall security of your application.
Conclusion

With Advanced Installer you can seamlessly integrate desktop applications with web workflows using custom URI schemes. This approach enhances user experience and allows for sophisticated interactions between web pages and installed applications.
Feel free to adapt and extend the provided scripts to suit your specific needs.