Migration to a New Installer Tool: Upgrading Older Versions of the Installer

Switching to a different packaging tool is not an easy task; a lot needs to be taken into consideration.
However, the most important aspect is how existing users will be upgraded to the new installer since it is created with a different tool.
In this article, we will discuss the key considerations for managing this transition effectively.
Let's start with the first one:
1. The previous setup is MSI-based

If the previous installer is MSI-based, the upgrade is seamless.
Simply add the "Upgrade Code" of the old MSI in the "Upgrades" page by using the [ New... ] button and selecting the old MSI file.

Use the New Upgrade option to select the MSI file or select directly the UpgradeCode.
2. The previous setup is not MSI-based

When you need to upgrade an installation package that is not MSI-based, you can use a custom action.
However, you might wonder how you will be able to find the location where the package is installed. Additionally, users might have different versions installed, so you also need to take these into consideration.
During the installation, Windows stores information about the installed package in the registry, in a dedicated location:
Per-machine installation type
- For 64-bit installers:
Computer\HKEY_LOCAL_MACHINE\SOFTWARE\Microsoft\Windows\CurrentVersion\Uninstall - For 32-bit installers:
Computer\HKEY_LOCAL_MACHINE\SOFTWARE\WOW6432Node\Microsoft\Windows\CurrentVersion\Uninstall
Per-user installation type
- For 64-bit installers:
Computer\HKEY_CURRENT_USER\Software\Microsoft\Windows\CurrentVersion\Uninstall - For 32-bit installers:
Computer\HKEY_CURRENT_USER\Software\Wow6432Node\Microsoft\Windows\CurrentVersion\Uninstall
Usually, you will find a lot of entries under these locations, with GUIDs from different installers, especially if you’re working on a development PC with a lot of other applications installed.
3. Configure project to upgrade non-msi previous versions

3.1 Automating the upgrade process for non-MSI-based installations

The most effective way to find and manage the location of the installed packages is to use a dynamic search.
For example the below PowerShell script can help:
#Requires -version 3
Param()

#iterate through all registries hives

$paths = @( "HKCU:\SOFTWARE\Microsoft\Windows\CurrentVersion\Uninstall",
            "HKCU:\SOFTWARE\Wow6432Node\Microsoft\Windows\CurrentVersion\Uninstall",
            "HKLM:\SOFTWARE\Microsoft\Windows\CurrentVersion\Uninstall",
            "HKLM:\SOFTWARE\Wow6432Node\Microsoft\Windows\CurrentVersion\Uninstall" )

foreach ($path in $paths){

    Get-ChildItem $path -ErrorAction SilentlyContinue | ForEach-Object {

        if ((Get-ItemProperty "$path\$($_.PSChildName)" | Select-Object DisplayName) -like "*Advanced Installer*")
        {
            #Write-Output "Registry Key: $_"
            #Get-ItemProperty "$path\$($_.PSChildName)" | Select-Object DisplayName, DisplayVersion, UninstallString | Format-Table -AutoSize

            $displayName = Get-ItemProperty "$path\$($_.PSChildName)" | Select-Object DisplayName
            $uninstallString = Get-ItemProperty "$path\$($_.PSChildName)" | Select-Object UninstallString
            $oldVersion = Get-ItemProperty "$path\$($_.PSChildName)" | Select-Object DisplayVersion

            Write-Host "Package that matches your search:" -ForegroundColor Yellow
            Write-Host $displayName.DisplayName -ForegroundColor Green
            Write-Host $path\$($_.PSChildName)
            Write-Host $uninstallString.UninstallString
            Write-Host $oldVersion.DisplayVersion

        }
    }
}As you can see, we’re trying to find the location where the Visual Studio Code keeps its registry. If Visual Studio Code is found on the machine, a similar output should be displayed:

Opening the related registry path, we’ll notice the following:

All the necessary information to trigger the uninstall process from the new setup created with Advanced Installer.
This approach eliminates the need to worry about the location of the installation or different versions that might be installed on the users’ machines.
We just need to implement the workflow in the setup package.
3.2 Configuring Your Advanced Installer Project

Here’s how you need to configure your Advanced Installer project to trigger the uninstall process:
1. Add a PowerShell Custom Action that will search for the installed version:

We only need to execute the custom action during installation, only when the package created with Advanced Installer is installed for the first time.
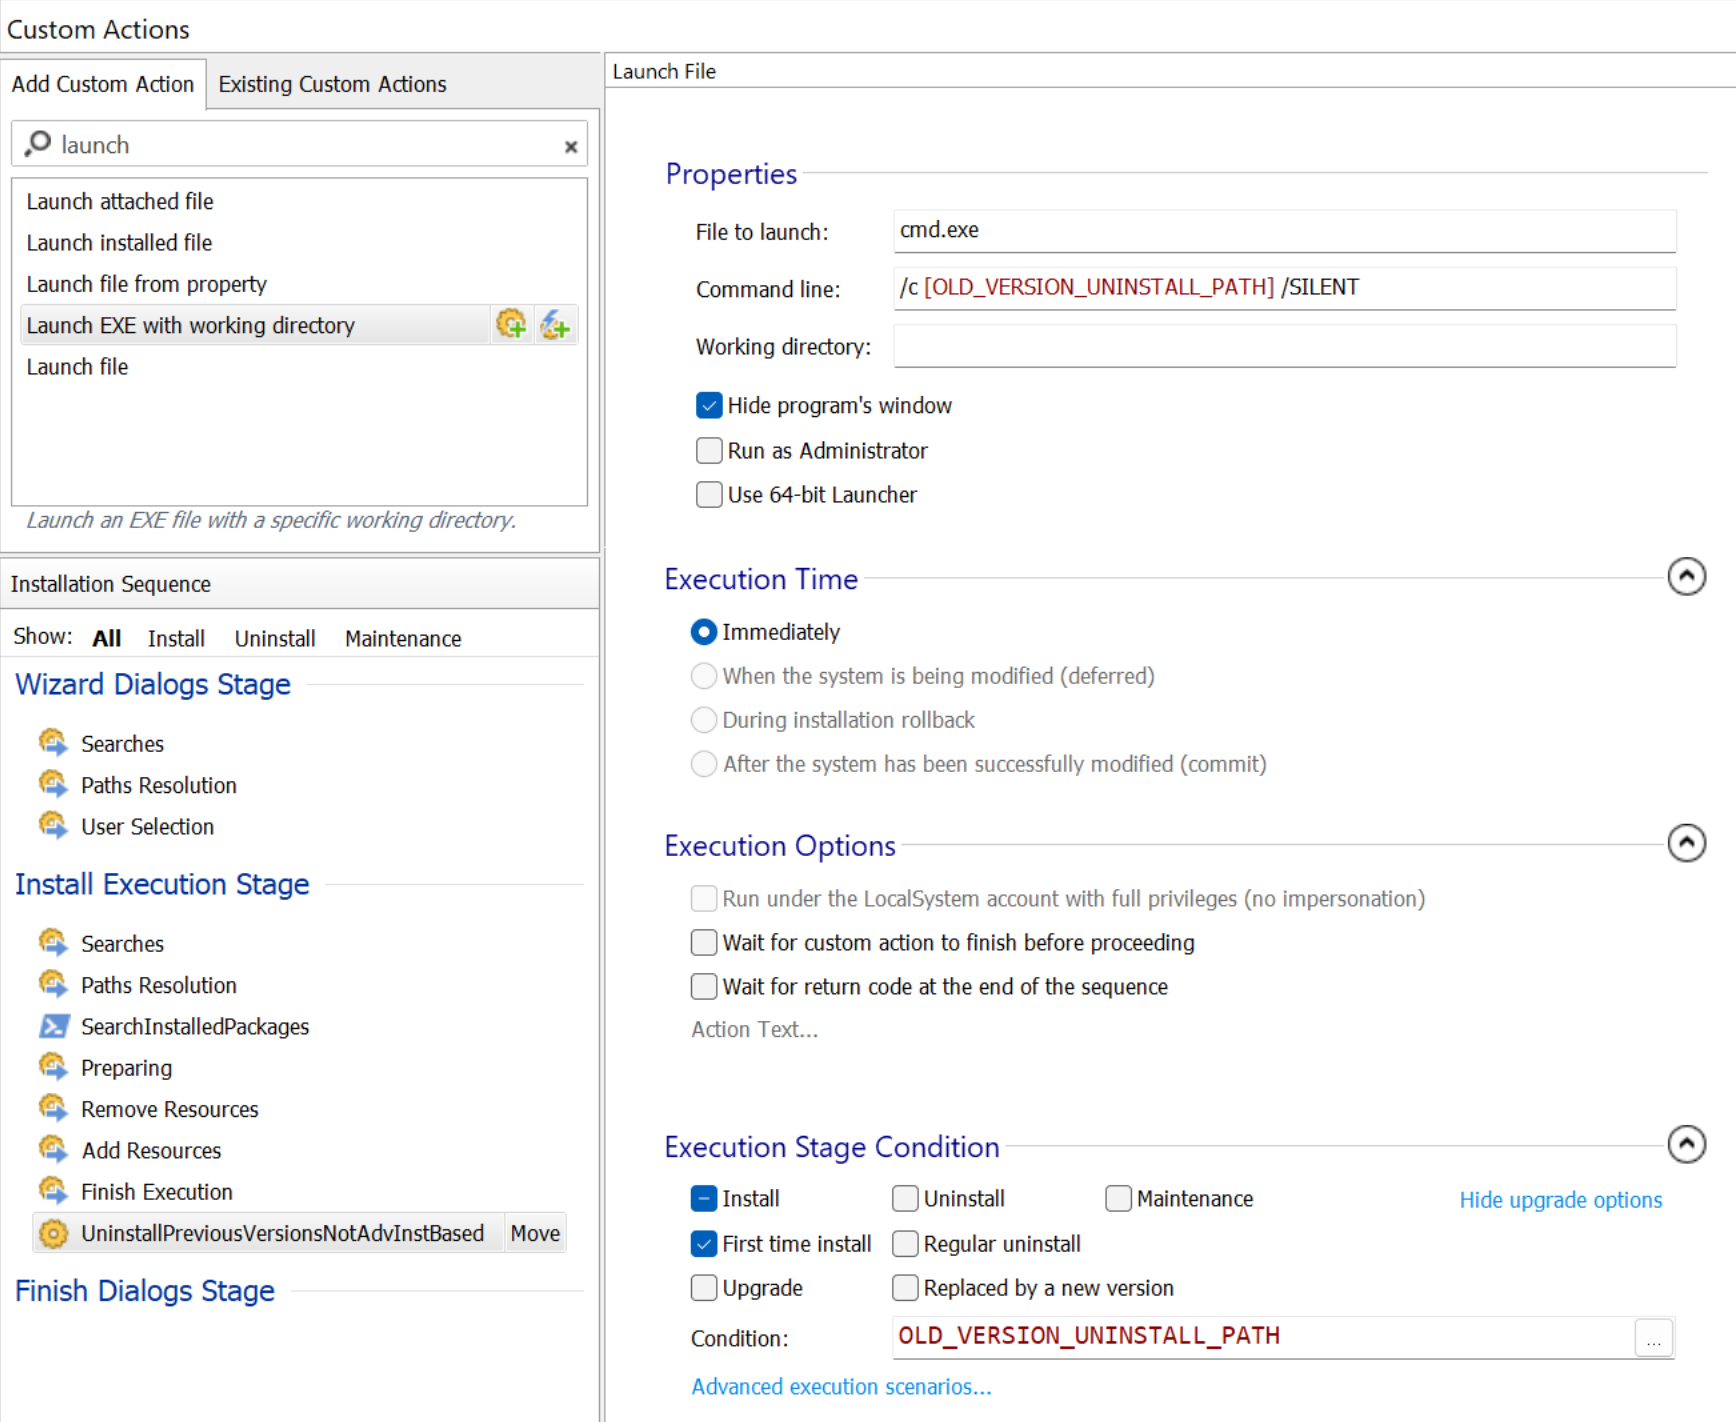
2. Configure the custom action that will trigger the Uninstall process.

The custom action will be executed only when a previous version is found and it is not created with Advanced Installer.
Since the installation is done at the end of the installation, the Wait for return code at the end of the sequence flag should be disabled. There is no need for the current installation to wait until the previous version is uninstalled. The process should be done silently, in the background.
3.3 Handling Concurrent MSI Executions

Since the previous version is not MSI-based, we can bypass the limitation regarding MSI files running concurrently during the Install Execute Stage. This means we don't need to be concerned about the restriction that typically prohibits two MSI files from executing simultaneously.
However, if this behavior occurs, e.g. the uninstalled package triggers the uninstall of another MSI based installer, we need to move the custom actions on the Wizard Dialogs Stage:

By following these steps, you can automate the upgrade process for non-MSI-based installations, ensuring a smooth transition to the new installer created with Advanced Installer.
That should be all. Happy packaging!