Using the Updater for local deployment

The following article uses options that are available starting with the Enterprise edition and project type.
This tutorial will focus on showing how the Updater can be used for local deployment. If your company has internal software which needs to be maintained, the Updater feature from Advanced Installer can do this easily.
1. Create the original package

Launch Advanced Installer, select Professional and press the button.

Next follow the steps 1 to 6 in the Simple Installation tutorial, but don't build the package.
After creating the project you must enable the Updater functionality. Go to the Updater section in the left-side panel, and check the option “Check for updates using Advanced Updater”.
We will assume that your company has a common share location, that is locally mapped by users to a Z network drive, this is why we will use the local URL path “file://z:/”
The Updater can use the following protocols of URL: http://, https://, ftp://,
file://
Universal Naming Convention (UNC) paths are also supported. You can use a path like
file://\\ServerName/Updater/Updates.txt to access a network shared
resource.
Create an empty text file on the Z network drive, and name it updates.txt. This file will be overwritten later with the configuration file.
Go to the Updater section, and paste your URL in the “Updates configuration file URL”(example “file://z:/updates.txt”)

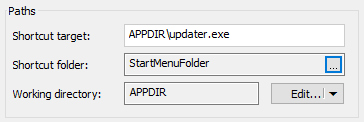
To make updating easier, place a shortcut of updater.exe in the Start Menu. Go to the Files and Folders Page - Installer Project, right click on the updater.exe file, and choose "New Shortcut To" -> "Installed file".

In the “Shortcut folder:” option, press the “...” button, and select Start Menu as the location.

![]() Save and install the package
Save and install the package
2. Create the update package

Create a copy of the original project, and open it.
![]() Go to the Product Details Tab
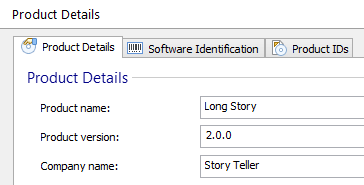
page and increase the "Product Version" (for example you can set it to 2.0.0). The Product
name should be the same as in the original package.
Go to the Product Details Tab
page and increase the "Product Version" (for example you can set it to 2.0.0). The Product
name should be the same as in the original package.

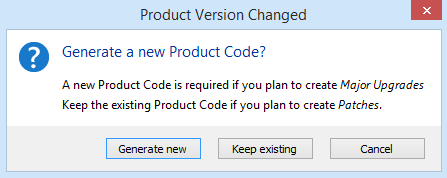
When selecting another page you will be prompted about the update method, choose Generate new.

Instead of creating a shortcut please see other alternatives in our samples on
how to integrate the updater with your
application.
![]() Save and build the package, don't install it.
Save and build the package, don't install it.
3. Create the configuration file

Create the configuration project by following the Create project and Add the first update sections in the Updates tutorial. The packages in the Updates tutorial are just examples, make sure you use the ones you created.
![]() Save and build the configuration package.
Save and build the configuration package.
After building the configuration package, rename the generated text file to updates.txt. Copy and overwrite the existing file on your Z network drive. The file will be used by the Updater to see if a new version of your software is available.
4. Run the Updater

![]() Launch
the Updater shortcut on your desktop. The changes will be detected, and your software will
be updated.
Launch
the Updater shortcut on your desktop. The changes will be detected, and your software will
be updated.