Using the Updater
The following article uses options that are available starting with the Enterprise edition and project type.
This tutorial will guide you step by step in creating and maintaining an install package that uses the Advanced Updater.
If you have an EXE file at your disposal to which you can easily change the version
you could use it instead of the “story.txt” file to complete this
tutorial.
1. Create the original install package

Create a professional project, but following the same steps as described in the Simple Installation tutorial. Don't build the package yet.
After adding the files to the package it is time to add the auto-update functionality.
![]() Switch to the Updater Settings by selecting it
in the left-side panel.
Switch to the Updater Settings by selecting it
in the left-side panel.
Check “Check for updates using Advanced Updater”. The “updater.exe” file will be automatically added in your application directory.
Now, you will have to reserve on your site a location for the updates configuration file. You will create this file when the first update will be released. For now, just input the location. Let's suppose you have chosen this location:
https://www.advancedinstaller.com/downloads/updates.ini
Enter it in the “Updates URL” field.

For deployment simplicity reasons we have used TXT as the extension for the updates
configuration file. If you want to use other extensions you might need to configure the MIME
types on your server to recognize that extension.
In order to be able to launch the Advanced Updater, create a desktop shortcut that will point to the updater.exe file in the package.
![]() Go to the Files and Folders page. Right click on
the “updater.exe” file and choose "New Shortcut...". In the newly appeared
dialog edit the fields like in the following screen-shot.
Go to the Files and Folders page. Right click on
the “updater.exe” file and choose "New Shortcut...". In the newly appeared
dialog edit the fields like in the following screen-shot.

Instead of creating a shortcut please see other alternatives in our samples on
how to integrate the updater with your
application.
![]() Save and build the package.
Save and build the package.
![]() Install the package.
Install the package.
![]() Click on the desktop shortcut. Naturally, no updates are
found.
Click on the desktop shortcut. Naturally, no updates are
found.
2. Manage the first update

First you need to create a backup of the original project. After the backup is made you can start modifying it to create a new version.
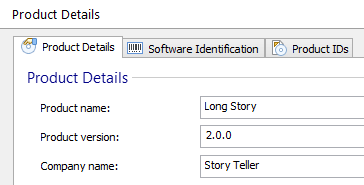
![]() Go to the Product Details Tab
page and increase the "Product Version" (for example you can set it to 2.0.0).
Go to the Product Details Tab
page and increase the "Product Version" (for example you can set it to 2.0.0).

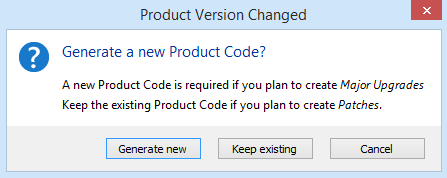
When selecting another page you will be prompted about the update method, choose Generate new.

Make sure the project contains the registry value "Version" in Registry page, set to value [ProductVersion].
![]() Save and build the package.
Save and build the package.
After creating a new version of the package it is time to create the "StoryUpdates.txt" file on the server so the updater will know that new updates are available.
Create a new Updates Configuration Project and configure the first update as showed in the updates tutorial.
Generate the updates configuration file and place it at the URL location you specified in the original package.
![]() Use the updater shortcut installed by the original package. You will
notice that a new update is found, download and install it. When checking for updates again
your application should be up to date (no updates should be found).
Use the updater shortcut installed by the original package. You will
notice that a new update is found, download and install it. When checking for updates again
your application should be up to date (no updates should be found).
If you receive the "Some of the updates failed to install properly"
message after installing an update, most likely you specified an incorrect detection
criteria in the Update Properties page of the
updates configuration project.
3. Manage the second update

Modify the content of files from the package or add a new one. You can now create another update, just like you created the first one. This new package can have the version 3.0.0. This version will be automatically used for the detection support, so it is very important to increase it.
After generating it, place the new version on your server.
Open your updates configuration project, and configure the new update.
![]() Check for updates again. You will notice that the first update is not
visible anymore, only the second one can be installed. Install the update.
Check for updates again. You will notice that the first update is not
visible anymore, only the second one can be installed. Install the update.
Recommended options for detecting an update are to search for a registry value or to
check the version of an executable file, eg. main application. For an example of a
configuration file please see: Sample updates configuration files
4. Manage a patch

To create a patch you can try following our patch creation tutorial. Patches can also be applied through the Auto Updater. Simply configure the patch as update, just like you configure a new version of the package. For the Updater it doesn't matter if the update is an MSI, EXE or MSP file.