Multiple Instances Page

This page allows you to install multiple instances of your product on the target computer. The existence of multiple instances is verified by the EXE setup file. This is why the corresponding option must be checked in the Configuration Tab page.

Windows Installer permits only one instance of the ProductCode to be installed per machine and one instance to be installed per user. Starting with Windows Installer 3.x or later multiple instances can be installed by applying ProductCode transforms (called instance transforms) to the base MSI package.
Advanced Installer creates a transform for each defined instance with the same name as in the “Instance IDs” pane and streams it into the MSI database. When the package runs the Multiple Instances selection dialog displayed by the EXE allows the user to install new instance or maintain an already installed one.
The instances are uniquely distinguished by a new ProductCode and additionally by the InstanceId property. Other properties can be created in the Instance Properties page. When the first instance is created the InstanceId property, it is added to the project with "#0" as value for the selected build. You can change it in the Install Parameters page.
The "#0" value is reserved for the base package.
Advanced Installer uses the name of an instance from “Instance IDs” pane as the InstanceId property value for the corresponding instance. The InstanceId property will not be resolved outside the Multiple Instances page.
Creating a new instance

Use the “New Instance” command from the context menu or press the Insert key while the “Instance IDs” panel is selected, in order to create a new instance.
Renaming an instance

Use the “Rename” command from the context menu or press the F2 key while an element is selected, to rename an instance.
Removing an instance

Use the “Delete” command from the context menu, or press the Delete key while an element is selected, to remove an instance.
Specifying the instances' installation order

Use the “Move Up” / “Move Down” context menu item or press the Shift+Up / Shift+Down keys while an instance is selected.
Generate instances at install time

This option enables generating custom name instances at install time for the selected build. It implies loosing all previously created instances.
Build major upgrades for multiple instances

The package is built with major upgrades support. This option has effect only after changing the Product Version.
You cannot author major upgrades and generate instances at install
time. The two options above are not compatible.
Instance Properties Tab


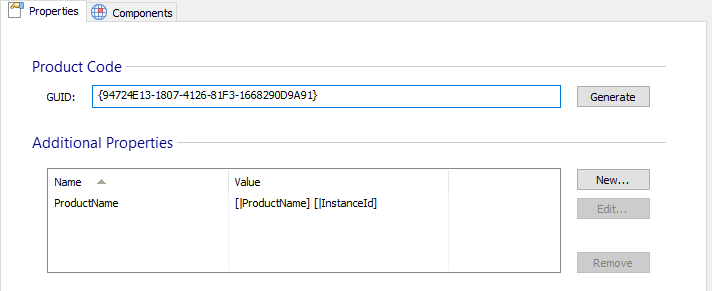
Product Code

The ProductCode property is mandatory and it's added automatically when the instance is created. You can use button to generate a new GUID.
Additional Properties

You can set additional properties for the selected instance. An example would be to set the ProductName property to a different value so the instances will be easily distinguished in the Control Panel->Add or Remove Programs applet. Use the [ New... ], [ Edit... ] and [ Remove ] buttons to select them.
Edit Instance Property Dialog

In this dialog, you can add a new property, or you can edit an existing one for the selected instance.

Name

The property's name. Use button to overwrite an existing property.
Value

The property's value. This field is of PseudoFormatted Type and can be edited using Smart Edit Control.
OK

Saves the property's name and value.
Cancel

Cancels the creation of a new property or discards the changes made to an existing property.
Instance Components Tab


Overwrite Components

You can overwrite package components for the selected instance. This is useful to keep the nonfile data resources of each instance isolated.
For example, an INI file is linked to an existing component. If this component is the same (same component GUID) from an instance to another, the INI file will be removed only after all instances are removed. To avoid this, add the appropriate component to "Overwrite Components" list. A new component GUID will be automatically generated when a new instance is created.
Use the [ Add... ] and [ Remove ] buttons to select/remove them.