Advanced Installer Ribbon

Advanced Installer’s Ribbon offers an efficient and easy way to navigate your project with just a couple of clicks. The Ribbon can be split into the following groups Quick-Access Toolbar, Tabs, and the Application Menu.

Quick Access Toolbar

The Quick-access Toolbar is a customizable toolbar which shows commands that are most often used.
![]()
- Save - save the current project
- Build - can choose to create all builds, rebuild all builds, or create a specific build
- Run - launch the installer; if it was not built it will generate it first
- Back - navigate backward in the project
- Next - navigate forward in the project
- Messages - show latest information and news about Advanced Installer
- Show below the Ribbon - move the Quick-access toolbar below the Ribbon
- Minimize the Ribbon - hide the Ribbon
Tabs

A Tab is a collection of features that are related to each other.
![]()
In the Tabs group, there is also a button to access the context-sensitive User Guide.
![]()
Solution Tab


- Build - build the solution
- Options - edit solution options using Edit Solution Options Dialog
Project Tab


- Build - can choose to create all builds, rebuild all builds, or create a specific build
- Run - launch the installer; if it was not built it will generate it first
- Run in VM - test the installation in a provisioned virtual machine
- Impersonate System Account - enable this option to impersonate the system account when using "Run in VM"
- Edit VM profiles - the Edit VM Profiles dialog will be shown allowing you to create and configure the profiles that will be used for virtual machine installations.
- Create a new VM - the wizard will be shown assisting you to create a new virtual machine and to configure it for testing the installation.
- Run in Docker - test the instalation in a Docker
container.
- Create a repackaging Docker image - run the Docker Image Prepare Wizard to set up a Docker image.
- Show Run Log - display the installation log
- Debug cmd line - send a command-line to the package before installation when using the option
- Open Output Folder - open Windows Explorer at the project location
- Options - set the project options from the Project Paths Tab
- Find - search the project
- Project Summary - dialog to navigate through the project content
View Tab


- Show
- Left Pane - show or hide the left pane
- Compact Left Pane - resize icons in the left pane
- Only Non-Empty Views - hide all views that don’t have changes
- Status Bar - show or hide the status bar
- Navigation
- Last Change - navigate to the last location where the project was modified
- Back - navigate backward in the project
- Next - navigate forward in the project
- Show/Hide Info Panes
- Installation - quick access menu to different sections of the project
- Log - show or hide the log pane
- Issues - show or hide results of the ICE validation
- References - display a list of the references of the item you have tried to delete
- Find Result - show or hide the search result pane
- Notes - display various notes added and is specific for the selected view
- Notifications - show or hide the notifications pane that displays a list while authoring the package or loading the project
- Messages - show latest information and news about Advanced Installer
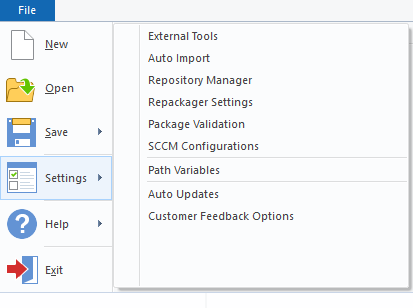
Settings Tab


- External Tools - configure additional tools used during the build process through the External Tools dialog
- Auto Import - configure the extensions used when importing XML and INI files
- Repository Manager - manage dialogs or prerequisites in the Advanced Installer repository
- Repackager Settings - configure the settings for the Advanced Installer Repackager
- Package Validation - configure package validation with ICEs, compatibility checks and WACK
- SCCM Configurations - define the settings based on which the System Center Configuration Manager (SCCM) configuration file will be created
- Path Variables - configure the path variables
- Auto Updates - configure Advanced Installer's update process through the "Update Options" dialog
- Customer Feedback - select if you want or not to help improve Advanced Installer by sending non-personal information
Wizards Tab


- Convert Paths - convert existing project paths to use path variables
- Create Transform - create a transform for an MSI Package installation
- Add Adobe Plug-in - add an Adobe Product plug-in to the project
- Add Office Addin - add an Office Product plug-in to the project
- Import
- Visual Studio Project - import a Visual Studio Project into an Advanced Installer project
- Visual Basic 6.0 Project - import a Visual Basic 6.0 Project into an Advanced Installer project
- Real Studio Project - import a Real Studio Project into an existing Advanced Installer project
- MSI/MSM Package - import an MSI/MSM file into an existing Advanced Installer project
- Eclipse Workspace - import the projects from an Eclipse workspace into an existing Advanced Installer project
- IntelliJ IDEA Workspace - import the projects from an IntelliJ IDEA workspace into an existing Advanced Installer project
- Repackage Result File - import a repackager result file (.RPK)
Repackager Summary

Use this dialog to review how the repackager was configured during the capture. It can be accessed from the Home tab in the Ribbon from an Architect project type, after importing a RPK file.

Generate Report

This option exports the entire hierarchical content from this dialog into an HTML, XML or PDF file.
