Temporary Files Operations in the Files and Folders Page

Unlike Advanced Installer's regular files or resources, "Temporary Files" are copied on the target machine at the beginning of the installation and are deleted at the end of it, ensuring you have access to them throughout the entire install process.
Temporary Files are copied between the CostFinalize and
MigrateFeatureStatesstandard actions, at the beginning of the setup and
removed during the InstallFinalize standard action.
If your project contains custom actions that depend on the temporary file, their actions
need to be placed after AI_ExtractTempFiles action. This specific Advanced
Installer custom action is not shown in the custom action view. You can see the sequence for
this custom action by going to Table Editor ->
Install Execute Sequence table -> AI_ExtractTempFiles
row.
In order to easily recognize them they have the following icon: ![]()
Adding Temporary Files

![]() Use the toolbar button,
the “Add Temporary Files...” tree/list context menu item. You can add more than
one file at a time. If a file with the same name already exists in the target directory, the
file to be added is skipped.
Use the toolbar button,
the “Add Temporary Files...” tree/list context menu item. You can add more than
one file at a time. If a file with the same name already exists in the target directory, the
file to be added is skipped.
To add an entire folder with all its files as temporary, see Folder Operations in the Files and Folders Page - VSIX Project.
Setting temporary file properties

![]() Use the toolbar button, the
“Properties...” list context menu item, press the Enter
key while a temporary file is selected in the “Files” panel or double click
on a file. The Edit Temporary File Dialog will be displayed
allowing you to edit the temporary file properties.
Use the toolbar button, the
“Properties...” list context menu item, press the Enter
key while a temporary file is selected in the “Files” panel or double click
on a file. The Edit Temporary File Dialog will be displayed
allowing you to edit the temporary file properties.
Renaming temporary files

Use the “Rename” context menu item or press the F2 key.
Moving temporary files to a different folder

Select the items to be moved then drag and drop them to the target folder.
Removing temporary files

![]() Use the toolbar button, the “Delete”
tree/list context menu item, or press the Delete key while a temporary
file is selected.
Use the toolbar button, the “Delete”
tree/list context menu item, or press the Delete key while a temporary
file is selected.
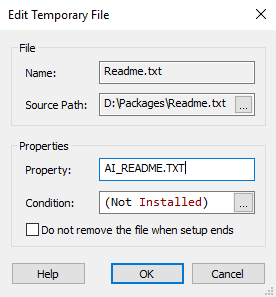
Edit Temporary File Dialog

This dialog allows you to specify temporary file settings.

Name

This field contains the temporary file's name.
Source Path

The path to the temporary file's source. Use the button to modify it.
Property

Specify the name of the property associated with the temporary file. This property will contain the file's extraction path.
If you use temporary files in different folders and the names of the
files are identical, you need to make sure that the properties
associated with them are different.
Condition

This conditions the file's extraction and removal. Use the to edit it. The condition is evaluated when the file must be extracted or removed.
Do not remove the file when setup ends.

Select this option if you don't want this temporary file deleted after the setup process ends.