How to deliver a file to all users profiles

The following article uses options that are available starting with the Professional edition and project type.
Let's assume that you need to deliver a file into a custom folder from the AppData of each user registered on the machine. e.g. C:\Users\aUser\AppData\Roaming\aFolder\
To install files or create sub-folders in the user profile folder you can follow one of the methodes below:
Using the Advanced Installer's dedicated built-in Custom Action

This method is available starting with Advanced Installer v22.0
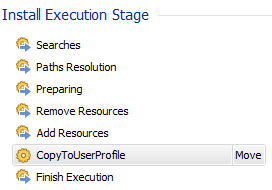
1. The first step is to go to the Custom Actions page and add a new Copy to User Profile custom action with sequence. By default it will be scheduled right before Add Resources group:

In this way, the custom action can access resources installed by the package (during Add Resources phase).
2. Then configure the Source Folder and Destination in the Properties section of the custom action. Make sure you enter the destination without %username% prefix. For example, if the destination will be C:\Users\%username%\test, the Destination field should only contain test:

3. Enable Copy to the profile of future registered users option for the custom action to make sure the file will be copied to all the user accounts existing on the machine:

Deprecated method (only for versions before Advanced Installer v22.0)

- In the Files and Folders page create a new property based folder. In the "Select a property" dialog press the button, declare the CUSTOM_PATH property with none as "Default Value" and select it. You can now add content to this property based folder.
- In the Custom Actions Page, under "Wizard Dialogs Stage -> Searches" add the predefined Set installer property custom action with the following settings:
Property: CUSTOM_PATH
Value: [WindowsVolume]Users\[LogonUser]\AppData\Roaming\aFolder\
- At install time the value of the CUSTOM_PATH property will be set with this value.
- Keeping the SHIFT key pressed, drag-and-drop the custom action in tree control, under "Install Execution Stage -> Searches". This will create a copy of the action in Install Execution Stage.
- Set the Scheduling Option for the custom action to “Skip action in Install Execution Stage if executed in Dialogs Stage” from Advanced Execution Scenarios dialog.
To deliver a file to all users profiles, two approaches can be used:
1. Using the self-healing mechanism

Self healing is one of the main features of Microsoft’s Windows Installer technology. Self healing leverages the windows installer database to allow a full or partial reinstallation of a managed product if the installation somehow becomes broken or corrupt.
Windows Installer addresses this feature through Advertised shortcuts. An advertised shortcut is created like any other shortcut, except it has the Advertised shortcut option checked in the Shortcut Properties Dialog.
When the application is installed, the self-healing feature is automatically activated if the application is launched through the advertised shortcuts. Since the shortcuts point to a file from a feature, only the components in this feature can be repaired. Therefore, if one of these components is missing, Windows Installer will trigger an auto-repair for the entire feature.
For details, please take a look on the How do I implement self-healing into the application? article with related information for hints and guidance.
2. Using the active-setup mechanism

Windows Active Setup is a mechanism for executing commands once per user early during logon. When the active setup is used, the following keys are compared:
HKLM\Software\Microsoft\Active Setup\Installed Components\[ProductCode]
and
HKCU\Software\Microsoft\Active Setup\Installed Components\[ProductCode]
If the HKCU registry entries don't exist, or the version number of HKCU is less than HKLM, then the specified application is executed for the current user. So, when each new user logs on, the operating system compares Active Setup keys between HKLM and HKCU, and runs the command line in StubPath if the HKCU entry is missing or the version in HKCU is less than HKLM.
To implement Active Setup, please create the following registry hive in the registry page:
HKLM\Software\Microsoft\Active Setup\Installed Components\[ProductCode]
Use the toolbar button to populate the registry key with the following values:
- First registry entry:
- Name: StubPath
- Data: msiexec /fou [ProductCode] /qb
- Second registry entry:
- Name: Version
- Data: 2,0,0
It should look something like that:

When using more complex version numbers, use a comma as delimiter and not a
period, eg: 1,0,3 not 1.0.3
When each user logs on for the first time after an Active Setup has been configured in HKLM, the operating system compares Active Setup keys between HKLM and HKCU, and runs the executable if the HKCU entry is missing or the version in HKCU is less than HKLM. To update the ActiveSetup executable, just install a new version, and increment the Version registry key (second registry entry above). Next time the user logs on, the active setup will run again for that user.
So, if your application requires installation of components such as files or registry keys on a per-user basis, but your application has no advertised entry points or other triggers to initiate the installation process, then Active Setup is a solution.